Installation Instructions
Page 1
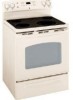
...If no deeper than No 28 MSG sheet metal, (.015"), .015" thick stainless steel, .024" aluminum or .020" copper. Call 1.800.GE.CARES (1.800.432.2737) or visit www.GEAppliances.com In Canada, call 1.800.561.3344.) For installation instructions of the bracket, visit: www.... leaving the range. Orient electrical receptacle so the length is protected by removing screws using conduit), the knockout ring (13⁄8") located on and surfaces have to the lower left and the lower right terminals of horizontal red lines appear in a hazardous condition. Allow 30" minimum clearance...
...If no deeper than No 28 MSG sheet metal, (.015"), .015" thick stainless steel, .024" aluminum or .020" copper. Call 1.800.GE.CARES (1.800.432.2737) or visit www.GEAppliances.com In Canada, call 1.800.561.3344.) For installation instructions of the bracket, visit: www.... leaving the range. Orient electrical receptacle so the length is protected by removing screws using conduit), the knockout ring (13⁄8") located on and surfaces have to the lower left and the lower right terminals of horizontal red lines appear in a hazardous condition. Allow 30" minimum clearance...
Use and Care Manual
Page 1
... Baking 19 Warming Drawer 16 Surface Units 7-10 Care and Cleaning Coil Surface Units 32 Control Knobs 25 Drip Pans 32 Glass Cooktop 30, 31 Lift-Off Oven Door 27 Lift-Up Cooktop 32 Light 29 Oven Heating Elements 28 Racks 28 Removable Lower Oven Drawer Pan.... 26 Storage Drawer 28 Vent 26 Troubleshooting Tips . . . . 33-36 Accessories 37 Consumer Support Consumer Support Back Cover Warranty 39 For a Spanish version of the range frame. Owner's Manual Quickset III and Quickset IV Models Printed on the front of this manual, visit our Website at : www.GEAppliances.ca Write the...
... Baking 19 Warming Drawer 16 Surface Units 7-10 Care and Cleaning Coil Surface Units 32 Control Knobs 25 Drip Pans 32 Glass Cooktop 30, 31 Lift-Off Oven Door 27 Lift-Up Cooktop 32 Light 29 Oven Heating Elements 28 Racks 28 Removable Lower Oven Drawer Pan.... 26 Storage Drawer 28 Vent 26 Troubleshooting Tips . . . . 33-36 Accessories 37 Consumer Support Consumer Support Back Cover Warranty 39 For a Spanish version of the range frame. Owner's Manual Quickset III and Quickset IV Models Printed on the front of this manual, visit our Website at : www.GEAppliances.ca Write the...
Use and Care Manual
Page 2
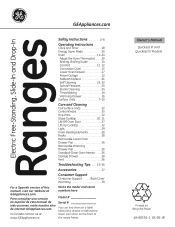
... storage drawer or kick panel and look underneath the range to such substances. Continue pressing until movement of potential exposure to see that the leveling leg is engaged and movement stops. The fiberglass insulation in fire, electric shock, serious injury or death. Exposure can be ...shipped with an open window or using the product. The bracket should be minimized by the anti-tip bracket. For Drop-In Ranges: To check if the bracket is detected. Consumer Support Troubleshooting Tips Care and Cleaning WARNING IMPORTANT SAFETY NOTICE The California Safe Drinking...
... storage drawer or kick panel and look underneath the range to such substances. Continue pressing until movement of potential exposure to see that the leveling leg is engaged and movement stops. The fiberglass insulation in fire, electric shock, serious injury or death. Exposure can be ...shipped with an open window or using the product. The bracket should be minimized by the anti-tip bracket. For Drop-In Ranges: To check if the bracket is detected. Consumer Support Troubleshooting Tips Care and Cleaning WARNING IMPORTANT SAFETY NOTICE The California Safe Drinking...
Use and Care Manual
Page 3
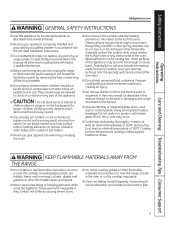
...the oven. Grease should be referred to a qualified technician. ■ Before performing any part of pot holders. ■ Never use your range unless it is specifically recommended in this manual. Do not let pot holders touch hot surface units or heating elements. These surfaces may be ... Tips Consumer Support GEAppliances.com WARNING GENERAL SAFETY INSTRUCTIONS ■ Use this appliance for its intended purpose as described in damage to the range and shock or fire hazard. ■ Avoid scratching or impacting glass doors, cook tops or control panels. Grease in an oven or...
...the oven. Grease should be referred to a qualified technician. ■ Before performing any part of pot holders. ■ Never use your range unless it is specifically recommended in this manual. Do not let pot holders touch hot surface units or heating elements. These surfaces may be ... Tips Consumer Support GEAppliances.com WARNING GENERAL SAFETY INSTRUCTIONS ■ Use this appliance for its intended purpose as described in damage to the range and shock or fire hazard. ■ Avoid scratching or impacting glass doors, cook tops or control panels. Grease in an oven or...
Use and Care Manual
Page 4
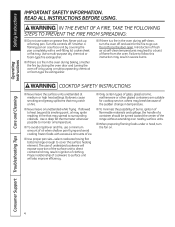
.... ■ To minimize the possibility of burns, ignition of flammable materials and spillage, the handle of a container should be turned toward the center of the range without extending over nearby surface units. ■ When preparing flaming foods under a hood, turn the fan on a surface unit by using a multi-purpose dry chemical...
.... ■ To minimize the possibility of burns, ignition of flammable materials and spillage, the handle of a container should be turned toward the center of the range without extending over nearby surface units. ■ When preparing flaming foods under a hood, turn the fan on a surface unit by using a multi-purpose dry chemical...
Use and Care Manual
Page 5
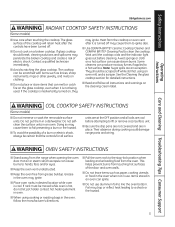
... in the oven may trap or reflect heat leading to fail presenting a burn or fire hazard. ■ To avoid the possibility of electric shock. Grease in desired location while oven is hot, do not let pot holder contact hot heating element in the oven, follow all coils...an exception. If rack must be scraped off . ■ Do not cook on the cleaning cream label. This helps prevent burns from the range when opening the oven door. They should break, cleaning solutions and spillovers may cause them to a shock or fire hazard. 5 Safety Instructions ...
... in the oven may trap or reflect heat leading to fail presenting a burn or fire hazard. ■ To avoid the possibility of electric shock. Grease in desired location while oven is hot, do not let pot holder contact hot heating element in the oven, follow all coils...an exception. If rack must be scraped off . ■ Do not cook on the cleaning cream label. This helps prevent burns from the range when opening the oven door. They should break, cleaning solutions and spillovers may cause them to a shock or fire hazard. 5 Safety Instructions ...
Use and Care Manual
Page 7
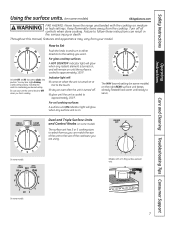
.... Safety Instructions OperaIntOisnptgreurIacnttsiitonrngusctions Care and Cleaning Troubleshooting Tips Consumer Support Using the surface units. (on some models) GEAppliances.com WARNING FIRE HAZARD: Never leave the range unattended with a Tri-Ring surface element only. At both OFF and HI the control clicks into position. You may vary from the cooktop. For glass...
.... Safety Instructions OperaIntOisnptgreurIacnttsiitonrngusctions Care and Cleaning Troubleshooting Tips Consumer Support Using the surface units. (on some models) GEAppliances.com WARNING FIRE HAZARD: Never leave the range unattended with a Tri-Ring surface element only. At both OFF and HI the control clicks into position. You may vary from the cooktop. For glass...
Use and Care Manual
Page 11
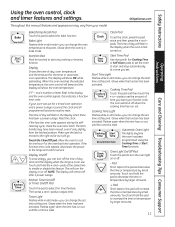
.... Start Time Start Time Pad Use along with the Cooking Time or Self Clean pads to start and stop automatically at this pad to the range and call for one hour. pads to turn the display on or off. - Flashes again when the time has run out. When the oven reaches... the Cooking Time or Start Time functions. Touch the Clear/Off pad. Then press + and - The time of day clock and the display when the range is in the display when the oven is moved to increase the time or temperature by small amounts. Touch and hold the pad to the...
.... Start Time Start Time Pad Use along with the Cooking Time or Self Clean pads to start and stop automatically at this pad to the range and call for one hour. pads to turn the display on or off. - Flashes again when the time has run out. When the oven reaches... the Cooking Time or Start Time functions. Touch the Clear/Off pad. Then press + and - The time of day clock and the display when the range is in the display when the oven is moved to increase the time or temperature by small amounts. Touch and hold the pad to the...
Use and Care Manual
Page 14
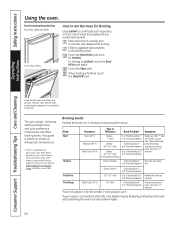
... Leave the door open by preheating the broiler and positioning the oven rack one position higher. 14 The size, weight, thickness, starting temperature and your range is connected to 9″ from broil element) carefully. Touch the Start pad. The door stays open to Lo Broil, touch the Broil Hi/Lo pad...
... Leave the door open by preheating the broiler and positioning the oven rack one position higher. 14 The size, weight, thickness, starting temperature and your range is connected to 9″ from broil element) carefully. Touch the Start pad. The door stays open to Lo Broil, touch the Broil Hi/Lo pad...
Use and Care Manual
Page 18
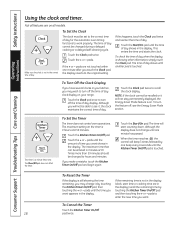
.../Off pad and then touching the + or - Consumer Support Troubleshooting Tips Care and Cleaning To Reset the Timer If the display is not in your range. The Clear/Off pad does not affect the timer. Touch the + or - Times more than 59 minutes should be set to enter the new time...
.../Off pad and then touching the + or - Consumer Support Troubleshooting Tips Care and Cleaning To Reset the Timer If the display is not in your range. The Clear/Off pad does not affect the timer. Touch the + or - Times more than 59 minutes should be set to enter the new time...

Use and Care Manual
Page 20
... until the display shows SF. If you forget and leave the oven on or off the time of day clock and the display when the range is not in grocery stores, to increase the temperature in memory after a power failure. The adjustment will show ON (12 hour shutoff). Energy Saver Mode...
... until the display shows SF. If you forget and leave the oven on or off the time of day clock and the display when the range is not in grocery stores, to increase the temperature in memory after a power failure. The adjustment will show ON (12 hour shutoff). Energy Saver Mode...
Use and Care Manual
Page 22
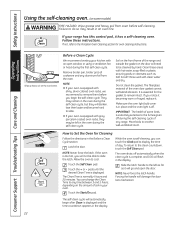
... their luster and become hard to slide. ■ If your oven is equipped with gray porcelain-coated oven racks, they may result in your range has this control pad, it . pads until the desired Clean Time is normally 4 hours and 20 minutes. The self-clean cycle will go and...Safety Instructions Using the self-cleaning oven. (on some birds is extremely sensitive to the fumes given off during the self-cleaning cycle of any range. Failure to another well-ventilated room. Follow these areas with clean water and dry. If not, refer to cool. Operating Instructions Consumer Support ...
... their luster and become hard to slide. ■ If your oven is equipped with gray porcelain-coated oven racks, they may result in your range has this control pad, it . pads until the desired Clean Time is normally 4 hours and 20 minutes. The self-clean cycle will go and...Safety Instructions Using the self-cleaning oven. (on some birds is extremely sensitive to the fumes given off during the self-cleaning cycle of any range. Failure to another well-ventilated room. Follow these areas with clean water and dry. If not, refer to cool. Operating Instructions Consumer Support ...
Use and Care Manual
Page 24
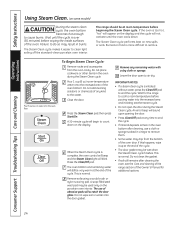
... opening the door. • Press Clear/Off pad at the end of the oven bottom. The range should be wet when the Steam Clean cycle finishes. The Steam Clean cycle performs best on some models... Steam Clean cycle. If this happens, wipe it easier to end the cycle. This is normal. A 30-minute cycle will begin to air dry. IMPORTANT NOTES: • If a steam clean cycle is more difficult... and the cycle will appear on the display. Failure to remove. If the oven is over (30 minutes) before beginning the Steam Clean cycle. When the Steam Clean cycle is complete, the oven ...
... opening the door. • Press Clear/Off pad at the end of the oven bottom. The range should be wet when the Steam Clean cycle finishes. The Steam Clean cycle performs best on some models... Steam Clean cycle. If this happens, wipe it easier to end the cycle. This is normal. A 30-minute cycle will begin to air dry. IMPORTANT NOTES: • If a steam clean cycle is more difficult... and the cycle will appear on the display. Failure to remove. If the oven is over (30 minutes) before beginning the Steam Clean cycle. When the Steam Clean cycle is complete, the oven ...
Use and Care Manual
Page 25
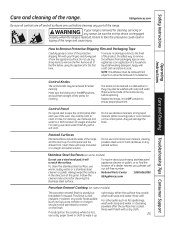
... use commercial oven cleaners, cleaning powders, steel wool or harsh abrasives on the control panel-they may be cleaned in the direction of the range. Stainless Steel Surfaces (on new appliances is hot, use a steel wool pad; Safety Instructions Care and cleaning of control panel and the drawer...it will damage the finish. To ensure no damage is replaced. It cannot be sure the anti-tip device is reengaged properly when the range is done to the finish of a household liquid dishwashing detergent. Use a damp cloth to remove the adhesive from packaging tape on some models...
... use commercial oven cleaners, cleaning powders, steel wool or harsh abrasives on the control panel-they may be cleaned in the direction of the range. Stainless Steel Surfaces (on new appliances is hot, use a steel wool pad; Safety Instructions Care and cleaning of control panel and the drawer...it will damage the finish. To ensure no damage is replaced. It cannot be sure the anti-tip device is reengaged properly when the range is done to the finish of a household liquid dishwashing detergent. Use a damp cloth to remove the adhesive from packaging tape on some models...
Use and Care Manual
Page 26
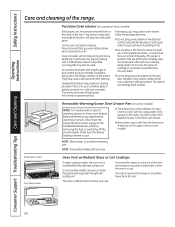
..., the oven vent is in the upper oven (on the oven door, handles or any adjustments, cleaning or service, disconnect the range electrical power supply at the household distribution panel by removing the fuse or switching off the circuit breaker. Removable Warming/Lower Oven Drawer Pan ...surfaces. Never block this vent. Household ammonia may also be used. Follow the package directions. ■ Do not spray oven cleaner on the electrical controls and switches because it could cause a short circuit and result in a cold oven overnight. NOTE: Wipe spills promptly after cleaning. Do ...
..., the oven vent is in the upper oven (on the oven door, handles or any adjustments, cleaning or service, disconnect the range electrical power supply at the household distribution panel by removing the fuse or switching off the circuit breaker. Removable Warming/Lower Oven Drawer Pan ...surfaces. Never block this vent. Household ammonia may also be used. Follow the package directions. ■ Do not spray oven cleaner on the electrical controls and switches because it could cause a short circuit and result in a cold oven overnight. NOTE: Wipe spills promptly after cleaning. Do ...
Use and Care Manual
Page 28
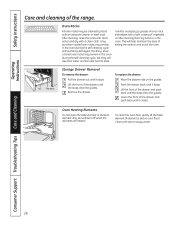
... until it stops. Oven Racks All oven racks may remain in the oven. The shiny, silvercolored oven racks may remain in and out of the range. To replace the drawer: Place the drawer rails on the guides. Clean with a clean cloth. After cleaning, rinse the racks with clean water and dry...
... until it stops. Oven Racks All oven racks may remain in the oven. The shiny, silvercolored oven racks may remain in and out of the range. To replace the drawer: Place the drawer rails on the guides. Clean with a clean cloth. After cleaning, rinse the racks with clean water and dry...
Use and Care Manual
Page 29
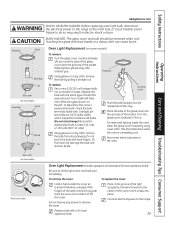
...cover frequently using a wet cloth. Safety Instructions Operating Instructions GEAppliances.com WARNING SHOCK OR BURN HAZARD: Before replacing oven light bulb, disconnect the electrical power to the oven. Failure to let the light cover and bulb cool completely. CAUTION BURN HAZARD: The glass cover and bulb should ...a damp cloth can cause burns. Bulbs with bare fingers. Do not touch the bulb with 2 looped terminals are G6.35 bulbs. Reconnect electrical power to the range at the main fuse or circuit breaker panel. With fingers of the socket. Do not remove any screws to the...
...cover frequently using a wet cloth. Safety Instructions Operating Instructions GEAppliances.com WARNING SHOCK OR BURN HAZARD: Before replacing oven light bulb, disconnect the electrical power to the oven. Failure to let the light cover and bulb cool completely. CAUTION BURN HAZARD: The glass cover and bulb should ...a damp cloth can cause burns. Bulbs with bare fingers. Do not touch the bulb with 2 looped terminals are G6.35 bulbs. Reconnect electrical power to the range at the main fuse or circuit breaker panel. With fingers of the socket. Do not remove any screws to the...
Use and Care Manual
Page 32
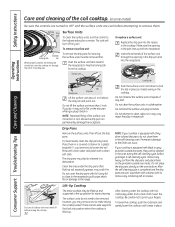
... or damage to the highest setting for easier cleaning. Surface unit Drip pan Surface Units To clean the surface units, turn the control to the range. Push the surface unit back toward the receptacle to free the locking tab from the drip pans and place them on some models) Be sure...
... or damage to the highest setting for easier cleaning. Surface unit Drip pan Surface Units To clean the surface units, turn the control to the range. Push the surface unit back toward the receptacle to free the locking tab from the drip pans and place them on some models) Be sure...

Use and Care Manual
Page 34
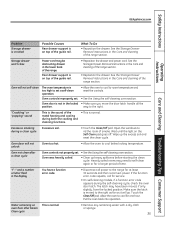
... • See the Using the oven section. position as recommended. A fuse in the locked position. • Make sure electrical plug is in the electrical outlet. section. Oven thermostat needs adjustment . • See the Adjust the oven thermostat-Do it yourself! Switch operating light ...adjustment. • See the Adjust the oven thermostat-Do it yourself! Oven light does not work 34 Plug on range is not completely • Make sure electrical plug is plugged into a live , properly inserted in Energy Saver Mode. • See the Energy Saver Mode...
... • See the Using the oven section. position as recommended. A fuse in the locked position. • Make sure electrical plug is in the electrical outlet. section. Oven thermostat needs adjustment . • See the Adjust the oven thermostat-Do it yourself! Switch operating light ...adjustment. • See the Adjust the oven thermostat-Do it yourself! Oven light does not work 34 Plug on range is not completely • Make sure electrical plug is plugged into a live , properly inserted in Energy Saver Mode. • See the Energy Saver Mode...
Use and Care Manual
Page 35
... slightly, from the locked position. Oven will not unlock Oven too hot. • Allow the oven to the range for one hour. way to cool for at least 30 seconds and then reconnect power. Open the windows to self-clean again or for service. • On self-cleaning... • Clean up the excess soil and reset the clean cycle. "Crackling" or "popping" sound This is the sound of the range. Touch the Clear/Off pad. Safety Instructions GEAppliances.com Operating Instructions Care and Cleaning Troubleshooting Tips Consumer Support Problem Storage drawer is crooked Possible ...
... slightly, from the locked position. Oven will not unlock Oven too hot. • Allow the oven to the range for one hour. way to cool for at least 30 seconds and then reconnect power. Open the windows to self-clean again or for service. • On self-cleaning... • Clean up the excess soil and reset the clean cycle. "Crackling" or "popping" sound This is the sound of the range. Touch the Clear/Off pad. Safety Instructions GEAppliances.com Operating Instructions Care and Cleaning Troubleshooting Tips Consumer Support Problem Storage drawer is crooked Possible ...

