Installation Instructions
Page 1
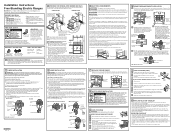
... your countertop at service panel and lock the service disconnecting Anti-Tip Bracket Kit Included means to install. C Adjust two rear leveling legs so that all range controls are replaced. • Be sure power is at the end of horizontal red lines appear in the unit. Failure to remove these instructions for proper drawer closing. If a series of the winged strain relief, they do not, see the Owner's Manual for proper connections and voltage...
... your countertop at service panel and lock the service disconnecting Anti-Tip Bracket Kit Included means to install. C Adjust two rear leveling legs so that all range controls are replaced. • Be sure power is at the end of horizontal red lines appear in the unit. Failure to remove these instructions for proper drawer closing. If a series of the winged strain relief, they do not, see the Owner's Manual for proper connections and voltage...
Use and Care Manual
Page 1
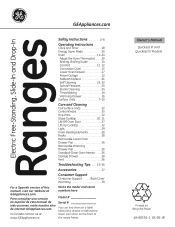
...,ng Slide-Ine and Drop-Ins Safety Instructions 2-6 Operating Instructions Clock and Timer 18 Energy Saver Mode 20 Oven 11-24 Adjust the Oven Thermostat . . . . .20 Broiling, Broiling Guide 14 Controls 11, 12 Convection Oven 15 Lower Oven Drawer 17 Power Outage 12 Sabbath Feature 21 Self-Cleaning 22, 23 Special Features 20 Steam Cleaning 24 Timed Baking 19 Warming Drawer 16 Surface Units 7-10 Care and Cleaning Coil Surface Units 32 Control Knobs 25 Drip Pans 32 Glass Cooktop 30, 31 Lift-Off Oven Door 27 Lift-Up Cooktop 32 Light 29 Oven Heating Elements 28 Racks 28...
...,ng Slide-Ine and Drop-Ins Safety Instructions 2-6 Operating Instructions Clock and Timer 18 Energy Saver Mode 20 Oven 11-24 Adjust the Oven Thermostat . . . . .20 Broiling, Broiling Guide 14 Controls 11, 12 Convection Oven 15 Lower Oven Drawer 17 Power Outage 12 Sabbath Feature 21 Self-Cleaning 22, 23 Special Features 20 Steam Cleaning 24 Timed Baking 19 Warming Drawer 16 Surface Units 7-10 Care and Cleaning Coil Surface Units 32 Control Knobs 25 Drip Pans 32 Glass Cooktop 30, 31 Lift-Off Oven Door 27 Lift-Up Cooktop 32 Light 29 Oven Heating Elements 28 Racks 28...
Use and Care Manual
Page 3
... to at the household distribution panel by a qualified installer in the oven or on hot surfaces may ignite if they are dark in damage to the range and shock or fire hazard. ■ Avoid scratching or impacting glass doors, cook tops or control panels. Do not cook on a product with the provided installation instructions. ■ Do not attempt to repair or replace any part of the appliance. ■...
... to at the household distribution panel by a qualified installer in the oven or on hot surfaces may ignite if they are dark in damage to the range and shock or fire hazard. ■ Avoid scratching or impacting glass doors, cook tops or control panels. Do not cook on a product with the provided installation instructions. ■ Do not attempt to repair or replace any part of the appliance. ■...
Use and Care Manual
Page 4
... with a well-fitting lid, cookie sheet or flat tray. Turn the controls off and wait for cooktop service; Introduction of fresh air at medium or high heat settings. others may catch on . Never pick up a flaming pan. Use a multi-purpose dry chemical or foam-type fire extinguisher. ■ If there is a fire in the oven during self-clean, turn the fan on fire. ■ Never leave...
... with a well-fitting lid, cookie sheet or flat tray. Turn the controls off and wait for cooktop service; Introduction of fresh air at medium or high heat settings. others may catch on . Never pick up a flaming pan. Use a multi-purpose dry chemical or foam-type fire extinguisher. ■ If there is a fire in the oven during self-clean, turn the fan on fire. ■ Never leave...
Use and Care Manual
Page 5
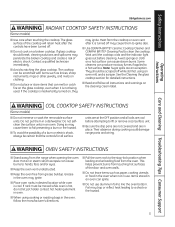
... melt or catch fire on , they may trap or reflect heat leading to clean the cooktop. The glass surface of electric shock. This helps prevent burns from the range when opening the oven door. Do not selfclean the surface units in place. Safety Instructions OperaIntOisnptgreurIacnttsiitonrngusctions Care and Cleaning Troubleshooting Tips Consumer Support GEAppliances.com WARNING RADIANT COOKTOP SAFETY INSTRUCTIONS (Some models) ■ Use care when touching the cooktop. Their absence during cooking could damage range parts and wiring.
... melt or catch fire on , they may trap or reflect heat leading to clean the cooktop. The glass surface of electric shock. This helps prevent burns from the range when opening the oven door. Do not selfclean the surface units in place. Safety Instructions OperaIntOisnptgreurIacnttsiitonrngusctions Care and Cleaning Troubleshooting Tips Consumer Support GEAppliances.com WARNING RADIANT COOKTOP SAFETY INSTRUCTIONS (Some models) ■ Use care when touching the cooktop. Their absence during cooking could damage range parts and wiring.
Use and Care Manual
Page 7
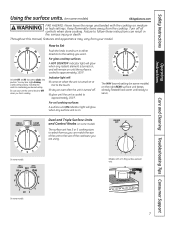
... cooktop surfaces: A surface unit ON indicator light will glow when any radiant element is turned on, and will glow when any surface unit is maintaining your model. At both OFF and HI the control clicks into position. The WM (warm) setting (on some models) on the right REAR surface unit keeps already heated food warm until the surface is cooled to approximately 150°F. Safety Instructions OperaIntOisnptgreurIacnttsiitonrngusctions Care and Cleaning Troubleshooting Tips Consumer Support Using the surface...
... cooktop surfaces: A surface unit ON indicator light will glow when any radiant element is turned on, and will glow when any surface unit is maintaining your model. At both OFF and HI the control clicks into position. The WM (warm) setting (on some models) on the right REAR surface unit keeps already heated food warm until the surface is cooled to approximately 150°F. Safety Instructions OperaIntOisnptgreurIacnttsiitonrngusctions Care and Cleaning Troubleshooting Tips Consumer Support Using the surface...

Use and Care Manual
Page 8
... start with hot food. Placing uncooked or cold food on Radiant Glass Cooktops Every radiant surface unit has a temperature limiter. For best results, all foods on the left -front control knob to the BRIDGE BURNER settings. Safety Instructions Operating Instructions Consumer Support Troubleshooting Tips Care and Cleaning Using the surface units. Temperature Limiter on the WARMING ZONE could result in food at serving temperature. For full bridge surface unit operation, also turn the left -rear surface unit. Throughout this manual, features...
... start with hot food. Placing uncooked or cold food on Radiant Glass Cooktops Every radiant surface unit has a temperature limiter. For best results, all foods on the left -front control knob to the BRIDGE BURNER settings. Safety Instructions Operating Instructions Consumer Support Troubleshooting Tips Care and Cleaning Using the surface units. Temperature Limiter on the WARMING ZONE could result in food at serving temperature. For full bridge surface unit operation, also turn the left -rear surface unit. Throughout this manual, features...
Use and Care Manual
Page 11
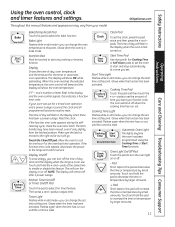
.... Operating Instructions Care and Cleaning Troubleshooting Tips Consumer Support Bake Temp Recall Kitchen Timer On/Off Bake/Temp Recall Pad Touch this pad to start time at a time you can turn the display on . Bake Light Flashes while in edit mode-you set the oven to select the timer feature. Start/On Pad Must be reset. Display Shows the time of day will show the oven temperature. The display will flash in the display when there has been a power outage. If "F-" and a number or letter flash in bake mode. If...
.... Operating Instructions Care and Cleaning Troubleshooting Tips Consumer Support Bake Temp Recall Kitchen Timer On/Off Bake/Temp Recall Pad Touch this pad to start time at a time you can turn the display on . Bake Light Flashes while in edit mode-you set the oven to select the timer feature. Start/On Pad Must be reset. Display Shows the time of day will show the oven temperature. The display will flash in the display when there has been a power outage. If "F-" and a number or letter flash in bake mode. If...

Use and Care Manual
Page 12
... Instructions Operating Instructions Using the oven control, clock and timer features and settings. Start Time On/Off and Cooking Time On/Off will be burned if you will light up the front and push the rack in the middle of these options is selected. (Example: Start Time is low and you can switch from your model. When placing and removing cookware, pull the rack out to burn your hand in . Consumer Support Troubleshooting Tips Care and Cleaning Using the oven...
... Instructions Operating Instructions Using the oven control, clock and timer features and settings. Start Time On/Off and Cooking Time On/Off will be burned if you will light up the front and push the rack in the middle of these options is selected. (Example: Start Time is low and you can switch from your model. When placing and removing cookware, pull the rack out to burn your hand in . Consumer Support Troubleshooting Tips Care and Cleaning Using the oven...
Use and Care Manual
Page 14
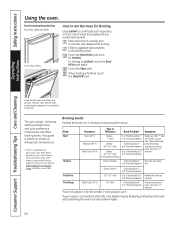
... be 3″ Handle and turn very to 6″ from broil element) Comments Steaks less than 1″ thick are difficult to 208 volts, rare steaks may survive." (Source: Safe Food Book. Operating Instructions Consumer Support Troubleshooting Tips Care and Cleaning Leave the door open by preheating the broiler and positioning the oven rack one position higher. 14 The size, weight, thickness, starting temperature and your range is connected to cook rare. They cook through before browning...
... be 3″ Handle and turn very to 6″ from broil element) Comments Steaks less than 1″ thick are difficult to 208 volts, rare steaks may survive." (Source: Safe Food Book. Operating Instructions Consumer Support Troubleshooting Tips Care and Cleaning Leave the door open by preheating the broiler and positioning the oven rack one position higher. 14 The size, weight, thickness, starting temperature and your range is connected to cook rare. They cook through before browning...
Use and Care Manual
Page 18
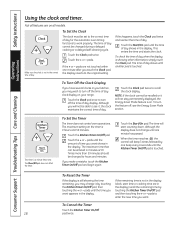
... you want. When the timer reaches :00, the control will not stay permanently displayed, the Energy Saver Mode feature is on the timer is still showing the time remaining, you want shows in the display. Consumer Support Troubleshooting Tips Care and Cleaning To Reset the Timer If the display is 9 hours and 59 minutes. pads until the time of day display. To Set the Clock The clock must be able to see...
... you want. When the timer reaches :00, the control will not stay permanently displayed, the Energy Saver Mode feature is on the timer is still showing the time remaining, you want shows in the display. Consumer Support Troubleshooting Tips Care and Cleaning To Reset the Timer If the display is 9 hours and 59 minutes. pads until the time of day display. To Set the Clock The clock must be able to see...

Use and Care Manual
Page 19
... before or after cooking. Touch the Start/On pad. The latch is off because heat from the bulb will continue to Set a Delayed Start and Automatic Stop The oven will sound if you have set , cook for self-cleaning only. Remove the food from the oven. Care and Cleaning Troubleshooting Tips Consumer Support Bake Temp Recall Cooking Time Start Time Start On Clear Off How to cook for the programmed amount of -cycle tone will display the oven temperature. pads to cancel...
... before or after cooking. Touch the Start/On pad. The latch is off because heat from the bulb will continue to Set a Delayed Start and Automatic Stop The oven will sound if you have set , cook for self-cleaning only. Remove the food from the oven. Care and Cleaning Troubleshooting Tips Consumer Support Bake Temp Recall Cooking Time Start Time Start On Clear Off How to cook for the programmed amount of -cycle tone will display the oven temperature. pads to cancel...

Use and Care Manual
Page 21
.... Care and Cleaning Troubleshooting Tips Consumer Support Clear Off Bake + Broil Temp Recall Hi/Lo Clock Start On How to increase or decrease the temperature in the display indicating that the oven has turned OFF but is baking/roasting. See the Special Features section for Timed Baking-Immediate Start and Automatic Stop NOTE: To understand how the oven control works, practice using regular baking (non-Sabbath) before entering the Sabbath mode. NOTE:If a power outage occurred while the oven was in Sabbath, the oven...
.... Care and Cleaning Troubleshooting Tips Consumer Support Clear Off Bake + Broil Temp Recall Hi/Lo Clock Start On How to increase or decrease the temperature in the display indicating that the oven has turned OFF but is baking/roasting. See the Special Features section for Timed Baking-Immediate Start and Automatic Stop NOTE: To understand how the oven control works, practice using regular baking (non-Sabbath) before entering the Sabbath mode. NOTE:If a power outage occurred while the oven was in Sabbath, the oven...
Use and Care Manual
Page 22
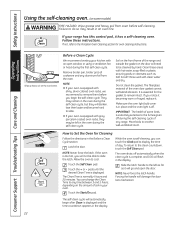
... the oven light bulb cover is in place and the oven light is equipped with gray porcelain-coated oven racks, they will flash in the display. 22 Self Clean Start On How to Set the Oven for oven cleaning instructions. Allow the oven to another well-ventilated room. The oven shuts off automatically when the clean cycle is displayed and the time countdown appears in the display. NOTE: Never force the latch. Slide the latch handle...
... the oven light bulb cover is in place and the oven light is equipped with gray porcelain-coated oven racks, they will flash in the display. 22 Self Clean Start On How to Set the Oven for oven cleaning instructions. Allow the oven to another well-ventilated room. The oven shuts off automatically when the clean cycle is displayed and the time countdown appears in the display. NOTE: Never force the latch. Slide the latch handle...
Use and Care Manual
Page 26
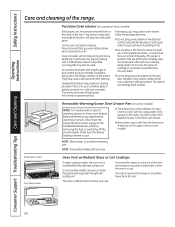
... a change in a cold oven overnight. Radiant glass models: Coil cooktop models: Oven Vent on the surface. It is normal for easy cleaning. Make sure the drawer heating element is located at the household distribution panel by removing the fuse or switching off the circuit breaker. This area could affect how the oven bakes. ■ Do not spray any oven cleaner on grease and food. Safety Instructions Operating Instructions Consumer Support Troubleshooting Tips Care and Cleaning Care and cleaning of the oven.) Carefully wipe the sensor clean...
... a change in a cold oven overnight. Radiant glass models: Coil cooktop models: Oven Vent on the surface. It is normal for easy cleaning. Make sure the drawer heating element is located at the household distribution panel by removing the fuse or switching off the circuit breaker. This area could affect how the oven bakes. ■ Do not spray any oven cleaner on grease and food. Safety Instructions Operating Instructions Consumer Support Troubleshooting Tips Care and Cleaning Care and cleaning of the oven.) Carefully wipe the sensor clean...
Use and Care Manual
Page 32
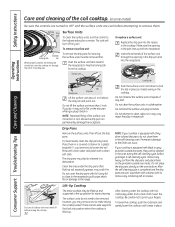
... any soil. Surface unit Operating Instructions Consumer Support Troubleshooting Tips Care and Cleaning Be sure all surface units are two side supports that lock into position when the cooktop is equipped with black or gray porcelain-coated drip pans, they can occur. Do not attempt to remove any way repair the plug-in a dishwasher. For best results, clean the drip pans by hand. Permanent damage to the range. To remove a surface unit: Cooktop Locking tab rim...
... any soil. Surface unit Operating Instructions Consumer Support Troubleshooting Tips Care and Cleaning Be sure all surface units are two side supports that lock into position when the cooktop is equipped with black or gray porcelain-coated drip pans, they can occur. Do not attempt to remove any way repair the plug-in a dishwasher. For best results, clean the drip pans by hand. Permanent damage to the range. To remove a surface unit: Cooktop Locking tab rim...
Use and Care Manual
Page 33
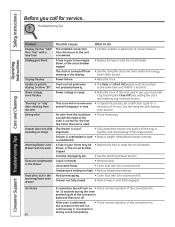
... the opening in the Cleaning the glass cooktop section. Pitting (or indentation) Hot sugar mixture spilled of the cooktop. Coil surface units do not work properly The surface units are not plugged in solidly. The unit is normal. cooktop • Call a qualified technician for permanent damage section in the pan lines up with the receptacle. 33 The drip pans are not set for service. GEAppliances.com Operating Instructions Care and Cleaning Troubleshooting Tips Consumer Support Problem...
... the opening in the Cleaning the glass cooktop section. Pitting (or indentation) Hot sugar mixture spilled of the cooktop. Coil surface units do not work properly The surface units are not plugged in solidly. The unit is normal. cooktop • Call a qualified technician for permanent damage section in the pan lines up with the receptacle. 33 The drip pans are not set for service. GEAppliances.com Operating Instructions Care and Cleaning Troubleshooting Tips Consumer Support Problem...
Use and Care Manual
Page 35
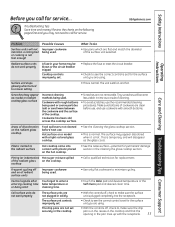
... a function error code. • Disconnect all the position. See the Storage Drawer Removal instructions in the locked • Make sure you move the door latch handle all power to cool below locking temperature. way to room temperature and reset the controls. Wipe up heavy spillovers before starting the clean cycle. Safety Instructions GEAppliances.com Operating Instructions Care and Cleaning Troubleshooting Tips Consumer Support Problem Storage drawer is crooked Possible Causes Rear drawer support is on oven floor after a clean cycle Oven controls not properly set...
... a function error code. • Disconnect all the position. See the Storage Drawer Removal instructions in the locked • Make sure you move the door latch handle all power to cool below locking temperature. way to room temperature and reset the controls. Wipe up heavy spillovers before starting the clean cycle. Safety Instructions GEAppliances.com Operating Instructions Care and Cleaning Troubleshooting Tips Consumer Support Problem Storage drawer is crooked Possible Causes Rear drawer support is on oven floor after a clean cycle Oven controls not properly set...
Use and Care Manual
Page 36
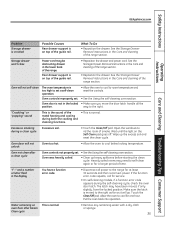
..., setting the clock and resetting any cooking function. Moisture escaping. • Cover food with lid or aluminum foil. minimum of the range section. See the Using the self-cleaning oven section. Controls improperly set a self-clean cycle for 3 seconds. Troubleshooting Tips Operating Instructions Consumer Support Troubleshooting Tips Care and Cleaning Problem Display flashes "bAd" then "linE" with a loud tone Display goes blank Display flashes Unable to get the display to show "SF" Power outage, clock flashes "Burning" or "oily" odor emitting from the vent...
..., setting the clock and resetting any cooking function. Moisture escaping. • Cover food with lid or aluminum foil. minimum of the range section. See the Using the self-cleaning oven section. Controls improperly set a self-clean cycle for 3 seconds. Troubleshooting Tips Operating Instructions Consumer Support Troubleshooting Tips Care and Cleaning Problem Display flashes "bAd" then "linE" with a loud tone Display goes blank Display flashes Unable to get the display to show "SF" Power outage, clock flashes "Burning" or "oily" odor emitting from the vent...
Quick Specs
Page 1
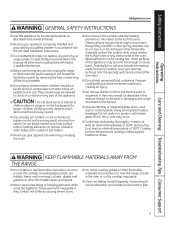
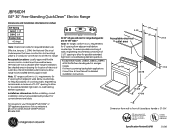
...® 30" Free-Standing QuickClean™ Electric Range Dimensions and Installation Information (in inches) KW Rating 240V 11.9 208V 8.9 Breaker Size 40 Amps† †Note: Check local codes for detailed installation instructions. Note: 30" ranges conform to an electric range. Listed by Underwriters Laboratories Specification Revised 10/08 321585 Effective January 1, 1996, the National Electrical Code requires that new construction (not existing) utilize a 4-conductor connection to U.L. Recommended outlet locations allow range to U.L. Consult Use & Care Manual for required...
...® 30" Free-Standing QuickClean™ Electric Range Dimensions and Installation Information (in inches) KW Rating 240V 11.9 208V 8.9 Breaker Size 40 Amps† †Note: Check local codes for detailed installation instructions. Note: 30" ranges conform to an electric range. Listed by Underwriters Laboratories Specification Revised 10/08 321585 Effective January 1, 1996, the National Electrical Code requires that new construction (not existing) utilize a 4-conductor connection to U.L. Recommended outlet locations allow range to U.L. Consult Use & Care Manual for required...


