
User Manual
Page 1
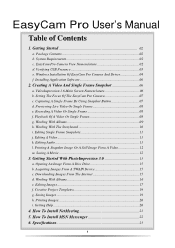
... Pro Camera View Nomenclature 02 d. Recording A Video Or Single Frame 08 f. Working With The Storyboard 10 i. Saving A Movie 12 3. Acquiring Images From A TWAIN Device 15 c. Getting Started 02 a. Windows Installation Of EasyCam Pro Camera And Driver 04 f. Setting The Focus Of The EasyCam Pro Camera 07 c. Specifications 23 1 Capturing A Single Frame By Using Snapshot Button 07 d. Playback Of A Video Or Single Frame 08 g. Working With Albums 16 e. Printing A Snapshot Image Or A Still Image From A Video 12 m. EasyCam Pro User's Manual Table...
... Pro Camera View Nomenclature 02 d. Recording A Video Or Single Frame 08 f. Working With The Storyboard 10 i. Saving A Movie 12 3. Acquiring Images From A TWAIN Device 15 c. Getting Started 02 a. Windows Installation Of EasyCam Pro Camera And Driver 04 f. Setting The Focus Of The EasyCam Pro Camera 07 c. Specifications 23 1 Capturing A Single Frame By Using Snapshot Button 07 d. Playback Of A Video Or Single Frame 08 g. Working With Albums 16 e. Printing A Snapshot Image Or A Still Image From A Video 12 m. EasyCam Pro User's Manual Table...

User Manual
Page 2
... card ● Modem for VideoConference ● Full- EasyCam Pro Camera View Nomenclature 1. Package Contents ● EasyCam Pro Camera ● USB connector cable ● Quick Start Guide ● Installation CD-ROM ○ Camera Driver ○ Application Software ● ArcSoft VideoImpression 1.6 ● ArcSoft PhotoImpression 3.0 ○ User's Manual System Requirements ● Intel Pentium II 350MHz Processor or equivalent ● 64MB System RAM ● Windows 98SE/Me/2000/XP ● CD-ROM drive ● 16-bit...
... card ● Modem for VideoConference ● Full- EasyCam Pro Camera View Nomenclature 1. Package Contents ● EasyCam Pro Camera ● USB connector cable ● Quick Start Guide ● Installation CD-ROM ○ Camera Driver ○ Application Software ● ArcSoft VideoImpression 1.6 ● ArcSoft PhotoImpression 3.0 ○ User's Manual System Requirements ● Intel Pentium II 350MHz Processor or equivalent ● 64MB System RAM ● Windows 98SE/Me/2000/XP ● CD-ROM drive ● 16-bit...

User Manual
Page 3
... turned on card. Normally, when the computer power is implemented. Figure 1 For computer main board with USB supported: Enter BIOS settings and enable USB, see the documentation that came with your computer and check to press some keys for main board type USB are not required. 3 For computer main board without USB: In this case, USB can be implemented by an USB add-on , before starting windows...
... turned on card. Normally, when the computer power is implemented. Figure 1 For computer main board with USB supported: Enter BIOS settings and enable USB, see the documentation that came with your computer and check to press some keys for main board type USB are not required. 3 For computer main board without USB: In this case, USB can be implemented by an USB add-on , before starting windows...

User Manual
Page 4
... driver Before installing Camera to the USB port on the screen, asking you have the correct orientation while plugging the USB connector into the USB port of your computer. 3. Plug the camera's connector to your CD-ROM drive. Click " Next " to continue. 8. Click "Next" to continue. 5. For example: Letter D indicates the location of EasyCam Pro Camera and Driver 1. The next screen shows the default path for the camera driver, depending on the existing operating...
... driver Before installing Camera to the USB port on the screen, asking you have the correct orientation while plugging the USB connector into the USB port of your computer. 3. Plug the camera's connector to your CD-ROM drive. Click " Next " to continue. 8. Click "Next" to continue. 5. For example: Letter D indicates the location of EasyCam Pro Camera and Driver 1. The next screen shows the default path for the camera driver, depending on the existing operating...

User Manual
Page 6
... work as shown below. New - Click "VideoImpress 1.6". 4. Control Buttons Timer Window - Video Playback Controls - Saves your mouse over an icon. (2) ("?") Help launches VideoImpression Help. Note: If the installer screen does not come up tool tips on screen waited instructions. 5. Select Programs>ArcSoft VideoImpression> ArcSoft VideoImpression 1.6. 3. Starts a new project, opens an existing one, and displays your CD-ROM drive. 2. VideoImpression 1.6 Main Screen Nomenclature 1. shows the current frame and the elapsed time...
... work as shown below. New - Click "VideoImpress 1.6". 4. Control Buttons Timer Window - Video Playback Controls - Saves your mouse over an icon. (2) ("?") Help launches VideoImpression Help. Note: If the installer screen does not come up tool tips on screen waited instructions. 5. Select Programs>ArcSoft VideoImpression> ArcSoft VideoImpression 1.6. 3. Starts a new project, opens an existing one, and displays your CD-ROM drive. 2. VideoImpression 1.6 Main Screen Nomenclature 1. shows the current frame and the elapsed time...

User Manual
Page 7
... focus the picture, turn the focus ring (the grooved plastic ring around the lens of the camera-see EasyCam Pro Camera Nomenclature on top of the camera) until the image becomes sharp. The window shows a Live preview as seen from the camera. 5. Press the sanpshot button (located on Page 2) to capture a single frame. 7 Click Start> Programs> ArcSoft VideoImpression 1.6> ArcSoft VideoImpression 1.6. 2. Capturing a Single Frame by Camera Snapshot button 1. " 4. The introduction screen...
... focus the picture, turn the focus ring (the grooved plastic ring around the lens of the camera-see EasyCam Pro Camera Nomenclature on top of the camera) until the image becomes sharp. The window shows a Live preview as seen from the camera. 5. Press the sanpshot button (located on Page 2) to capture a single frame. 7 Click Start> Programs> ArcSoft VideoImpression 1.6> ArcSoft VideoImpression 1.6. 2. Capturing a Single Frame by Camera Snapshot button 1. " 4. The introduction screen...

User Manual
Page 8
... the source to add it to enable live preview. 2. Follow steps 1~3 in "Setting the Focus" to enable live preview. 2. Follow steps 1~3 in "Set the Focus" to Edit Board. 5. To start video recording, click on album. (See Editing a Video or Single Frame - To save captured video, click on "Play." 8 To replay captured video, click on "Save" ( ). To stop video recording, click on "Stop" ( ). 3. Preview Live Video or Single Frame 1. Record a Video or Single Frame...
... the source to add it to enable live preview. 2. Follow steps 1~3 in "Setting the Focus" to enable live preview. 2. Follow steps 1~3 in "Set the Focus" to Edit Board. 5. To start video recording, click on album. (See Editing a Video or Single Frame - To save captured video, click on "Play." 8 To replay captured video, click on "Save" ( ). To stop video recording, click on "Stop" ( ). 3. Preview Live Video or Single Frame 1. Record a Video or Single Frame...

User Manual
Page 9
... create movies by placing image and movie files onto the Storyboard from digital cameras. You can play, save, and email your hard drive or any removable media (diskettes, CDs, etc.). Acquire - Capture - Lets you to browse through your computer to add image, movie, or audio file thumbnails to view or work from TWAIN devices like digital cameras and scanners. Select Album - (Located immediately to the...
... create movies by placing image and movie files onto the Storyboard from digital cameras. You can play, save, and email your hard drive or any removable media (diskettes, CDs, etc.). Acquire - Capture - Lets you to browse through your computer to add image, movie, or audio file thumbnails to view or work from TWAIN devices like digital cameras and scanners. Select Album - (Located immediately to the...

User Manual
Page 10
.... Working with the Storyboard Note: The Storyboard shows you each step or part of a movie file, for simultaneous playback. Soundtracks - You can add a transition by double-clicking on a Transition icon between two thumbnails, or by dragging them to your movie change. You can rearrange the audio files by clicking on the Transition icon when editing a still image or video file...
.... Working with the Storyboard Note: The Storyboard shows you each step or part of a movie file, for simultaneous playback. Soundtracks - You can add a transition by double-clicking on a Transition icon between two thumbnails, or by dragging them to your movie change. You can rearrange the audio files by clicking on the Transition icon when editing a still image or video file...

User Manual
Page 11
... window. Playback Slider - Starting Mark - Allows you to add text to change the brightness of an image. Pause - Adjusts the volume of the audio Ending Mark - You can select the font type, style and size. Editing a Video To edit a video, double click on the preview window in "Still Image Template" Play Movie - Note: If you are a PC user, you to the Album Screen (See "Working...
... window. Playback Slider - Starting Mark - Allows you to add text to change the brightness of an image. Pause - Adjusts the volume of the audio Ending Mark - You can select the font type, style and size. Editing a Video To edit a video, double click on the preview window in "Still Image Template" Play Movie - Note: If you are a PC user, you to the Album Screen (See "Working...

User Manual
Page 13
... website (Online Service). The PhotoImpression Main Screen will still be able to a photo-sharing website (To Internet: Upload). - It also allows you to access other programs (Cool Software). -Lets you will appear on the entire screen. Even if you zoom in the Navigation Window to an email at various sizes (Email-a compliant email program is required), set the image as a percentage. Select Programs>ArcSoft PhotoImpression>PhotoImpression 3.0. Magnification Controls - View Controls: Navigation Window - You...
... website (Online Service). The PhotoImpression Main Screen will still be able to a photo-sharing website (To Internet: Upload). - It also allows you to access other programs (Cool Software). -Lets you will appear on the entire screen. Even if you zoom in the Navigation Window to an email at various sizes (Email-a compliant email program is required), set the image as a percentage. Select Programs>ArcSoft PhotoImpression>PhotoImpression 3.0. Magnification Controls - View Controls: Navigation Window - You...

User Manual
Page 15
... the Online Service button, and then click the Download button. 3. Note: You must have an account with the photo-sharing site you wish to view. Click the Get Photo button. 2. Follow the instructions onscreen to download images from the supported photosharing website. 4. Options include setting the file type for Folder dialog will appear. Navigate to the folder that is stored on the Main Screen, and...
... the Online Service button, and then click the Download button. 3. Note: You must have an account with the photo-sharing site you wish to view. Click the Get Photo button. 2. Follow the instructions onscreen to download images from the supported photosharing website. 4. Options include setting the file type for Folder dialog will appear. Navigate to the folder that is stored on the Main Screen, and...

User Manual
Page 16
... album file. Removing the image file will delete it permanently from your album. You can add multiple files at one time by holding down Ctrl (PC) or Shift (Mac) while clicking on each file to be in the floppy drive in your album by holding down . Album Screen Saver (Windows only) - You can select "[New]" to start a new, blank album. Creates a "virtual notebook" and...
... album file. Removing the image file will delete it permanently from your album. You can add multiple files at one time by holding down Ctrl (PC) or Shift (Mac) while clicking on each file to be in the floppy drive in your album by holding down . Album Screen Saver (Windows only) - You can select "[New]" to start a new, blank album. Creates a "virtual notebook" and...

User Manual
Page 17
... image size by width percentage. Crops all layers to only show you to another location. Crops the image to the selected area when checked. You can change accordingly. Selects an area of the slider. For example, entering "50" would make the image _ its current height. Crop/Resize: - Gives cropped edges a warm fade based on the position of...
... image size by width percentage. Crops all layers to only show you to another location. Crops the image to the selected area when checked. You can change accordingly. Selects an area of the slider. For example, entering "50" would make the image _ its current height. Crop/Resize: - Gives cropped edges a warm fade based on the position of...

User Manual
Page 18
... is saved as a PSF file. 18 Allows you set a color on the image, but in general, the lines in an image. It offers more control than Brightness/Contrast. -Decreases the contrast between adjacent pixels, creating a fuzzy effect over the entire layer. - The effects are varied depending on your image. Click on your image as well. Toggling the green light above...
... is saved as a PSF file. 18 Allows you set a color on the image, but in general, the lines in an image. It offers more control than Brightness/Contrast. -Decreases the contrast between adjacent pixels, creating a fuzzy effect over the entire layer. - The effects are varied depending on your image. Click on your image as well. Toggling the green light above...

User Manual
Page 19
To Internet: Click the Upload button to upload images to open your images. Simply choose a style that you want, use the Toolbar to fine-tune your email program is not enabled in an email. Simply select the template that you like, then click Apply. : You can easily open a new mail message and automatically attach the current image to it. A program icon will become available: To File: - Email (Windows only...
To Internet: Click the Upload button to upload images to open your images. Simply choose a style that you want, use the Toolbar to fine-tune your email program is not enabled in an email. Simply select the template that you like, then click Apply. : You can easily open a new mail message and automatically attach the current image to it. A program icon will become available: To File: - Email (Windows only...

User Manual
Page 20
... copies (Windows only) that you to choose from your album to use a specific feature or tool, click the Help (?) button in the upper right-hand corner of the screen. 20 You can add a title, center the image and title, change the space between the images on how to specific areas on a template by clicking the Set Text button. Getting Help PhotoImpression provides extensive online help. You...
... copies (Windows only) that you to choose from your album to use a specific feature or tool, click the Help (?) button in the upper right-hand corner of the screen. 20 You can add a title, center the image and title, change the space between the images on how to specific areas on a template by clicking the Set Text button. Getting Help PhotoImpression provides extensive online help. You...

User Manual
Page 21
... location for the first time, you need more information or instruction on the Tools menu. How to Install Microsoft NetMeeting 1 How To Install NetMeeting (XP includes as standard) 1.1 For Windows 98/Me Users Click Start, point to Programs, point to Accessories, point to download. 2 How To Start With The Camera 2.1. NOTE: The Location and Comments information is optional), and then type the name of the screen...
... location for the first time, you need more information or instruction on the Tools menu. How to Install Microsoft NetMeeting 1 How To Install NetMeeting (XP includes as standard) 1.1 For Windows 98/Me Users Click Start, point to Programs, point to Accessories, point to download. 2 How To Start With The Camera 2.1. NOTE: The Location and Comments information is optional), and then type the name of the screen...

User Manual
Page 22
... use a specific feature or tool, click the "Help" button in the upper right-hand comer of the screen. 22 After the installation package is completed, click Start, point to Programs, and click Windows Messenger. 1.2 For Windows XP Users 1.2.1 Click Start, point to Programs, and click Windows Messenger. 1.2.2 After you run Messenger for the first time, you can have a Video Conversation with Messenger. For more information or instruction...
... use a specific feature or tool, click the "Help" button in the upper right-hand comer of the screen. 22 After the installation package is completed, click Start, point to Programs, and click Windows Messenger. 1.2 For Windows XP Users 1.2.1 Click Start, point to Programs, and click Windows Messenger. 1.2.2 After you run Messenger for the first time, you can have a Video Conversation with Messenger. For more information or instruction...

User Manual
Page 23
... Focus Range View Angle Aperture H/W Snapshot Anti-Flicker Video Output Resolution Video Frame Rate Microphone Video Data Format File Format Camera Control Settings Dimension Driver Compliance OS support CMOS with 300K Pixels 24 Bits, 16.7 million RGB true color USB V1.1 Automatic Automatic Manual, 10cm~infinity 52° (diagonal) F/2.6 Yes Yes 640X480, 352X288, 320X240, 176X144, 160X120 Up to 30 fps Built-in RGB24, I420 JPEG (still image) AVI (streaming video...
... Focus Range View Angle Aperture H/W Snapshot Anti-Flicker Video Output Resolution Video Frame Rate Microphone Video Data Format File Format Camera Control Settings Dimension Driver Compliance OS support CMOS with 300K Pixels 24 Bits, 16.7 million RGB true color USB V1.1 Automatic Automatic Manual, 10cm~infinity 52° (diagonal) F/2.6 Yes Yes 640X480, 352X288, 320X240, 176X144, 160X120 Up to 30 fps Built-in RGB24, I420 JPEG (still image) AVI (streaming video...


