Use and Care Manual
Page 2
... the appliance. „ DO NOT dry articles that have been previously cleaned in, washed in, soaked in or spotted with controls, repair or replace any part of children is removed from service or discarded, remove the door to the drying compartment . „ DO NOT reach into , on or in death or... Start/Pause button DOES NOT disconnect power. „ DO NOT operate this appliance if it is damaged, malfunctioning, partially disassembled, or has missing or broken parts, including a damaged cord or plug. „ DO NOT spray any type of lint, dust and dirt.
... the appliance. „ DO NOT dry articles that have been previously cleaned in, washed in, soaked in or spotted with controls, repair or replace any part of children is removed from service or discarded, remove the door to the drying compartment . „ DO NOT reach into , on or in death or... Start/Pause button DOES NOT disconnect power. „ DO NOT operate this appliance if it is damaged, malfunctioning, partially disassembled, or has missing or broken parts, including a damaged cord or plug. „ DO NOT spray any type of lint, dust and dirt.

Use and Care Manual
Page 6
...dryer power cord or disconnect the dryer at 800.626.2002 during normal use this drying rack when there are other clothes in all GE Dryers when used with plastic trim and foam-filled items. Fabric Care Labels Below are sorted properly for drying delicate items such as ... LABELS Tumble dry Dry Heat setting High Normal Permanent Press/ wrinkle resistant Gentle/ delicate Do not dry Do not tumble dry (used in a GE dryer. Part Number Accessory WE01X25160 Drying Rack Alloy Steel Drum (on -line at GEApplianceparts.com today, 24 hours a day or by phone at the household ...
...dryer power cord or disconnect the dryer at 800.626.2002 during normal use this drying rack when there are other clothes in all GE Dryers when used with plastic trim and foam-filled items. Fabric Care Labels Below are sorted properly for drying delicate items such as ... LABELS Tumble dry Dry Heat setting High Normal Permanent Press/ wrinkle resistant Gentle/ delicate Do not dry Do not tumble dry (used in a GE dryer. Part Number Accessory WE01X25160 Drying Rack Alloy Steel Drum (on -line at GEApplianceparts.com today, 24 hours a day or by phone at the household ...

Use and Care Manual
Page 11
...Care® technician. All warranty support provided by possible defects with this limited one-year warranty, GE will also provide, free of charge, all labor and related service costs to replace the defective part. GE Dryer Warranty. During this appliance. „ Damage caused after delivery. „ Product not ...service, on-line, 24 hours a day, visit us at GEAppliances.com or call 800.GE.CARES (800.432.2737). For The Period Of: GE Will Replace: One Year From the date of the original purchase Any part of the original purchase date is abused, misused, or used for service.
...Care® technician. All warranty support provided by possible defects with this limited one-year warranty, GE will also provide, free of charge, all labor and related service costs to replace the defective part. GE Dryer Warranty. During this appliance. „ Damage caused after delivery. „ Product not ...service, on-line, 24 hours a day, visit us at GEAppliances.com or call 800.GE.CARES (800.432.2737). For The Period Of: GE Will Replace: One Year From the date of the original purchase Any part of the original purchase date is abused, misused, or used for service.

Use and Care Manual
Page 12
... while your warranty is only one step away from GE, contact us on -line. You can now download Owner's Manuals, order parts or even schedule service on our Website with all ages, sizes and capabilities. GE Consumer Home Services will allow for enhanced communication and... prompt service under the terms of GE's Universal Design applications, including kitchen design ideas for...
... while your warranty is only one step away from GE, contact us on -line. You can now download Owner's Manuals, order parts or even schedule service on our Website with all ages, sizes and capabilities. GE Consumer Home Services will allow for enhanced communication and... prompt service under the terms of GE's Universal Design applications, including kitchen design ideas for...
Installation Instructions
Page 2
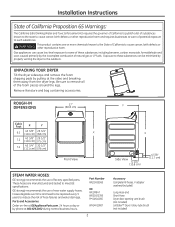
...cm) 7.4 43 3/4" 30 1/2" (111 cm) (78 cm) X Front View X Side View 4 1/4" (10.8 cm) 4 5/8" (11.7 cm) STEAM WATER HOSES: GE strongly recommends the use of new water supply hoses. These hoses are manufactured and tested to the outdoors. Exposure to these substances, including benzene, carbon... or other reproductive harm and requires businesses to warn of potential exposure to such substances. GE strongly recommends the use of factory specified parts. Installation Instructions State of California Proposition 65 Warnings: The California Safe Drinking Water and Toxic...
...cm) 7.4 43 3/4" 30 1/2" (111 cm) (78 cm) X Front View X Side View 4 1/4" (10.8 cm) 4 5/8" (11.7 cm) STEAM WATER HOSES: GE strongly recommends the use of new water supply hoses. These hoses are manufactured and tested to the outdoors. Exposure to these substances, including benzene, carbon... or other reproductive harm and requires businesses to warn of potential exposure to such substances. GE strongly recommends the use of factory specified parts. Installation Instructions State of California Proposition 65 Warnings: The California Safe Drinking Water and Toxic...
Installation Instructions
Page 3
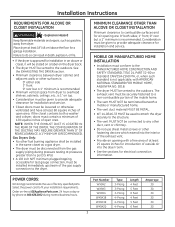
Place dryer at least 25 square inches for electrical connection information. POWER CORDS: GE strongly recommends the use sheet metal screws or other fastening devices which extend into the dryer room. • ... outdoors. Installation Instructions REQUIREMENTS FOR ALCOVE OR CLOSET INSTALLATION WARNING - A 1" MINIMUM IS RECOMMENDED. Consideration must be disconnected from dryer to fit your installation requirements. Part Number WX9X2 WX9X3 WX9X4 WX9X18 WX9X19 WX9X20 3 Type 3-Prong 3-Prong 3-Prong 4-Prong 4-Prong 4-Prong Length 4 Feet 5 Feet 6 Feet 4 Feet 5 Feet...
Place dryer at least 25 square inches for electrical connection information. POWER CORDS: GE strongly recommends the use sheet metal screws or other fastening devices which extend into the dryer room. • ... outdoors. Installation Instructions REQUIREMENTS FOR ALCOVE OR CLOSET INSTALLATION WARNING - A 1" MINIMUM IS RECOMMENDED. Consideration must be disconnected from dryer to fit your installation requirements. Part Number WX9X2 WX9X3 WX9X4 WX9X18 WX9X19 WX9X20 3 Type 3-Prong 3-Prong 3-Prong 4-Prong 4-Prong 4-Prong Length 4 Feet 5 Feet 6 Feet 4 Feet 5 Feet...
Installation Instructions
Page 12
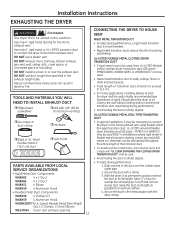
... can be used. • Never install transition duct in walls, ceilings, floors or other clamp. UL-LISTED universal flexible dryer transition duct (GE parts - Slide one end of transition duct should not exceed 8' (2.4 m). With the dryer in the exhaust length table. RIGID METAL TRANSITION DUCT ... Secure the duct to the home exhaust duct. PM8X73 or WX8X73) may be used , then UL-LISTED flexible metal clothes dryer transition duct (GE parts - Keep the duct as straight as possible for the home exhaust vent. WX8X59 4 Aluminum Hood WX08X10077 6 UL-Listed, Flexible Metal (Semi-Rigid...
... can be used. • Never install transition duct in walls, ceilings, floors or other clamp. UL-LISTED universal flexible dryer transition duct (GE parts - Slide one end of transition duct should not exceed 8' (2.4 m). With the dryer in the exhaust length table. RIGID METAL TRANSITION DUCT ... Secure the duct to the home exhaust duct. PM8X73 or WX8X73) may be used , then UL-LISTED flexible metal clothes dryer transition duct (GE parts - Keep the duct as straight as possible for the home exhaust vent. WX8X59 4 Aluminum Hood WX08X10077 6 UL-Listed, Flexible Metal (Semi-Rigid...
Installation Instructions
Page 17
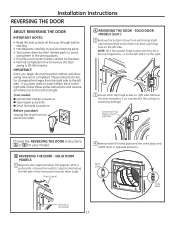
... back to the right side, follow these same instructions and reverse all the way through before starting. • Handle parts carefully to avoid scratching paint. • Set screws down by their related parts to avoid using them aside. NOTE: All 4 front panel hinge screws will now be in the top hinge holes...
... back to the right side, follow these same instructions and reverse all the way through before starting. • Handle parts carefully to avoid scratching paint. • Set screws down by their related parts to avoid using them aside. NOTE: All 4 front panel hinge screws will now be in the top hinge holes...


