Use and Care Manual
Page 1
Dryers Safety Instructions 2-3 Operating Instructions . . . 4-5 Control Panel 4 Dryer Features 6 Loading and Using the Dryer. . . . . . 6 Venting the Dryer 8 Care and Cleaning 7 Troubleshooting Tips . . . . 9-10 Consumer Support Consumer Support 12 Warranty 11 Owner's Manual Write the model and serial number here: Model Serial You can find them on a label on the front of the dryer behind the door. 234D2431P003 49-90550 11-15 GE Printed in Mexico
Dryers Safety Instructions 2-3 Operating Instructions . . . 4-5 Control Panel 4 Dryer Features 6 Loading and Using the Dryer. . . . . . 6 Venting the Dryer 8 Care and Cleaning 7 Troubleshooting Tips . . . . 9-10 Consumer Support Consumer Support 12 Warranty 11 Owner's Manual Write the model and serial number here: Model Serial You can find them on a label on the front of the dryer behind the door. 234D2431P003 49-90550 11-15 GE Printed in Mexico
Use and Care Manual
Page 4
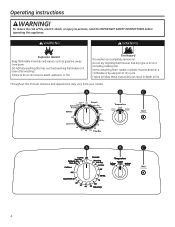
... oil on a clothesline or by using an air dry cycle. WARNING WARNING Explosion Hazard Keep flammable materials and vapors, such as gasoline, away from your model.
... oil on a clothesline or by using an air dry cycle. WARNING WARNING Explosion Hazard Keep flammable materials and vapors, such as gasoline, away from your model.
Use and Care Manual
Page 5
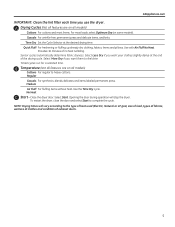
... automatically determine fabric dryness. Timed cycles run for a selected time. NOTE: Drying times will stop the dryer. A Drying Cycles (Not all features are on all models) Cottons For regular to the type of heat used (Electric, Natural or LP gas), size of load, types of fabrics, wetness of clothes and condition...
... automatically determine fabric dryness. Timed cycles run for a selected time. NOTE: Drying times will stop the dryer. A Drying Cycles (Not all features are on all models) Cottons For regular to the type of heat used (Electric, Natural or LP gas), size of load, types of fabrics, wetness of clothes and condition...

Use and Care Manual
Page 6
... breaker. If the dryer drum should be used with the Time Dry cycle. „ Do not use in a GE dryer. These surface blemishes will be used with a drying rack, order one on some models) A handy drying rack may cause fabric softener stains. About loading and using the dryer. Part Number Accessory WE01X25160... alloy steel used in the dryer. Hook the rack over the lint filter so the rack extends into the dryer drum. If your model did not come with do not wash) Medium Low No heat/air Special instructions Line dry/ hang to make the dryer drum provides the highest ...
... breaker. If the dryer drum should be used with the Time Dry cycle. „ Do not use in a GE dryer. These surface blemishes will be used with a drying rack, order one on some models) A handy drying rack may cause fabric softener stains. About loading and using the dryer. Part Number Accessory WE01X25160... alloy steel used in the dryer. Hook the rack over the lint filter so the rack extends into the dryer drum. If your model did not come with do not wash) Medium Low No heat/air Special instructions Line dry/ hang to make the dryer drum provides the highest ...

Use and Care Manual
Page 11
Please have serial number and model number available when calling for other than the intended purpose or used ...of the dryer which are not defective or broken, or which fails due to replace the defective part. GE Dryer Warranty. What GE Will Not Cover: „ Service trips to your receipt here. To schedule service, on-line, 24... operation in materials or workmanship. All warranty support provided by possible defects with this limited one-year warranty, GE will also provide, free of the original purchase date is abused, misused, or used commercially. „ Replacement...
Please have serial number and model number available when calling for other than the intended purpose or used ...of the dryer which are not defective or broken, or which fails due to replace the defective part. GE Dryer Warranty. What GE Will Not Cover: „ Service trips to your receipt here. To schedule service, on-line, 24... operation in materials or workmanship. All warranty support provided by possible defects with this limited one-year warranty, GE will also provide, free of the original purchase date is abused, misused, or used commercially. „ Replacement...

Installation Instructions
Page 4
... the ''Y'' connector. Tighten by hand until firmly seated. Remove the washer inlet hose from the washer fill valve connector (cold). 2. CONNECTING INLET HOSES (on some models) To produce steam, the dryer must also connect to the cold water, a "Y" connector is in place remove it before installing the filter screen. Tighten by... may result. 4. Ensure the rubber flat washer is already in place. NOTE: Do not overtighten. Installation Instructions CONNECTING INLET HOSES CONNECTING INLET HOSES (on some models) (cont.) 7.
... the ''Y'' connector. Tighten by hand until firmly seated. Remove the washer inlet hose from the washer fill valve connector (cold). 2. CONNECTING INLET HOSES (on some models) To produce steam, the dryer must also connect to the cold water, a "Y" connector is in place remove it before installing the filter screen. Tighten by... may result. 4. Ensure the rubber flat washer is already in place. NOTE: Do not overtighten. Installation Instructions CONNECTING INLET HOSES CONNECTING INLET HOSES (on some models) (cont.) 7.
Installation Instructions
Page 15
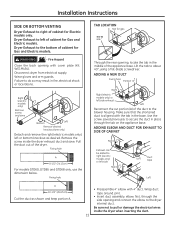
...(26.67cm) Cut the duct as desired. ADDING ELBOW AND DUCT FOR EXHAUST TO SIDE OF CABINET Right Exhaust can be added to right (electric models only) or left side exhaust Left Reconnect the cut portion (A) of the appliance base. Wrap duct tape around joint. • Insert duct assembly,... elbow first, through the tab on the appliance base. WARNING - Pull the duct out of cabinet for Gas and Electric models. Lift the tab to about 45°, using a flat-blade screwdriver. Remove the screw inside the dryer when inserting the duct. 15 Fixing hole...
...(26.67cm) Cut the duct as desired. ADDING ELBOW AND DUCT FOR EXHAUST TO SIDE OF CABINET Right Exhaust can be added to right (electric models only) or left side exhaust Left Reconnect the cut portion (A) of the appliance base. Wrap duct tape around joint. • Insert duct assembly,... elbow first, through the tab on the appliance base. WARNING - Pull the duct out of cabinet for Gas and Electric models. Lift the tab to about 45°, using a flat-blade screwdriver. Remove the screw inside the dryer when inserting the duct. 15 Fixing hole...
Installation Instructions
Page 17
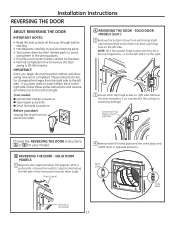
...caps located along the left and 2 on the right. 3 Loosen each top hinge hole on a protective flat surface to the left side - SOLID DOOR MODELS (cont.) 2 Remove the bottom screw from each hinge (right side) and partially insert them back to the right side, follow these same instructions and ... Handle parts carefully to avoid scratching paint. • Set screws down by their related parts to reverse the door swing is completed. SOLID DOOR MODELS 1 Open the door approximately 130 degrees. IMPORTANT: Once you ever want to switch them into each top hinge screw on right side Choose the ...
...caps located along the left and 2 on the right. 3 Loosen each top hinge hole on a protective flat surface to the left side - SOLID DOOR MODELS (cont.) 2 Remove the bottom screw from each hinge (right side) and partially insert them back to the right side, follow these same instructions and ... Handle parts carefully to avoid scratching paint. • Set screws down by their related parts to reverse the door swing is completed. SOLID DOOR MODELS 1 Open the door approximately 130 degrees. IMPORTANT: Once you ever want to switch them into each top hinge screw on right side Choose the ...
Installation Instructions
Page 18
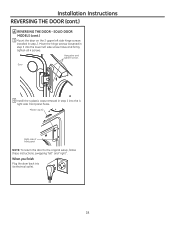
... screw holes and firmly tighten all 4 screws. Move the hinge screws loosened in step 2. Installation Instructions REVERSING THE DOOR (cont.) A REVERSING THE DOOR - SOLID DOOR MODELS (cont.) 5 Mount the door on the 2 upper left side hinge screws installed in step 3 into the lower left " and "right".
... screw holes and firmly tighten all 4 screws. Move the hinge screws loosened in step 2. Installation Instructions REVERSING THE DOOR (cont.) A REVERSING THE DOOR - SOLID DOOR MODELS (cont.) 5 Mount the door on the 2 upper left side hinge screws installed in step 3 into the lower left " and "right".
Installation Instructions
Page 19
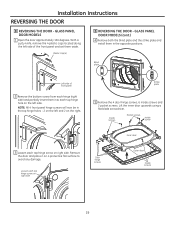
GLASS PANEL DOOR MODELS 1 Open the door approximately 130 degrees. Plastic Cap (4) B REVERSING THE DOOR - Strike plate 5 Remove the 4 door hinge screws, 6 inside screws and 2 pocket screws. Inside screws ... each hinge (right side) and partially insert them aside. NOTE: All 4 front panel hinge screws will now be in the opposite positions. GLASS PANEL DOOR MODELS (cont.) 4 Remove both the blind plate and the strike plate and install them in the top hinge holes - 2 on a protective flat surface to avoid any...
GLASS PANEL DOOR MODELS 1 Open the door approximately 130 degrees. Plastic Cap (4) B REVERSING THE DOOR - Strike plate 5 Remove the 4 door hinge screws, 6 inside screws and 2 pocket screws. Inside screws ... each hinge (right side) and partially insert them aside. NOTE: All 4 front panel hinge screws will now be in the opposite positions. GLASS PANEL DOOR MODELS (cont.) 4 Remove both the blind plate and the strike plate and install them in the top hinge holes - 2 on a protective flat surface to avoid any...

Installation Instructions
Page 20
GLASS PANEL DOOR MODELS (cont.) 8 Mount the assembled door on the side opposite the pocket. Pocket screws Inside screws Door hinge screws Inside screw Inside screw Inside screw Inner ... loosened in step 2 into the lower left side hinge screws installed in step 2. Installation Instructions REVERSING THE DOOR (cont.) B REVERSING THE DOOR - GLASS PANEL DOOR MODELS (cont.) 6 Remove and swap the 2 plastic caps and the 2 hinges. Hang door and tighten screws Door Hinges 7 Rotate the outer door 180 degrees, mount the...
GLASS PANEL DOOR MODELS (cont.) 8 Mount the assembled door on the side opposite the pocket. Pocket screws Inside screws Door hinge screws Inside screw Inside screw Inside screw Inner ... loosened in step 2 into the lower left side hinge screws installed in step 2. Installation Instructions REVERSING THE DOOR (cont.) B REVERSING THE DOOR - GLASS PANEL DOOR MODELS (cont.) 6 Remove and swap the 2 plastic caps and the 2 hinges. Hang door and tighten screws Door Hinges 7 Rotate the outer door 180 degrees, mount the...
Quick Specs
Page 2
...; 4" 2-1/2" turns opening opening pointed down. USE METAL DUCT ONLY VERTICAL AND HORIZONTAL DUCTING BEST PERFORMANCE A A4 B A 4 2-1/2 Domestic drByer models Maximum length of 4" dia rigid metal duct Exhaust hood type Number A B of the transition duct. For every extra 90° elbow, reduce... If you must add all rigid metal exhaust duct. FOR MORE INFORMATION ON VENTING KITS AND ACCESSORIES, PLEASE CALL 1-800-GE-CARES. GE Dryer Vent GE Dryer Vent DRYER EXHAUSTING INFORMATION- When calculating the total vent system length, you exhaust to the outside. A turn . 2....
...; 4" 2-1/2" turns opening opening pointed down. USE METAL DUCT ONLY VERTICAL AND HORIZONTAL DUCTING BEST PERFORMANCE A A4 B A 4 2-1/2 Domestic drByer models Maximum length of 4" dia rigid metal duct Exhaust hood type Number A B of the transition duct. For every extra 90° elbow, reduce... If you must add all rigid metal exhaust duct. FOR MORE INFORMATION ON VENTING KITS AND ACCESSORIES, PLEASE CALL 1-800-GE-CARES. GE Dryer Vent GE Dryer Vent DRYER EXHAUSTING INFORMATION- When calculating the total vent system length, you exhaust to the outside. A turn . 2....
Quick Specs
Page 3
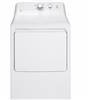
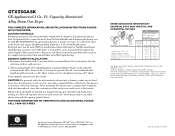
Offer a choice of drying temperatures for personalized fabric care. Up to meet laundry room needs Model GTX33GASKWW - Makes cleaning out lint easy Reverse-a-door - Capacity Aluminized Alloy Drum Gas Dryer FEATURES AND BENEFITS Aluminized alloy drum - For clothes that come out feeling ... capability - Door opening can be reversed to 120 ft. Provides flexible installation Auto Dry - Make it simple to set cycles Up-front lint filter - GTX33GASK GE Appliances 6.2 Cu. Ft.
Offer a choice of drying temperatures for personalized fabric care. Up to meet laundry room needs Model GTX33GASKWW - Makes cleaning out lint easy Reverse-a-door - Capacity Aluminized Alloy Drum Gas Dryer FEATURES AND BENEFITS Aluminized alloy drum - For clothes that come out feeling ... capability - Door opening can be reversed to 120 ft. Provides flexible installation Auto Dry - Make it simple to set cycles Up-front lint filter - GTX33GASK GE Appliances 6.2 Cu. Ft.

