Installation Instructions
Page 2
... legs. These hoses are manufactured and tested to such substances. GE strongly recommends the use of factory specified parts. Part Number WE25X20060 OR WE1M847 WE01X22395 PM14X10056 WX14X10007 2 Accessory Complete Kit (hoses, Y-adapter washers) (included) Long Hose and Short Hose Dryer door opening vent brush (not included) LintEater™ Dryer rotary tube brush (not...
... legs. These hoses are manufactured and tested to such substances. GE strongly recommends the use of factory specified parts. Part Number WE25X20060 OR WE1M847 WE01X22395 PM14X10056 WX14X10007 2 Accessory Complete Kit (hoses, Y-adapter washers) (included) Long Hose and Short Hose Dryer door opening vent brush (not included) LintEater™ Dryer rotary tube brush (not...
Installation Instructions
Page 3
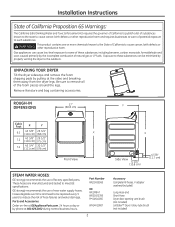
...outdoors. Consideration must contain a minimum of 120 square inches of factory specified parts. POWER CORDS: GE strongly recommends the use sheet metal screws or other fuel burning appliance shall be vented to combustible surfaces and for installation in an alcove or closet, it will be stated on ... be securely fastened to a non-combustible portion of the mobile home. • The vent MUST NOT be terminated beneath a mobile or manufactured home. • The vent duct material MUST BE METAL. • KIT 14-D346-33 MUST be used to attach the dryer securely to the structure. •...
...outdoors. Consideration must contain a minimum of 120 square inches of factory specified parts. POWER CORDS: GE strongly recommends the use sheet metal screws or other fuel burning appliance shall be vented to combustible surfaces and for installation in an alcove or closet, it will be stated on ... be securely fastened to a non-combustible portion of the mobile home. • The vent MUST NOT be terminated beneath a mobile or manufactured home. • The vent duct material MUST BE METAL. • KIT 14-D346-33 MUST be used to attach the dryer securely to the structure. •...
Installation Instructions
Page 15
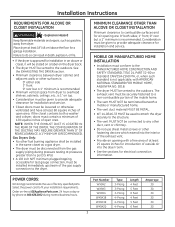
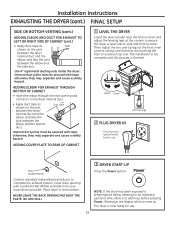
... dryer internal duct. Fixing hole TAB LOCATION Not for Gas and Electric models. Make sure that the shortened duct is aligned with cover plate (Kit WE1M454). Dryer Exhaust to about 45°, using a flat-blade screwdriver. Lift the tab to the bottom of cabinet for Gas and Electric ...models. Wear gloves and arm guards. Installation Instructions SIDE OR BOTTOM VENTING Dryer Exhaust to do so may result in fire, electrical shock or lacerations. ADDING ELBOW AND DUCT FOR EXHAUST TO SIDE OF CABINET Right...
... dryer internal duct. Fixing hole TAB LOCATION Not for Gas and Electric models. Make sure that the shortened duct is aligned with cover plate (Kit WE1M454). Dryer Exhaust to about 45°, using a flat-blade screwdriver. Lift the tab to the bottom of cabinet for Gas and Electric ...models. Wear gloves and arm guards. Installation Instructions SIDE OR BOTTOM VENTING Dryer Exhaust to do so may result in fire, electrical shock or lacerations. ADDING ELBOW AND DUCT FOR EXHAUST TO SIDE OF CABINET Right...
Installation Instructions
Page 16
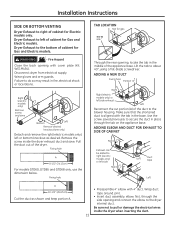
... to ensure the dryer is level side-to-side and front-to warm up before use . 16 NEVER LEAVE THE BACK OPENING WITHOUT THE PLATE. (Kit WE1M454.) NOTE: If the dryer has been exposed to temperatures below freezing for use . Otherwise, the display will not come on the joint between the... and the elbow, and also the joint between the elbow and the side duct. Installation Instructions EXHAUSTING THE DRYER (cont.) FINAL SETUP SIDE OR BOTTOM VENTING (cont.) ADDING ELBOW AND DUCT FOR EXHAUST TO LEFT OR RIGHT SIDE OF CABINET (cont.) • Apply duct tape as shown on . Raise Lower Anti...
... to ensure the dryer is level side-to-side and front-to warm up before use . 16 NEVER LEAVE THE BACK OPENING WITHOUT THE PLATE. (Kit WE1M454.) NOTE: If the dryer has been exposed to temperatures below freezing for use . Otherwise, the display will not come on the joint between the... and the elbow, and also the joint between the elbow and the side duct. Installation Instructions EXHAUSTING THE DRYER (cont.) FINAL SETUP SIDE OR BOTTOM VENTING (cont.) ADDING ELBOW AND DUCT FOR EXHAUST TO LEFT OR RIGHT SIDE OF CABINET (cont.) • Apply duct tape as shown on . Raise Lower Anti...
Quick Specs
Page 2
... safety do not terminate exhaust into a chimney, under any other obstruction with your installation. FOR MORE INFORMATION ON VENTING KITS AND ACCESSORIES, PLEASE CALL 1-800-GE-CARES. Two 45° elbows will be treated as a 90° elbow. For the side exhaust installations,...(semi-rigid) ducting can be located at geappliances.com or call GE Answer Center® Service, 800.626.2000. GE Dryer Vent GE Dryer Vent DRYER EXHAUSTING INFORMATION- If rigid metal duct cannot be used (Kit WX08X10077). Please see installation instruction packed with the opening 0 120 ft...
... safety do not terminate exhaust into a chimney, under any other obstruction with your installation. FOR MORE INFORMATION ON VENTING KITS AND ACCESSORIES, PLEASE CALL 1-800-GE-CARES. Two 45° elbows will be treated as a 90° elbow. For the side exhaust installations,...(semi-rigid) ducting can be located at geappliances.com or call GE Answer Center® Service, 800.626.2000. GE Dryer Vent GE Dryer Vent DRYER EXHAUSTING INFORMATION- If rigid metal duct cannot be used (Kit WX08X10077). Please see installation instruction packed with the opening 0 120 ft...


