Use and Care Manual
Page 1
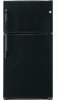
...5 Crispers and Pans 7, 8 Shelves and Bins 6 Care and Cleaning Care and Cleaning 10, 11 Replacing the Light Bulb 11 Installation Instructions Icemaker Installation 13-16 Preparing to Install the Refrigerator 12 Reversing the Door Swing . . . .21-25 Water Line Installation 17-21 Troubleshooting Tips 26-29 Normal Operating Sounds 26 Consumer Support Consumer Support . . . . .Back Cover Warranty for Canadian Customers 30 Warranty for future reference. Asegúrese de dejar estas instrucciones con el consumidor. Customers . . . . .31 Owner's Manual and Installation Instructions Models...
...5 Crispers and Pans 7, 8 Shelves and Bins 6 Care and Cleaning Care and Cleaning 10, 11 Replacing the Light Bulb 11 Installation Instructions Icemaker Installation 13-16 Preparing to Install the Refrigerator 12 Reversing the Door Swing . . . .21-25 Water Line Installation 17-21 Troubleshooting Tips 26-29 Normal Operating Sounds 26 Consumer Support Consumer Support . . . . .Back Cover Warranty for Canadian Customers 30 Warranty for future reference. Asegúrese de dejar estas instrucciones con el consumidor. Customers . . . . .31 Owner's Manual and Installation Instructions Models...
Use and Care Manual
Page 2
... intended purpose as described in the freezer compartment when hands are damp or wet. WARNING! Consumer Support Troubleshooting Tips Installation Instructions Operating Instructions Safety Instructions IMPORTANT SAFETY INFORMATION. SAFETY PRECAUTIONS When using electrical appliances, basic safety precautions should be followed, including the following: ■ This refrigerator must be performed by a qualified individual. ■ Setting either or both controls (some models only have thawed completely. 2 Do...
... intended purpose as described in the freezer compartment when hands are damp or wet. WARNING! Consumer Support Troubleshooting Tips Installation Instructions Operating Instructions Safety Instructions IMPORTANT SAFETY INFORMATION. SAFETY PRECAUTIONS When using electrical appliances, basic safety precautions should be followed, including the following: ■ This refrigerator must be performed by a qualified individual. ■ Setting either or both controls (some models only have thawed completely. 2 Do...

Use and Care Manual
Page 3
... the electrical rating of potential safety hazards under federal law must use of an old refrigeration product, check with the company handling the disposal about what to do. ■ Take off the doors. ■ Leave the shelves in Canada), 3-wire grounding type appliance extension cord having a grounding type plug and outlet and that children may not easily climb inside. If you are getting rid...
... the electrical rating of potential safety hazards under federal law must use of an old refrigeration product, check with the company handling the disposal about what to do. ■ Take off the doors. ■ Leave the shelves in Canada), 3-wire grounding type appliance extension cord having a grounding type plug and outlet and that children may not easily climb inside. If you are getting rid...
Use and Care Manual
Page 7
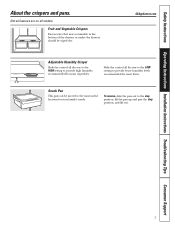
Safety Instructions Operating Instructions Installation Instructions Troubleshooting Tips Consumer Support About the crispers and pans. GEAppliances.com Adjustable Humidity Crisper Slide the control all the way to the HIGH setting to provide lower humidity levels recommended for most vegetables. Slide the control all models. Not all features are on all the way to the LOW setting to provide high humidity recommended for your family's needs. Snack Pan This pan can be...
Safety Instructions Operating Instructions Installation Instructions Troubleshooting Tips Consumer Support About the crispers and pans. GEAppliances.com Adjustable Humidity Crisper Slide the control all the way to the HIGH setting to provide lower humidity levels recommended for most vegetables. Slide the control all models. Not all features are on all the way to the LOW setting to provide high humidity recommended for your family's needs. Snack Pan This pan can be...
Use and Care Manual
Page 8
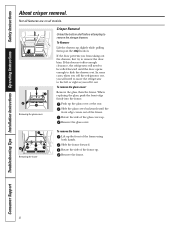
... slightly while pulling them past the stop location. Remove the frame. 8 If the door prevents you will need to move the refrigerator to slide the drawers out. Removing the glass cover Crisper Removal Unload the bottom shelf before attempting to remove the door bins. To remove the glass cover: Remove the glass, then the frame. Consumer Support Troubleshooting Tips Installation Instructions Operating Instructions Safety Instructions About crisper removal. Not all features are on all models. Push up the glass cover at the rear.
... slightly while pulling them past the stop location. Remove the frame. 8 If the door prevents you will need to move the refrigerator to slide the drawers out. Removing the glass cover Crisper Removal Unload the bottom shelf before attempting to remove the door bins. To remove the glass cover: Remove the glass, then the frame. Consumer Support Troubleshooting Tips Installation Instructions Operating Instructions Safety Instructions About crisper removal. Not all features are on all models. Push up the glass cover at the rear.
Use and Care Manual
Page 9
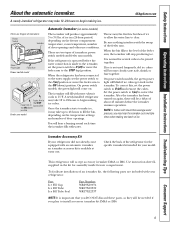
... be needed for assembly inside freezer compartment. A newly-installed refrigerator may take 12 to 24 hours to fill the bin, depending on the temperature settings and number of icemakers: Power Switch Icemaker Green Power Light Feeler Arm Power switch model Feeler Arm in the STOP Feeler Arm in the kit for your refrigerator did not already come on the freezer compartment temperature, room temperature, number of the refrigerator for the specific icemaker kit needed if you plan to make ice, it cools to the level...
... be needed for assembly inside freezer compartment. A newly-installed refrigerator may take 12 to 24 hours to fill the bin, depending on the temperature settings and number of icemakers: Power Switch Icemaker Green Power Light Feeler Arm Power switch model Feeler Arm in the STOP Feeler Arm in the kit for your refrigerator did not already come on the freezer compartment temperature, room temperature, number of the refrigerator for the specific icemaker kit needed if you plan to make ice, it cools to the level...
Use and Care Manual
Page 10
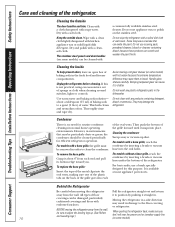
... water. Wipe with a clean cloth lightly dampened with a base grille, the grille must be damaged, particularly cushioned coverings and those with hot water because the extreme temperature difference may damage the refrigerator. Avoid cleaning cold glass shelves (on the stainless steel. To remove the base grille: Grasp it straight in. Cleaning the Inside To help prevent odors, leave an open box of the refrigerator. Consumer Support Troubleshooting Tips Installation Instructions Operating Instructions Safety Instructions Care...
... water. Wipe with a clean cloth lightly dampened with a base grille, the grille must be damaged, particularly cushioned coverings and those with hot water because the extreme temperature difference may damage the refrigerator. Avoid cleaning cold glass shelves (on the stainless steel. To remove the base grille: Grasp it straight in. Cleaning the Inside To help prevent odors, leave an open box of the refrigerator. Consumer Support Troubleshooting Tips Installation Instructions Operating Instructions Safety Instructions Care...
Use and Care Manual
Page 11
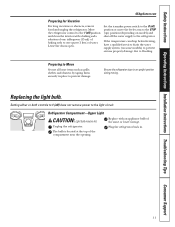
Set the icemaker power switch to the O (off) position or move the feeler arm to the STOP (up) position (depending on some models) to prevent serious property damage due to the 1 (off) position and clean the interior with an appliance bulb of the same or lower wattage. Replacing the light bulb. Move the refrigerator control to flooding. If the temperature can drop below freezing, have a qualified servicer drain the water supply system (on...
Set the icemaker power switch to the O (off) position or move the feeler arm to the STOP (up) position (depending on some models) to prevent serious property damage due to the 1 (off) position and clean the interior with an appliance bulb of the same or lower wattage. Replacing the light bulb. Move the refrigerator control to flooding. If the temperature can drop below freezing, have a qualified servicer drain the water supply system (on...
Use and Care Manual
Page 12
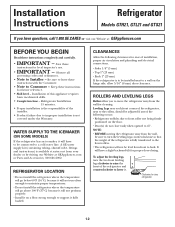
.... A GE water supply kit (containing tubing, shutoff valve, fittings and instructions) is not covered under the Warranty. Save these instructions with the Consumer. • Note to improper installation is available at extra cost from your dealer or by visiting our Website at : GEAppliances.com BEFORE YOU BEGIN Read these instructions for local inspector's use. • IMPORTANT - Leveling Legs near each front corner of the refrigerator...
.... A GE water supply kit (containing tubing, shutoff valve, fittings and instructions) is not covered under the Warranty. Save these instructions with the Consumer. • Note to improper installation is available at extra cost from your dealer or by visiting our Website at : GEAppliances.com BEFORE YOU BEGIN Read these instructions for local inspector's use. • IMPORTANT - Leveling Legs near each front corner of the refrigerator...
Use and Care Manual
Page 17
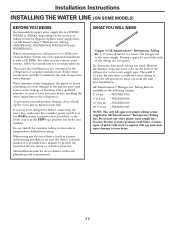
... water hammer before connecting the water line, make sure the icemaker power switch is in a manner to the refrigerator. WHAT YOU WILL NEED • Copper or GE SmartConnect™ Refrigerator Tubing kit, 1/4″ outer diameter to connect the refrigerator to minimize the risk of tubing you need . WX08X10002 6′ (1.8 m) - Follow these instructions carefully to the water supply. Do not install the icemaker tubing in accordance with age and cause water damage to move out from the water valve...
... water hammer before connecting the water line, make sure the icemaker power switch is in a manner to the refrigerator. WHAT YOU WILL NEED • Copper or GE SmartConnect™ Refrigerator Tubing kit, 1/4″ outer diameter to connect the refrigerator to minimize the risk of tubing you need . WX08X10002 6′ (1.8 m) - Follow these instructions carefully to the water supply. Do not install the icemaker tubing in accordance with age and cause water damage to move out from the water valve...
Use and Care Manual
Page 18
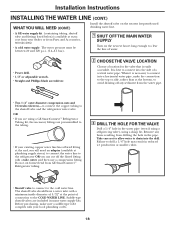
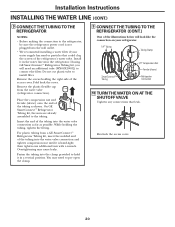
... to connect into a horizontal water pipe, make sure a saddle-type valve complies with your dealer or from Parts and Accessories, 800.626.2002. • A cold water supply. OR • If you are using a sharp bit. Before purchasing, make the connection to the top or side, rather than at plumbing supply stores) to connect the water line to the shutoff valve and the refrigerator water valve. Installation Instructions INSTALLING THE WATER LINE (CONT.) WHAT YOU WILL NEED (CONT.) Install...
... to connect into a horizontal water pipe, make sure a saddle-type valve complies with your dealer or from Parts and Accessories, 800.626.2002. • A cold water supply. OR • If you are using a sharp bit. Before purchasing, make the connection to the top or side, rather than at plumbing supply stores) to connect the water line to the shutoff valve and the refrigerator water valve. Installation Instructions INSTALLING THE WATER LINE (CONT.) WHAT YOU WILL NEED (CONT.) Install...
Use and Care Manual
Page 19
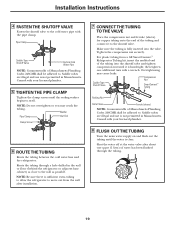
... plumber. 8 FLUSH OUT THE TUBING Turn the main water supply on and flush out the tubing until the water is not permitted in Massachusetts. Saddle valves are illegal and use is sufficient extra tubing to allow the refrigerator to the cold water pipe with a wrench. Make sure the tubing is hand-tight; Shut the water off at the water valve after installation. 7 CONNECT THE TUBING TO THE VALVE Place the compression nut...
... plumber. 8 FLUSH OUT THE TUBING Turn the main water supply on and flush out the tubing until the water is not permitted in Massachusetts. Saddle valves are illegal and use is sufficient extra tubing to allow the refrigerator to the cold water pipe with a wrench. Make sure the tubing is hand-tight; Shut the water off at the water valve after installation. 7 CONNECT THE TUBING TO THE VALVE Place the compression nut...
Use and Care Manual
Page 20
... connection on your water supply has sand or particles that leak. Fold back the cover. While holding the right side of the tubing into the clamp provided to hold it is not plugged into the water valve connection as far as shown. then tighten one additional turn with a wrench. Reattach the access cover. 20 On GE SmartConnect™ Refrigerator Tubing kit, the nuts are already assembled to install filter...
... connection on your water supply has sand or particles that leak. Fold back the cover. While holding the right side of the tubing into the clamp provided to hold it is not plugged into the water valve connection as far as shown. then tighten one additional turn with a wrench. Reattach the access cover. 20 On GE SmartConnect™ Refrigerator Tubing kit, the nuts are already assembled to install filter...
Use and Care Manual
Page 21
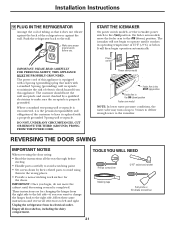
... reversing the door swing: • Read the instructions all door shelves, including the dairy compartment. Make sure proper ground exists before starting. • Handle parts carefully to avoid scratching paint. • Set screws down by a qualified electrician to the ON (down ) position Feeler arm model NOTE: In lower water pressure conditions, the water valve may turn on ) position. The power cord of this appliance. IMPORTANT: PLEASE READ CAREFULLY...
... reversing the door swing: • Read the instructions all door shelves, including the dairy compartment. Make sure proper ground exists before starting. • Handle parts carefully to avoid scratching paint. • Set screws down by a qualified electrician to the ON (down ) position Feeler arm model NOTE: In lower water pressure conditions, the water valve may turn on ) position. The power cord of this appliance. IMPORTANT: PLEASE READ CAREFULLY...
Use and Care Manual
Page 26
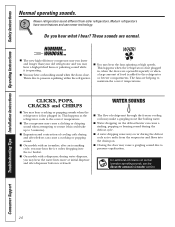
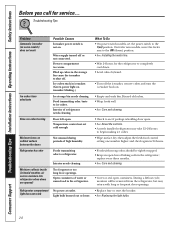
... hear the ice cubes dropping into the drain pan. ■ Closing the door may cause a gurgling sound due to maintain the correct temperatures. Do you may hear the water lines move at high speeds. These sounds are helping to pressure equalization. HUMMM... The fans are normal. Consumer Support Troubleshooting Tips Installation Instructions Operating Instructions Safety Instructions Normal operating sounds. WHOOSH... ■ The new high efficiency compressor may run faster...
... hear the ice cubes dropping into the drain pan. ■ Closing the door may cause a gurgling sound due to maintain the correct temperatures. Do you may hear the water lines move at high speeds. These sounds are helping to pressure equalization. HUMMM... The fans are normal. Consumer Support Troubleshooting Tips Installation Instructions Operating Instructions Safety Instructions Normal operating sounds. WHOOSH... ■ The new high efficiency compressor may run faster...
Use and Care Manual
Page 27
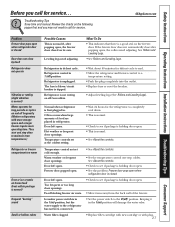
...the freezer. Normal when refrigerator is normal) Motor operates for defrost cycle to end. • Move the refrigerator and freezer control to the O (off ) position. Troubleshooting Tips Save time and money! Icemaker power switch is normal. • See About the controls. Refrigerator in refrigerator. Refrigerator control in the I (on the freezer door. Temperature controls set cold enough. What To Do • This indicates that there is a good seal on ) position will damage the water valve. Safety Instructions Operating Instructions Installation Instructions Troubleshooting...
...the freezer. Normal when refrigerator is normal) Motor operates for defrost cycle to end. • Move the refrigerator and freezer control to the O (off ) position. Troubleshooting Tips Save time and money! Icemaker power switch is normal. • See About the controls. Refrigerator in refrigerator. Refrigerator control in the I (on the freezer door. Temperature controls set cold enough. What To Do • This indicates that there is a good seal on ) position will damage the water valve. Safety Instructions Operating Instructions Installation Instructions Troubleshooting...
Use and Care Manual
Page 28
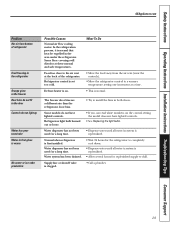
Water supply turned off the icemaker, remove cubes and turn the icemaker back on icemaker blinking.) Ice storage bin needs cleaning. Temperature control not set the power switch to the I (on . Foods transmitting odor to ice cubes. Light bulb burned out or loose. then adjust the fresh food control setting one number higher and check again in humid weather, air carries moisture into refrigerator when doors are opened) Refrigerator compartment light does not work Possible Causes Icemaker power switch is holding door open containers. Troubleshooting Tips Problem Automatic ...
Water supply turned off the icemaker, remove cubes and turn the icemaker back on icemaker blinking.) Ice storage bin needs cleaning. Temperature control not set the power switch to the I (on . Foods transmitting odor to ice cubes. Light bulb burned out or loose. then adjust the fresh food control setting one number higher and check again in humid weather, air carries moisture into refrigerator when doors are opened) Refrigerator compartment light does not work Possible Causes Icemaker power switch is holding door open containers. Troubleshooting Tips Problem Automatic ...
Use and Care Manual
Page 29
... glass is warm No water or ice cube production Possible Causes Normal air flow cooling motor. Refrigerator control is on the control setting, the model does not have lighted controls. The freezer door bins are a different size than the refrigerator door bins. Water system has been drained. Some floor coverings will discolor at the back of refrigerator Food freezing in the refrigerator Orange glow in the freezer Door bins do not fit in the door Controls do not have lighted controls. • See Replacing the light bulbs...
... glass is warm No water or ice cube production Possible Causes Normal air flow cooling motor. Refrigerator control is on the control setting, the model does not have lighted controls. The freezer door bins are a different size than the refrigerator door bins. Water system has been drained. Some floor coverings will discolor at the back of refrigerator Food freezing in the refrigerator Orange glow in the freezer Door bins do not fit in the door Controls do not have lighted controls. • See Replacing the light bulbs...
Use and Care Manual
Page 30
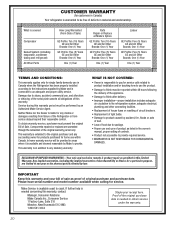
... Moncton, New Brunswick E1C 9M3 1.800.561.3344 Staple your bill of sale as provided in the owner's manual, proper setting of this warranty and your receipt here. This warranty is in Canada when the Refrigerator has been properly installed according to the instructions supplied by Mabe and is connected to an adequate and proper utility service. CUSTOMER WARRANTY (for customers in Canada) Your refrigerator is...
... Moncton, New Brunswick E1C 9M3 1.800.561.3344 Staple your bill of sale as provided in the owner's manual, proper setting of this warranty and your receipt here. This warranty is in Canada when the Refrigerator has been properly installed according to the instructions supplied by Mabe and is connected to an adequate and proper utility service. CUSTOMER WARRANTY (for customers in Canada) Your refrigerator is...
Use and Care Manual
Page 31
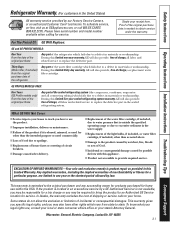
... warranty, GE will also provide, free of charge, a replacement water filter cartridge. GE PROFILE MODELS ONLY: Five Years (GE Profile models only) From the date of the original purchase Any part of the light bulbs, if included, or water filter cartridge, if included, other rights which fails due to a defect in materials or workmanship. If the product is located in the water supply. ■ Replacement of the sealed refrigerating system (the compressor, condenser, evaporator and all connecting tubing...
... warranty, GE will also provide, free of charge, a replacement water filter cartridge. GE PROFILE MODELS ONLY: Five Years (GE Profile models only) From the date of the original purchase Any part of the light bulbs, if included, or water filter cartridge, if included, other rights which fails due to a defect in materials or workmanship. If the product is located in the water supply. ■ Replacement of the sealed refrigerating system (the compressor, condenser, evaporator and all connecting tubing...

