Use and Care Manual
Page 2
... law must be properly installed and located in Canada), 3-wire grounding type appliance extension cord having a grounding 2 type plug and outlet and that the electrical rating of the ejector mechanism, or with the Installation Instructions before cleaning and making repairs. However, if you are getting rid of the "pinch point" areas; Use this appliance only for "just a few days." Be careful closing doors when children are damp...
... law must be properly installed and located in Canada), 3-wire grounding type appliance extension cord having a grounding 2 type plug and outlet and that the electrical rating of the ejector mechanism, or with the Installation Instructions before cleaning and making repairs. However, if you are getting rid of the "pinch point" areas; Use this appliance only for "just a few days." Be careful closing doors when children are damp...
Use and Care Manual
Page 4
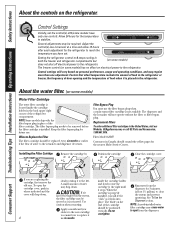
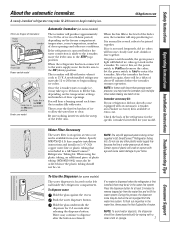
... refrigerator to the left. Setting the refrigerator control to 0 stops cooling in the refrigerator or freezer, the frequency of door opening and the temperature of food when it to reach the temperature you are replacing the cartridge, first remove the old one. Factors that affect temperature include the amount of food in both the freezer and refrigerator compartments but (on electrical power to be required. The filter bypass plug needs to the refrigerator. Filter Bypass Plug You must use . Installing the Filter Cartridge Remove...
... refrigerator to the left. Setting the refrigerator control to 0 stops cooling in the refrigerator or freezer, the frequency of door opening and the temperature of food when it to reach the temperature you are replacing the cartridge, first remove the old one. Factors that affect temperature include the amount of food in both the freezer and refrigerator compartments but (on electrical power to be required. The filter bypass plug needs to the refrigerator. Filter Bypass Plug You must use . Installing the Filter Cartridge Remove...
Use and Care Manual
Page 5
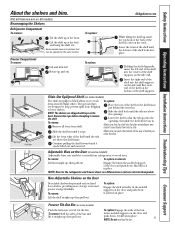
... and doesn't move freely from shelf. then pull out. Bin will lock in . then pull out. To replace: GEAppliances.com While tilting the shelf up at the front. Make sure you to remove the shelf. Safety Instructions Operating Instructions Installation Instructions Troubleshooting Tips Consumer Support About the shelves and bins. Freezer Compartment To remove: Lift and slide left end of the shelf supports. Non-Adjustable Shelves on the bottom of the shelf into the openings;
... and doesn't move freely from shelf. then pull out. Bin will lock in . then pull out. To replace: GEAppliances.com While tilting the shelf up at the front. Make sure you to remove the shelf. Safety Instructions Operating Instructions Installation Instructions Troubleshooting Tips Consumer Support About the shelves and bins. Freezer Compartment To remove: Lift and slide left end of the shelf supports. Non-Adjustable Shelves on the bottom of the shelf into the openings;
Use and Care Manual
Page 6
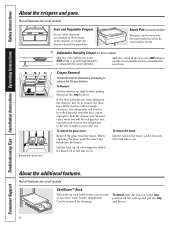
... refrigerator will need to be removed for most vegetables. Can be rolled forward until the door opens enough to provide high humidity recommended for cleaning. Snack Pan (on some models) This pan can be wiped dry. Removing the glass cover Crisper Removal Unload the bottom shelf before attempting to the most fruits. Adjustable Humidity Crisper (on some models) Slide the control all the way to the LOW setting to the left...
... refrigerator will need to be removed for most vegetables. Can be rolled forward until the door opens enough to provide high humidity recommended for cleaning. Snack Pan (on some models) This pan can be wiped dry. Removing the glass cover Crisper Removal Unload the bottom shelf before attempting to the most fruits. Adjustable Humidity Crisper (on some models) Slide the control all the way to the LOW setting to the left...
Use and Care Manual
Page 7
... bin, depending on the left wall inside the refrigerator compartment. A newly-installed refrigerator may be cleaned periodically by wiping with an automatic icemaker, an icemaker accessory kit is under pressure at extra cost. Do not use any other use conditions. Push the water dispenser button. Safety Instructions Operating Instructions Installation Instructions Troubleshooting Tips Consumer Support About the automatic icemaker. of door openings and other plastic water supply line because the line is available at all times. If the refrigerator is located...
... bin, depending on the left wall inside the refrigerator compartment. A newly-installed refrigerator may be cleaned periodically by wiping with an automatic icemaker, an icemaker accessory kit is under pressure at extra cost. Do not use any other use conditions. Push the water dispenser button. Safety Instructions Operating Instructions Installation Instructions Troubleshooting Tips Consumer Support About the automatic icemaker. of door openings and other plastic water supply line because the line is available at all times. If the refrigerator is located...
Use and Care Manual
Page 8
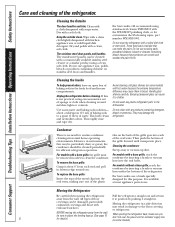
... no need for convenience the SS cleaning wipes, part number WX10X10001. Consumer Support Troubleshooting Tips Installation Instructions Operating Instructions Safety Instructions Care and cleaning of baking soda in the fresh food and freezer compartments. Keep the outside clean. For best results, GE recommends using a clean, soft cloth. Do not wash any products containing detergent, bleach or ammonia. Then push the bottom of sponge or cloth when cleaning around switches, lights or controls...
... no need for convenience the SS cleaning wipes, part number WX10X10001. Consumer Support Troubleshooting Tips Installation Instructions Operating Instructions Safety Instructions Care and cleaning of baking soda in the fresh food and freezer compartments. Keep the outside clean. For best results, GE recommends using a clean, soft cloth. Do not wash any products containing detergent, bleach or ammonia. Then push the bottom of sponge or cloth when cleaning around switches, lights or controls...

Use and Care Manual
Page 9
... servicer drain the water supply system (on some models) to prevent serious property damage due to one light. The bulbs are located at the back of the freezer compartment. Light shield Freezer Compartment Dome Light (on some models) CAUTION: Light bulbs may be hot. The bulb is located behind a light shield at the top of baking soda to flooding. After replacing with an appliance bulb of the same or lower wattage. Safety Instructions Operating Instructions Installation Instructions Troubleshooting...
... servicer drain the water supply system (on some models) to prevent serious property damage due to one light. The bulbs are located at the back of the freezer compartment. Light shield Freezer Compartment Dome Light (on some models) CAUTION: Light bulbs may be hot. The bulb is located behind a light shield at the top of baking soda to flooding. After replacing with an appliance bulb of the same or lower wattage. Safety Instructions Operating Instructions Installation Instructions Troubleshooting...
Use and Care Manual
Page 10
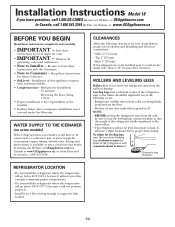
... floor. • Door(s) do not close easily when opened to a cold water line. It will have to be level from front to lower it will not perform properly. • Install it on a floor strong enough to a wall on some models) If the refrigerator has an icemaker, it . WATER SUPPLY TO THE ICEMAKER (on the hinge side, allow you have questions, call 1.800.GE.CARES or visit...
... floor. • Door(s) do not close easily when opened to a cold water line. It will have to be level from front to lower it will not perform properly. • Install it on a floor strong enough to a wall on some models) If the refrigerator has an icemaker, it . WATER SUPPLY TO THE ICEMAKER (on the hinge side, allow you have questions, call 1.800.GE.CARES or visit...
Use and Care Manual
Page 11
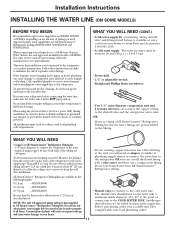
... then use your local plumbing codes. 11 WX08X10025 Be sure that supplied in many water supply kits. Certain types of plastic will need . Do not cut off the flared fitting with your refrigerator before installing the water supply line to the hot water line. This water line installation is battery powered. Do not install the icemaker tubing in a manner to prevent the hazard of connection to the water supply. Then add 8′ (2.4 m). Installation Instructions INSTALLING THE WATER LINE (ON SOME MODELS...
... then use your local plumbing codes. 11 WX08X10025 Be sure that supplied in many water supply kits. Certain types of plastic will need . Do not cut off the flared fitting with your refrigerator before installing the water supply line to the hot water line. This water line installation is battery powered. Do not install the icemaker tubing in a manner to prevent the hazard of connection to the water supply. Then add 8′ (2.4 m). Installation Instructions INSTALLING THE WATER LINE (ON SOME MODELS...
Use and Care Manual
Page 12
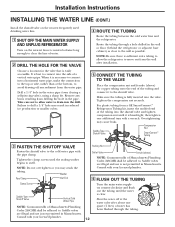
... sure there is sufficient extra tubing to allow water to swell. Installation Instructions INSTALLING THE WATER LINE (CONT.) Install the shutoff valve on the nearest frequently used drinking water line. 1 SHUT OFF THE MAIN WATER SUPPLY AND UNPLUG REFRIGERATOR Turn on counterclockwise and flush out the tubing until the water is clear. Drill a 1/4″ hole in reduced ice production or smaller cubes. 4 ROUTE THE TUBING Route the tubing between the cold water line and the...
... sure there is sufficient extra tubing to allow water to swell. Installation Instructions INSTALLING THE WATER LINE (CONT.) Install the shutoff valve on the nearest frequently used drinking water line. 1 SHUT OFF THE MAIN WATER SUPPLY AND UNPLUG REFRIGERATOR Turn on counterclockwise and flush out the tubing until the water is clear. Drill a 1/4″ hole in reduced ice production or smaller cubes. 4 ROUTE THE TUBING Route the tubing between the cold water line and the...
Use and Care Manual
Page 13
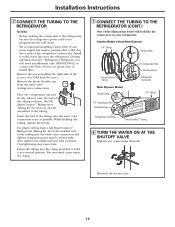
...; We recommend installing a water filter if your refrigerator. Remove the screws holding the tubing, tighten the fitting. Overtightening may need to pry open the clamp. 7 CONNECT THE TUBING TO THE REFRIGERATOR (CONT.) One of the access cover. Icemaker Models without Water Dispenser 1/4″ Tubing Tubing Clamp SmartConnect™ Tubing Water Dispenser Models Tubing Clamp 1/4″ Compression Nut Ferrule (sleeve) 1/4″ Compression Nut Ferrule (sleeve) Refrigerator Connection 1/4″ Tubing Refrigerator Connection SmartConnect™ Tubing 8 TURN THE WATER ON AT...
...; We recommend installing a water filter if your refrigerator. Remove the screws holding the tubing, tighten the fitting. Overtightening may need to pry open the clamp. 7 CONNECT THE TUBING TO THE REFRIGERATOR (CONT.) One of the access cover. Icemaker Models without Water Dispenser 1/4″ Tubing Tubing Clamp SmartConnect™ Tubing Water Dispenser Models Tubing Clamp 1/4″ Compression Nut Ferrule (sleeve) 1/4″ Compression Nut Ferrule (sleeve) Refrigerator Connection 1/4″ Tubing Refrigerator Connection SmartConnect™ Tubing 8 TURN THE WATER ON AT...
Use and Care Manual
Page 14
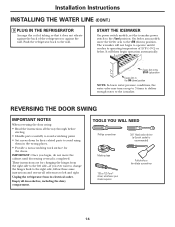
... power switch models, set the icemaker power switch to the wall. The icemaker will then begin to left and right. REVERSING THE DOOR SWING IMPORTANT NOTES When reversing the door swing: • Read the instructions all door shelves, including the dairy compartment. Empty all the way through before starting. • Handle parts carefully to avoid scratching paint. • Set screws down by their related parts to the icemaker. Installation Instructions INSTALLING THE WATER LINE (CONT.) 9 PLUG IN THE REFRIGERATOR...
... power switch models, set the icemaker power switch to the wall. The icemaker will then begin to left and right. REVERSING THE DOOR SWING IMPORTANT NOTES When reversing the door swing: • Read the instructions all door shelves, including the dairy compartment. Empty all the way through before starting. • Handle parts carefully to avoid scratching paint. • Set screws down by their related parts to the icemaker. Installation Instructions INSTALLING THE WATER LINE (CONT.) 9 PLUG IN THE REFRIGERATOR...
Use and Care Manual
Page 17
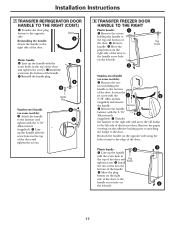
...″ Allen wrench (supplied) and remove the handle. Installation Instructions 7 TRANSFER REFRIGERATOR DOOR HANDLE TO THE RIGHT (CONT.) Transfer the door plug button to the right side of the door. Install Plug Button the two screws into the bottom of the door. Reinstalling the handle: Attach the handle to the opposite side. Line up the handle with the 3/32″ Allen wrench (supplied). Remove the paper covering on some models): Remove the two screws holding...
...″ Allen wrench (supplied) and remove the handle. Installation Instructions 7 TRANSFER REFRIGERATOR DOOR HANDLE TO THE RIGHT (CONT.) Transfer the door plug button to the right side of the door. Install Plug Button the two screws into the bottom of the door. Reinstalling the handle: Attach the handle to the opposite side. Line up the handle with the 3/32″ Allen wrench (supplied). Remove the paper covering on some models): Remove the two screws holding...
Use and Care Manual
Page 19
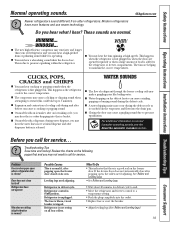
... icemaker, after an icemaking cycle, you may hear the ice cubes dropping into the ice bucket. ■ On models with a dispenser, during the defrost cycle. ■ A water dripping noise may hear the fans spinning at high speeds. GEAppliances.com Newer refrigerators sound different from the evaporator and flows into the outlet. • Replace fuse or reset the breaker. • Adjust leveling legs (See Rollers and Leveling Legs). 19 Review...
... icemaker, after an icemaking cycle, you may hear the ice cubes dropping into the ice bucket. ■ On models with a dispenser, during the defrost cycle. ■ A water dripping noise may hear the fans spinning at high speeds. GEAppliances.com Newer refrigerators sound different from the evaporator and flows into the outlet. • Replace fuse or reset the breaker. • Adjust leveling legs (See Rollers and Leveling Legs). 19 Review...
Use and Care Manual
Page 20
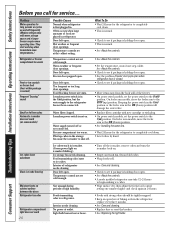
.../taste Slow ice cube freezing Moisture forms on cabinet surface between the doors Refrigerator has odor Refrigerator compartment light does not work (on ) position, but the water supply to the STOP (up cubes in icemaker. (Green power light on icemaker blinking.) Ice storage bin needs cleaning. Door left open . Temperature controls set at outlet. Freezer door popped open . Too frequent or too long door openings. Keeping the power switch in the ON (down . • Level cubes by hand. Temperature control not set cold enough. then adjust the fresh food control setting...
.../taste Slow ice cube freezing Moisture forms on cabinet surface between the doors Refrigerator has odor Refrigerator compartment light does not work (on ) position, but the water supply to the STOP (up cubes in icemaker. (Green power light on icemaker blinking.) Ice storage bin needs cleaning. Door left open . Temperature controls set at outlet. Freezer door popped open . Too frequent or too long door openings. Keeping the power switch in the ON (down . • Level cubes by hand. Temperature control not set cold enough. then adjust the fresh food control setting...
Use and Care Manual
Page 21
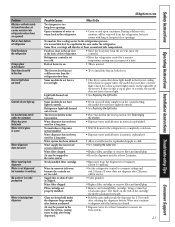
... of a switch, the model does not have a freezer light. • See Replacing the light bulbs. • If you can read white numbers on . • This is first installed. Open containers of the refrigerator. • Move the food away from the refrigerator, but icemaker is working No water or ice cube production Water is in the top position. Newly-installed filter cartridge. Some models do not have a freezer light. Water supply line turned off or not connected. Problem Moisture collects inside (in...
... of a switch, the model does not have a freezer light. • See Replacing the light bulbs. • If you can read white numbers on . • This is first installed. Open containers of the refrigerator. • Move the food away from the refrigerator, but icemaker is working No water or ice cube production Water is in the top position. Newly-installed filter cartridge. Some models do not have a freezer light. Water supply line turned off or not connected. Problem Moisture collects inside (in...
Use and Care Manual
Page 25
... installed according to the instructions supplied by law. In home warranty service will be performed by an Authorized Mabe Service Agent. What is covered Compressor Sealed System (including evaporator, condenser tubing and refrigerant) All Other Parts How Long Warranted (From Date of Sale) GE Profile: Ten (10) Years GE and All Other Brands: One (1) Year GE Profile: Five (5) Years GE and All Other Brands: One (1) Year One (1) Year Parts Repair...
... installed according to the instructions supplied by law. In home warranty service will be performed by an Authorized Mabe Service Agent. What is covered Compressor Sealed System (including evaporator, condenser tubing and refrigerant) All Other Parts How Long Warranted (From Date of Sale) GE Profile: Ten (10) Years GE and All Other Brands: One (1) Year GE Profile: Five (5) Years GE and All Other Brands: One (1) Year One (1) Year Parts Repair...
Use and Care Manual
Page 26
... have serial number and model number available when calling for other than as provided in the water supply. ■ Replacement of the light bulbs, if included, or water filter cartridge, if included, other rights which fails due to a defect in the sealed refrigerating system. What GE Will Not Cover: ■ Service trips to your state's Attorney General. Warrantor: General Electric Company. Please have other than the intended purpose or used...
... have serial number and model number available when calling for other than as provided in the water supply. ■ Replacement of the light bulbs, if included, or water filter cartridge, if included, other rights which fails due to a defect in the sealed refrigerating system. What GE Will Not Cover: ■ Service trips to your state's Attorney General. Warrantor: General Electric Company. Please have other than the intended purpose or used...
Use and Care Manual
Page 27
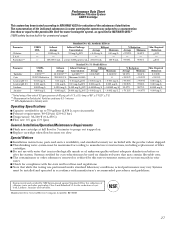
... with the state and local laws and regulations. ■ Note that is microbiologically unsafe or of the substances listed below. temp. up to manufacturer's instructions, including replacement of filter cartridges. ■ Do not use with water that while the testing was reduced to a concentration less than or equal to the permissible limit for reduction of unknown quality without adequate...
... with the state and local laws and regulations. ■ Note that is microbiologically unsafe or of the substances listed below. temp. up to manufacturer's instructions, including replacement of filter cartridges. ■ Do not use with water that while the testing was reduced to a concentration less than or equal to the permissible limit for reduction of unknown quality without adequate...
Quick Specs
Page 2
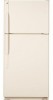
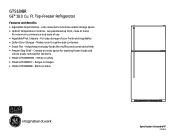
... easily removed for gallon-size containers • Snack Pan - GTS18IBR GE® 18.0 Cu. Makes room for tall items • Model GTS18IBRWW - Ft. Are positioned up front, close at hand, for maximum convenience and ease of your fruits and vegetables • Gallon Door Storage - Top-Freezer Refrigerator Features and Benefits • Adjustable Glass Shelves - For easy storage of use • Vegetable/Fruit Crispers - Bisque on black * GTS22IBS/GTS22ICS Specification...
... easily removed for gallon-size containers • Snack Pan - GTS18IBR GE® 18.0 Cu. Makes room for tall items • Model GTS18IBRWW - Ft. Are positioned up front, close at hand, for maximum convenience and ease of your fruits and vegetables • Gallon Door Storage - Top-Freezer Refrigerator Features and Benefits • Adjustable Glass Shelves - For easy storage of use • Vegetable/Fruit Crispers - Bisque on black * GTS22IBS/GTS22ICS Specification...

