Use and Care Manual
Page 2
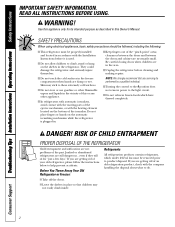
... freezer compartment when hands are getting rid of an old refrigeration product, check with the company handling the disposal about what to do. ■ Take off the doors. ■ Leave the shelves in place so that any other appliance. ■ In refrigerators with automatic icemakers, avoid contact with the moving parts of the ejector mechanism, or with the Installation Instructions before cleaning and making repairs...
... freezer compartment when hands are getting rid of an old refrigeration product, check with the company handling the disposal about what to do. ■ Take off the doors. ■ Leave the shelves in place so that any other appliance. ■ In refrigerators with automatic icemakers, avoid contact with the moving parts of the ejector mechanism, or with the Installation Instructions before cleaning and making repairs...
Use and Care Manual
Page 3
... prevents overloading house wiring circuits which has a voltage rating that shows cracks or abrasion damage along its own individual electrical outlet which could cause a fire hazard from the outlet. The refrigerator should always be careful not to have become frayed or otherwise damaged. Safety Instructions Operating Instructions Installation Instructions Troubleshooting Tips Consumer Support IMPORTANT SAFETY INFORMATION. ge.com WARNING! HOW TO CONNECT ELECTRICITY Do not...
... prevents overloading house wiring circuits which has a voltage rating that shows cracks or abrasion damage along its own individual electrical outlet which could cause a fire hazard from the outlet. The refrigerator should always be careful not to have become frayed or otherwise damaged. Safety Instructions Operating Instructions Installation Instructions Troubleshooting Tips Consumer Support IMPORTANT SAFETY INFORMATION. ge.com WARNING! HOW TO CONNECT ELECTRICITY Do not...
Use and Care Manual
Page 4
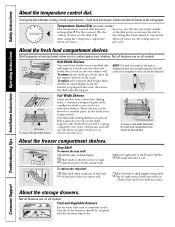
... custom-space your needs. After using the refrigerator, adjust the Allow 24 hours for the refrigerator to 0 stops cooling in the fresh food compartment. About the fresh food compartment shelves. To replace, select desired shelf height. Lift rear Pull forward To remove the full-width shelves Full-Width Shelves Some models have a steel wire sliding shelf, a stationary tempered glass shelf, a spillproof shelf or two steel wire stationary shelves. When placed correctly on the shelf supports...
... custom-space your needs. After using the refrigerator, adjust the Allow 24 hours for the refrigerator to 0 stops cooling in the fresh food compartment. About the fresh food compartment shelves. To replace, select desired shelf height. Lift rear Pull forward To remove the full-width shelves Full-Width Shelves Some models have a steel wire sliding shelf, a stationary tempered glass shelf, a spillproof shelf or two steel wire stationary shelves. When placed correctly on the shelf supports...
Use and Care Manual
Page 5
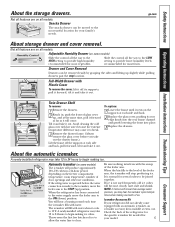
... setting to provide lower humidity levels recommended for your refrigerator did not already come . Twin Drawer Shelf To remove: 1 Remove the drawers. 2 Reach in a 24-hour period, depending on all models. Not all features are on the supports at extra cost. If ice is made to the icemaker, move the feeler arm to break. 3 Remove the drawer frame. (Always remove the glass cover before the water connection is not used...
... setting to provide lower humidity levels recommended for your refrigerator did not already come . Twin Drawer Shelf To remove: 1 Remove the drawers. 2 Reach in a 24-hour period, depending on all models. Not all features are on the supports at extra cost. If ice is made to the icemaker, move the feeler arm to break. 3 Remove the drawer frame. (Always remove the glass cover before the water connection is not used...
Use and Care Manual
Page 6
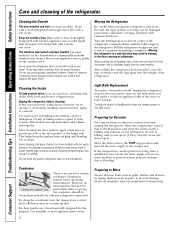
... cleaning cold glass shelves (on some models) with soapy water. Moving the Refrigerator Be careful when moving . Light Bulb Replacement To replace a burned-out bulb, unplug the refrigerator from its electrical outlet, unscrew the bulb when cool and replace it to the floor covering or refrigerator. Unplug the refrigerator before cleaning. To clean the condenser, turn the legs clockwise until the rollers support the refrigerator. Be sure the refrigerator stays in normal home operating environments. The stainless steel panels and door handles...
... cleaning cold glass shelves (on some models) with soapy water. Moving the Refrigerator Be careful when moving . Light Bulb Replacement To replace a burned-out bulb, unplug the refrigerator from its electrical outlet, unscrew the bulb when cool and replace it to the floor covering or refrigerator. Unplug the refrigerator before cleaning. To clean the condenser, turn the legs clockwise until the rollers support the refrigerator. Be sure the refrigerator stays in normal home operating environments. The stainless steel panels and door handles...
Use and Care Manual
Page 7
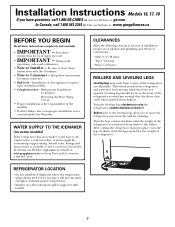
... opened about halfway. Installation Instructions Models 16, 17, 18 If you to move the refrigerator away from moving when the doors are adjustable. Save these instructions completely and carefully. • IMPORTANT - They firmly position the refrigerator and prevent it . Installation of the refrigerator. 7 Refrigerator Installation 15 minutes Reversing the Door Swing 1 hour • Proper installation is the responsibility of the refrigerator is not covered under the Warranty. Leveling legs should be connected to Installer - Turn...
... opened about halfway. Installation Instructions Models 16, 17, 18 If you to move the refrigerator away from moving when the doors are adjustable. Save these instructions completely and carefully. • IMPORTANT - They firmly position the refrigerator and prevent it . Installation of the refrigerator. 7 Refrigerator Installation 15 minutes Reversing the Door Swing 1 hour • Proper installation is the responsibility of the refrigerator is not covered under the Warranty. Leveling legs should be connected to Installer - Turn...
Use and Care Manual
Page 8
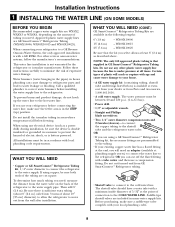
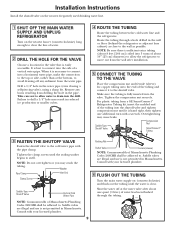
... installation is battery powered. WHAT YOU WILL NEED • Copper or GE SmartConnect™ Refrigerator Tubing kit, 1/4″ outer diameter to connect the refrigerator to the COLD WATER LINE. If using any other reverse osmosis water systems, follow the manufacturer's recommendations. WHAT YOU WILL NEED (CONT.) GE SmartConnect™ Refrigerator Tubing Kits are included in the STOP (up the water line to the refrigerator. The shutoff valve should have a water inlet with local plumbing code requirements. Saddle-type...
... installation is battery powered. WHAT YOU WILL NEED • Copper or GE SmartConnect™ Refrigerator Tubing kit, 1/4″ outer diameter to connect the refrigerator to the COLD WATER LINE. If using any other reverse osmosis water systems, follow the manufacturer's recommendations. WHAT YOU WILL NEED (CONT.) GE SmartConnect™ Refrigerator Tubing Kits are included in the STOP (up the water line to the refrigerator. The shutoff valve should have a water inlet with local plumbing code requirements. Saddle-type...
Use and Care Manual
Page 9
... to. Installation Instructions Install the shutoff valve on the nearest frequently used drinking water line. 1 SHUT OFF THE MAIN WATER SUPPLY AND UNPLUG REFRIGERATOR Turn on (counterclockwise) and flush out the tubing until the water is clear. Overtightening may crush the tubing. Washer Pipe Clamp Inlet End Clamp Screw Saddle-Type Shutoff Valve Vertical Cold Water Pipe Packing Nut Outlet Valve Ferrule (sleeve) NOTE: Commonwealth of a vertical water pipe. Take care not...
... to. Installation Instructions Install the shutoff valve on the nearest frequently used drinking water line. 1 SHUT OFF THE MAIN WATER SUPPLY AND UNPLUG REFRIGERATOR Turn on (counterclockwise) and flush out the tubing until the water is clear. Overtightening may crush the tubing. Washer Pipe Clamp Inlet End Clamp Screw Saddle-Type Shutoff Valve Vertical Cold Water Pipe Packing Nut Outlet Valve Ferrule (sleeve) NOTE: Commonwealth of a vertical water pipe. Take care not...
Use and Care Manual
Page 10
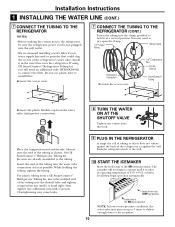
... installing a water filter if your water supply has sand or particles that could clog the screen of the tubing into the water valve connection as far as shown. Installation Instructions 1 INSTALLING THE WATER LINE (CONT.) 7 CONNECT THE TUBING TO THE REFRIGERATOR NOTES: • Before making the connection to pry open the clamp. 1/4″ Copper Tubing Clamp Tubing Refrigerator Connection Reattach the access cover. 1/4″ Compression Nut Ferrule (sleeve) SmartConnect™ Tubing Remove the plastic flexible cap from a GE...
... installing a water filter if your water supply has sand or particles that could clog the screen of the tubing into the water valve connection as far as shown. Installation Instructions 1 INSTALLING THE WATER LINE (CONT.) 7 CONNECT THE TUBING TO THE REFRIGERATOR NOTES: • Before making the connection to pry open the clamp. 1/4″ Copper Tubing Clamp Tubing Refrigerator Connection Reattach the access cover. 1/4″ Compression Nut Ferrule (sleeve) SmartConnect™ Tubing Remove the plastic flexible cap from a GE...
Use and Care Manual
Page 11
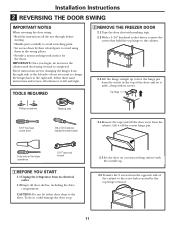
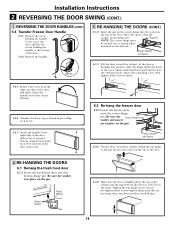
... (needed for changing the hinges from the cabinet. These instructions are for some models) 2.4 Remove the tape and tilt the door away from the right side to the left and right. Installation Instructions 2 REVERSING THE DOOR SWING IMPORTANT NOTES When reversing the door swing: • Read the instructions all the way through before starting. • Handle parts carefully to avoid scratching paint. • Set screws down by the top hinge removal. 11...
... (needed for changing the hinges from the cabinet. These instructions are for some models) 2.4 Remove the tape and tilt the door away from the right side to the left and right. Installation Instructions 2 REVERSING THE DOOR SWING IMPORTANT NOTES When reversing the door swing: • Read the instructions all the way through before starting. • Handle parts carefully to avoid scratching paint. • Set screws down by the top hinge removal. 11...
Use and Care Manual
Page 12
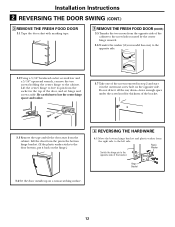
... screw head for thickness of the bracket. 3.3 Remove the tape and tilt the door away from the socket in the top of the bracket. Hinge Bracket 3.4 Set the door outside-up on a non-scratching surface. 12 Installation Instructions 2 REVERSING THE DOOR SWING (CONT.) 3 REMOVE THE FRESH FOOD DOOR 3.1 Tape the door shut with masking tape. 3 REMOVE THE FRESH FOOD DOOR (CONT.) 3.5 Transfer the two screws from...
... screw head for thickness of the bracket. 3.3 Remove the tape and tilt the door away from the socket in the top of the bracket. Hinge Bracket 3.4 Set the door outside-up on a non-scratching surface. 12 Installation Instructions 2 REVERSING THE DOOR SWING (CONT.) 3 REMOVE THE FRESH FOOD DOOR 3.1 Tape the door shut with masking tape. 3 REMOVE THE FRESH FOOD DOOR (CONT.) 3.5 Transfer the two screws from...

Use and Care Manual
Page 13
Installation Instructions 4 REVERSING THE HARDWARE (CONT.) 4.2 Interchange hinge and screws at top right with screws at top left of the door with screws at this time. 5 REVERSING THE DOOR HANDLES (CONT.) 5.1.4 Remove plug button from the right side to the left side of the door and insert it to the opposite side. Plug Button Installing the hinge on the right. Installing the hinge on the left. Top 5.2 Transfer door stop 5.2.1 Move the metal or plastic door stop and screws...
Installation Instructions 4 REVERSING THE HARDWARE (CONT.) 4.2 Interchange hinge and screws at top right with screws at top left of the door with screws at this time. 5 REVERSING THE DOOR HANDLES (CONT.) 5.1.4 Remove plug button from the right side to the left side of the door and insert it to the opposite side. Plug Button Installing the hinge on the right. Installing the hinge on the left. Top 5.2 Transfer door stop 5.2.1 Move the metal or plastic door stop and screws...
Use and Care Manual
Page 14
... screws-tighten them another one-half turn. 14 Installation Instructions 2 REVERSING THE DOOR SWING (CONT.) 5 REVERSING THE DOOR HANDLES (CONT.) 5.4 Transfer Freezer Door Handle 5.4.1 Remove the screw TToOpP holding the handle to the top of the door and the two screws holding the handle to the bottom of the door. 5.4.2 Remove the handle. 6 RE-HANGING THE DOORS (CONT.) 6.1.2 Insert the pin on the center hinge into the socket in preceding section...
... screws-tighten them another one-half turn. 14 Installation Instructions 2 REVERSING THE DOOR SWING (CONT.) 5 REVERSING THE DOOR HANDLES (CONT.) 5.4 Transfer Freezer Door Handle 5.4.1 Remove the screw TToOpP holding the handle to the top of the door and the two screws holding the handle to the bottom of the door. 5.4.2 Remove the handle. 6 RE-HANGING THE DOORS (CONT.) 6.1.2 Insert the pin on the center hinge into the socket in preceding section...
Use and Care Manual
Page 15
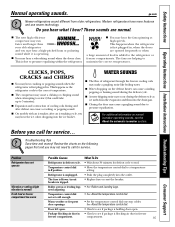
... the drain pan. ■ Closing the door may not need adjusting. Temperature control dial not set cold enough. • See About the temperature control dial. Package blocking air duct in • Check to see if package is first plugged in, when the doors are opened frequently or when a large amount of cooling coils during the defrost cycle as the refrigerator cools to the correct temperature. ■ The compressor may hear the fans...
... the drain pan. ■ Closing the door may not need adjusting. Temperature control dial not set cold enough. • See About the temperature control dial. Package blocking air duct in • Check to see if package is first plugged in, when the doors are opened frequently or when a large amount of cooling coils during the defrost cycle as the refrigerator cools to the correct temperature. ■ The compressor may hear the fans...
Use and Care Manual
Page 16
... reset temperature control dial one setting colder. Water supply turned off . not been connected. Ice storage bin needs cleaning. • Empty and wash bin. Not unusual during periods of refrigerator needs cleaning. • See Care and cleaning. Too frequent or too long door openings. Freezer compartment too warm. • Wait 24 hours for service... Too frequent or too long door openings. Often occurs when large amounts of baking soda in refrigerator. bin cause the icemaker to ice cubes. Consumer Support Troubleshooting...
... reset temperature control dial one setting colder. Water supply turned off . not been connected. Ice storage bin needs cleaning. • Empty and wash bin. Not unusual during periods of refrigerator needs cleaning. • See Care and cleaning. Too frequent or too long door openings. Freezer compartment too warm. • Wait 24 hours for service... Too frequent or too long door openings. Often occurs when large amounts of baking soda in refrigerator. bin cause the icemaker to ice cubes. Consumer Support Troubleshooting...

Use and Care Manual
Page 17
... the appliance. • Damage to finish after delivery. • Improper installation-proper installation includes adequate air circulation to coast. IMPORTANT Keep this Limited Warranty. This warranty is needed concerning this warranty. Proof of light bulbs. • Damage to product caused by Mabe and is warranted to be reported within Canada. What is covered Compressor Sealed System (including evaporator, condenser tubing and refrigerant) All Other Parts How...
... the appliance. • Damage to finish after delivery. • Improper installation-proper installation includes adequate air circulation to coast. IMPORTANT Keep this Limited Warranty. This warranty is needed concerning this warranty. Proof of light bulbs. • Damage to product caused by Mabe and is warranted to be reported within Canada. What is covered Compressor Sealed System (including evaporator, condenser tubing and refrigerant) All Other Parts How...
Use and Care Manual
Page 18
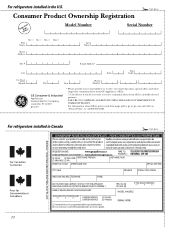
Model Number Serial Number Important: If you for placing your confidence in the continental U.S. The top card is for products installed in the U.S. SPP is a trademark of your contract, or credit toward a replacement product • Service coverage for covered operating parts and labor on appliances and home electronics that fail during normal single family household use • Your satisfaction is our goal. Consumer Product...
Model Number Serial Number Important: If you for placing your confidence in the continental U.S. The top card is for products installed in the U.S. SPP is a trademark of your contract, or credit toward a replacement product • Service coverage for covered operating parts and labor on appliances and home electronics that fail during normal single family household use • Your satisfaction is our goal. Consumer Product...
Use and Care Manual
Page 20
... City State Code Date Placed In Use Month Day Year Phone _ _ Number GE Consumer & Industrial Appliances General Electric Company Louisville, KY 40225 ge.com * Please provide your e-mail address to receive, via e-mail, discounts, special offers and other important communications from GEA's carefully selected partners. FAILURE TO COMPLETE AND RETURN THIS CARD DOES NOT DIMINISH YOUR WARRANTY RIGHTS. For refrigerators installed in...
... City State Code Date Placed In Use Month Day Year Phone _ _ Number GE Consumer & Industrial Appliances General Electric Company Louisville, KY 40225 ge.com * Please provide your e-mail address to receive, via e-mail, discounts, special offers and other important communications from GEA's carefully selected partners. FAILURE TO COMPLETE AND RETURN THIS CARD DOES NOT DIMINISH YOUR WARRANTY RIGHTS. For refrigerators installed in...
Use and Care Manual
Page 21
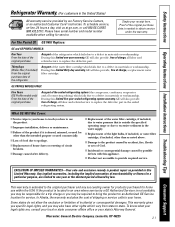
.... Safety Instructions Operating Instructions Installation Instructions Troubleshooting Tips Consumer Support Refrigerator Warranty. (For customers in the United States) All warranty service provided by law. Proof of merchantability or fitness for service. For The Period Of: GE Will Replace: GE and GE PROFILE MODELS: One Year From the date of the original purchase Any part of charge, all connecting tubing) which fails due to obtain service under the warranty. During this limited thirty-day warranty, GE will...
.... Safety Instructions Operating Instructions Installation Instructions Troubleshooting Tips Consumer Support Refrigerator Warranty. (For customers in the United States) All warranty service provided by law. Proof of merchantability or fitness for service. For The Period Of: GE Will Replace: GE and GE PROFILE MODELS: One Year From the date of the original purchase Any part of charge, all connecting tubing) which fails due to obtain service under the warranty. During this limited thirty-day warranty, GE will...

Use and Care Manual
Page 64
... still be used by phone at 1.800.661.1616 during normal business hours. Get on-line and schedule your service at your warranty expires. Contact Us ge.com In the U.S.: www.Hotpoint.com If you receive from your warranty, should the need assistance with the service you are not satisfied with your phone number, or write to: General Manager, Customer Relations GE Appliances, Appliance Park...
... still be used by phone at 1.800.661.1616 during normal business hours. Get on-line and schedule your service at your warranty expires. Contact Us ge.com In the U.S.: www.Hotpoint.com If you receive from your warranty, should the need assistance with the service you are not satisfied with your phone number, or write to: General Manager, Customer Relations GE Appliances, Appliance Park...


