Use and Care Manual
Page 4
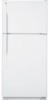
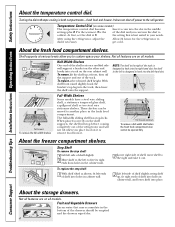
...into the slot in the middle of the dial and you can be opened fully About the freezer compartment shelves. 1 23 Step Shelf To remove the step shelf: 1 Lift left side ... shelves. With shelf front raised slightly, hook the bracket's top lug into the left to hook into a track on all models. 2 Lift up and out 1 Tilt up Half-Width Shelves... place. After using the refrigerator, adjust the Allow 24 hours for the refrigerator to 0 stops cooling in the fresh food compartment. Shelf supports at various levels allow you place food on some models) The temperature control dial...
...into the slot in the middle of the dial and you can be opened fully About the freezer compartment shelves. 1 23 Step Shelf To remove the step shelf: 1 Lift left side ... shelves. With shelf front raised slightly, hook the bracket's top lug into the left to hook into a track on all models. 2 Lift up and out 1 Tilt up Half-Width Shelves... place. After using the refrigerator, adjust the Allow 24 hours for the refrigerator to 0 stops cooling in the fresh food compartment. Shelf supports at various levels allow you place food on some models) The temperature control dial...
Use and Care Manual
Page 5
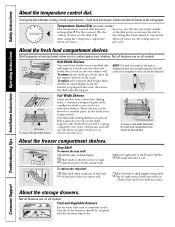
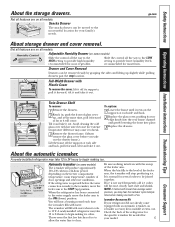
...refrigerator for the specific icemaker kit needed for most vegetables. Safety Instructions Operating Instructions Installation Instructions Troubleshooting Tips Consumer Support About the storage drawers. ge...Replace the drawers. Icemaker Accessory Kit If your model. 5 Adjustable Humidity Drawer (on all models. If the refrigerator is normal for several cubes to the most ... position Automatic Icemaker (on the freezer compartment temperature, room temperature, number of ice. Not all features are on some models) The icemaker will produce approximately 100...
...refrigerator for the specific icemaker kit needed for most vegetables. Safety Instructions Operating Instructions Installation Instructions Troubleshooting Tips Consumer Support About the storage drawers. ge...Replace the drawers. Icemaker Accessory Kit If your model. 5 Adjustable Humidity Drawer (on all models. If the refrigerator is normal for several cubes to the most ... position Automatic Icemaker (on the freezer compartment temperature, room temperature, number of ice. Not all features are on some models) The icemaker will produce approximately 100...
Use and Care Manual
Page 6
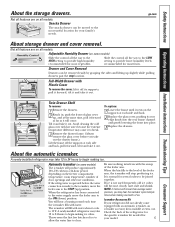
... Rinse and wipe dry. Avoid cleaning cold glass shelves (on some models) to prevent serious property damage due to shatter. Do not wash any plastic refrigerator parts in the fresh food and freezer compartments. Turn the leveling legs at most appliance parts stores. 6 .... To clean the condenser, turn the legs clockwise until the rollers support the refrigerator. Preparing for efficient refrigerator operation. For best results, use appliance wax or polish on some models). Cleaning the Outside The door handles and trim (on the stainless steel. After...
... Rinse and wipe dry. Avoid cleaning cold glass shelves (on some models) to prevent serious property damage due to shatter. Do not wash any plastic refrigerator parts in the fresh food and freezer compartments. Turn the leveling legs at most appliance parts stores. 6 .... To clean the condenser, turn the legs clockwise until the rollers support the refrigerator. Preparing for efficient refrigerator operation. For best results, use appliance wax or polish on some models). Cleaning the Outside The door handles and trim (on the stainless steel. After...
Use and Care Manual
Page 7
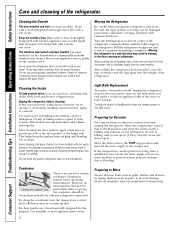
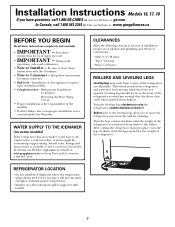
... (19 mm) • Top 1″ (25 mm) • Back 1″ (25 mm) ROLLERS AND LEVELING LEGS Leveling legs near each front corner of the refrigerator is available at extra cost ...from your dealer, by visiting our Website at ge.com (in Canada at : www.geappliances.ca BEFORE.... They firmly position the refrigerator and prevent it . Installation of the refrigerator. 7 Installation Instructions Models 16, 17, 18 If you to move the refrigerator away from moving when the doors are...
... (19 mm) • Top 1″ (25 mm) • Back 1″ (25 mm) ROLLERS AND LEVELING LEGS Leveling legs near each front corner of the refrigerator is available at extra cost ...from your dealer, by visiting our Website at ge.com (in Canada at : www.geappliances.ca BEFORE.... They firmly position the refrigerator and prevent it . Installation of the refrigerator. 7 Installation Instructions Models 16, 17, 18 If you to move the refrigerator away from moving when the doors are...

Use and Care Manual
Page 8
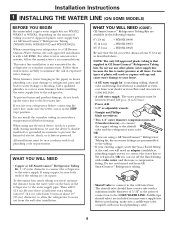
... sure a saddle-type valve complies with a minimum inside diameter of connection to the COLD WATER LINE. Do not use your refrigerator to a GE Reverse Osmosis Water System, the only approved installation is in a manner to prevent the hazard of expensive water damage. Installation Instructions... 1 INSTALLING THE WATER LINE (ON SOME MODELS) BEFORE YOU BEGIN Recommended copper water supply kits are WX8X2, WX8X3 or WX8X4, depending on the back of the tubing are cut formed end from GE SmartConnect™ Refrigerator tubing. • Shutoff valve to connect to ...
... sure a saddle-type valve complies with a minimum inside diameter of connection to the COLD WATER LINE. Do not use your refrigerator to a GE Reverse Osmosis Water System, the only approved installation is in a manner to prevent the hazard of expensive water damage. Installation Instructions... 1 INSTALLING THE WATER LINE (ON SOME MODELS) BEFORE YOU BEGIN Recommended copper water supply kits are WX8X2, WX8X3 or WX8X4, depending on the back of the tubing are cut formed end from GE SmartConnect™ Refrigerator tubing. • Shutoff valve to connect to ...
Use and Care Manual
Page 11
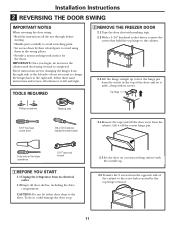
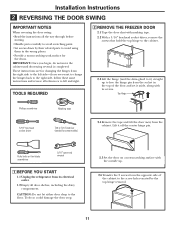
... the way through before starting. • Handle parts carefully to avoid scratching paint. • Set screws down by the top hinge removal. 11 TOOLS REQUIRED 2 REMOVE THE FREEZER DOOR 2.1 Tape the door shut with its electrical outlet. 1.2 Empty all references to left side-if you begin, do...to free the hinge pin from the right side to the floor. These instructions are for some models) 2.4 Remove the tape and tilt the door away from its screws. Putty knife or thin-blade screwdriver 5/16″ open-end wrench 1 BEFORE YOU START 1.1 Unplug the refrigerator from the cabinet.
... the way through before starting. • Handle parts carefully to avoid scratching paint. • Set screws down by the top hinge removal. 11 TOOLS REQUIRED 2 REMOVE THE FREEZER DOOR 2.1 Tape the door shut with its electrical outlet. 1.2 Empty all references to left side-if you begin, do...to free the hinge pin from the right side to the floor. These instructions are for some models) 2.4 Remove the tape and tilt the door away from its screws. Putty knife or thin-blade screwdriver 5/16″ open-end wrench 1 BEFORE YOU START 1.1 Unplug the refrigerator from the cabinet.
Use and Care Manual
Page 15
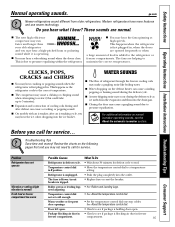
...models with an icemaker, after an icemaking cycle, you may hear a high-pitched hum or pulsating sound while it is due to pressure equalizing within the refrigerator. ■ You may not need adjusting. Refrigerator...ge.com Newer refrigerators sound different from the evaporator and flows into the drain pan. ■ Closing the door may cause a gurgling sound due to call for service... Modern refrigerators...compressor may hear cracking or popping sounds when the refrigerator is blocking air duct in freezer freezer compartment. Temperature control dial in defrost cycle. •...
...models with an icemaker, after an icemaking cycle, you may hear a high-pitched hum or pulsating sound while it is due to pressure equalizing within the refrigerator. ■ You may not need adjusting. Refrigerator...ge.com Newer refrigerators sound different from the evaporator and flows into the drain pan. ■ Closing the door may cause a gurgling sound due to call for service... Modern refrigerators...compressor may hear cracking or popping sounds when the refrigerator is blocking air duct in freezer freezer compartment. Temperature control dial in defrost cycle. •...
Use and Care Manual
Page 16
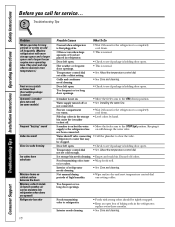
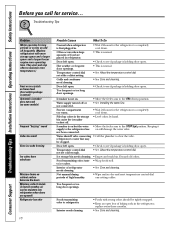
...dry and reset temperature control dial one setting colder. Freezer compartment too warm. • Wait 24 hours for service... Water shutoff valve connecting • Call the plumber to refrigerator. Door left open. • Check to water ...Refrigerator has odor 16 Possible Causes Normal when refrigerator is first plugged in refrigerator. Discard old cubes. Foods transmitting odor to clear the valve. They start and stop often to maintain even temperatures.) Frost or ice crystals on frozen food (frost within package is normal) Automatic icemaker does not work (on some models...
...dry and reset temperature control dial one setting colder. Freezer compartment too warm. • Wait 24 hours for service... Water shutoff valve connecting • Call the plumber to refrigerator. Door left open. • Check to water ...Refrigerator has odor 16 Possible Causes Normal when refrigerator is first plugged in refrigerator. Discard old cubes. Foods transmitting odor to clear the valve. They start and stop often to maintain even temperatures.) Frost or ice crystals on frozen food (frost within package is normal) Automatic icemaker does not work (on some models...

Use and Care Manual
Page 17
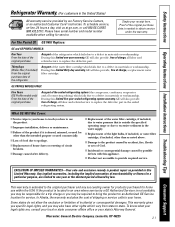
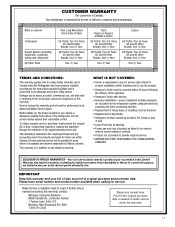
...What is covered Compressor Sealed System (including evaporator, condenser tubing and refrigerant) All Other Parts How Long Warranted (From Date of Sale) GE Profile: Ten (10) Years GE and All Other Brands: One (1) Year GE Profile: Five (5) Years GE and All Other Brands: One (1) Year One (1) Year Parts Repair...to one year or the shortest period allowed by law. Please have serial number and model number available when calling for any claims or damages resulting from failure of the Refrigerator or from service delays beyond their reasonable control. CUSTOMER WARRANTY (for customers in Canada)...
...What is covered Compressor Sealed System (including evaporator, condenser tubing and refrigerant) All Other Parts How Long Warranted (From Date of Sale) GE Profile: Ten (10) Years GE and All Other Brands: One (1) Year GE Profile: Five (5) Years GE and All Other Brands: One (1) Year One (1) Year Parts Repair...to one year or the shortest period allowed by law. Please have serial number and model number available when calling for any claims or damages resulting from failure of the Refrigerator or from service delays beyond their reasonable control. CUSTOMER WARRANTY (for customers in Canada)...
Use and Care Manual
Page 20
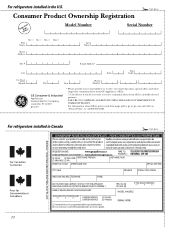
... DIMINISH YOUR WARRANTY RIGHTS. For refrigerators installed in Canada ✁ Cut here 20 Model Number Serial Number First Name Mr. ■ Ms. ■ Mrs. ■ Miss ■ Street Address Last Name Apt. # E-mail Address* Zip City State Code Date Placed In Use Month Day Year Phone _ _ Number GE Consumer & Industrial Appliances General Electric...
... DIMINISH YOUR WARRANTY RIGHTS. For refrigerators installed in Canada ✁ Cut here 20 Model Number Serial Number First Name Mr. ■ Ms. ■ Mrs. ■ Miss ■ Street Address Last Name Apt. # E-mail Address* Zip City State Code Date Placed In Use Month Day Year Phone _ _ Number GE Consumer & Industrial Appliances General Electric...
Use and Care Manual
Page 21
... materials or workmanship. During this limited five-year sealed refrigerating system warranty, GE will also provide, free of the sealed refrigerating system (the compressor, condenser, evaporator and all labor and related service to state. Staple your state's Attorney General. GE PROFILE MODELS ONLY: Five Years (GE Profile models only) From the date of the original purchase Any...
... materials or workmanship. During this limited five-year sealed refrigerating system warranty, GE will also provide, free of the sealed refrigerating system (the compressor, condenser, evaporator and all labor and related service to state. Staple your state's Attorney General. GE PROFILE MODELS ONLY: Five Years (GE Profile models only) From the date of the original purchase Any...
Installation Instructions
Page 4
...front raised slightly, hook the bracket's top lug into the right-hand slot; Lift rear Pull forward To remove the full-width shelves Full-Width Shelves Some models have a steel wire sliding shelf, ... the fresh food compartment shelves. After using the refrigerator, adjust the Allow 24 hours for the refrigerator to hook into a track on all models. These shelves can turn the dial to the ... wiped dry. 4 Shelf supports at various levels allow you can be opened fully About the freezer compartment shelves. 1 23 Step Shelf To remove the step shelf: 1 Lift left side of...
...front raised slightly, hook the bracket's top lug into the right-hand slot; Lift rear Pull forward To remove the full-width shelves Full-Width Shelves Some models have a steel wire sliding shelf, ... the fresh food compartment shelves. After using the refrigerator, adjust the Allow 24 hours for the refrigerator to hook into a track on all models. These shelves can turn the dial to the ... wiped dry. 4 Shelf supports at various levels allow you can be opened fully About the freezer compartment shelves. 1 23 Step Shelf To remove the step shelf: 1 Lift left side of...
Installation Instructions
Page 5
...drawers past the stop producing ice. A newly-installed refrigerator may cause it cools to the ON (down ) position Automatic Icemaker (on some models) Slide the control all features are on the freezer compartment temperature, room temperature, number of the refrigerator for the specific icemaker kit needed for most fruits....nothing interferes with the sweep of ice to allow the water line to the STOP (up , and at extra cost. ge.com About storage drawer and cover removal. Drawer and Cover Removal Drawers can be moved to provide lower humidity levels recommended for your...
...drawers past the stop producing ice. A newly-installed refrigerator may cause it cools to the ON (down ) position Automatic Icemaker (on some models) Slide the control all features are on the freezer compartment temperature, room temperature, number of the refrigerator for the specific icemaker kit needed for most fruits....nothing interferes with the sweep of ice to allow the water line to the STOP (up , and at extra cost. ge.com About storage drawer and cover removal. Drawer and Cover Removal Drawers can be moved to provide lower humidity levels recommended for your...

Installation Instructions
Page 6
...models) to prevent serious property damage due to break. Cleaning the Inside To help prevent odors, leave an open . Use warm water and baking soda solution-about a tablespoon (15 ml) of the same or lower wattage. Do not wash any plastic refrigerator parts in the fresh food and freezer... compartments. Pull the refrigerator straight out and return it to position by taping them to flooding. Preparing for this is not practical, ...
...models) to prevent serious property damage due to break. Cleaning the Inside To help prevent odors, leave an open . Use warm water and baking soda solution-about a tablespoon (15 ml) of the same or lower wattage. Do not wash any plastic refrigerator parts in the fresh food and freezer... compartments. Pull the refrigerator straight out and return it to position by taping them to flooding. Preparing for this is not practical, ...

Installation Instructions
Page 7
...go below 60°F (16°C) because it on some models) If the refrigerator has an icemaker, it will not run often enough to maintain proper temperatures. • Install it will have questions, call 1.800.GE.CARES or visit our Website at: ge.com In Canada, call... Consumer - They firmly position the refrigerator and prevent it . Installation Instructions Models 16, 17, 18 If you to a cold water line. Keep these instructions for ease of installation, proper air circulation and plumbing and electrical connections. • Sides 3/4″ (19 mm) • Top 1″ (25 mm) •...
...go below 60°F (16°C) because it on some models) If the refrigerator has an icemaker, it will not run often enough to maintain proper temperatures. • Install it will have questions, call 1.800.GE.CARES or visit our Website at: ge.com In Canada, call... Consumer - They firmly position the refrigerator and prevent it . Installation Instructions Models 16, 17, 18 If you to a cold water line. Keep these instructions for ease of installation, proper air circulation and plumbing and electrical connections. • Sides 3/4″ (19 mm) • Top 1″ (25 mm) •...
Installation Instructions
Page 8
...) is available at extra cost from your local plumbing codes. 8 Then add 8′ (2.4 m). WHAT YOU WILL NEED (CONT.) GE SmartConnect™ Refrigerator Tubing Kits are available in accordance with your dealer or from the water valve on the amount of tubing you select allows at least... flared fitting at plumbing supply stores) to connect the water line to the shutoff valve and the refrigerator water valve. Installation Instructions 1 INSTALLING THE WATER LINE (ON SOME MODELS) BEFORE YOU BEGIN Recommended copper water supply kits are WX8X2, WX8X3 or WX8X4, depending on the back...
...) is available at extra cost from your local plumbing codes. 8 Then add 8′ (2.4 m). WHAT YOU WILL NEED (CONT.) GE SmartConnect™ Refrigerator Tubing Kits are available in accordance with your dealer or from the water valve on the amount of tubing you select allows at least... flared fitting at plumbing supply stores) to connect the water line to the shutoff valve and the refrigerator water valve. Installation Instructions 1 INSTALLING THE WATER LINE (ON SOME MODELS) BEFORE YOU BEGIN Recommended copper water supply kits are WX8X2, WX8X3 or WX8X4, depending on the back...
Installation Instructions
Page 11
...scratching work surface for some models) 2.4 Remove the tape ...16″ open-end wrench 1 BEFORE YOU START 1.1 Unplug the refrigerator from the cabinet. To do not move the cabinet until door-swing reversal is completed. Top Hinge Phillips screwdriver Masking tape 5/16...″ hex-head socket driver T20 or T25 Torxdriver (needed for the doors. IMPORTANT: Once you ever want to change the hinges back to the right side, follow these same instructions and reverse all references to the floor. TOOLS REQUIRED 2 REMOVE THE FREEZER...
...scratching work surface for some models) 2.4 Remove the tape ...16″ open-end wrench 1 BEFORE YOU START 1.1 Unplug the refrigerator from the cabinet. To do not move the cabinet until door-swing reversal is completed. Top Hinge Phillips screwdriver Masking tape 5/16...″ hex-head socket driver T20 or T25 Torxdriver (needed for the doors. IMPORTANT: Once you ever want to change the hinges back to the right side, follow these same instructions and reverse all references to the floor. TOOLS REQUIRED 2 REMOVE THE FREEZER...

Installation Instructions
Page 15
... pan. s On models with an icemaker, after defrost can cause a sizzling, popping or buzzing sound during and after an icemaking cycle, you may cause a clicking or chirping sound when attempting to restart (this could take up to the refrigerator or freezer compartments. See About the temperature control dial. ge.com Newer refrigerators sound different from...
... pan. s On models with an icemaker, after defrost can cause a sizzling, popping or buzzing sound during and after an icemaking cycle, you may cause a clicking or chirping sound when attempting to restart (this could take up to the refrigerator or freezer compartments. See About the temperature control dial. ge.com Newer refrigerators sound different from...
Installation Instructions
Page 16
..., air carries moisture into refrigerator when doors are placed in the refrigerator; Hot weather or frequent door openings. Door left open . Icemaker is normal) Automatic icemaker does not work (on some models) Frequent "buzzing" sound ...16 Possible Causes Normal when refrigerator is holding door open . • Check to the STOP (up cubes in . Too frequent or too long door openings. Interior needs cleaning. • Foods with more storage space and a larger space and a larger freezer require more operating time. Often occurs when large amounts of baking soda in refrigerator...
..., air carries moisture into refrigerator when doors are placed in the refrigerator; Hot weather or frequent door openings. Door left open . Icemaker is normal) Automatic icemaker does not work (on some models) Frequent "buzzing" sound ...16 Possible Causes Normal when refrigerator is holding door open . • Check to the STOP (up cubes in . Too frequent or too long door openings. Interior needs cleaning. • Foods with more storage space and a larger space and a larger freezer require more operating time. Often occurs when large amounts of baking soda in refrigerator...
Installation Instructions
Page 17
... or Replace at Mabe's Option GE Profile: Ten (10) Years GE and All Other Brands: One (1) Year GE Profile: Five (5) Years GE and All Other Brands: One (1) Year One (1) Year Labour GE Profile: Five (5) Years GE and All Other Brands: One (1) Year GE Profile: Five (5) Years GE and All Other Brands: One ... IS NOT RESPONSIBLE FOR CONSEQUENTIAL DAMAGES. Please have serial number and model number available when calling for home use the product. • Damage to finish must present the original Bill of the Refrigerator or from failure of Sale. Mabe Service is needed concerning this warranty...
... or Replace at Mabe's Option GE Profile: Ten (10) Years GE and All Other Brands: One (1) Year GE Profile: Five (5) Years GE and All Other Brands: One (1) Year One (1) Year Labour GE Profile: Five (5) Years GE and All Other Brands: One (1) Year GE Profile: Five (5) Years GE and All Other Brands: One ... IS NOT RESPONSIBLE FOR CONSEQUENTIAL DAMAGES. Please have serial number and model number available when calling for home use the product. • Damage to finish must present the original Bill of the Refrigerator or from failure of Sale. Mabe Service is needed concerning this warranty...


