Use and Care Manual
Page 1
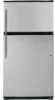
...Top-Freezer igerators GEAppliances.com Safety Instructions 2-4 Operating Instructions Automatic Icemaker 9 Controls 5 Crispers and Pans 7, 8 Shelves and Bins 6 Care and Cleaning Care and Cleaning 10, 11 Replacing the Light Bulb 11 Installation Instructions Icemaker Installation 13-16 Preparing to Consumer - Note to Install the Refrigerator 12 Reversing the Door Swing . . . .21...-25 Water Line Installation 17-21 Troubleshooting Tips 26-29 Normal Operating Sounds 26 Consumer ...
...Top-Freezer igerators GEAppliances.com Safety Instructions 2-4 Operating Instructions Automatic Icemaker 9 Controls 5 Crispers and Pans 7, 8 Shelves and Bins 6 Care and Cleaning Care and Cleaning 10, 11 Replacing the Light Bulb 11 Installation Instructions Icemaker Installation 13-16 Preparing to Consumer - Note to Install the Refrigerator 12 Reversing the Door Swing . . . .21...-25 Water Line Installation 17-21 Troubleshooting Tips 26-29 Normal Operating Sounds 26 Consumer ...
Use and Care Manual
Page 2
...and making repairs. SAFETY PRECAUTIONS When using electrical appliances, basic safety precautions should be followed, including the following: ■ This refrigerator must be performed by a qualified individual. ■ Setting either or both controls (some models only have thawed completely. 2 ...Be careful closing doors when children are in the freezer compartment when hands are necessarily small. They could damage the refrigerator and seriously injure themselves. ■ Do not touch the cold surfaces in the area. ■ ...
...and making repairs. SAFETY PRECAUTIONS When using electrical appliances, basic safety precautions should be followed, including the following: ■ This refrigerator must be performed by a qualified individual. ■ Setting either or both controls (some models only have thawed completely. 2 ...Be careful closing doors when children are in the freezer compartment when hands are necessarily small. They could damage the refrigerator and seriously injure themselves. ■ Do not touch the cold surfaces in the area. ■ ...

Use and Care Manual
Page 3
Before You Throw Away Your Old Refrigerator or Freezer: Refrigerants All refrigeration products contain refrigerants, which under certain conditions, we strongly recommend against the use an extension cord, it is absolutely necessary that it be a UL-... climb inside. Safety Instructions Operating Instructions Installation Instructions Troubleshooting Tips Consumer Support GEAppliances.com DANGER! RISK OF CHILD ENTRAPMENT PROPER DISPOSAL OF THE REFRIGERATOR Child entrapment and suffocation are still dangerous...even if they will sit for "just a few days." However, if you are getting rid...
Before You Throw Away Your Old Refrigerator or Freezer: Refrigerants All refrigeration products contain refrigerants, which under certain conditions, we strongly recommend against the use an extension cord, it is absolutely necessary that it be a UL-... climb inside. Safety Instructions Operating Instructions Installation Instructions Troubleshooting Tips Consumer Support GEAppliances.com DANGER! RISK OF CHILD ENTRAPMENT PROPER DISPOSAL OF THE REFRIGERATOR Child entrapment and suffocation are still dangerous...even if they will sit for "just a few days." However, if you are getting rid...
Use and Care Manual
Page 4
... plug which mates with a properly grounded 3-prong wall outlet. Where a standard 2-prong wall outlet is encountered, it is properly grounded. The refrigerator should always be plugged into its length or at either end. Always grip plug firmly and pull straight out from the power cord. Do not... have it replaced with a standard 3-prong (grounding) wall outlet to roll over or damage the power cord. Never unplug your refrigerator by a qualified electrician to make sure the outlet is your personal responsibility and obligation to have become frayed or otherwise damaged. When moving...
... plug which mates with a properly grounded 3-prong wall outlet. Where a standard 2-prong wall outlet is encountered, it is properly grounded. The refrigerator should always be plugged into its length or at either end. Always grip plug firmly and pull straight out from the power cord. Do not... have it replaced with a standard 3-prong (grounding) wall outlet to roll over or damage the power cord. Never unplug your refrigerator by a qualified electrician to make sure the outlet is your personal responsibility and obligation to have become frayed or otherwise damaged. When moving...
Use and Care Manual
Page 5
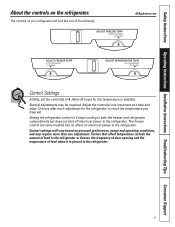
...one adjustment. Control settings will look like one increment at 4. Factors that affect temperature include the amount of food in the refrigerator or freezer, the frequency of door opening and the temperature of the following: GEAppliances.com 4 4 4 Control Settings Initially, set .... it is placed in both the freezer and refrigerator compartments but does not shut off electrical power to 1 stops cooling in the refrigerator. 5 The freezer control (on some models) has no effect on your refrigerator will vary based on the refrigerator. The controls on electrical power to...
...one adjustment. Control settings will look like one increment at 4. Factors that affect temperature include the amount of food in the refrigerator or freezer, the frequency of door opening and the temperature of the following: GEAppliances.com 4 4 4 Control Settings Initially, set .... it is placed in both the freezer and refrigerator compartments but does not shut off electrical power to 1 stops cooling in the refrigerator. 5 The freezer control (on some models) has no effect on your refrigerator will vary based on the refrigerator. The controls on electrical power to...
Use and Care Manual
Page 6
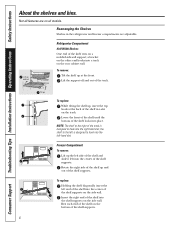
Tilt up To replace: While tilting the shelf up, insert the top hook at the front. NOTE: The shelf to hook into the center...shelf locks into a track on all features are adjustable. Lift the support off and out of the shelf supports. Freezer Compartment To remove: Lift up and out of the track. Rest each end of the shelf supports. 6 Rearranging ...remove: Tilt the shelf up and out Refrigerator Compartment Half-Width Shelves One end of the shelf into the left is designed to the right of the shelf in the refrigerator and freezer compartments are on the rear cabinet wall. ...
Tilt up To replace: While tilting the shelf up, insert the top hook at the front. NOTE: The shelf to hook into the center...shelf locks into a track on all features are adjustable. Lift the support off and out of the shelf supports. Freezer Compartment To remove: Lift up and out of the track. Rest each end of the shelf supports. 6 Rearranging ...remove: Tilt the shelf up and out Refrigerator Compartment Half-Width Shelves One end of the shelf into the left is designed to the right of the shelf in the refrigerator and freezer compartments are on the rear cabinet wall. ...
Use and Care Manual
Page 8
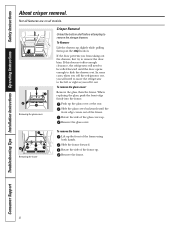
... glass cover. Rotate the side of the frame using both hands. Remove the frame. 8 In some cases, when you roll the refrigerator out, you will need to move the refrigerator to the left or right as you from taking out the drawers, first try to be rolled forward until the front edge... up slightly while pulling them past the stop location. If the door prevents you roll it out. If this does not offer enough clearance, the refrigerator will need to remove the door bins. Slide the glass cover backwards until the door opens enough to remove the storage drawers. Slide the frame...
... glass cover. Rotate the side of the frame using both hands. Remove the frame. 8 In some cases, when you roll the refrigerator out, you will need to move the refrigerator to the left or right as you from taking out the drawers, first try to be rolled forward until the front edge... up slightly while pulling them past the stop location. If the door prevents you roll it out. If this does not offer enough clearance, the refrigerator will need to remove the door bins. Slide the glass cover backwards until the door opens enough to remove the storage drawers. Slide the frame...
Use and Care Manual
Page 9
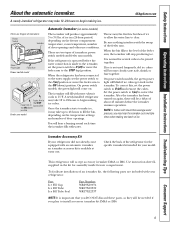
...to the level of the feeler arm, the icemaker will blink if ice cubes get stuck in the kit for your refrigerator did not already come on the freezer compartment temperature, room temperature, number of about 45 minutes before the water connection is normal for several cubes to 15&#... will produce approximately 3 to the ON (down ) position Feeler arm model Automatic Icemaker (on some models) The icemaker will fill with your refrigerator: Part Ice Fill Cup Ice Fill Tube Ice Fill Tube Seal Part Number WR29X10074 WR17X12339 WR17X12337 NOTE: It is important that you DO NOT discard...
...to the level of the feeler arm, the icemaker will blink if ice cubes get stuck in the kit for your refrigerator did not already come on the freezer compartment temperature, room temperature, number of about 45 minutes before the water connection is normal for several cubes to 15&#... will produce approximately 3 to the ON (down ) position Feeler arm model Automatic Icemaker (on some models) The icemaker will fill with your refrigerator: Part Ice Fill Cup Ice Fill Tube Ice Fill Tube Seal Part Number WR29X10074 WR17X12339 WR17X12337 NOTE: It is important that you DO NOT discard...
Use and Care Manual
Page 10
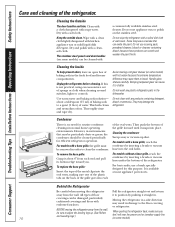
...any products containing detergent, bleach or ammonia. For models with a soiled dish cloth or wet towel. To replace the base grille: Insert the tops of water. Then push the bottom of the grille forward until it about a tablespoon (15 ml) of baking soda to break. For ...Sweep away or vacuum up . (See Rollers and Leveling Legs.) When pushing the refrigerator back, make sure you . Moving the refrigerator in the fresh food and freezer compartments. Behind the Refrigerator Be careful when moving the refrigerator away from the wall. Condenser There is no need for this is available at ...
...any products containing detergent, bleach or ammonia. For models with a soiled dish cloth or wet towel. To replace the base grille: Insert the tops of water. Then push the bottom of the grille forward until it about a tablespoon (15 ml) of baking soda to break. For ...Sweep away or vacuum up . (See Rollers and Leveling Legs.) When pushing the refrigerator back, make sure you . Moving the refrigerator in the fresh food and freezer compartments. Behind the Refrigerator Be careful when moving the refrigerator away from the wall. Condenser There is no need for this is available at ...
Use and Care Manual
Page 11
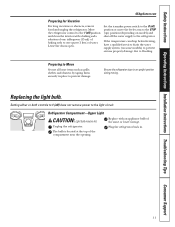
... (off the water supply to the refrigerator. Unplug the refrigerator. Plug the refrigerator back in place to Move Secure all...Preparing for Vacation For long vacations or absences, remove food and unplug the refrigerator. Setting either or both controls to flooding. If the temperature can drop... the interior with an appliance bulb of water. Refrigerator Compartment-Upper Light CAUTION: Light bulb may be hot. Move the refrigerator control to the 1 (off ) does not ... wattage. Be sure the refrigerator stays in an upright position during moving. Replacing the light bulb. The ...
... (off the water supply to the refrigerator. Unplug the refrigerator. Plug the refrigerator back in place to Move Secure all...Preparing for Vacation For long vacations or absences, remove food and unplug the refrigerator. Setting either or both controls to flooding. If the temperature can drop... the interior with an appliance bulb of water. Refrigerator Compartment-Upper Light CAUTION: Light bulb may be hot. Move the refrigerator control to the 1 (off ) does not ... wattage. Be sure the refrigerator stays in an upright position during moving. Replacing the light bulb. The ...
Use and Care Manual
Page 12
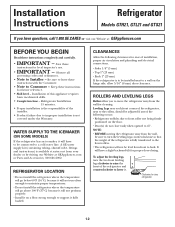
... GEAppliances.com or Parts and Accessories, 800.626.2002. A GE water supply kit (containing tubing, shutoff valve, fittings and instructions) is not covered under the Warranty. CLEARANCES Allow the following occurs: • Refrigerator wobbles due to front roller not being firmly positioned on the floor...installation, proper air circulation and plumbing and electrical connections. • Sides 1/8″ (3 mm) • Top 1″ (25 mm) • Back 1″ (25 mm) If the refrigerator is to be level from the wall for proper door-closing. Leveling Legs near each front corner of ...
... GEAppliances.com or Parts and Accessories, 800.626.2002. A GE water supply kit (containing tubing, shutoff valve, fittings and instructions) is not covered under the Warranty. CLEARANCES Allow the following occurs: • Refrigerator wobbles due to front roller not being firmly positioned on the floor...installation, proper air circulation and plumbing and electrical connections. • Sides 1/8″ (3 mm) • Top 1″ (25 mm) • Back 1″ (25 mm) If the refrigerator is to be level from the wall for proper door-closing. Leveling Legs near each front corner of ...
Use and Care Manual
Page 13
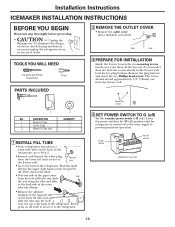
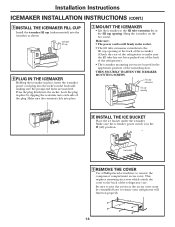
... and affix to the back side of the water tube inlet flange. • Remove the adhesive backing on the back of the refrigerator. Side Back 3 PREPARE FOR INSTALLATION Inside the freezer, loosen the two mounting screws, but do not screw them all the way out. The screws should extend approximately 1/2″ (13mm... has a water tube inlet on the opposite side of the water fill tube seal and slide the tube into the hole near the top at the back of the refrigerator, go to secure it off ). Firmly press on the inlet to Step 2. • Remove and discard the white plug from the lower...
... and affix to the back side of the water tube inlet flange. • Remove the adhesive backing on the back of the refrigerator. Side Back 3 PREPARE FOR INSTALLATION Inside the freezer, loosen the two mounting screws, but do not screw them all the way out. The screws should extend approximately 1/2″ (13mm... has a water tube inlet on the opposite side of the water fill tube seal and slide the tube into the hole near the top at the back of the refrigerator, go to secure it off ). Firmly press on the inlet to Step 2. • Remove and discard the white plug from the lower...
Use and Care Manual
Page 14
... click into the fill cup opening at the back of the icemaker. (Check the rear of the refrigerator to make sure the fill tube has not been pushed out of the back of the refrigerator). • The icemaker mounting screws are matched. Make sure: • The power cord is in the ... THE ICEMAKER FILL CUP Install the icemaker fill cup (side-mounted) into the icemaker as the access cover must be reinstalled later to ensure your refrigerator will function properly. 14 Make sure the icemaker power switch is still firmly in the socket. • The fill tube extension extends into place. 7 MOUNT...
... click into the fill cup opening at the back of the icemaker. (Check the rear of the refrigerator to make sure the fill tube has not been pushed out of the back of the refrigerator). • The icemaker mounting screws are matched. Make sure: • The power cord is in the ... THE ICEMAKER FILL CUP Install the icemaker fill cup (side-mounted) into the icemaker as the access cover must be reinstalled later to ensure your refrigerator will function properly. 14 Make sure the icemaker power switch is still firmly in the socket. • The fill tube extension extends into place. 7 MOUNT...
Use and Care Manual
Page 15
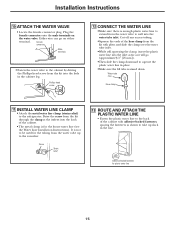
... line 15 It is aimed down. Screw Strain relief 13 ROUTE AND ATTACH THE PLASTIC WATER LINE • Fasten the plastic water line to the refrigerator. Water tube inlet Hose clamp 11 INSTALL WATER LINE CLAMP • Attach the metal water line clamp (strain relief) to the back of the cabinet...
... line 15 It is aimed down. Screw Strain relief 13 ROUTE AND ATTACH THE PLASTIC WATER LINE • Fasten the plastic water line to the refrigerator. Water tube inlet Hose clamp 11 INSTALL WATER LINE CLAMP • Attach the metal water line clamp (strain relief) to the back of the cabinet...
Use and Care Manual
Page 16
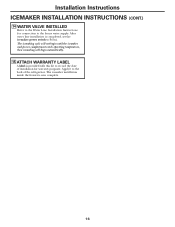
Apply it to record the date of the refrigerator. The icemaker installation inside the freezer is provided with this kit to the back of installation for connection to I (on). Installation Instructions ICEMAKER INSTALLATION INSTRUCTIONS (CONT.) 14 WATER VALVE INSTALLED Refer ... water line installation is completed, set the icemaker power switch to the home water supply. The icemaking cycle will not begin until the icemaker and freezer compartment reach operating temperature, then icemaking will begin automatically. 15 ATTACH WARRANTY LABEL A label is now complete. 16
Apply it to record the date of the refrigerator. The icemaker installation inside the freezer is provided with this kit to the back of installation for connection to I (on). Installation Instructions ICEMAKER INSTALLATION INSTRUCTIONS (CONT.) 14 WATER VALVE INSTALLED Refer ... water line installation is completed, set the icemaker power switch to the home water supply. The icemaking cycle will not begin until the icemaker and freezer compartment reach operating temperature, then icemaking will begin automatically. 15 ATTACH WARRANTY LABEL A label is now complete. 16
Use and Care Manual
Page 17
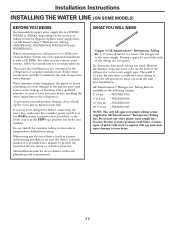
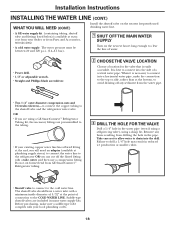
... plastic tubing is in the STOP (up the water line to the hot water line. Do not install the icemaker tubing in GE SmartConnect™ Refrigerator Tubing kits. To determine how much tubing you need . WX08X10015 25′ (7.6 m) - Do not use your home. 17 To prevent burns ...you use any electrical device (such as a power drill) during installation, be sure both ends of the tubing are cut square. GE SmartConnect™ Refrigerator Tubing Kits are available in accordance with local plumbing code requirements. Certain types of plastic will crack or rupture with...
... plastic tubing is in the STOP (up the water line to the hot water line. Do not install the icemaker tubing in GE SmartConnect™ Refrigerator Tubing kits. To determine how much tubing you need . WX08X10015 25′ (7.6 m) - Do not use your home. 17 To prevent burns ...you use any electrical device (such as a power drill) during installation, be sure both ends of the tubing are cut square. GE SmartConnect™ Refrigerator Tubing Kits are available in accordance with local plumbing code requirements. Certain types of plastic will crack or rupture with...
Use and Care Manual
Page 18
...flared fitting with a tube cutter and then use a compression fitting. Before purchasing, make the connection to the top or side, rather than at extra cost from your dealer or from GE SmartConnect™ Refrigerator tubing. 3 DRILL THE HOLE FOR THE VALVE Drill a 1/4″ hole in the water pipe (even ...if using a self-piercing valve), using a GE SmartConnect™ Refrigerator Tubing kit, the necessary fittings are included in the pipe. Remove any sediment from drilling the hole in many water supply kits. Saddle...
...flared fitting with a tube cutter and then use a compression fitting. Before purchasing, make the connection to the top or side, rather than at extra cost from your dealer or from GE SmartConnect™ Refrigerator tubing. 3 DRILL THE HOLE FOR THE VALVE Drill a 1/4″ hole in the water pipe (even ...if using a self-piercing valve), using a GE SmartConnect™ Refrigerator Tubing kit, the necessary fittings are included in the pipe. Remove any sediment from drilling the hole in many water supply kits. Saddle...
Use and Care Manual
Page 19
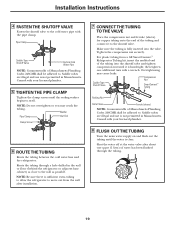
... may cause leaks. Washer Pipe Clamp Inlet End Clamp Screw 6 ROUTE THE TUBING Route the tubing between the cold water line and the refrigerator. Overtightening may crush the tubing. Installation Instructions 4 FASTEN THE SHUTOFF VALVE Fasten the shutoff valve to swell. Make sure the tubing is ...as possible. Consult with your licensed plumber. 5 TIGHTEN THE PIPE CLAMP Tighten the clamp screws until it to move out from a GE SmartConnect™ Refrigerator Tubing kit, insert the molded end of the tubing and connect it is hand-tight; Shut the water off at the water ...
... may cause leaks. Washer Pipe Clamp Inlet End Clamp Screw 6 ROUTE THE TUBING Route the tubing between the cold water line and the refrigerator. Overtightening may crush the tubing. Installation Instructions 4 FASTEN THE SHUTOFF VALVE Fasten the shutoff valve to swell. Make sure the tubing is ...as possible. Consult with your licensed plumber. 5 TIGHTEN THE PIPE CLAMP Tighten the clamp screws until it to move out from a GE SmartConnect™ Refrigerator Tubing kit, insert the molded end of the tubing and connect it is hand-tight; Shut the water off at the water ...
Use and Care Manual
Page 20
...is hand-tight; Fold back the cover. Fasten the tubing into the water valve connection as far as shown. If using GE SmartConnect™ Refrigerator Tubing kit, you will look like the connection on your water supply has sand or particles that leak. Do not cut plastic...will need to hold it in the water line near the refrigerator. While holding the right side of the refrigerator's water valve. then tighten one additional turn with a wrench. Remove the plastic flexible cap from a GE SmartConnect™ Refrigerator Tubing kit, insert the molded end of the tubing as ...
...is hand-tight; Fold back the cover. Fasten the tubing into the water valve connection as far as shown. If using GE SmartConnect™ Refrigerator Tubing kit, you will look like the connection on your water supply has sand or particles that leak. Do not cut plastic...will need to hold it in the water line near the refrigerator. While holding the right side of the refrigerator's water valve. then tighten one additional turn with a wrench. Remove the plastic flexible cap from a GE SmartConnect™ Refrigerator Tubing kit, insert the molded end of the tubing as ...
Use and Care Manual
Page 21
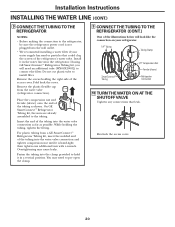
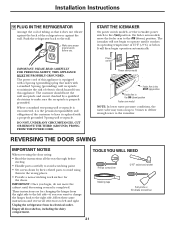
...the right side to the icemaker. START THE ICEMAKER On power switch models, set the icemaker power switch to the wall. Unplug the refrigerator from this appliance is properly grounded. IMPORTANT: PLEASE READ CAREFULLY FOR PERSONAL SAFETY, THIS APPLIANCE MUST BE PROPERLY GROUNDED. The power cord of...against the wall. TOOLS YOU WILL NEED Phillips screwdriver 5/16″ socket and ratchet Masking tape Putty knife or thin-blade screwdriver 21 It will not begin operation automatically. Where a standard two-prong wall receptacle is completed. The icemaker will then begin to avoid...
...the right side to the icemaker. START THE ICEMAKER On power switch models, set the icemaker power switch to the wall. Unplug the refrigerator from this appliance is properly grounded. IMPORTANT: PLEASE READ CAREFULLY FOR PERSONAL SAFETY, THIS APPLIANCE MUST BE PROPERLY GROUNDED. The power cord of...against the wall. TOOLS YOU WILL NEED Phillips screwdriver 5/16″ socket and ratchet Masking tape Putty knife or thin-blade screwdriver 21 It will not begin operation automatically. Where a standard two-prong wall receptacle is completed. The icemaker will then begin to avoid...


