

Installation Instructions
Page 1
... 2). Close supervision of children is necessary when the appliance is used near children. • Install the dryer where the temperature is Clean (see section 1) and Meets Attached Installation Specifications (see section 9. 234D1113P001 31-16224-1 07/07/10 GE Flexible venting materials are located in the control console. • Do not allow children on...
... 2). Close supervision of children is necessary when the appliance is used near children. • Install the dryer where the temperature is Clean (see section 1) and Meets Attached Installation Specifications (see section 9. 234D1113P001 31-16224-1 07/07/10 GE Flexible venting materials are located in the control console. • Do not allow children on...
Installation Instructions
Page 2
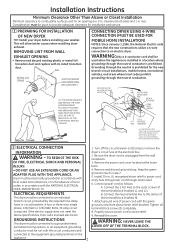
...wall receptacle. 3. GROUNDING INSTRUCTIONS This dryer must be connected to provide adequate clearance for installation and service. 1 PREPARING FOR INSTALLATION OF NEW DRYER TIP: Install your dryer before installing your washer. Reinstall the cover. KEEP GREEN GROUND SCREW SCREWS (3) HOT WIRE L1 ... and 1 in a location where grounding through strain relief. 6. CONNECTING DRYER USING 4-WIRE CONNECTION (MUST BE USED FOR MOBILE HOME INSTALLATION) NOTES: SInce January 1,1996, the National Electric code requires that the new constructions utilize a 4-wire connection to an individual branch...
...wall receptacle. 3. GROUNDING INSTRUCTIONS This dryer must be connected to provide adequate clearance for installation and service. 1 PREPARING FOR INSTALLATION OF NEW DRYER TIP: Install your dryer before installing your washer. Reinstall the cover. KEEP GREEN GROUND SCREW SCREWS (3) HOT WIRE L1 ... and 1 in a location where grounding through strain relief. 6. CONNECTING DRYER USING 4-WIRE CONNECTION (MUST BE USED FOR MOBILE HOME INSTALLATION) NOTES: SInce January 1,1996, the National Electric code requires that the new constructions utilize a 4-wire connection to an individual branch...

Installation Instructions
Page 3
... A. above ground level or any other wildlife. • Termination should present minimal resistance to the exhaust air flow and should be installed at the lower back. 4. Install 3/4 in . UL recognized strain relief to strain relief. 8. B. WARNING: NEVER LEAVE THE COVER OFF OF THE TERMINAL BLOCK. ... to the center of exhaust hood (wall cap), and all terminal block screws (3) completely. 7. Reinstall the cover. The correct exhaust installation is unplugged from the wall. 3. The MAXIMUM ALLOWABLE duct length and number of bends of the exhaust system depends upon the type of...
... A. above ground level or any other wildlife. • Termination should present minimal resistance to the exhaust air flow and should be installed at the lower back. 4. Install 3/4 in . UL recognized strain relief to strain relief. 8. B. WARNING: NEVER LEAVE THE COVER OFF OF THE TERMINAL BLOCK. ... to the center of exhaust hood (wall cap), and all terminal block screws (3) completely. 7. Reinstall the cover. The correct exhaust installation is unplugged from the wall. 3. The MAXIMUM ALLOWABLE duct length and number of bends of the exhaust system depends upon the type of...

Installation Instructions
Page 4
... level) ELBOW HIGHLY RECOMMENDED RECOMMENDED CONFIGUR A TION TO MINIMIZE EXHAUST BLOCKAGE. LEVEL SIDE-TO-SIDE. 4 LEVELING LEGS 2 ANTI-TIP LEGS 4 Installation Instructions EXHAUST INFORMATION (cont) SEALING OF JOINTS • All joints should be insulated to reduce condensation and lint build-up. 4 EXHAUST CONNECTION .... • Provide an access for lint. • Duct joints can accumulate lint, creating a potential fire hazard. • Never install a screen in any fasteners that runs through an unheated area or is near air conditioning should be tight to avoid leaks. TO REDUCE...
... level) ELBOW HIGHLY RECOMMENDED RECOMMENDED CONFIGUR A TION TO MINIMIZE EXHAUST BLOCKAGE. LEVEL SIDE-TO-SIDE. 4 LEVELING LEGS 2 ANTI-TIP LEGS 4 Installation Instructions EXHAUST INFORMATION (cont) SEALING OF JOINTS • All joints should be insulated to reduce condensation and lint build-up. 4 EXHAUST CONNECTION .... • Provide an access for lint. • Duct joints can accumulate lint, creating a potential fire hazard. • Never install a screen in any fasteners that runs through an unheated area or is near air conditioning should be tight to avoid leaks. TO REDUCE...

Installation Instructions
Page 5
... both the dryer and the wall is : 0 in. DO ELBOW HIGHLY RECOMMENDED ELBOWS HIGHLY RECOMMENDED 8 MOBILE OR MANUFACTURED HOME INSTALLATION • Installation MUST conform to the MANUFACTURED HOME CONSTRUCTION & SAFETY STANDARD, TITLE 24, PART 32-80 or, when such standard is not ...other surfaces is highly recommended (see illustrations below). of local codes, with a clamp. 3. See EXHAUST INFORMATION section 3 & 4. • The installation must contain a minimum of open area equally distributed. either side 3 in . in its permanent position, extend the duct to the outdoors. of ...
... both the dryer and the wall is : 0 in. DO ELBOW HIGHLY RECOMMENDED ELBOWS HIGHLY RECOMMENDED 8 MOBILE OR MANUFACTURED HOME INSTALLATION • Installation MUST conform to the MANUFACTURED HOME CONSTRUCTION & SAFETY STANDARD, TITLE 24, PART 32-80 or, when such standard is not ...other surfaces is highly recommended (see illustrations below). of local codes, with a clamp. 3. See EXHAUST INFORMATION section 3 & 4. • The installation must contain a minimum of open area equally distributed. either side 3 in . in its permanent position, extend the duct to the outdoors. of ...

Installation Instructions
Page 6
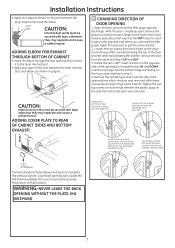
... tape around joint. • Insert duct assembly, elbow first, through the tab on the appliance base. BEFORE PERFORMING THIS EXHAUST INSTALLATION, BE SURE TO DISCONNECT THE DRYER FROM ITS ELECTRICAL SUPPLY. Make sure that the shortened duct is aligned with 4" duct. Detach...duct to about 45º using a flat blade screwdriver. 6 PROTECT YOUR HANDS AND ARMS FROM SHARP EDGES WHEN WORKING INSIDE THE CABINET. Installation Instructions 9 DRYER EXHAUST TO RIGHT, LEFT OR BOTTOM CABINET WARNING - REMOVE DESIRED KNOCKOUT (ONE ONLY). Note: Only 4" round rigid metal ducting...
... tape around joint. • Insert duct assembly, elbow first, through the tab on the appliance base. BEFORE PERFORMING THIS EXHAUST INSTALLATION, BE SURE TO DISCONNECT THE DRYER FROM ITS ELECTRICAL SUPPLY. Make sure that the shortened duct is aligned with 4" duct. Detach...duct to about 45º using a flat blade screwdriver. 6 PROTECT YOUR HANDS AND ARMS FROM SHARP EDGES WHEN WORKING INSIDE THE CABINET. Installation Instructions 9 DRYER EXHAUST TO RIGHT, LEFT OR BOTTOM CABINET WARNING - REMOVE DESIRED KNOCKOUT (ONE ONLY). Note: Only 4" round rigid metal ducting...
Installation Instructions
Page 7
... BOTTOM AND TIGHTEN THE TWO TOP SCREWS OF EACH HINGE PL ATE (KIT WE1M454) Connect standard metal elbows and ducts to get the screw started. 2. Installation Instructions • Apply duct tape as shown on the joint between the dryer internal duct and elbow, as shown on page 6. 10 CHANGING DIRECTION OF...
... BOTTOM AND TIGHTEN THE TWO TOP SCREWS OF EACH HINGE PL ATE (KIT WE1M454) Connect standard metal elbows and ducts to get the screw started. 2. Installation Instructions • Apply duct tape as shown on the joint between the dryer internal duct and elbow, as shown on page 6. 10 CHANGING DIRECTION OF...
Installation Instructions
Page 8
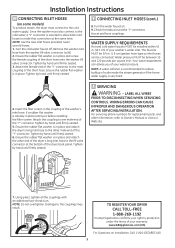
...until firmly seated. 6. LABEL ALL WIRES PRIOR TO DISCONNECTING WHEN SERVICING CONTROLS. WIRING ERRORS CAN CAUSE IMPROPER AND DANGEROUS OPERATION AFTER SERVICING/INSTALLATION. Tighten by hand until firmly seated. 3. Tighten by hand until firmly seated. 11 CONNECTING INLET HOSES (cont.) 8. TO REGISTER... Your water department can be 3/4 in place and attach the other information, refer to Owner's Manual or visit our Web site. 7. Installation Instructions 11 CONNECTING INLET HOSES (on some models) To produce steam, the dryer must also connect to the cold water, a "Y" connector...
...until firmly seated. 6. LABEL ALL WIRES PRIOR TO DISCONNECTING WHEN SERVICING CONTROLS. WIRING ERRORS CAN CAUSE IMPROPER AND DANGEROUS OPERATION AFTER SERVICING/INSTALLATION. Tighten by hand until firmly seated. 3. Tighten by hand until firmly seated. 11 CONNECTING INLET HOSES (cont.) 8. TO REGISTER... Your water department can be 3/4 in place and attach the other information, refer to Owner's Manual or visit our Web site. 7. Installation Instructions 11 CONNECTING INLET HOSES (on some models) To produce steam, the dryer must also connect to the cold water, a "Y" connector...
Use and Care Manual
Page 2
... dryers will not be exhausted to these substances, namely benzene, carbon monoxide, formaldehyde and soot, caused primarily by a qualified installer, service agency or the gas supplier. Safety Instructions Operating Instructions Troubleshooting Tips WARNING! do not use only rigid metal 4″...performed by the incomplete combustion of this or any electrical switch; READ All INSTRuCTIONS BEFORE uSING. n Installation and service must be minimized further by calling 800.GE.CARES (800.432.2737). Follow the gas supplier's instructions carefully. 5 If you can receive ...
... dryers will not be exhausted to these substances, namely benzene, carbon monoxide, formaldehyde and soot, caused primarily by a qualified installer, service agency or the gas supplier. Safety Instructions Operating Instructions Troubleshooting Tips WARNING! do not use only rigid metal 4″...performed by the incomplete combustion of this or any electrical switch; READ All INSTRuCTIONS BEFORE uSING. n Installation and service must be minimized further by calling 800.GE.CARES (800.432.2737). Follow the gas supplier's instructions carefully. 5 If you can receive ...
Use and Care Manual
Page 11
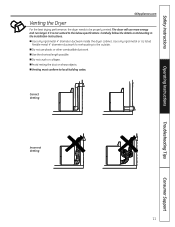
n Avoid resting the duct on Exhausting in the Installation Instructions. Correct Venting Incorrect Venting 11 Troubleshooting Tips Consumer Support Use only rigid metal or UL listed flexible metal 4" diameter ductwork for exhausting to the ...
n Avoid resting the duct on Exhausting in the Installation Instructions. Correct Venting Incorrect Venting 11 Troubleshooting Tips Consumer Support Use only rigid metal or UL listed flexible metal 4" diameter ductwork for exhausting to the ...
Use and Care Manual
Page 13
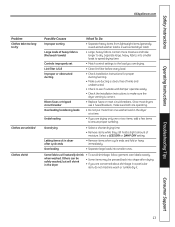
...they still hold a slight amount of kinks and unobstructed. • Check to see if outside wall damper operates easily. • Check the Installation Instructions to make sure both are operating. • Do not put more moisture and take too long to dry Clothes are drying. • ...Clean lint filter before every load. • Check installation instructions for proper ducting/venting. • Make sure ducting is correct. • Replace fuses or reset circuit breakers. Since most dryers use 2 fuses...
...they still hold a slight amount of kinks and unobstructed. • Check to see if outside wall damper operates easily. • Check the Installation Instructions to make sure both are operating. • Do not put more moisture and take too long to dry Clothes are drying. • ...Clean lint filter before every load. • Check installation instructions for proper ducting/venting. • Make sure ducting is correct. • Replace fuses or reset circuit breakers. Since most dryers use 2 fuses...
Use and Care Manual
Page 15
...Owner's Manual. n Products which are not defective or broken, or which are working as provided in an area where service by a GE Authorized Servicer is extended to use within the USA. n Damage caused after delivery. EXCluSION OF IMPlIED WARRANTIES-your sole and exclusive remedy is... your local or state consumer affairs office or your home to teach you may be responsible for service. Staple your home. n Improper installation, delivery or maintenance. In Alaska, the warranty excludes the cost of the original purchase date is needed to the product caused by law...
...Owner's Manual. n Products which are not defective or broken, or which are working as provided in an area where service by a GE Authorized Servicer is extended to use within the USA. n Damage caused after delivery. EXCluSION OF IMPlIED WARRANTIES-your sole and exclusive remedy is... your local or state consumer affairs office or your home to teach you may be responsible for service. Staple your home. n Improper installation, delivery or maintenance. In Alaska, the warranty excludes the cost of the original purchase date is needed to the product caused by law...


