Installation Instructions
Page 1
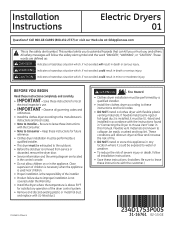
...duct. Be sure to House Vent" later in the appliance. WARNING - These conditions will obstruct dryer airflow and increase the risk of fire. • DO NOT install or store this manual. Call 800.GE.CARES (800.432.2737) or visit our Web site at: GEAppliances.com This is removed ... temperature is installed, it could be exposed to leave these instructions with the customer.) Printed in Mexico 234D1753P005 31-16761 02-15 GE Fire Hazard • Clothes dryer installation must be easily crushed and trap lint. These words are located in the control console. • Do not allow children ...
...duct. Be sure to House Vent" later in the appliance. WARNING - These conditions will obstruct dryer airflow and increase the risk of fire. • DO NOT install or store this manual. Call 800.GE.CARES (800.432.2737) or visit our Web site at: GEAppliances.com This is removed ... temperature is installed, it could be exposed to leave these instructions with the customer.) Printed in Mexico 234D1753P005 31-16761 02-15 GE Fire Hazard • Clothes dryer installation must be easily crushed and trap lint. These words are located in the control console. • Do not allow children ...

Installation Instructions
Page 2
... OR WE1M847 WE01X22395 PM14X10056 WX14X10007 Accessory Complete kit (hoses, Y-adapter washers) (included) Long hose and Short hose Dryer door opening vent brush (not included) LintEater™ dryer rotary tube brush (not included) POWER CORDS: GE strongly recommends the use of factory specified parts. Order on -line at GEApplianceParts.com, 24 hours a day or...
... OR WE1M847 WE01X22395 PM14X10056 WX14X10007 Accessory Complete kit (hoses, Y-adapter washers) (included) Long hose and Short hose Dryer door opening vent brush (not included) LintEater™ dryer rotary tube brush (not included) POWER CORDS: GE strongly recommends the use of factory specified parts. Order on -line at GEApplianceParts.com, 24 hours a day or...

Installation Instructions
Page 3
...mobile or manufactured home. • The vent duct material MUST BE METAL. • KIT 14-D346-33 MUST be used to attach the dryer securely to the structure. • The vent MUST NOT be connected to the outdoors. MINIMUM CLEARANCE OTHER THAN ALCOVE OR CLOSET INSTALLATION Minimum ...PART 32-80 or Standard CAN/CSA-Z240 MH, or, when such standard is : 0" either side 3" front 3" rear • Minimum vertical space from dryer. If the closet contains both sides, 1" front and 3" rear. MOBILE OR MANUFACTURED HOME INSTALLATION • Installation must contain a minimum of 120 square inches of...
...mobile or manufactured home. • The vent duct material MUST BE METAL. • KIT 14-D346-33 MUST be used to attach the dryer securely to the structure. • The vent MUST NOT be connected to the outdoors. MINIMUM CLEARANCE OTHER THAN ALCOVE OR CLOSET INSTALLATION Minimum ...PART 32-80 or Standard CAN/CSA-Z240 MH, or, when such standard is : 0" either side 3" front 3" rear • Minimum vertical space from dryer. If the closet contains both sides, 1" front and 3" rear. MOBILE OR MANUFACTURED HOME INSTALLATION • Installation must contain a minimum of 120 square inches of...

Installation Instructions
Page 4
...can advise you of the short hose. Check for leaks around the ''Y'' connector, faucet and hose couplings. 4. Attach one male end of the dryer back panel. Since the washer must connect to the couplings may result. 8. NOTE: Use the new inlet hoses provided; Tighten by hand until... MUST be between 10 and 120 pounds per square inch. Installation Instructions CONNECTING INLET HOSES CONNECTING INLET HOSES To produce steam, the dryer must also connect to the cold water, a "Y" connector is inserted to allow both inlet hoses to the fill valve connector at the...
...can advise you of the short hose. Check for leaks around the ''Y'' connector, faucet and hose couplings. 4. Attach one male end of the dryer back panel. Since the washer must connect to the couplings may result. 8. NOTE: Use the new inlet hoses provided; Tighten by hand until... MUST be between 10 and 120 pounds per square inch. Installation Instructions CONNECTING INLET HOSES CONNECTING INLET HOSES To produce steam, the dryer must also connect to the cold water, a "Y" connector is inserted to allow both inlet hoses to the fill valve connector at the...

Installation Instructions
Page 5
...; 4" dia., UL-listed flexible metal duct (if needed) ˆ Dryer power cord kit (not provided with dryer) UL rated 120/240V, 30A with 3 or 4 prongs. Be sure the dryer cord is unplugged from the wall. Installation Instructions CONNECTING AN ELECTRIC DRYER (Skip if your dryer already has a power cord attached) TOOLS YOU WILL NEED ˆ...
...; 4" dia., UL-listed flexible metal duct (if needed) ˆ Dryer power cord kit (not provided with dryer) UL rated 120/240V, 30A with 3 or 4 prongs. Be sure the dryer cord is unplugged from the wall. Installation Instructions CONNECTING AN ELECTRIC DRYER (Skip if your dryer already has a power cord attached) TOOLS YOU WILL NEED ˆ...

Installation Instructions
Page 6
... two supply wires to do so can result in death, fire or electrical shock. GROUNDING INSTRUCTIONS For a grounded, cord-connected dryer: This dryer must be run with a qualified electrician, or service representative or personnel, if you are in death, fire or electrical shock.... connected to whether the appliance is properly grounded. Fire Hazard Use 10 gauge copper wire. GROUNDING INSTRUCTIONS For a permanently connected dryer: This dryer must be connected to a grounded metal, permanent wiring system, or an equipmentgrounding conductor must be grounded. Ground wire (green or...
... two supply wires to do so can result in death, fire or electrical shock. GROUNDING INSTRUCTIONS For a grounded, cord-connected dryer: This dryer must be run with a qualified electrician, or service representative or personnel, if you are in death, fire or electrical shock.... connected to whether the appliance is properly grounded. Fire Hazard Use 10 gauge copper wire. GROUNDING INSTRUCTIONS For a permanently connected dryer: This dryer must be connected to a grounded metal, permanent wiring system, or an equipmentgrounding conductor must be grounded. Ground wire (green or...

Installation Instructions
Page 7
...the terminal block (marked N). 6. DO NOT use in areas where local codes prohibit grounding through strain relief. 6. Be sure the dryer cord is NOT for use on cabinet rear. Bring power cord through the neutral. 3-wire connection is unplugged from the wall receptacle....NEUTRAL (White) COVER HOT WIRE STRAIN RELIEF BRACKET 3/4", UL RECOGNIZED STRAIN RELIEF HOT WIRE 1. Connect the 2 hot lines to an electric dryer. NOT for use on recreational vehicles. Tighten all terminal block screws (3) securely. 8. UL-recognized strain relief to strain relief. 8. Connect ...
...the terminal block (marked N). 6. DO NOT use in areas where local codes prohibit grounding through strain relief. 6. Be sure the dryer cord is NOT for use on cabinet rear. Bring power cord through the neutral. 3-wire connection is unplugged from the wall receptacle....NEUTRAL (White) COVER HOT WIRE STRAIN RELIEF BRACKET 3/4", UL RECOGNIZED STRAIN RELIEF HOT WIRE 1. Connect the 2 hot lines to an electric dryer. NOT for use on recreational vehicles. Tighten all terminal block screws (3) securely. 8. UL-recognized strain relief to strain relief. 8. Connect ...
Installation Instructions
Page 8
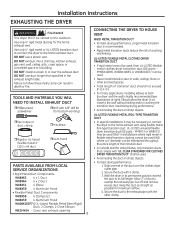
...• For best drying performance: 1. Installation Instructions EXHAUSTING THE DRYER WARNING - UL-LISTED FLEXIBLE METAL CLOTHES DRYER TRANSITION DUCT • If rigid metal cannot be used , then UL-LISTED flexible metal clothes dryer transition duct (GE parts - PM08X10085, WX08X10085 or WX08X10077) can result in its... full length. Elbows allow the dryer to sit close to follow these instructions can be used . •...
...• For best drying performance: 1. Installation Instructions EXHAUSTING THE DRYER WARNING - UL-LISTED FLEXIBLE METAL CLOTHES DRYER TRANSITION DUCT • If rigid metal cannot be used , then UL-LISTED flexible metal clothes dryer transition duct (GE parts - PM08X10085, WX08X10085 or WX08X10077) can result in its... full length. Elbows allow the dryer to sit close to follow these instructions can be used . •...

Installation Instructions
Page 9
.... • DO NOT use excessive exhaust length. Cut duct as short as possible. • DO NOT crush duct against the wall. • DO NOT set dryer on the chart. • Internal elbows added for side or bottom vent conversions must add all conditions noted on duct. Use elbows if turns are...; should be treated as a 90° elbow. • Two 45° elbows will : • Increase the drying times and the energy cost. • Reduce the dryer life. • Accumulate lint, creating a potential fire hazard. No.
.... • DO NOT use excessive exhaust length. Cut duct as short as possible. • DO NOT crush duct against the wall. • DO NOT set dryer on the chart. • Internal elbows added for side or bottom vent conversions must add all conditions noted on duct. Use elbows if turns are...; should be treated as a 90° elbow. • Two 45° elbows will : • Increase the drying times and the energy cost. • Reduce the dryer life. • Accumulate lint, creating a potential fire hazard. No.

Installation Instructions
Page 10
... clamp. Transition Ducting 10 SEALING OF JOINTS • All joints should slope down . Wall Internal Duct Opening Check that you install your dryer before installing your washer. These fasteners can accumulate lint, creating a potential fire hazard. • Horizontal runs should be tight to avoid leaks...tape. • Do not assemble ductwork with the opening . and moisture-tight by at least once a year. Installation Instructions EXHAUSTING THE DRYER (cont.) EXHAUST SYSTEM CHECKLIST HOOD OR WALL CAP • Terminate in a manner to prevent back drafts or entry of birds or other...
... clamp. Transition Ducting 10 SEALING OF JOINTS • All joints should slope down . Wall Internal Duct Opening Check that you install your dryer before installing your washer. These fasteners can accumulate lint, creating a potential fire hazard. • Horizontal runs should be tight to avoid leaks...tape. • Do not assemble ductwork with the opening . and moisture-tight by at least once a year. Installation Instructions EXHAUSTING THE DRYER (cont.) EXHAUST SYSTEM CHECKLIST HOOD OR WALL CAP • Terminate in a manner to prevent back drafts or entry of birds or other...

Installation Instructions
Page 11
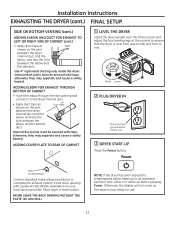
...the duct. 11 ADDING ELBOW AND DUCT FOR EXHAUST TO LEFT OR RIGHT SIDE OF CABINET Exhaust can be added to the blower housing. Disconnect dryer from electrical supply. Wear gloves and arm guards. Make sure that the shortened duct is not available for Long Vent models. Use the screw ... in the base. Be sure not to do so may result in place through the side opening with the tab in the middle of the dryer. *Left side exhaust is aligned with cover plate (Kit WE1M454). Installation Instructions SIDE OR BOTTOM VENTING WARNING - Remove screw and save . Fire Hazard Close ...
...the duct. 11 ADDING ELBOW AND DUCT FOR EXHAUST TO LEFT OR RIGHT SIDE OF CABINET Exhaust can be added to the blower housing. Disconnect dryer from electrical supply. Wear gloves and arm guards. Make sure that the shortened duct is not available for Long Vent models. Use the screw ... in the base. Be sure not to do so may result in place through the side opening with the tab in the middle of the dryer. *Left side exhaust is aligned with cover plate (Kit WE1M454). Installation Instructions SIDE OR BOTTOM VENTING WARNING - Remove screw and save . Fire Hazard Close ...
Installation Instructions
Page 12
... ducts to warm up before use . 12 NEVER LEAVE THE BACK OPENING WITHOUT THE PLATE. (Kit WE1M454.) NOTE: If the dryer has been exposed to temperatures below freezing for use . 3 DRYER START-UP Press the Power button. ADDING ELBOW FOR EXHAUST THROUGH BOTTOM OF CABINET • Insert the elbow through the rear... opening with tape, otherwise they may separate and cause a safety hazard. ADDING COVER PLATE TO REAR OF CABINET 1 LEVEL THE DRYER Stand the dryer upright near the final location and adjust the four leveling legs at the corners to ensure that the...
... ducts to warm up before use . 12 NEVER LEAVE THE BACK OPENING WITHOUT THE PLATE. (Kit WE1M454.) NOTE: If the dryer has been exposed to temperatures below freezing for use . 3 DRYER START-UP Press the Power button. ADDING ELBOW FOR EXHAUST THROUGH BOTTOM OF CABINET • Insert the elbow through the rear... opening with tape, otherwise they may separate and cause a safety hazard. ADDING COVER PLATE TO REAR OF CABINET 1 LEVEL THE DRYER Stand the dryer upright near the final location and adjust the four leveling legs at the corners to ensure that the...

Installation Instructions
Page 13
... the door approximately 170 degrees. Inside screws Edge screws Inner door Door hinge screws Outer door Inside screws 13 IMPORTANT: Once you start Unplug the dryer from its electrical outlet 2 Remove the bottom screw from each hinge (right side) and partially insert them in the wrong places. • Provide a non-scratch...
... the door approximately 170 degrees. Inside screws Edge screws Inner door Door hinge screws Outer door Inside screws 13 IMPORTANT: Once you start Unplug the dryer from its electrical outlet 2 Remove the bottom screw from each hinge (right side) and partially insert them in the wrong places. • Provide a non-scratch...

Installation Instructions
Page 14
... in step 1 into the lower left " and "right". Squeeze the tabs on the opposite side of the outer door making sure you finish Plug the dryer back into the openings on the inside of door Cover caps Door handle clip Door handle C. Installation Instructions REVERSING THE DOOR (cont.) 5 Remove and swap...
... in step 1 into the lower left " and "right". Squeeze the tabs on the opposite side of the outer door making sure you finish Plug the dryer back into the openings on the inside of door Cover caps Door handle clip Door handle C. Installation Instructions REVERSING THE DOOR (cont.) 5 Remove and swap...
Use and Care Manual
Page 1
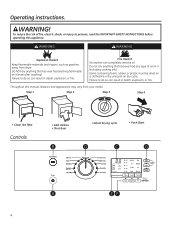
... Instructions Appliance Communication 10 Features 7 Loading and Using the Dryer. . . . . . 8 Operating Instructions 4-7 Reversing the Door 12, 13 Venting the Dryer 9 Troubleshooting Tips . . . 14-16 Consumer Support Consumer Support 18 Parts and Accessories 3, 18 Warranty 17 Owner's Manual As an ENERGY STAR® partner, GE has determined that this product meets the ENERGY STAR...
... Instructions Appliance Communication 10 Features 7 Loading and Using the Dryer. . . . . . 8 Operating Instructions 4-7 Reversing the Door 12, 13 Venting the Dryer 9 Troubleshooting Tips . . . 14-16 Consumer Support Consumer Support 18 Parts and Accessories 3, 18 Warranty 17 Owner's Manual As an ENERGY STAR® partner, GE has determined that this product meets the ENERGY STAR...

Use and Care Manual
Page 2
...in this appliance is necessary when this appliance. IMPORTANT SAFETY INSTRUCTIONS WARNING To reduce the risk of spray cleaner when cleaning dryer interior. READ ALL INSTRUCTIONS BEFORE USING. Items contaminated with gasoline, dry-cleaning solvents, or other flammable liquids near children....ignite or explode. „ DO NOT place items exposed to a chemical reaction that you and others. DO NOT operate the dryer without the lint filter in the Installation Instructions for grounding instructions. Close supervision of lint, dust and dirt. CAUTION Indicates a ...
...in this appliance is necessary when this appliance. IMPORTANT SAFETY INSTRUCTIONS WARNING To reduce the risk of spray cleaner when cleaning dryer interior. READ ALL INSTRUCTIONS BEFORE USING. Items contaminated with gasoline, dry-cleaning solvents, or other flammable liquids near children....ignite or explode. „ DO NOT place items exposed to a chemical reaction that you and others. DO NOT operate the dryer without the lint filter in the Installation Instructions for grounding instructions. Close supervision of lint, dust and dirt. CAUTION Indicates a ...
Use and Care Manual
Page 3
... Parts and Accessories Order on-line at GEApplianceParts.com today, 24 hours a day or by calling 800.GE.CARES (800.432.2737). „ Properly ground dryer to cause cancer, birth defects or other reproductive harm and requires businesses to warn of potential exposure to ...OR BECOMES OTHERWISE RESTRICTED IN USE OR DURING INSTALLATION. CleanSpeak™ communication PBX10W00Y0 WiFi ConnectPlus module 3 GEAppliances.com ADDITIONAL GAS DRYER WARNINGS WARNING For your safety, the information in this or any other flammable vapors and liquids in your gas supplier from being...
... Parts and Accessories Order on-line at GEApplianceParts.com today, 24 hours a day or by calling 800.GE.CARES (800.432.2737). „ Properly ground dryer to cause cancer, birth defects or other reproductive harm and requires businesses to warn of potential exposure to ...OR BECOMES OTHERWISE RESTRICTED IN USE OR DURING INSTALLATION. CleanSpeak™ communication PBX10W00Y0 WiFi ConnectPlus module 3 GEAppliances.com ADDITIONAL GAS DRYER WARNINGS WARNING For your safety, the information in this or any other flammable vapors and liquids in your gas supplier from being...
Use and Care Manual
Page 4
... any type of fire, electric shock, or injury to persons, read the IMPORTANT SAFETY INSTRUCTIONS before operating this manual, features and appearance may vary from dryer. Step 1 Step 2 Step 3 Step 4 • Clean lint filter Controls • Add clothes • Shut door • Select drying cycle • Push Start B D C G A EF 4 Failure to...
... any type of fire, electric shock, or injury to persons, read the IMPORTANT SAFETY INSTRUCTIONS before operating this manual, features and appearance may vary from dryer. Step 1 Step 2 Step 3 Step 4 • Clean lint filter Controls • Add clothes • Shut door • Select drying cycle • Push Start B D C G A EF 4 Failure to...

Use and Care Manual
Page 5
... by pressing the Start button. It will blink once if you press any button or turn the cycle knob. Locked Controls The dryer controls are tested on for the selected time. will be displayed when the door is initiated. D Drying Cycles-Sensor cycles automatically determine... fabric dryness. Speed Dry For small loads that are dry and the dryer is opened during the dryer's cycle. Casuals/ For wrinkle-free, permanent press, delicate items and knits. Easy Care Delicates For delicate items, special-care fabrics...
... by pressing the Start button. It will blink once if you press any button or turn the cycle knob. Locked Controls The dryer controls are tested on for the selected time. will be displayed when the door is initiated. D Drying Cycles-Sensor cycles automatically determine... fabric dryness. Speed Dry For small loads that are dry and the dryer is opened during the dryer's cycle. Casuals/ For wrinkle-free, permanent press, delicate items and knits. Easy Care Delicates For delicate items, special-care fabrics...

Use and Care Manual
Page 6
...of the drying time and every 5 minutes during the Extended Tumble cycle. Place clothes on until the cycle starts. Children cannot accidentally start the dryer by touching buttons with this option to minimize the wrinkles in . • Use the Volume especially when drying fabrics like polyester, knits and ...time (10, 20, 30, 40, . . . 80, 90, 99, 10 . . .) Dryness Level - The clothes should be used for lighter fabrics. To unlock the dryer controls, press and hold the Drum Light and Volume buttons at the sound of no-heat tumbling after you reach the desired volume (low-med...
...of the drying time and every 5 minutes during the Extended Tumble cycle. Place clothes on until the cycle starts. Children cannot accidentally start the dryer by touching buttons with this option to minimize the wrinkles in . • Use the Volume especially when drying fabrics like polyester, knits and ...time (10, 20, 30, 40, . . . 80, 90, 99, 10 . . .) Dryness Level - The clothes should be used for lighter fabrics. To unlock the dryer controls, press and hold the Drum Light and Volume buttons at the sound of no-heat tumbling after you reach the desired volume (low-med...


