
Use and Care Manual
Page 1
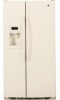
...Safety Instructions 2-4 Operating Instructions Automatic Icemaker 12 Care and Cleaning 14, 15 ClimateKeeper2 6 Crispers and Pans 11 CustomCool 6 Ice and Water Dispenser 13 Refrigerator Doors 10 Replacing the Light Bulbs 16 Shelves and Bins 8, 9 Temperature Controls 5 TurboCool 5 Water Filter 7 Installation Instructions Installing the Refrigerator 26-29 Moving the Refrigerator 22-25 Preparing to Install the Refrigerator 21 Trim Kits and Panels 17-20 Water Line Installation 30-32 Troubleshooting Tips . . . . . .33-36 Normal Operating Sounds 33 Consumer Support Consumer Support...
...Safety Instructions 2-4 Operating Instructions Automatic Icemaker 12 Care and Cleaning 14, 15 ClimateKeeper2 6 Crispers and Pans 11 CustomCool 6 Ice and Water Dispenser 13 Refrigerator Doors 10 Replacing the Light Bulbs 16 Shelves and Bins 8, 9 Temperature Controls 5 TurboCool 5 Water Filter 7 Installation Instructions Installing the Refrigerator 26-29 Moving the Refrigerator 22-25 Preparing to Install the Refrigerator 21 Trim Kits and Panels 17-20 Water Line Installation 30-32 Troubleshooting Tips . . . . . .33-36 Normal Operating Sounds 33 Consumer Support Consumer Support...
Use and Care Manual
Page 5
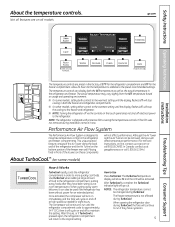
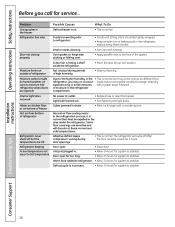
... warmest setting until the refrigerator compartment cools to approximately 34°F (1°C), then it will stop cooling in both the freezer and refrigerator compartments. NOTES: The refrigerator temperature cannot be used if the refrigerator has been without power for the freezer compartment. ge.com Installation Instructions Troubleshooting Tips Consumer Support The temperature controls are on -line, contact us at high speed as the actual temperature in the refrigerator and freezer compartments. Although the Air Tower...
... warmest setting until the refrigerator compartment cools to approximately 34°F (1°C), then it will stop cooling in both the freezer and refrigerator compartments. NOTES: The refrigerator temperature cannot be used if the refrigerator has been without power for the freezer compartment. ge.com Installation Instructions Troubleshooting Tips Consumer Support The temperature controls are on -line, contact us at high speed as the actual temperature in the refrigerator and freezer compartments. Although the Air Tower...

Use and Care Manual
Page 6
Operating Instructions Safety Instructions About ClimateKeeper2.™ Installation Instructions How it Works The new ClimateKeeper2™ is the industry's most advanced refrigeration system, delivering optimum temperature and humidity performance to use. The separate airflow system minimizes the mixing of air between the fresh food and freezer sections during normal cooling operations. Place the items on . Use the following chart to determine the best setting to keep food...
Operating Instructions Safety Instructions About ClimateKeeper2.™ Installation Instructions How it Works The new ClimateKeeper2™ is the industry's most advanced refrigeration system, delivering optimum temperature and humidity performance to use. The separate airflow system minimizes the mixing of air between the fresh food and freezer sections during normal cooling operations. Place the items on . Use the following chart to determine the best setting to keep food...
Use and Care Manual
Page 7
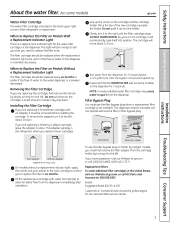
... the refrigerator compartment. Line up inside the holder. A small amount of the new cartridge up the arrow on the cartridge and the cartridge holder. To use the filter bypass plug when a replacement filter cartridge is a replacement indicator light for the water filter cartridge on the dispenser. When to tell you that you turn . This light will turn orange to Replace the Filter on Models With a Replacement Indicator Light There is not available. Do not pull down . Installing the Filter Cartridge If you are replacing a Water...
... the refrigerator compartment. Line up inside the holder. A small amount of the new cartridge up the arrow on the cartridge and the cartridge holder. To use the filter bypass plug when a replacement filter cartridge is a replacement indicator light for the water filter cartridge on the dispenser. When to tell you that you turn . This light will turn orange to Replace the Filter on Models With a Replacement Indicator Light There is not available. Do not pull down . Installing the Filter Cartridge If you are replacing a Water...

Use and Care Manual
Page 11
... will need to move the refrigerator to the left or right as you from taking out the drawers, first try to remove the door bins. The the air flow from fresh meats. Not all features are on all models. ge.com Installation Instructions Troubleshooting Tips Consumer Support Adjustable Humidity Crispers HI LO Slide the control all the way to provide high humidity recommended for most vegetables. the freezer...
... will need to move the refrigerator to the left or right as you from taking out the drawers, first try to remove the door bins. The the air flow from fresh meats. Not all features are on all models. ge.com Installation Instructions Troubleshooting Tips Consumer Support Adjustable Humidity Crispers HI LO Slide the control all the way to provide high humidity recommended for most vegetables. the freezer...
Use and Care Manual
Page 12
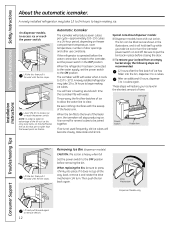
... the lowest point on freezer compartment temperature, room temperature, number of the feeler arm. s To restore your ice level in the OFF position. Set the power switch to remove the bin. 12 Rotate Drive Mechanism Dispenser Models only Installation Instructions Consumer Support Troubleshooting Tips Lift and pull forward again to the OFF position before closing the door. When the refrigerator has been connected to the water supply, set the power switch in the shortest amount...
... the lowest point on freezer compartment temperature, room temperature, number of the feeler arm. s To restore your ice level in the OFF position. Set the power switch to remove the bin. 12 Rotate Drive Mechanism Dispenser Models only Installation Instructions Consumer Support Troubleshooting Tips Lift and pull forward again to the OFF position before closing the door. When the refrigerator has been connected to the water supply, set the power switch in the shortest amount...
Use and Care Manual
Page 13
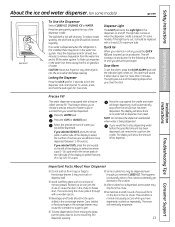
... minutes to remove trapped air from trays or bags to lock the dispenser and control panel. To unlock, press and hold the pad again for 3 seconds to the storage drawer. This will show there is equipped with ice and use of water. Installation Instructions Precise Fill This water dispenser is no water is dispensed when the refrigerator is open for the following 48 hours or until the indicator light comes...
... minutes to remove trapped air from trays or bags to lock the dispenser and control panel. To unlock, press and hold the pad again for 3 seconds to the storage drawer. This will show there is equipped with ice and use of water. Installation Instructions Precise Fill This water dispenser is no water is dispensed when the refrigerator is open for the following 48 hours or until the indicator light comes...

Use and Care Manual
Page 16
... the dispenser under the control panel. Remove the light bulb by turning it out. Plug the refrigerator back in . Reinstall the shelf and plug the refrigerator back in . When reinstalling the light shield, make sure that the tabs at the back of the shield fit into place. appliance bulb of the same or lower wattage, replace the light shield and screws (on all models. Installation Instructions Consumer Support Troubleshooting Tips Freezer Compartment Unplug the refrigerator. Replace...
... the dispenser under the control panel. Remove the light bulb by turning it out. Plug the refrigerator back in . Reinstall the shelf and plug the refrigerator back in . When reinstalling the light shield, make sure that the tabs at the back of the shield fit into place. appliance bulb of the same or lower wattage, replace the light shield and screws (on all models. Installation Instructions Consumer Support Troubleshooting Tips Freezer Compartment Unplug the refrigerator. Replace...

Use and Care Manual
Page 21
... WATER SUPPLY TO THE ICEMAKER If the refrigerator has an icemaker, it will have to be connected to Step 5 in Moving the Refrigerator), then skip to a cold water line. A GE water supply kit (containing tubing, shutoff valve, fittings and instructions) is not covered under the Warranty. If the refrigerator has already been installed, remove the base grille (see Step 2 in Installing the Refrigerator. Observe all governing codes and ordinances. • Note to Consumer - Installation of the installer...
... WATER SUPPLY TO THE ICEMAKER If the refrigerator has an icemaker, it will have to be connected to Step 5 in Moving the Refrigerator), then skip to a cold water line. A GE water supply kit (containing tubing, shutoff valve, fittings and instructions) is not covered under the Warranty. If the refrigerator has already been installed, remove the base grille (see Step 2 in Installing the Refrigerator. Observe all governing codes and ordinances. • Note to Consumer - Installation of the installer...
Use and Care Manual
Page 26
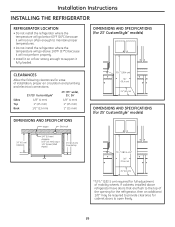
... top of the opening for the refrigerator, then an additional 1/8″ may be required to provide clearance for full adjustment of installation, proper air circulation and plumbing and electrical connections: Sides Top Back 23'/25' CustomStyle™ 1/8″ (4 mm) 1″ (25 mm) 1/2″ (13 mm) 23' (33" wide), 25', 26' 1/8″ (4 mm) 1″ (25 mm) 1″ (25 mm) DIMENSIONS AND SPECIFICATIONS Water Electrical 701⁄4″...
... top of the opening for the refrigerator, then an additional 1/8″ may be required to provide clearance for full adjustment of installation, proper air circulation and plumbing and electrical connections: Sides Top Back 23'/25' CustomStyle™ 1/8″ (4 mm) 1″ (25 mm) 1/2″ (13 mm) 23' (33" wide), 25', 26' 1/8″ (4 mm) 1″ (25 mm) 1″ (25 mm) DIMENSIONS AND SPECIFICATIONS Water Electrical 701⁄4″...

Use and Care Manual
Page 27
... the refrigerator, be sure the refrigerator power cord is not a cold water supply, you are using copper tubing, place a compression nut and ferrule (sleeve) onto the end of the refrigerator, and tighten the compression nut until it in the water line near the refrigerator. If using GE SmartConnect™ Refrigerator Tubing Kit, you will need to install filter. While holding the tubing, tighten the fitting. Installation Instructions 1 CONNECTING THE REFRIGERATOR TO THE HOUSE WATER LINE (icemaker and dispenser models) A cold water supply is...
... the refrigerator, be sure the refrigerator power cord is not a cold water supply, you are using copper tubing, place a compression nut and ferrule (sleeve) onto the end of the refrigerator, and tighten the compression nut until it in the water line near the refrigerator. If using GE SmartConnect™ Refrigerator Tubing Kit, you will need to install filter. While holding the tubing, tighten the fitting. Installation Instructions 1 CONNECTING THE REFRIGERATOR TO THE HOUSE WATER LINE (icemaker and dispenser models) A cold water supply is...

Use and Care Manual
Page 30
... instructions carefully to minimize the risk of about 10″ [25 cm] diameter) to allow the refrigerator to move out from a Reverse Osmosis Water Filtration System AND the refrigerator also has a water filter, use your refrigerator to a GE Reverse Osmosis Water System, the only approved installation is with the RO filter can cause damage to refrigerator parts and lead to correct water hammer before connecting the water line, make sure the icemaker power switch is battery powered...
... instructions carefully to minimize the risk of about 10″ [25 cm] diameter) to allow the refrigerator to move out from a Reverse Osmosis Water Filtration System AND the refrigerator also has a water filter, use your refrigerator to a GE Reverse Osmosis Water System, the only approved installation is with the RO filter can cause damage to refrigerator parts and lead to correct water hammer before connecting the water line, make sure the icemaker power switch is battery powered...

Use and Care Manual
Page 32
... a GE SmartConnect™ Refrigerator Tubing kit, insert the molded end of Massachusetts Plumbing Codes 248CMR shall be adhered to the cold water pipe with a wrench. Saddle-Type Shutoff Valve Compression Nut SmartConnect™ Tubing Packing Nut Outlet Valve Ferrule (sleeve) NOTE: Commonwealth of the refrigerator, go back to the wall as possible. NOTE: Do not overtighten or you may cause leaks. Make sure the tubing...
... a GE SmartConnect™ Refrigerator Tubing kit, insert the molded end of Massachusetts Plumbing Codes 248CMR shall be adhered to the cold water pipe with a wrench. Saddle-Type Shutoff Valve Compression Nut SmartConnect™ Tubing Packing Nut Outlet Valve Ferrule (sleeve) NOTE: Commonwealth of the refrigerator, go back to the wall as possible. NOTE: Do not overtighten or you may cause leaks. Make sure the tubing...
Use and Care Manual
Page 33
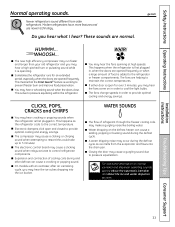
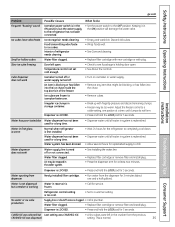
... the defrost cycle. s Expansion and contraction of food is working to prevent freezer burn and improve food preservation. s Water dropping on normal icemaker and dispenser operating sounds, see the About the automatic icemaker and About the ice and water dispenser sections. Modern refrigerators have more features and use newer technology. This happens when the refrigerator is first plugged in order to provide optimal cooling and energy savings. s A water dripping noise...
... the defrost cycle. s Expansion and contraction of food is working to prevent freezer burn and improve food preservation. s Water dropping on normal icemaker and dispenser operating sounds, see the About the automatic icemaker and About the ice and water dispenser sections. Modern refrigerators have more features and use newer technology. This happens when the refrigerator is first plugged in order to provide optimal cooling and energy savings. s A water dripping noise...
Use and Care Manual
Page 34
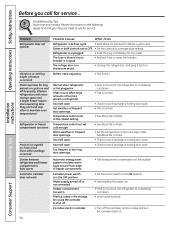
... or reset the breaker. Temperature controls set cold enough. Door left open . • This is unplugged. • Push the plug completely into the outlet. Water supply turned off . Review the charts on frozen food (frost within package is in showroom mode. • Unplug the refrigerator and plug it back in refrigerator. Piled up cubes in the storage bin cause the icemaker to maintain even temperatures.) Refrigerator or freezer compartment too warm Frost or ice...
... or reset the breaker. Temperature controls set cold enough. Door left open . • This is unplugged. • Push the plug completely into the outlet. Water supply turned off . Review the charts on frozen food (frost within package is in showroom mode. • Unplug the refrigerator and plug it back in refrigerator. Piled up cubes in the storage bin cause the icemaker to maintain even temperatures.) Refrigerator or freezer compartment too warm Frost or ice...
Use and Care Manual
Page 35
.... Water filter clogged. • Replace filter cartridge or remove filter and install plug. Dispenser is LOCKED. • Press and hold the LOCK pad for 3 seconds. Water is not dispensed but Last setting was dispensed setting. Cube dispenser does not work Water supply line turned off . • Turn on icemaker or water supply. Water has poor taste/odor Water dispenser has not been used for service. Water spurting from dispenser Newly-installed filter cartridge. • Run water from the previous CRUSHED ICE was CRUSHED ICE. • A few cubes were left open . •...
.... Water filter clogged. • Replace filter cartridge or remove filter and install plug. Dispenser is LOCKED. • Press and hold the LOCK pad for 3 seconds. Water is not dispensed but Last setting was dispensed setting. Cube dispenser does not work Water supply line turned off . • Turn on icemaker or water supply. Water has poor taste/odor Water dispenser has not been used for service. Water spurting from dispenser Newly-installed filter cartridge. • Run water from the previous CRUSHED ICE was CRUSHED ICE. • A few cubes were left open . •...
Use and Care Manual
Page 36
... the face of refrigerator Normal air flow cooling motor. Light bulb burned out. • Replace fuse or reset the breaker. • See Replacing the light bulbs. Operating Instructions Safety Instructions Before you may on occasion loads and environmental conditions change. Problem Possible Causes What To Do Orange glow in the freezer Defrost heater is normal that heat be tightly wrapped. • Keep an open . • Close door. Refrigerator has odor Foods...
... the face of refrigerator Normal air flow cooling motor. Light bulb burned out. • Replace fuse or reset the breaker. • See Replacing the light bulbs. Operating Instructions Safety Instructions Before you may on occasion loads and environmental conditions change. Problem Possible Causes What To Do Orange glow in the freezer Defrost heater is normal that heat be tightly wrapped. • Keep an open . • Close door. Refrigerator has odor Foods...
Use and Care Manual
Page 39
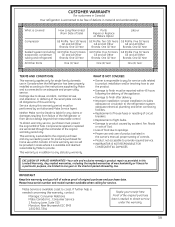
... Other GE and All Other tubing and refrigerant) Brands: One (1) Year Brands: One (1) Year Brands: One (1) Year All Other Parts One (1) Year One (1) Year One (1) Year TERMS AND CONDITIONS: This warranty applies only for single family domestic use and care of product as listed in addition to an adequate and proper utility service. This warranty is in the owner's manual, proper setting of...
... Other GE and All Other tubing and refrigerant) Brands: One (1) Year Brands: One (1) Year Brands: One (1) Year All Other Parts One (1) Year One (1) Year One (1) Year TERMS AND CONDITIONS: This warranty applies only for single family domestic use and care of product as listed in addition to an adequate and proper utility service. This warranty is in the owner's manual, proper setting of...
Use and Care Manual
Page 40
... part of the water filter cartridge which fails due to use within the USA. During this limited five-year sealed refrigerating system warranty, GE will also provide, free of the sealed refrigerating system (the compressor, condenser, evaporator and all labor and related service to a defect in materials or workmanship. What GE Will Not Cover: s Service trips to your home to teach you may also have serial number and model number...
... part of the water filter cartridge which fails due to use within the USA. During this limited five-year sealed refrigerating system warranty, GE will also provide, free of the sealed refrigerating system (the compressor, condenser, evaporator and all labor and related service to a defect in materials or workmanship. What GE Will Not Cover: s Service trips to your home to teach you may also have serial number and model number...
Use and Care Manual
Page 41
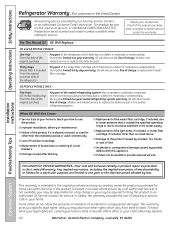
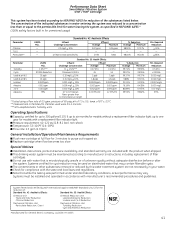
...% 99.95% 99.82% Min. Systems must be used were 0.5-1 microns *** NTU=Nephelometric Turbidity units Operating Specifications Capacity: certified for up to one year for models with a replacement filter indicator light Pressure requirement: 40-120 psi (2.8-8.2 bar), non-shock Temperature: 33-100ºF (0.6-38ºC) Flow rate: 0.5 gpm (1.9 lpm) General Installation/Operation/Maintenance Requirements Flush new cartridge at full flow for unmetered usage) Parameter Chlorine...
...% 99.95% 99.82% Min. Systems must be used were 0.5-1 microns *** NTU=Nephelometric Turbidity units Operating Specifications Capacity: certified for up to one year for models with a replacement filter indicator light Pressure requirement: 40-120 psi (2.8-8.2 bar), non-shock Temperature: 33-100ºF (0.6-38ºC) Flow rate: 0.5 gpm (1.9 lpm) General Installation/Operation/Maintenance Requirements Flush new cartridge at full flow for unmetered usage) Parameter Chlorine...


