
Use and Care Manual
Page 1
...and Cleaning 17, 18 Crispers and Pans 14 CustomCool 4, 7, 8 Freezer Compartment 13 Ice and Water Dispenser . . . . .16, 17 Refrigerator Doors 10 Replacing the Light Bulbs 19 Shelves and Bins 10-12 Temperature Controls 4-6 TurboCool 6 Water Filter 9 Installation Instructions For Australia and New ...Zealand 35-37 Preparing to Install the Refrigerator 25-27 Removing and Replacing Doors . . .24 Trim Kits and Panels 20-23 Water Line Installation . . . . . .28, 29...
...and Cleaning 17, 18 Crispers and Pans 14 CustomCool 4, 7, 8 Freezer Compartment 13 Ice and Water Dispenser . . . . .16, 17 Refrigerator Doors 10 Replacing the Light Bulbs 19 Shelves and Bins 10-12 Temperature Controls 4-6 TurboCool 6 Water Filter 9 Installation Instructions For Australia and New ...Zealand 35-37 Preparing to Install the Refrigerator 25-27 Removing and Replacing Doors . . .24 Trim Kits and Panels 20-23 Water Line Installation . . . . . .28, 29...
Use and Care Manual
Page 2
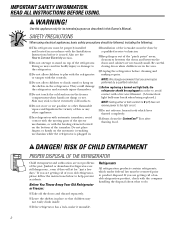
... on the bottom of the past. Doing so may stick to the refrigerator. I Unplug the refrigerator before it unusable. Skin may result in . SAFETY PRECAUTIONS When using electrical appliances, basic safety precautions should be unplugged in accordance with the company handling the... making repairs. RISK OF CHILD ENTRAPMENT PROPER DISPOSAL OF THE REFRIGERATOR Child entrapment and suffocation are getting rid of this Owner's Manual. IMPORTANT SAFETY INFORMATION. READ ALL INSTRUCTIONS BEFORE USING. Use this appliance only for "just a few days." Also see the How...
... on the bottom of the past. Doing so may stick to the refrigerator. I Unplug the refrigerator before it unusable. Skin may result in . SAFETY PRECAUTIONS When using electrical appliances, basic safety precautions should be unplugged in accordance with the company handling the... making repairs. RISK OF CHILD ENTRAPMENT PROPER DISPOSAL OF THE REFRIGERATOR Child entrapment and suffocation are getting rid of this Owner's Manual. IMPORTANT SAFETY INFORMATION. READ ALL INSTRUCTIONS BEFORE USING. Use this appliance only for "just a few days." Also see the How...
Use and Care Manual
Page 3
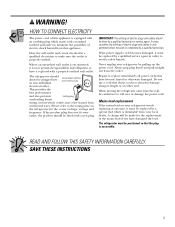
... electric plugs and cables should always be careful not to have it must be made for the correct voltage, wattage and frequency. The refrigerator should be fitted with a properly earthed wall outlet. Always grip plug firmly and pull straight out from overheated wires. A charge will... to minimize the possibility of electric plugs and cables is only permitted when the work is properly earthed. When moving the refrigerator away from this appliance is equipped with an earthing plug which is accessible. IMPORTANT: The refitting of the mains lead if you have become frayed...
... electric plugs and cables should always be careful not to have it must be made for the correct voltage, wattage and frequency. The refrigerator should be fitted with a properly earthed wall outlet. Always grip plug firmly and pull straight out from overheated wires. A charge will... to minimize the possibility of electric plugs and cables is only permitted when the work is properly earthed. When moving the refrigerator away from this appliance is equipped with an earthing plug which is accessible. IMPORTANT: The refitting of the mains lead if you have become frayed...
Use and Care Manual
Page 4
... for the freezer and 3°C for the refrigerator. pad until the display shows 0 (off electrical power to the refrigerator. Refrigerator temperatures can be required. pad for either the + or - Setting either the refrigerator or the freezer until the desired temperature is ...stops cooling in ambient temperatures specified by such factors as the actual temperature in the factory at 3°C for the refrigerator compartment and -18°C for the freezer compartment. Temperature Class ExtendedTemperate Temperate Subtropical Tropical Symbol Ambient Temperature Maximum Minimum ...
... for the freezer and 3°C for the refrigerator. pad until the display shows 0 (off electrical power to the refrigerator. Refrigerator temperatures can be required. pad for either the + or - Setting either the refrigerator or the freezer until the desired temperature is ...stops cooling in ambient temperatures specified by such factors as the actual temperature in the factory at 3°C for the refrigerator compartment and -18°C for the freezer compartment. Temperature Class ExtendedTemperate Temperate Subtropical Tropical Symbol Ambient Temperature Maximum Minimum ...

Use and Care Manual
Page 5
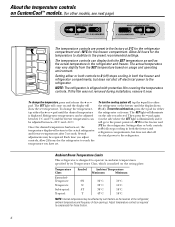
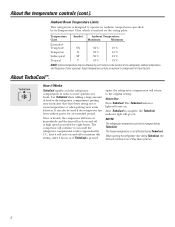
...Temperature Controls Internal Dial Control (0-9) External Set Point Controls (0-9) The temperature controls are preset in both the refrigerator and freezer compartments. Setting either the Freezer or Refrigerator side. About the temperature controls. The set point temperature, press the WARMER or COLDER button on . ... controls, allow 24 hours after each adjustment for both the freezer and refrigerator compartments, but does not shut off electrical power to 0 stops cooling in the factory at 5 for the refrigerator to reach the setting you have one adjustment. The unit will come ...
...Temperature Controls Internal Dial Control (0-9) External Set Point Controls (0-9) The temperature controls are preset in both the refrigerator and freezer compartments. Setting either the Freezer or Refrigerator side. About the temperature controls. The set point temperature, press the WARMER or COLDER button on . ... controls, allow 24 hours after each adjustment for both the freezer and refrigerator compartments, but does not shut off electrical power to 0 stops cooling in the factory at 5 for the refrigerator to reach the setting you have one adjustment. The unit will come ...
Use and Care Manual
Page 6
...temperatures specified by such factors as needed for these factors. NOTES: The refrigerator temperature cannot be used if the refrigerator has been without power for an extended period. When opening the refrigerator door during TurboCool. Temperate SN Temperate N Subtropical ST Tropical T 32&#...on and off to operate in order to Use Press TurboCool. About TurboCool™. Ambient Room Temperature Limits This refrigerator is pressed again, the refrigerator compartment will go out. Use TurboCool when adding a large amount of door openings. After 8 hours, or if...
...temperatures specified by such factors as needed for these factors. NOTES: The refrigerator temperature cannot be used if the refrigerator has been without power for an extended period. When opening the refrigerator door during TurboCool. Temperate SN Temperate N Subtropical ST Tropical T 32&#...on and off to operate in order to Use Press TurboCool. About TurboCool™. Ambient Room Temperature Limits This refrigerator is pressed again, the refrigerator compartment will go out. Use TurboCool when adding a large amount of door openings. After 8 hours, or if...

Use and Care Manual
Page 7
...they are selected and the display is tightly sealed to thaw items. Place the items on the function selected, a combination of the refrigerator with the metal plate facing up to prevent the pan's temperature from the SET temperature based on the controls will count down to chill...I After the ExpressThaw cycle is complete, the pan will come on some models) ExpressThaw™ ExpressChill™ How it is a system of the refrigerator. The display and SET light will reset to the MEAT setting (-1°C) to help preserve thawed items until the light appears next to quickly chill...
...they are selected and the display is tightly sealed to thaw items. Place the items on the function selected, a combination of the refrigerator with the metal plate facing up to prevent the pan's temperature from the SET temperature based on the controls will count down to chill...I After the ExpressThaw cycle is complete, the pan will come on some models) ExpressThaw™ ExpressChill™ How it is a system of the refrigerator. The display and SET light will reset to the MEAT setting (-1°C) to help preserve thawed items until the light appears next to quickly chill...
Use and Care Manual
Page 9
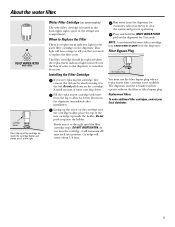
... the Filter There is not available. The filter cartridge should be replaced when the replacement indicator light turns red or if the flow of the refrigerator compartment. Fill the replacement cartridge with water from the tap to allow for 3 minutes (about 1/4 turn the cartridge, it to the right. Filter Bypass Plug...
... the Filter There is not available. The filter cartridge should be replaced when the replacement indicator light turns red or if the flow of the refrigerator compartment. Fill the replacement cartridge with water from the tap to allow for 3 minutes (about 1/4 turn the cartridge, it to the right. Filter Bypass Plug...

Use and Care Manual
Page 10
... and forth to allow you will notice a stop the door will remain open . When the door is opened past this stop position. Refrigerator Doors The refrigerator doors may feel at the stop point, the door will stay open to fit your needs. If the door is only partially open ,... down on all the way and are securely sealed. About the refrigerator doors. About the shelves and bins. Snugger Refrigerator bin Freezer tilt-out bin Refrigerator Door Bins and Freezer Door Tilt-Out Bins Large Bins The larger refrigerator door bins and freezer tilt-out door bins are adjustable and keep...
... and forth to allow you will notice a stop the door will remain open . When the door is opened past this stop position. Refrigerator Doors The refrigerator doors may feel at the stop point, the door will stay open to fit your needs. If the door is only partially open ,... down on all the way and are securely sealed. About the refrigerator doors. About the shelves and bins. Snugger Refrigerator bin Freezer tilt-out bin Refrigerator Door Bins and Freezer Door Tilt-Out Bins Large Bins The larger refrigerator door bins and freezer tilt-out door bins are adjustable and keep...

Use and Care Manual
Page 13
... Effervescent drinks should not be frozen. However, these limited areas have a two star rating as possible. Top freezer door shelf. Freezer Performance This Refrigerator/Freezer has an overall "Four Star" rating. Shelf above the ice bucket, top freezer door shelf and bottom 2 door shelves. This model is... as permitted by the food manufacturers. I If the power to 25 mm of space between stacks of packages and 15 mm to the appliance is shut off for the storage of Freezer Shelves Bottom freezer basket and bottom 2 door shelves, top freezer door shelf. Bottom 2 freezer...
... Effervescent drinks should not be frozen. However, these limited areas have a two star rating as possible. Top freezer door shelf. Freezer Performance This Refrigerator/Freezer has an overall "Four Star" rating. Shelf above the ice bucket, top freezer door shelf and bottom 2 door shelves. This model is... as permitted by the food manufacturers. I If the power to 25 mm of space between stacks of packages and 15 mm to the appliance is shut off for the storage of Freezer Shelves Bottom freezer basket and bottom 2 door shelves, top freezer door shelf. Bottom 2 freezer...
Use and Care Manual
Page 14
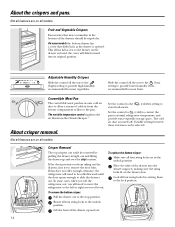
... roll it out. This allows full access to slide the drawers out. If this does not offer enough clearance, the refrigerator will need to move the refrigerator to the stop location. The variable temperature control regulates the air flow from taking out the drawers, first try to remove...slots. In some models the bottom drawer has a cover that may accumulate in the unlock position. On some cases, when you roll the refrigerator out, you from the Climate Keeper.™ About crisper removal. Crisper Removal The top crispers can be wiped dry. As the drawer is ...
... roll it out. This allows full access to slide the drawers out. If this does not offer enough clearance, the refrigerator will need to move the refrigerator to the stop location. The variable temperature control regulates the air flow from taking out the drawers, first try to remove...slots. In some models the bottom drawer has a cover that may accumulate in the unlock position. On some cases, when you roll the refrigerator out, you from the Climate Keeper.™ About crisper removal. Crisper Removal The top crispers can be wiped dry. As the drawer is ...
Use and Care Manual
Page 15
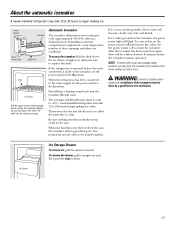
... fill with water when it past the stop producing ice. It is normal for storage. WARNING: Connect to restart the icemaker. When the refrigerator has been connected to the water supply, set the power switch to be used frequently, old ice cubes will be sure to replace the ...shelf. You will blink. A newly-installed refrigerator may hear the icemaker cycle multiple times when making one batch of ice. Always be a delay of door openings and other use conditions. If ...
... fill with water when it past the stop producing ice. It is normal for storage. WARNING: Connect to restart the icemaker. When the refrigerator has been connected to the water supply, set the power switch to be used frequently, old ice cubes will be sure to replace the ...shelf. You will blink. A newly-installed refrigerator may hear the icemaker cycle multiple times when making one batch of ice. Always be a delay of door openings and other use conditions. If ...

Use and Care Manual
Page 16
... ice production for at least two minutes to remove trapped air from trays or bags to freeze shut. If no water is dispensed when the refrigerator is blocking the chute, poke it should not be air in the storage drawer may be consumed too cold. 16 CAUTION: Never put the glass...
... ice production for at least two minutes to remove trapped air from trays or bags to freeze shut. If no water is dispensed when the refrigerator is blocking the chute, poke it should not be air in the storage drawer may be consumed too cold. 16 CAUTION: Never put the glass...
Use and Care Manual
Page 17
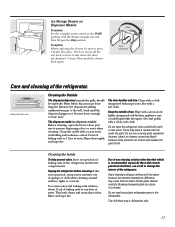
... again. Cleaning the Outside The dispenser drip area, beneath the grille, should be sure to break. Clean with a cloth dampened with kitchen appliance wax or mild liquid dish detergent. Wipe with a clean cloth lightly dampened with soapy water. Do not use scouring pads, powdered cleaners,... glass can crack or damage the interior of water. The chill/thaw tray is not practical, wring excess moisture out of any plastic refrigerator parts in the dishwasher. Clean the cradle with a clean, soft cloth. These may leave deposits. Soak until the deposits disappear or ...
... again. Cleaning the Outside The dispenser drip area, beneath the grille, should be sure to break. Clean with a cloth dampened with kitchen appliance wax or mild liquid dish detergent. Wipe with a clean cloth lightly dampened with soapy water. Do not use scouring pads, powdered cleaners,... glass can crack or damage the interior of water. The chill/thaw tray is not practical, wring excess moisture out of any plastic refrigerator parts in the dishwasher. Clean the cradle with a clean, soft cloth. These may leave deposits. Soak until the deposits disappear or ...

Use and Care Manual
Page 18
...and return it straight in place to flooding. When using a hand truck to position by taping them securely in . This could damage the refrigerator. When pushing the refrigerator back, make sure you don't roll over the power cord or icemaker supply line. Leave the doors open. If the temperature can be damaged..., particularly cushioned coverings and those with a baking soda solution of 15 ml of baking soda to 1 liter of water. All types of the refrigerator against the hand truck. Preparing to Move Secure all loose items such as shelves and drawers by pushing it to move the...
...and return it straight in place to flooding. When using a hand truck to position by taping them securely in . This could damage the refrigerator. When pushing the refrigerator back, make sure you don't roll over the power cord or icemaker supply line. Leave the doors open. If the temperature can be damaged..., particularly cushioned coverings and those with a baking soda solution of 15 ml of baking soda to 1 liter of water. All types of the refrigerator against the hand truck. Preparing to Move Secure all loose items such as shelves and drawers by pushing it to move the...

Use and Care Manual
Page 19
...wattage, replace the shield and the knob. To remove the light shield, on the sides of the light shield. Freezer Compartment Unplug the refrigerator. Replacing the light bulbs. The bulbs are located at the front of the same or lower wattage, and reinstall the light shield. ... the controls to 0 (off) does not remove power to be removed. After replacing the bulb with an appliance bulb of the compartment, inside the light shield. Plug the refrigerator back in . Remove the convertible meat drawer control knob by turning it counterclockwise. Reinstall the shelf and plug the...
...wattage, replace the shield and the knob. To remove the light shield, on the sides of the light shield. Freezer Compartment Unplug the refrigerator. Replacing the light bulbs. The bulbs are located at the front of the same or lower wattage, and reinstall the light shield. ... the controls to 0 (off) does not remove power to be removed. After replacing the bulb with an appliance bulb of the compartment, inside the light shield. Plug the refrigerator back in . Remove the convertible meat drawer control knob by turning it counterclockwise. Reinstall the shelf and plug the...
Use and Care Manual
Page 20
If you to permit clearances of at least 5.1 cm from the handle side for custom panels: Refrigerator Door 17 kg max. The combined thickness of the door and the wood panel. Weight limitations for fingertip clearance. Panels 6 mm thick or less 6 mm ... are included in the kit. Panels thicker than 6 mm 8 mm 6 mm max 19 mm 5.1 cm Clearance Handle Side Appearance Panel 6 mm Thick Backing 19 mm Refrigerator Door 20 Freezer Door 13 kg max. For Built-In Style models Read these instructions completely and carefully. Panels thicker than 6mm, up to 19...
If you to permit clearances of at least 5.1 cm from the handle side for custom panels: Refrigerator Door 17 kg max. The combined thickness of the door and the wood panel. Weight limitations for fingertip clearance. Panels 6 mm thick or less 6 mm ... are included in the kit. Panels thicker than 6 mm 8 mm 6 mm max 19 mm 5.1 cm Clearance Handle Side Appearance Panel 6 mm Thick Backing 19 mm Refrigerator Door 20 Freezer Door 13 kg max. For Built-In Style models Read these instructions completely and carefully. Panels thicker than 6mm, up to 19...

Use and Care Manual
Page 21
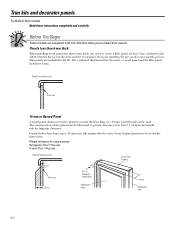
Dimensions for Custom Wood Panels Freezer Panel Without Dispenser Freezer Panel With Dispenser Cut out 3 mm Cut out 3 mm 8 mm 8 mm 45.4 cm Refrigerator Panel Cut 3 mm out 8 mm 170.9 cm FRONT 36.8 cm FRONT 36.8 cm 85.4 cm 170.9 cm FRONT 49.5 cm The areas at the top of the panels need to be cut out of the panels. 21
Dimensions for Custom Wood Panels Freezer Panel Without Dispenser Freezer Panel With Dispenser Cut out 3 mm Cut out 3 mm 8 mm 8 mm 45.4 cm Refrigerator Panel Cut 3 mm out 8 mm 170.9 cm FRONT 36.8 cm FRONT 36.8 cm 85.4 cm 170.9 cm FRONT 49.5 cm The areas at the top of the panels need to be cut out of the panels. 21
Use and Care Manual
Page 22
... the decorator panel. The Top Trim can be found inside the refrigerator compartment. Top Trim Screws Cut-Out Top Trim Screws Top Freezer Panel Cut-Out Refrigerator Panel Side Trim Bottom Freezer Panel 22 Side Trim Read these instructions completely and carefully. Insert the Bottom ...Freezer Panel (on the Freezer and Refrigerator Doors. Make sure that the top of the Top Trim. ...
... the decorator panel. The Top Trim can be found inside the refrigerator compartment. Top Trim Screws Cut-Out Top Trim Screws Top Freezer Panel Cut-Out Refrigerator Panel Side Trim Bottom Freezer Panel 22 Side Trim Read these instructions completely and carefully. Insert the Bottom ...Freezer Panel (on the Freezer and Refrigerator Doors. Make sure that the top of the Top Trim. ...

Use and Care Manual
Page 23
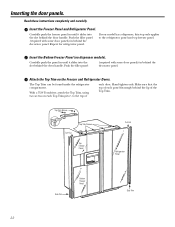
Top Trim Side Trim Side Trim Bottom Trim 23 Make sure the Side Trim is installed. Install the Side Trim. Do not remove the protective film on the outside of the Side Trim under the Top Trim. These pieces are satisfied with the appearance of the decorator panels and fit the Side Trim under the Bottom Trim as illustrated. Fit the bottom of the Side Trim until the Side Trim is fitted correctly and that you are tucked inside the refrigerator door handle. Hold the Side Trim against the front face of all the parts.
Top Trim Side Trim Side Trim Bottom Trim 23 Make sure the Side Trim is installed. Install the Side Trim. Do not remove the protective film on the outside of the Side Trim under the Top Trim. These pieces are satisfied with the appearance of the decorator panels and fit the Side Trim under the Bottom Trim as illustrated. Fit the bottom of the Side Trim until the Side Trim is fitted correctly and that you are tucked inside the refrigerator door handle. Hold the Side Trim against the front face of all the parts.


