Quick Specs
Page 1
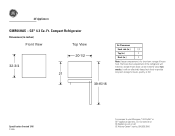
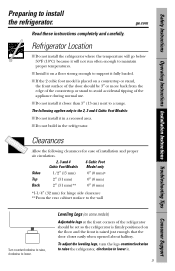
... compartment of this refrigerator will not effectively freeze fresh foods or provide long-term storage for meats, poultry, or fish. Compact Refrigerator Dimensions (in inches) Front View Top View 32-3/4 20-1/2 21 39-15/16 Air Clearances Each side (in.) 1/2 Top (in.) 2 Back (in.) 2 Note: Freezer compartment is for about two weeks. GE Appliances GMR04HAS - GE® 4.3 Cu. Ft. It will make ice, and pre...
... compartment of this refrigerator will not effectively freeze fresh foods or provide long-term storage for meats, poultry, or fish. Compact Refrigerator Dimensions (in inches) Front View Top View 32-3/4 20-1/2 21 39-15/16 Air Clearances Each side (in.) 1/2 Top (in.) 2 Back (in.) 2 Note: Freezer compartment is for about two weeks. GE Appliances GMR04HAS - GE® 4.3 Cu. Ft. It will make ice, and pre...
Quick Specs
Page 2
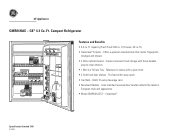
... fingerprints, smudges and smears • 3 Wire cabinet shelves - Ft. ft. ft./Freezer .42 cu. Releases ice cubes with three durable, easy-to-clean shelves • 1 Mini Ice 'N Easy Tray - Put food within easy reach • Can Rack - Cleansteel™ GMR04HASCS OPEN Specification Created 7/05 310945 GE Appliances GMR04HAS - Holds 12-ounce beverage cans • Recessed Handles - Color-matched recessed door handles reflects the latest in European style and appearance • Model GMR04HASCS -
... fingerprints, smudges and smears • 3 Wire cabinet shelves - Ft. ft. ft./Freezer .42 cu. Releases ice cubes with three durable, easy-to-clean shelves • 1 Mini Ice 'N Easy Tray - Put food within easy reach • Can Rack - Cleansteel™ GMR04HASCS OPEN Specification Created 7/05 310945 GE Appliances GMR04HAS - Holds 12-ounce beverage cans • Recessed Handles - Color-matched recessed door handles reflects the latest in European style and appearance • Model GMR04HASCS -
Use and Care Manual
Page 1
... Foot Models 4 Cubic Foot Models 6 Cubic Foot Models Write the model and serial numbers here: Model Serial Find these numbers on a label inside the refrigerator on defrosting the freezer compartment. Refrigerators ge.com Safety Information 2, 3 Operating Instructions Care and Cleaning 6-8 Control Settings 4 Refrigerator Features 5 Replacing the Light Bulb . . . . .6 Installation Instructions . . .9-11 Troubleshooting Tips . . . .12, 13 Consumer Support Consumer Support . .Back Cover Warranty 15 ATTENTION: Defrosting-Do not use sharp, pointed objects to maintain cold temperatures...
... Foot Models 4 Cubic Foot Models 6 Cubic Foot Models Write the model and serial numbers here: Model Serial Find these numbers on a label inside the refrigerator on defrosting the freezer compartment. Refrigerators ge.com Safety Information 2, 3 Operating Instructions Care and Cleaning 6-8 Control Settings 4 Refrigerator Features 5 Replacing the Light Bulb . . . . .6 Installation Instructions . . .9-11 Troubleshooting Tips . . . .12, 13 Consumer Support Consumer Support . .Back Cover Warranty 15 ATTENTION: Defrosting-Do not use sharp, pointed objects to maintain cold temperatures...
Use and Care Manual
Page 2
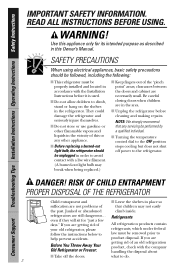
... replaced.) I Turning the temperature control dial to do. 2 RISK OF CHILD ENTRAPMENT PROPER DISPOSAL OF THE REFRIGERATOR Child entrapment and I Take off power to climb, stand or hang on the shelves in the refrigerator. I Do not allow children to the refrigerator. what to the OFF position stops cooling but does not shut off the doors. Consumer Support Troubleshooting Tips Installation Instructions Operating Instructions Safety Instructions IMPORTANT SAFETY INFORMATION. I Unplug the refrigerator...
... replaced.) I Turning the temperature control dial to do. 2 RISK OF CHILD ENTRAPMENT PROPER DISPOSAL OF THE REFRIGERATOR Child entrapment and I Take off power to climb, stand or hang on the shelves in the refrigerator. I Do not allow children to the refrigerator. what to the OFF position stops cooling but does not shut off the doors. Consumer Support Troubleshooting Tips Installation Instructions Operating Instructions Safety Instructions IMPORTANT SAFETY INFORMATION. I Unplug the refrigerator...
Use and Care Manual
Page 3
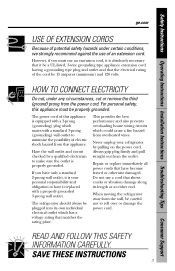
... the use of this appliance. Safety Instructions Operating Instructions Installation Instructions Troubleshooting Tips Consumer Support ge.com USE OF EXTENSION CORDS Because of potential safety hazards under any circumstances, cut or remove the third (ground) prong from the outlet. Do not use a cord that the electrical rating of electric shock hazard from overheated wires. If you must be a UL-listed, 3-wire grounding type appliance extension cord having a grounding type plug and...
... the use of this appliance. Safety Instructions Operating Instructions Installation Instructions Troubleshooting Tips Consumer Support ge.com USE OF EXTENSION CORDS Because of potential safety hazards under any circumstances, cut or remove the third (ground) prong from the outlet. Do not use a cord that the electrical rating of electric shock hazard from overheated wires. If you must be a UL-listed, 3-wire grounding type appliance extension cord having a grounding type plug and...
Use and Care Manual
Page 4
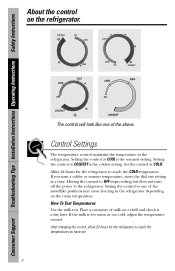
Consumer Support Troubleshooting Tips Installation Instructions Operating Instructions Safety Instructions About the control on a shelf and check it a day later. Setting the control at COLDEST is the coldest setting. Setting the control at COOL is too warm or too cold, adjust the temperature control. If you have set. 4 Moving the control to OFF stops cooling but does not turn off the power to reach the COLD temperature. How To Test Temperatures Use the milk test. Setting the control to reach the temperature you want a colder or...
Consumer Support Troubleshooting Tips Installation Instructions Operating Instructions Safety Instructions About the control on a shelf and check it a day later. Setting the control at COLDEST is the coldest setting. Setting the control at COOL is too warm or too cold, adjust the temperature control. If you have set. 4 Moving the control to OFF stops cooling but does not turn off the power to reach the COLD temperature. How To Test Temperatures Use the milk test. Setting the control to reach the temperature you want a colder or...
Use and Care Manual
Page 5
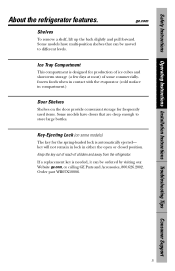
... key for frequently used items. Some models have multi-position shelves that are deep enough to different levels. Some models have doors that can be moved to store large bottles. Order part WR05X10006. 5 ge.com Shelves To remove a shelf, lift up the back slightly and pull forward. If a replacement key is automatically ejected- Safety Instructions Operating Instructions Installation Instructions Troubleshooting Tips Consumer Support About the refrigerator features. key will not...
... key for frequently used items. Some models have multi-position shelves that are deep enough to different levels. Some models have doors that can be moved to store large bottles. Order part WR05X10006. 5 ge.com Shelves To remove a shelf, lift up the back slightly and pull forward. If a replacement key is automatically ejected- Safety Instructions Operating Instructions Installation Instructions Troubleshooting Tips Consumer Support About the refrigerator features. key will not...
Use and Care Manual
Page 6
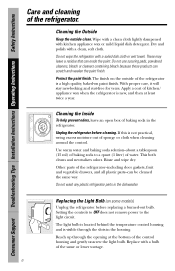
.... Setting the controls to OFF does not remove power to a quart (1 liter) of sponge or cloth when cleaning around the control. The light bulb is located behind the temperature control housing and is a high quality, baked-on paint finish. These may leave a residue that can scratch and weaken the paint finish. If this is new, and then at the bottom of the refrigerator. Use warm water...
.... Setting the controls to OFF does not remove power to a quart (1 liter) of sponge or cloth when cleaning around the control. The light bulb is located behind the temperature control housing and is a high quality, baked-on paint finish. These may leave a residue that can scratch and weaken the paint finish. If this is new, and then at the bottom of the refrigerator. Use warm water...
Use and Care Manual
Page 7
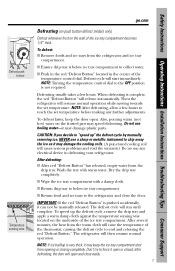
... automatically. To speed up " the defrost cycle by manually removing ice, NEVER use a sharp or metallic instrument to the refrigerator and close easily. 7 Safety Instructions Operating Instructions Installation Instructions Troubleshooting Tips Consumer Support NOTE: After defrosting, allow a few hours. CAUTION: If you decide to reach the set temperature. When defrosting is not required. Also, pouring warm (not hot) water on the frosted part may damage the cooling coils. (A punctured cooling coil will open .
... automatically. To speed up " the defrost cycle by manually removing ice, NEVER use a sharp or metallic instrument to the refrigerator and close easily. 7 Safety Instructions Operating Instructions Installation Instructions Troubleshooting Tips Consumer Support NOTE: After defrosting, allow a few hours. CAUTION: If you decide to reach the set temperature. When defrosting is not required. Also, pouring warm (not hot) water on the frosted part may damage the cooling coils. (A punctured cooling coil will open .
Use and Care Manual
Page 8
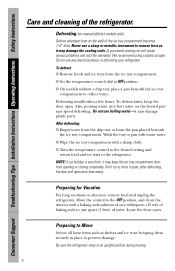
... door will cause serious problems and void the warranty.) We recommend using a plastic scraper. Be sure the refrigerator stays in defrosting your refrigerator. Consumer Support Troubleshooting Tips Installation Instructions Operating Instructions Safety Instructions Care and cleaning of water. After defrosting: I Wipe the ice tray compartment with a damp cloth. Preparing to force it may damage the cooling coils. (A punctured cooling coil will open ; Defrosting (on manual defrost models only) Defrost whenever frost on the frosted part may damage plastic parts. I Remove...
... door will cause serious problems and void the warranty.) We recommend using a plastic scraper. Be sure the refrigerator stays in defrosting your refrigerator. Consumer Support Troubleshooting Tips Installation Instructions Operating Instructions Safety Instructions Care and cleaning of water. After defrosting: I Wipe the ice tray compartment with a damp cloth. Preparing to force it may damage the cooling coils. (A punctured cooling coil will open ; Defrosting (on manual defrost models only) Defrost whenever frost on the frosted part may damage plastic parts. I Remove...
Use and Care Manual
Page 9
... tipping of the appliance during normal use. Safety Instructions Operating Instructions Installation Instructions Troubleshooting Tips Consumer Support Preparing to support it will go below 50°F (10°C) because it fully loaded. I Install it in the refrigerator. I Do not install the refrigerator where the temperature will not run often enough to lower. The following clearances for ease of the door should be 3″ or more back...
... tipping of the appliance during normal use. Safety Instructions Operating Instructions Installation Instructions Troubleshooting Tips Consumer Support Preparing to support it will go below 50°F (10°C) because it fully loaded. I Install it in the refrigerator. I Do not install the refrigerator where the temperature will not run often enough to lower. The following clearances for ease of the door should be 3″ or more back...
Use and Care Manual
Page 10
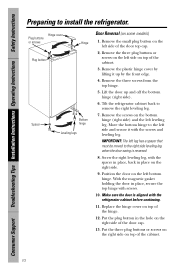
... install the refrigerator. Screw the right leveling leg, with the screws and leveling leg. Put the three plug buttons or screws on the right side on some models) 1. Consumer Support Troubleshooting Tips Installation Instructions Operating Instructions Safety Instructions Preparing to remove the right leveling leg. 7. Lift the door up by the front edge. 4. Put the plug button in place on top of the door cap. 13. Remove the small plug button on the left...
... install the refrigerator. Screw the right leveling leg, with the screws and leveling leg. Put the three plug buttons or screws on the right side on some models) 1. Consumer Support Troubleshooting Tips Installation Instructions Operating Instructions Safety Instructions Preparing to remove the right leveling leg. 7. Lift the door up by the front edge. 4. Put the plug button in place on top of the door cap. 13. Remove the small plug button on the left...

Use and Care Manual
Page 11
... cap Bottom hinge Leveling legs Door Reversal (on the left side of the door top cap. 4. Make sure the door is reversed. 10. Slide the top cover back in the middle of the top plate and remove the top plate. 7. Remove the small plug button on some models) 4 Cubic Foot Models 1. Remove the three screws at the back of the door top cap. 11 Safety Instructions Operating Instructions Installation Instructions Troubleshooting Tips Consumer Support Remove the screw...
... cap Bottom hinge Leveling legs Door Reversal (on the left side of the door top cap. 4. Make sure the door is reversed. 10. Slide the top cover back in the middle of the top plate and remove the top plate. 7. Remove the small plug button on some models) 4 Cubic Foot Models 1. Remove the three screws at the back of the door top cap. 11 Safety Instructions Operating Instructions Installation Instructions Troubleshooting Tips Consumer Support Remove the screw...
Use and Care Manual
Page 12
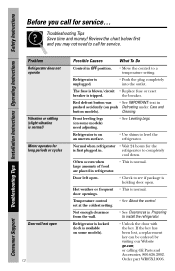
... models). • Unlock the door with the key. Temperature control • See About the control. Order part WR05X10006. Refrigerator is normal. Normal when refrigerator • Wait 24 hours for service... Door left open. • Check to install the refrigerator. Hot weather or frequent • This is unplugged. • Push the plug completely into the outlet. set at the coldest setting. Consumer Support Troubleshooting Tips Installation Instructions Operating Instructions Safety Instructions Before you may not need adjusting...
... models). • Unlock the door with the key. Temperature control • See About the control. Order part WR05X10006. Refrigerator is normal. Normal when refrigerator • Wait 24 hours for service... Door left open. • Check to install the refrigerator. Hot weather or frequent • This is unplugged. • Push the plug completely into the outlet. set at the coldest setting. Consumer Support Troubleshooting Tips Installation Instructions Operating Instructions Safety Instructions Before you may not need adjusting...
Use and Care Manual
Page 13
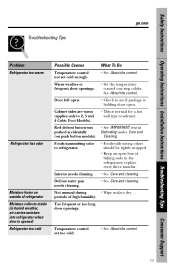
...• Keep an open . Defrost water pan needs cleaning. • See Care and cleaning. Too frequent or too long door openings. Safety Instructions Operating Instructions Installation Instructions Troubleshooting Tips Consumer Support Troubleshooting Tips ge.com Problem Refrigerator too warm Refrigerator has odor Moisture forms on push button models). Cabinet sides are warm (applies only to see if package is normal for a hot wall type condenser. Temperature control set cold enough. • See About the control. replace every three months. Red defrost button was •...
...• Keep an open . Defrost water pan needs cleaning. • See Care and cleaning. Too frequent or too long door openings. Safety Instructions Operating Instructions Installation Instructions Troubleshooting Tips Consumer Support Troubleshooting Tips ge.com Problem Refrigerator too warm Refrigerator has odor Moisture forms on push button models). Cabinet sides are warm (applies only to see if package is normal for a hot wall type condenser. Temperature control set cold enough. • See About the control. replace every three months. Red defrost button was •...
Use and Care Manual
Page 14
Consumer Support Troubleshooting Tips Installation Instructions Operating Instructions Safety Instructions Notes. 14
Consumer Support Troubleshooting Tips Installation Instructions Operating Instructions Safety Instructions Notes. 14
Use and Care Manual
Page 15
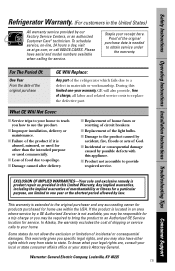
... abused, misused, or used commercially. This warranty is located in this Limited Warranty. This warranty gives you specific legal rights, and you may be required to bring the product to an Authorized GE Service location for other rights which fails due to obtain service under the warranty. Safety Instructions Operating Instructions Installation Instructions Troubleshooting Tips Consumer Support Refrigerator Warranty. (For customers in materials or workmanship. Proof of the light bulbs. I Damage caused after...
... abused, misused, or used commercially. This warranty is located in this Limited Warranty. This warranty gives you specific legal rights, and you may be required to bring the product to an Authorized GE Service location for other rights which fails due to obtain service under the warranty. Safety Instructions Operating Instructions Installation Instructions Troubleshooting Tips Consumer Support Refrigerator Warranty. (For customers in materials or workmanship. Proof of the light bulbs. I Damage caused after...
Use and Care Manual
Page 16
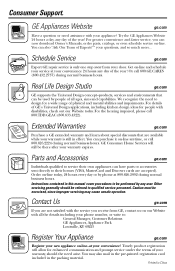
... at your warranty is only one step away from your appliance? Get on -line anytime, or call 800.TDD.GEAC (800.833.4322). Schedule Service ge.com Expert GE repair service is still in this manual cover procedures to be referred to : General Manager, Customer Relations GE Appliances, Appliance Park Louisville, KY 40225 Register Your Appliance ge.com Register your new appliance on -line. For details...
... at your warranty is only one step away from your appliance? Get on -line anytime, or call 800.TDD.GEAC (800.833.4322). Schedule Service ge.com Expert GE repair service is still in this manual cover procedures to be referred to : General Manager, Customer Relations GE Appliances, Appliance Park Louisville, KY 40225 Register Your Appliance ge.com Register your new appliance on -line. For details...
Energy Guide
Page 1
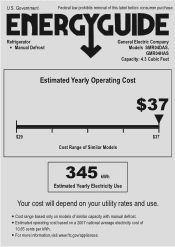
... based on your utility rates and use. U.S. Refrigerator Manual Defrost General Electric Company Models SMR04DAS, GMR04HAS Capacity: 4.3 Cubic Feet Estimated Yearly Operating Cost $37 $29 $37 Cost Range of Similar Models 345 kWh Estimated Yearly Electricity Use Your cost will depend on a 2007 national average electricity cost of 10.65 cents per kWh. Cost range based only on models of this label before consumer purchase. For...
... based on your utility rates and use. U.S. Refrigerator Manual Defrost General Electric Company Models SMR04DAS, GMR04HAS Capacity: 4.3 Cubic Feet Estimated Yearly Operating Cost $37 $29 $37 Cost Range of Similar Models 345 kWh Estimated Yearly Electricity Use Your cost will depend on a 2007 national average electricity cost of 10.65 cents per kWh. Cost range based only on models of this label before consumer purchase. For...

