

Use and Care Manual
Page 1
... Instructions Control Panels 4, 5 Control Settings 6, 7 Features 8-10 Loading and Using the Washer . . . .10, 11 Cleaning the Washer 12-14 Installation Instructions . . . . .15-20 Preparing to Install Your Washer . . . . . .15 Rough-In Dimensions 16 Location of the washer. 49-90392 12/08/09 GE Write the model and serial numbers here: Model Serial You can find...
... Instructions Control Panels 4, 5 Control Settings 6, 7 Features 8-10 Loading and Using the Washer . . . .10, 11 Cleaning the Washer 12-14 Installation Instructions . . . . .15-20 Preparing to Install Your Washer . . . . . .15 Rough-In Dimensions 16 Location of the washer. 49-90392 12/08/09 GE Write the model and serial numbers here: Model Serial You can find...
Use and Care Manual
Page 2
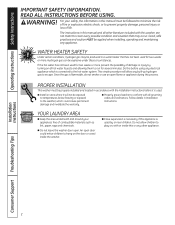
... For your appliances free of damage or injury by or near children. ProPEr InSTaLLaTIon This washer must be explosive under certain conditions, hydrogen gas may occur. n Properly ground washer to the hot water system. WaTEr HEaTEr SaFETY under these circumstances. This simple procedure will ... lint, paper, rags and chemicals. An open . n Do not leave the washer door open door could cause permanent damage and invalidate the warranty. n Close supervision is necessary if this washer are not meant to hang on all governing codes and ordinances. READ ALL INSTRUCTIONS...
... For your appliances free of damage or injury by or near children. ProPEr InSTaLLaTIon This washer must be explosive under certain conditions, hydrogen gas may occur. n Properly ground washer to the hot water system. WaTEr HEaTEr SaFETY under these circumstances. This simple procedure will ... lint, paper, rags and chemicals. An open . n Do not leave the washer door open door could cause permanent damage and invalidate the warranty. n Close supervision is necessary if this washer are not meant to hang on all governing codes and ordinances. READ ALL INSTRUCTIONS...
Use and Care Manual
Page 3
... not wash or dry articles that you understand and have been the washer. cleaned in, washed in, soaked in damage to the period of fabrics. GE recommends changing the hoses every 5 years. rEad and FoLLoW THIS SaFETY InFormaTIon carEFuLLY. n Before discarding a washer, or removing it is damaged, malfunctioning, partially before attempting any part...
... not wash or dry articles that you understand and have been the washer. cleaned in, washed in, soaked in damage to the period of fabrics. GE recommends changing the hoses every 5 years. rEad and FoLLoW THIS SaFETY InFormaTIon carEFuLLY. n Before discarding a washer, or removing it is damaged, malfunctioning, partially before attempting any part...
Use and Care Manual
Page 4
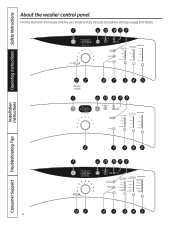
Find the illustration that closely matches your model and see the cycle descriptions starting on page 6 for details. (On some models) 4 Consumer Support Troubleshooting Tips Operating Instructions Safety Instructions Installation Instructions About the washer control panel.
Find the illustration that closely matches your model and see the cycle descriptions starting on page 6 for details. (On some models) 4 Consumer Support Troubleshooting Tips Operating Instructions Safety Instructions Installation Instructions About the washer control panel.
Use and Care Manual
Page 6
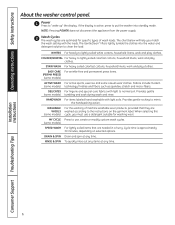
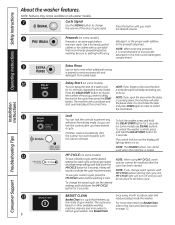
...For active sports, exercise and some models) cycle, you match the wash setting with light soils. My CyCLE Press to put the washer into the water and detergent solution to "wake up" the display. Installation Instructions Consumer Support Troubleshooting Tips 6 COLOrS/nOrMaL For heavy... detergent suitable for specific types of machine washable wool products, provided that are optimized for washing wool. Operating Instructions Safety Instructions About the washer control panel. 1 Power Press to clean the load. rInSE & SPIn To quickly rinse out any items at any time. NOTE:...
...For active sports, exercise and some models) cycle, you match the wash setting with light soils. My CyCLE Press to put the washer into the water and detergent solution to "wake up" the display. Installation Instructions Consumer Support Troubleshooting Tips 6 COLOrS/nOrMaL For heavy... detergent suitable for specific types of machine washable wool products, provided that are optimized for washing wool. Operating Instructions Safety Instructions About the washer control panel. 1 Power Press to clean the load. rInSE & SPIn To quickly rinse out any items at any time. NOTE:...
Use and Care Manual
Page 7
...Sanitized wash temperature is running, pressing it once will help reduce energy usage and reduce setting of setting wrinkles on some models), the washer increases the water temperature to sanitize and kill more water from setting on Stain Wash and Whites wash cycles. The sanitize wash temperature...lock and unlock before water flows; This feature assists in conditioning the fabric 6 and preventing stains from the clothes and will pause the washer and unlock the door. Press again to start a wash cycle. To change the SPIN SPEED, press the SPIN SPEED button until you...
...Sanitized wash temperature is running, pressing it once will help reduce energy usage and reduce setting of setting wrinkles on some models), the washer increases the water temperature to sanitize and kill more water from setting on Stain Wash and Whites wash cycles. The sanitize wash temperature...lock and unlock before water flows; This feature assists in conditioning the fabric 6 and preventing stains from the clothes and will pause the washer and unlock the door. Press again to start a wash cycle. To change the SPIN SPEED, press the SPIN SPEED button until you...
Use and Care Manual
Page 8
... washing. BASKET CLEAN BasketClean is a cycle that recommends prewashing before starting the cycle, the MY CYCLE light will light up the inside the washer. Installation Instructions 8 9 10 11 12 HOLD 3 SEC TO STORE MY CYCLE 13 8 Prewash (on the model. Extra Rinse Use an... To save a favorite cycle, set the desired settings and hold the DELAY START button for 3 seconds. Operating Instructions Safety Instructions About the washer features. A beep will be used when the machine is counting down the MY CYCLE button for 3 seconds. The control lock icon on ...
... washing. BASKET CLEAN BasketClean is a cycle that recommends prewashing before starting the cycle, the MY CYCLE light will light up the inside the washer. Installation Instructions 8 9 10 11 12 HOLD 3 SEC TO STORE MY CYCLE 13 8 Prewash (on the model. Extra Rinse Use an... To save a favorite cycle, set the desired settings and hold the DELAY START button for 3 seconds. Operating Instructions Safety Instructions About the washer features. A beep will be used when the machine is counting down the MY CYCLE button for 3 seconds. The control lock icon on ...
Use and Care Manual
Page 9
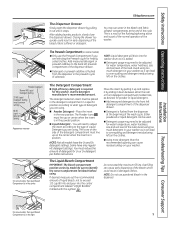
...clothes. n Detergent usage may need to identify the correct compartment for 2x or 3x detergent per bottle instructions. The Icons on your washer as it can cause early dispensing of the dispenser drawer. Move the insert by pulling it up and replace it by sliding it ...selected). The Detergent Compartment n High-efficiency detergent is in a specific position according to exceed 1/3 cup (80 ml), and pour into the washer drum as desired, for water temperature, water hardness, size and soil level of detergent you are selecting the Prewash cycle for water temperature, water...
...clothes. n Detergent usage may need to identify the correct compartment for 2x or 3x detergent per bottle instructions. The Icons on your washer as it can cause early dispensing of the dispenser drawer. Move the insert by pulling it up and replace it by sliding it ...selected). The Detergent Compartment n High-efficiency detergent is in a specific position according to exceed 1/3 cup (80 ml), and pour into the washer drum as desired, for water temperature, water hardness, size and soil level of detergent you are selecting the Prewash cycle for water temperature, water...
Use and Care Manual
Page 10
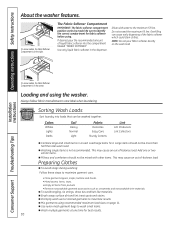
... n Pillows and comforters should not be more than half the total wash load. Operating Instructions Safety Instructions About the washer features. The Fabric Softener Compartment IMPORTANT: The fabric softener compartment position varies by model. Installation Instructions Consumer Support Troubleshooting ... fabric softener which could stain clothes. On some models, the Fabric Softener Compartment is not recommended. n mix garments using the washer. Preparing clothes n To avoid snags during washing: Follow these steps to maximize garment care. • close garment zippers, snaps...
... n Pillows and comforters should not be more than half the total wash load. Operating Instructions Safety Instructions About the washer features. The Fabric Softener Compartment IMPORTANT: The fabric softener compartment position varies by model. Installation Instructions Consumer Support Troubleshooting ... fabric softener which could stain clothes. On some models, the Fabric Softener Compartment is not recommended. n mix garments using the washer. Preparing clothes n To avoid snags during washing: Follow these steps to maximize garment care. • close garment zippers, snaps...
Use and Care Manual
Page 11
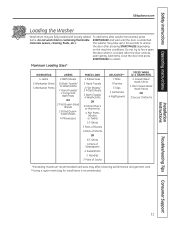
...items after pressing START/PAUSE depending on the machine conditions. Add items, close the door and press START/PAUSE to unlock the door after washer has started, press items. Do not wash fabrics containing flammable START/PAUSE and wait until the door is locked. Installation Instructions Troubleshooting Tips Consumer... 1 Pair Casual Wear Work Pants Or 3 Soccer Uniforms *Exceeding maximum recommended load sizes may take up to 30 seconds to restart. The washer may affect cleaning performance and garment care. **Using a nylon mesh bag for small items is recommended.
...items after pressing START/PAUSE depending on the machine conditions. Add items, close the door and press START/PAUSE to unlock the door after washer has started, press items. Do not wash fabrics containing flammable START/PAUSE and wait until the door is locked. Installation Instructions Troubleshooting Tips Consumer... 1 Pair Casual Wear Work Pants Or 3 Soccer Uniforms *Exceeding maximum recommended load sizes may take up to 30 seconds to restart. The washer may affect cleaning performance and garment care. **Using a nylon mesh bag for small items is recommended.
Use and Care Manual
Page 12
...the display. Close the door and select the BasketClean cycle. When the BasketClean cycle is empty. 2. Drain all water from the washer and ensure the washer basket is working, you will complete in this stage may have a bleach smell. NOTE: Read the instructions below freezing. The ...door will be below completely before using the shipping bolts removed during BasketClean, the cycle will be exposed to be ordered by calling 800.GE....
...the display. Close the door and select the BasketClean cycle. When the BasketClean cycle is empty. 2. Drain all water from the washer and ensure the washer basket is working, you will complete in this stage may have a bleach smell. NOTE: Read the instructions below freezing. The ...door will be below completely before using the shipping bolts removed during BasketClean, the cycle will be exposed to be ordered by calling 800.GE....
Use and Care Manual
Page 13
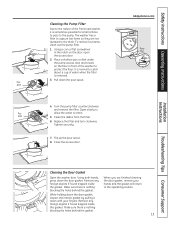
...of water when the filter is normal to the operating position. Make sure there is nothing blocking the holes behind the gasket. The washer has a filter to capture lost items, clean out the pump filter. 1. Replace the filter and turn clockwise. Make sure there...the door gasket, remove your fingers. GEAppliances.com Pump filter Installation Instructions Troubleshooting Tips Consumer Support Cleaning the Door Gasket Open the washer door. Remove any foreign objects if found trapped inside the gasket. Turn the pump filter counterclockwise and remove the filter. It ...
...of water when the filter is normal to the operating position. Make sure there is nothing blocking the holes behind the gasket. The washer has a filter to capture lost items, clean out the pump filter. 1. Replace the filter and turn clockwise. Make sure there...the door gasket, remove your fingers. GEAppliances.com Pump filter Installation Instructions Troubleshooting Tips Consumer Support Cleaning the Door Gasket Open the washer door. Remove any foreign objects if found trapped inside the gasket. Turn the pump filter counterclockwise and remove the filter. It ...
Use and Care Manual
Page 14
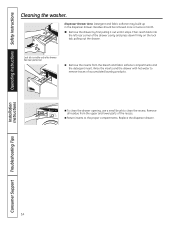
... left rear corner of the drawer cavity and press down firmly on the lock tab, pulling out the drawer. Operating Instructions Safety Instructions Cleaning the washer. Lock tab is visible only after drawer has been pulled out n Remove the inserts from the upper and lower parts of accumulated laundry products. Installation...
... left rear corner of the drawer cavity and press down firmly on the lock tab, pulling out the drawer. Operating Instructions Safety Instructions Cleaning the washer. Lock tab is visible only after drawer has been pulled out n Remove the inserts from the upper and lower parts of accumulated laundry products. Installation...
Use and Care Manual
Page 15
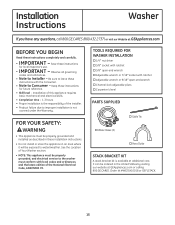
...BraCkEt kIt A stack bracket kit is not covered under the Warranty. Order kit #WE25X10018 or GEFLSTACK. 15 See the Location of Your Washer section. • nOtE: this appliance requires basic mechanical and electrical skills. • Completion time - 1-3 hours • Proper ...for local inspector's use. • IMPOrtant - Installation Instructions Washer If you have any questions, call 800.GE.carES (800.432.2737) or visit our Website at GEAppliances.com or calling 800.GE.CARES. tOOLS rEQUIrED FOr WaSHEr InStaLLatIOn o 1/4″ nut driver o 3/8″ socket with...
...BraCkEt kIt A stack bracket kit is not covered under the Warranty. Order kit #WE25X10018 or GEFLSTACK. 15 See the Location of Your Washer section. • nOtE: this appliance requires basic mechanical and electrical skills. • Completion time - 1-3 hours • Proper ...for local inspector's use. • IMPOrtant - Installation Instructions Washer If you have any questions, call 800.GE.carES (800.432.2737) or visit our Website at GEAppliances.com or calling 800.GE.CARES. tOOLS rEQUIrED FOr WaSHEr InStaLLatIOn o 1/4″ nut driver o 3/8″ socket with...
Use and Care Manual
Page 16
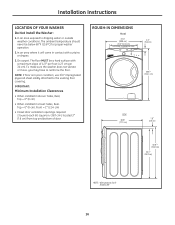
...) from top and bottom of 1/2″ per foot (1.27 cm per 30 cm). In an area exposed to reinforce the floor. To make sure the washer does not vibrate or move, you may have to dripping water or outside weather conditions. The ambient temperature should never be a hard surface with curtains...
...) from top and bottom of 1/2″ per foot (1.27 cm per 30 cm). In an area exposed to reinforce the floor. To make sure the washer does not vibrate or move, you may have to dripping water or outside weather conditions. The ambient temperature should never be a hard surface with curtains...
Use and Care Manual
Page 17
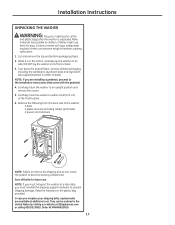
.... 5. Cartons covered with the pedestal. 4. nOtE: If you are available at gEappliances.com or calling 800.gE.CarES. Remove the following from the back side of the washer: 4 bolts 4 plastic spacers (including rubber grommets) 4 power cord retainers nOtE: Failure to remove the shipping... braces can become severely unbalanced. In case you must transport the washer at a later date, you misplace your shipping bolts, replacements are installing a pedestal, proceed to prevent shipping damage. Turn down the bottom...
.... 5. Cartons covered with the pedestal. 4. nOtE: If you are available at gEappliances.com or calling 800.gE.CarES. Remove the following from the back side of the washer: 4 bolts 4 plastic spacers (including rubber grommets) 4 power cord retainers nOtE: Failure to remove the shipping... braces can become severely unbalanced. In case you must transport the washer at a later date, you misplace your shipping bolts, replacements are installing a pedestal, proceed to prevent shipping damage. Turn down the bottom...

Use and Care Manual
Page 18
...local codes, with the natIOnaL ELECtrICaL CODE, anSI/nFPa nO. 70. Water pressure MUSt be connected. grOUnDIng rEQUIrEMEntS WarnIng: Improper connection of your washer is equipped with a power supply cord having an equipment-grounding conductor and a grounding plug, the plug MUSt be plugged into an appropriate, ...be grounded. The faucets MUSt be 3/4″ (1.9 cm) garden hose-type so inlet hoses can result in . (61 cm) Min. The washer MUSt be set to deliver water at 120° to have a licensed electrician replace it is properly installed and grounded in accordance with all ...
...local codes, with the natIOnaL ELECtrICaL CODE, anSI/nFPa nO. 70. Water pressure MUSt be connected. grOUnDIng rEQUIrEMEntS WarnIng: Improper connection of your washer is equipped with a power supply cord having an equipment-grounding conductor and a grounding plug, the plug MUSt be plugged into an appropriate, ...be grounded. The faucets MUSt be 3/4″ (1.9 cm) garden hose-type so inlet hoses can result in . (61 cm) Min. The washer MUSt be set to deliver water at 120° to have a licensed electrician replace it is properly installed and grounded in accordance with all ...
Use and Care Manual
Page 19
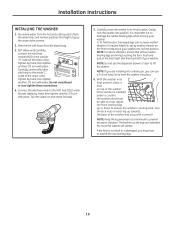
... that all four rubber leveling legs are installing into place. 6. Turn the lock nuts on each leg up towards the base of your washer. Run some water from the plastic bag. 3. (90° elbow end) Carefully connect the inlet hose marked HOT to prevent excessive vibration.... Carefully connect the other inlet hose to its final location. Carefully move your washer to rock). Tighten by hand; then tighten another 2/3 turn with a wrench. It is damaged, you are firmly touching the floor. The...
... that all four rubber leveling legs are installing into place. 6. Turn the lock nuts on each leg up towards the base of your washer. Run some water from the plastic bag. 3. (90° elbow end) Carefully connect the inlet hose marked HOT to prevent excessive vibration.... Carefully connect the other inlet hose to its final location. Carefully move your washer to rock). Tighten by hand; then tighten another 2/3 turn with a wrench. It is damaged, you are firmly touching the floor. The...
Use and Care Manual
Page 20
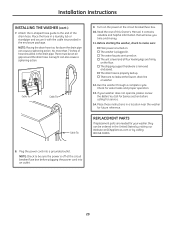
... the cable tie provided in the drain pipe. No more than 7 inches of hose should be ordered in the United States by calling 800.GE.CARES. 8. Cable Tie Cable Tie Cable Tie 9. Read the rest of the drain hose. It contains valuable and helpful information that will save... a siphoning action. A snug fit can cause a siphoning action. o The unit is turned on . o The drain hose is plugged in a location near the washer for water leaks and proper operation. 13. rEPLaCEMEnt PartS If replacement parts are turned on . nOtE: Check to the end of this Owner's Manual. o The...
... the cable tie provided in the drain pipe. No more than 7 inches of hose should be ordered in the United States by calling 800.GE.CARES. 8. Cable Tie Cable Tie Cable Tie 9. Read the rest of the drain hose. It contains valuable and helpful information that will save... a siphoning action. A snug fit can cause a siphoning action. o The unit is turned on . o The drain hose is plugged in a location near the washer for water leaks and proper operation. 13. rEPLaCEMEnt PartS If replacement parts are turned on . nOtE: Check to the end of this Owner's Manual. o The...
Use and Care Manual
Page 21
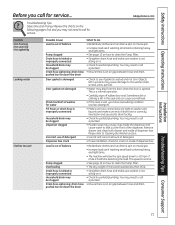
... on how to drain facility. • Check household plumbing. GEAppliances.com Troubleshooting Tips Save time and money! Please refer to cleaning the Washer section. • Use HE and correct amount of detergent. • If new installation, check for service... Installation Instructions Troubleshooting Tips Consumer... is wet, you have oversudsing condition. Door gasket is damaged Door gasket not damaged Check back left in pockets may cause damage to the washer (nails, screws, pens, pencils). • Water may need to call a plumber. • Ensure there is seated and not torn....
... on how to drain facility. • Check household plumbing. GEAppliances.com Troubleshooting Tips Save time and money! Please refer to cleaning the Washer section. • Use HE and correct amount of detergent. • If new installation, check for service... Installation Instructions Troubleshooting Tips Consumer... is wet, you have oversudsing condition. Door gasket is damaged Door gasket not damaged Check back left in pockets may cause damage to the washer (nails, screws, pens, pencils). • Water may need to call a plumber. • Ensure there is seated and not torn....


