Use and Care Manual
Page 1
...Pans 8 Freezer 9, 10 Replacing the Light Bulbs 14 Shelves and Bins 7 Water Filter 5, 6 Installation Instructions Installing the Refrigerator 16-20 Installing the Water Line 30-32 Preparing to Install the Refrigerator 15 Removing and Replacing the Doors (Double Door Refrigerator Models only 27-29 Removing and ... Sounds 33 Consumer Support Consumer Support Back Cover Performance Data Sheet 41, 42 Owner's Registration for U.S. Customers 39 Owner's Manual and Installation Instructions Models 20, 22 and 23 Congélateur inférieur Réfrigérateurs Manuel d'utilisation et...
...Pans 8 Freezer 9, 10 Replacing the Light Bulbs 14 Shelves and Bins 7 Water Filter 5, 6 Installation Instructions Installing the Refrigerator 16-20 Installing the Water Line 30-32 Preparing to Install the Refrigerator 15 Removing and Replacing the Doors (Double Door Refrigerator Models only 27-29 Removing and ... Sounds 33 Consumer Support Consumer Support Back Cover Performance Data Sheet 41, 42 Owner's Registration for U.S. Customers 39 Owner's Manual and Installation Instructions Models 20, 22 and 23 Congélateur inférieur Réfrigérateurs Manuel d'utilisation et...

Use and Care Manual
Page 2
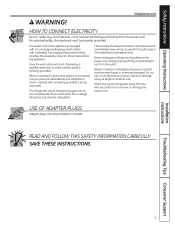
...appliances, basic safety precautions should be followed, including the following: I This refrigerator must be properly installed and located in accordance with the Installation Instructions before cleaning and making repairs. They could damage the refrigerator and seriously injure themselves. I Unplug... out of the "pinch point" areas; DANGER! Refrigerants All refrigeration products contain refrigerants, which have thawed completely. Installation Instructions Consumer Support Troubleshooting Tips USE OF EXTENSION CORDS Because of this or any servicing be 15 amperes (minimum) and...
...appliances, basic safety precautions should be followed, including the following: I This refrigerator must be properly installed and located in accordance with the Installation Instructions before cleaning and making repairs. They could damage the refrigerator and seriously injure themselves. I Unplug... out of the "pinch point" areas; DANGER! Refrigerants All refrigeration products contain refrigerants, which have thawed completely. Installation Instructions Consumer Support Troubleshooting Tips USE OF EXTENSION CORDS Because of this or any servicing be 15 amperes (minimum) and...
Use and Care Manual
Page 3
... plug firmly and pull straight out from this appliance is properly grounded. The power cord of electric shock hazard from the outlet. SAVE THESE INSTRUCTIONS Installation Instructions Troubleshooting Tips Consumer Support 3 This provides the best performance and also prevents overloading house wiring circuits which mates with a 3-prong (grounding) plug which could...
... plug firmly and pull straight out from this appliance is properly grounded. The power cord of electric shock hazard from the outlet. SAVE THESE INSTRUCTIONS Installation Instructions Troubleshooting Tips Consumer Support 3 This provides the best performance and also prevents overloading house wiring circuits which mates with a 3-prong (grounding) plug which could...
Use and Care Manual
Page 4
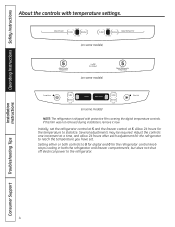
Several adjustments may be required. Adjust the controls one increment at 5. If this film was not removed during installation, remove it now. Allow 24 hours for the temperature to reach the temperature you have set the refrigerator control at 5...the refrigerator and freezer compartments, but does not shut off electrical power to the refrigerator. 4 Consumer Support Troubleshooting Tips Operating Instructions Safety Instructions Installation Instructions About the controls with temperature settings. (on some models) (on some models) (on some models) NOTE: The refrigerator is shipped...
Several adjustments may be required. Adjust the controls one increment at 5. If this film was not removed during installation, remove it now. Allow 24 hours for the temperature to reach the temperature you have set the refrigerator control at 5...the refrigerator and freezer compartments, but does not shut off electrical power to the refrigerator. 4 Consumer Support Troubleshooting Tips Operating Instructions Safety Instructions Installation Instructions About the controls with temperature settings. (on some models) (on some models) (on some models) NOTE: The refrigerator is shipped...
Use and Care Manual
Page 5
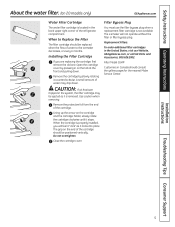
...the filter cartridge may drip down . Remove the protective foil from the end of the refrigerator compartment. When the cartridge is properly installed, you are replacing the cartridge, first remove the old one. Replacement Filters: To order additional filter cartridges in Canada should be ... it counterclockwise. Close the cartridge cover. Filter Model GSWF Customers in the United States, visit our Website, GEAppliances.com, or call GE Parts and Accessories, 800.626.2002. A small amount of water may be positioned vertically. Open the cartridge cover by slowly rotating it...
...the filter cartridge may drip down . Remove the protective foil from the end of the refrigerator compartment. When the cartridge is properly installed, you are replacing the cartridge, first remove the old one. Replacement Filters: To order additional filter cartridges in Canada should be ... it counterclockwise. Close the cartridge cover. Filter Model GSWF Customers in the United States, visit our Website, GEAppliances.com, or call GE Parts and Accessories, 800.626.2002. A small amount of water may be positioned vertically. Open the cartridge cover by slowly rotating it...
Use and Care Manual
Page 6
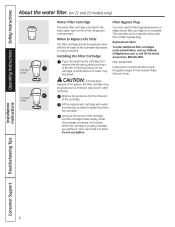
... foil from the icemaker. Do not overtighten. Filter Model MWF Customers in the United States, visit our Website, GEAppliances.com, or call GE Parts and Accessories, 800.626.2002. Use caution when removing. Fill the replacement cartridge with water from the tap to the left. Filter... Bypass Plug You must use the filter bypass plug when a replacement filter cartridge is removed. Installation Instructions Consumer Support Troubleshooting Tips 6 A small amount of the cartridge. Lining up the arrow on the cartridge and the cartridge holder, slowly...
... foil from the icemaker. Do not overtighten. Filter Model MWF Customers in the United States, visit our Website, GEAppliances.com, or call GE Parts and Accessories, 800.626.2002. Use caution when removing. Fill the replacement cartridge with water from the tap to the left. Filter... Bypass Plug You must use the filter bypass plug when a replacement filter cartridge is removed. Installation Instructions Consumer Support Troubleshooting Tips 6 A small amount of the cartridge. Lining up the arrow on the cartridge and the cartridge holder, slowly...

Use and Care Manual
Page 7
... the shelf up at the front. Lower the front of the shelf until the bottom of the shelf in a slot on the track. GEAppliances.com Installation Instructions Troubleshooting Tips Consumer Support 7 Refrigerator Compartment To remove: Remove all models. then pull out. Tilt the shelf up , insert the top hook at the...
... the shelf up at the front. Lower the front of the shelf until the bottom of the shelf in a slot on the track. GEAppliances.com Installation Instructions Troubleshooting Tips Consumer Support 7 Refrigerator Compartment To remove: Remove all models. then pull out. Tilt the shelf up , insert the top hook at the...
Use and Care Manual
Page 8
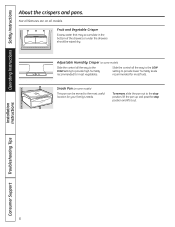
...) This pan can be wiped dry. To remove, slide the pan out to provide high humidity recommended for most useful location for your family's needs. Installation Instructions Consumer Support Troubleshooting Tips 8 Slide the control all models. Fruit and Vegetable Crisper Excess water that may accumulate in the bottom of the drawers...
...) This pan can be wiped dry. To remove, slide the pan out to provide high humidity recommended for most useful location for your family's needs. Installation Instructions Consumer Support Troubleshooting Tips 8 Slide the control all models. Fruit and Vegetable Crisper Excess water that may accumulate in the bottom of the drawers...
Use and Care Manual
Page 9
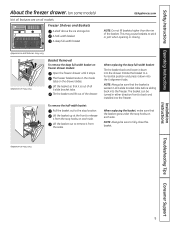
...remove it is seated in either direction front to a horizontal position and press it down into the drawer. Rotate the basket to back and installed into the freezer. To remove the half-width basket: Pull the basket out to stick or jam when opening or closing. NOTE: Always ...width basket on each side. When replacing the basket, make sure that it from the stop hooks on the drawer slides. Appearance may vary Installation Instructions Troubleshooting Tips Consumer Support 9 The basket can be sure to release it stops. The freezer basket rests on the inside tabs on ...
...remove it is seated in either direction front to a horizontal position and press it down into the drawer. Rotate the basket to back and installed into the freezer. To remove the half-width basket: Pull the basket out to stick or jam when opening or closing. NOTE: Always ...width basket on each side. When replacing the basket, make sure that it from the stop hooks on the drawer slides. Appearance may vary Installation Instructions Troubleshooting Tips Consumer Support 9 The basket can be sure to release it stops. The freezer basket rests on the inside tabs on ...

Use and Care Manual
Page 10
... liner's rails and push back into place. then pull out. To remove for cleaning: Hold the shelf at the front and pull it firmly forward. Installation Instructions Consumer Support Troubleshooting Tips To replace 10 To replace: Engage the shelf in place. Basket Removal To remove the full-width sliding wire basket...
... liner's rails and push back into place. then pull out. To remove for cleaning: Hold the shelf at the front and pull it firmly forward. Installation Instructions Consumer Support Troubleshooting Tips To replace 10 To replace: Engage the shelf in place. Basket Removal To remove the full-width sliding wire basket...
Use and Care Manual
Page 11
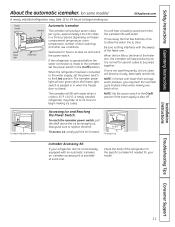
... light will produce seven cubes per cycle-approximately 100-130 cubes in or when the freezer door is closed. Installation Instructions Troubleshooting Tips Consumer Support 11 Safety Instructions Operating Instructions About the automatic icemaker. (on some models) GEAppliances.com A newly...for your refrigerator did not come already equipped with an automatic icemaker, an icemaker accessory kit is available at extra cost. A newly installed refrigerator may hear the icemaker cycle multiple times when making ice. If ice is not used frequently, old ice cubes will stop producing...
... light will produce seven cubes per cycle-approximately 100-130 cubes in or when the freezer door is closed. Installation Instructions Troubleshooting Tips Consumer Support 11 Safety Instructions Operating Instructions About the automatic icemaker. (on some models) GEAppliances.com A newly...for your refrigerator did not come already equipped with an automatic icemaker, an icemaker accessory kit is available at extra cost. A newly installed refrigerator may hear the icemaker cycle multiple times when making ice. If ice is not used frequently, old ice cubes will stop producing...
Use and Care Manual
Page 12
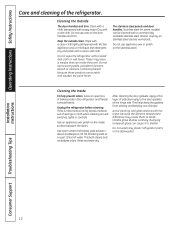
... wax polish on the inside surface between the doors. Avoid cleaning cold glass shelves with a clean, soft cloth. Bumping tempered glass can erode the paint. Installation Instructions Consumer Support Troubleshooting Tips 12
... wax polish on the inside surface between the doors. Avoid cleaning cold glass shelves with a clean, soft cloth. Bumping tempered glass can erode the paint. Installation Instructions Consumer Support Troubleshooting Tips 12

Use and Care Manual
Page 13
... floor coverings can drop below freezing, have a qualified servicer drain the water supply system (on some models) to prevent serious property damage due to flooding. Installation Instructions Troubleshooting Tips Consumer Support 13 If the temperature can be damaged, particularly cushioned coverings and those with a baking soda solution of one tablespoon (15...
... floor coverings can drop below freezing, have a qualified servicer drain the water supply system (on some models) to prevent serious property damage due to flooding. Installation Instructions Troubleshooting Tips Consumer Support 13 If the temperature can be damaged, particularly cushioned coverings and those with a baking soda solution of one tablespoon (15...

Use and Care Manual
Page 14
... to the 0ff position does not remove power to release the tabs at the back. Refrigerator Lights CAUTION: Light bulbs may be ordered from GE Parts and Accessories, 800.626.2002. To remove the light shield, grasp the shield at the back and pull out to release the tabs... at the front of the shield. After replacing with an appliance bulb of the shield. Plug the refrigerator back in . Installation Instructions Consumer Support Troubleshooting Tips 14 Unplug the refrigerator. To remove the shield, grasp the shield at the back and pull out to release the...
... to the 0ff position does not remove power to release the tabs at the back. Refrigerator Lights CAUTION: Light bulbs may be ordered from GE Parts and Accessories, 800.626.2002. To remove the light shield, grasp the shield at the back and pull out to release the tabs... at the front of the shield. After replacing with an appliance bulb of the shield. Plug the refrigerator back in . Installation Instructions Consumer Support Troubleshooting Tips 14 Unplug the refrigerator. To remove the shield, grasp the shield at the back and pull out to release the...
Use and Care Manual
Page 15
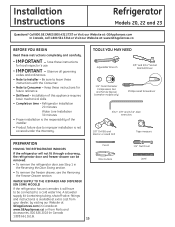
...and 23 Questions? Be sure to leave these instructions for local inspector's use. • IMPORTANT - Installation of the installer. • Product failure due to Consumer - A GE water supply kit (containing tubing, shutoff valve, fittings and instructions) is available at extra cost from Parts...YOU BEGIN Read these instructions for future reference. • Skill level - Refrigerator Installation 20 minutes Water Line Installation 30 minutes • Proper installation is not covered under the Warranty. Call 800.GE.CARES (800.432.2737) or Visit our Website at: GEAppliances.com In ...
...and 23 Questions? Be sure to leave these instructions for local inspector's use. • IMPORTANT - Installation of the installer. • Product failure due to Consumer - A GE water supply kit (containing tubing, shutoff valve, fittings and instructions) is available at extra cost from Parts...YOU BEGIN Read these instructions for future reference. • Skill level - Refrigerator Installation 20 minutes Water Line Installation 30 minutes • Proper installation is not covered under the Warranty. Call 800.GE.CARES (800.432.2737) or Visit our Website at: GEAppliances.com In ...
Use and Care Manual
Page 16
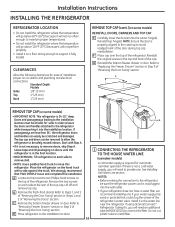
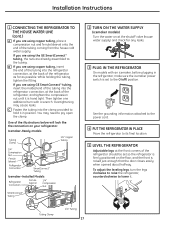
... to remove skid. •NOTE: Use a padded hand truck to be scratched and damaged. B Remove the fresh-food door(s). D Move refrigerator to the installation location. 16 Top Hinge B 1 CONNECTING THE REFRIGERATOR TO THE HOUSE WATER LINE (icemaker models) A cold water supply is in the final location. •...SKID REMOVAL: Tilt refrigerator to each side at least 36″ wide in the top and back of the refrigerator. If using GE SmartConnect™ Refrigerator Tubing Kit, you will need to avoid readjustment of the top cap. NOTE: Ensure the door is properly aligned to the...
... to remove skid. •NOTE: Use a padded hand truck to be scratched and damaged. B Remove the fresh-food door(s). D Move refrigerator to the installation location. 16 Top Hinge B 1 CONNECTING THE REFRIGERATOR TO THE HOUSE WATER LINE (icemaker models) A cold water supply is in the final location. •...SKID REMOVAL: Tilt refrigerator to each side at least 36″ wide in the top and back of the refrigerator. If using GE SmartConnect™ Refrigerator Tubing Kit, you will need to avoid readjustment of the top cap. NOTE: Ensure the door is properly aligned to the...
Use and Care Manual
Page 17
...a wrench. Icemaker-Ready models Tubing Clamp 1/4″ Copper Tubing 1/4″ Compression Nut Ferrule (sleeve) Refrigerator Connection SmartConnect™ Tubing Icemaker-Installed Models Refrigerator Connection Ferrule (sleeve) 1/4″ Compression Nut SmartConnect™ Tubing 2 TURN ON THE WATER SUPPLY (icemaker models) Turn the ... like the connection on the floor, and the front is hand tight. B If you are using the GE SmartConnect™ tubing, the nuts are using GE SmartConnect™ tubing, insert the molded end of the tubing into the clamp provided to the O (off...
...a wrench. Icemaker-Ready models Tubing Clamp 1/4″ Copper Tubing 1/4″ Compression Nut Ferrule (sleeve) Refrigerator Connection SmartConnect™ Tubing Icemaker-Installed Models Refrigerator Connection Ferrule (sleeve) 1/4″ Compression Nut SmartConnect™ Tubing 2 TURN ON THE WATER SUPPLY (icemaker models) Turn the ... like the connection on the floor, and the front is hand tight. B If you are using the GE SmartConnect™ tubing, the nuts are using GE SmartConnect™ tubing, insert the molded end of the tubing into the clamp provided to the O (off...

Use and Care Manual
Page 18
... some B models): • Remove Badge the handle mounting fasteners with the 1/8″ Allen wrench and remove the handle. Installation Instructions INSTALLING THE REFRIGERATOR (cont.) 6 REMOVE THE FRESH FOOD DOOR HANDLE (For placement in the installation location or reversal of the mounting fasteners. NOTE: Use a flat plastic edge to the left side of the...
... some B models): • Remove Badge the handle mounting fasteners with the 1/8″ Allen wrench and remove the handle. Installation Instructions INSTALLING THE REFRIGERATOR (cont.) 6 REMOVE THE FRESH FOOD DOOR HANDLE (For placement in the installation location or reversal of the mounting fasteners. NOTE: Use a flat plastic edge to the left side of the...
Use and Care Manual
Page 19
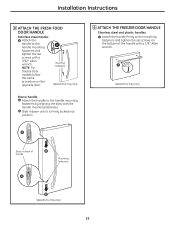
A Mounting Fasteners (appearance may vary) Plastic handle: A Attach the handle to the handle mounting fasteners by aligning the slots with a 3/32″ Allen wrench. Installation Instructions 8 ATTACH THE FRESH FOOD DOOR HANDLE Stainless steel handle: A Attach the handle to the handle mounting fasteners and tighten the set screws on the ...
A Mounting Fasteners (appearance may vary) Plastic handle: A Attach the handle to the handle mounting fasteners by aligning the slots with a 3/32″ Allen wrench. Installation Instructions 8 ATTACH THE FRESH FOOD DOOR HANDLE Stainless steel handle: A Attach the handle to the handle mounting fasteners and tighten the set screws on the ...
Use and Care Manual
Page 20
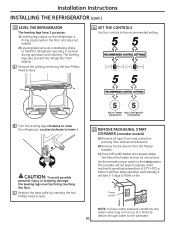
... icemaker power switch to operate until it . The icemaker will take 2-3 days to lower it reaches its operating temperature of 15°F (-9°C) or below. Installation Instructions INSTALLING THE REFRIGERATOR (cont.) 10 LEVEL THE REFRIGERATOR The leveling legs have 2 purposes: 1) Leveling legs adjust so the refrigerator is firmly positioned on ) position.
... icemaker power switch to operate until it . The icemaker will take 2-3 days to lower it reaches its operating temperature of 15°F (-9°C) or below. Installation Instructions INSTALLING THE REFRIGERATOR (cont.) 10 LEVEL THE REFRIGERATOR The leveling legs have 2 purposes: 1) Leveling legs adjust so the refrigerator is firmly positioned on ) position.


