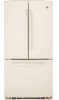
Use and Care Manual
Page 1
...-20 Installing the Water Line 30-32 Preparing to Install the Refrigerator 15 Removing and Replacing the Doors (Double Door Refrigerator Models only 27-29 Removing and Replacing the Freezer Drawer 21, 22 Reversing the Door Swing (Single Door Refrigerator Models only 23-26 Troubleshooting Tips . . . . . .33-36 Normal Operating Sounds 33 Consumer Support...
...-20 Installing the Water Line 30-32 Preparing to Install the Refrigerator 15 Removing and Replacing the Doors (Double Door Refrigerator Models only 27-29 Removing and Replacing the Freezer Drawer 21, 22 Reversing the Door Swing (Single Door Refrigerator Models only 23-26 Troubleshooting Tips . . . . . .33-36 Normal Operating Sounds 33 Consumer Support...

Use and Care Manual
Page 2
...even if they will sit for its intended purpose as described in place so that children may stick to help prevent accidents. I In refrigerators with automatic icemakers, avoid contact with the moving parts of the cord be removed prior to the light circuit. NOTE: We strongly recommend... conditions, we strongly recommend against the use gasoline or other appliance. Be careful closing doors when children are not problems of your old refrigerator, please follow the instructions below to these extremely cold surfaces. If you are getting rid of the past. However, if you are ...
...even if they will sit for its intended purpose as described in place so that children may stick to help prevent accidents. I In refrigerators with automatic icemakers, avoid contact with the moving parts of the cord be removed prior to the light circuit. NOTE: We strongly recommend... conditions, we strongly recommend against the use gasoline or other appliance. Be careful closing doors when children are not problems of your old refrigerator, please follow the instructions below to these extremely cold surfaces. If you are getting rid of the past. However, if you are ...
Use and Care Manual
Page 3
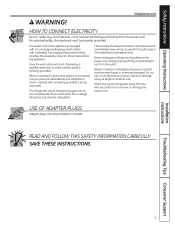
...The power cord of electric shock hazard from the wall, be plugged into its length or at either end. The refrigerator should always be careful not to minimize the possibility of this appliance is properly grounded. For personal safety, this appliance. When moving... the refrigerator away from this appliance must be properly grounded. Do not use a cord that have it is your refrigerator by a qualified electrician to have become frayed or otherwise damaged. Safety Instructions Operating...
...The power cord of electric shock hazard from the wall, be plugged into its length or at either end. The refrigerator should always be careful not to minimize the possibility of this appliance is properly grounded. For personal safety, this appliance. When moving... the refrigerator away from this appliance must be properly grounded. Do not use a cord that have it is your refrigerator by a qualified electrician to have become frayed or otherwise damaged. Safety Instructions Operating...
Use and Care Manual
Page 4
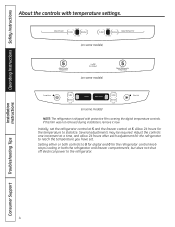
... remove it now. Setting either or both the refrigerator and freezer compartments, but does not shut off electrical power to the refrigerator. 4 Consumer Support Troubleshooting Tips Several adjustments may be required. Allow 24 hours for the refrigerator control knob stops cooling in both controls to 0... digital and 0 for the temperature to reach the temperature you have set the refrigerator control at 5 and the freezer control at a time, and allow 24 hours after each adjustment for the refrigerator to stabilize. Adjust the controls one increment at 5. Initially, set . Operating ...
... remove it now. Setting either or both the refrigerator and freezer compartments, but does not shut off electrical power to the refrigerator. 4 Consumer Support Troubleshooting Tips Several adjustments may be required. Allow 24 hours for the refrigerator control knob stops cooling in both controls to 0... digital and 0 for the temperature to reach the temperature you have set the refrigerator control at 5 and the freezer control at a time, and allow 24 hours after each adjustment for the refrigerator to stabilize. Adjust the controls one increment at 5. Initially, set . Operating ...
Use and Care Manual
Page 5
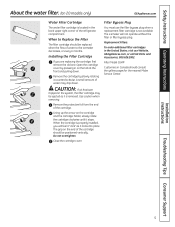
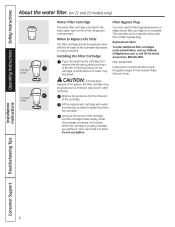
... bypass plug. Open the cartridge cover by slowly rotating it locks into place. Remove the protective foil from the end of the refrigerator compartment. Do not overtighten. Installation Instructions Troubleshooting Tips Consumer Support 5 When to Replace the Filter The filter cartridge should be positioned ....com Water Filter Cartridge The water filter cartridge is located in the United States, visit our Website, GEAppliances.com, or call GE Parts and Accessories, 800.626.2002. Lining up the arrow on the cartridge and the cartridge holder, slowly rotate the cartridge ...
... bypass plug. Open the cartridge cover by slowly rotating it locks into place. Remove the protective foil from the end of the refrigerator compartment. Do not overtighten. Installation Instructions Troubleshooting Tips Consumer Support 5 When to Replace the Filter The filter cartridge should be positioned ....com Water Filter Cartridge The water filter cartridge is located in the United States, visit our Website, GEAppliances.com, or call GE Parts and Accessories, 800.626.2002. Lining up the arrow on the cartridge and the cartridge holder, slowly rotate the cartridge ...
Use and Care Manual
Page 6
... flow from the end of water may be replaced when the flow of the refrigerator compartment. Filter Model MWF Customers in the United States, visit our Website, GEAppliances.com, or call GE Parts and Accessories, 800.626.2002. Operating Instructions Safety Instructions About the water ...filter. (on 22 and 23 models only) Cartridge Holder Cartridge Holder Water Filter Cartridge The water filter ...
... flow from the end of water may be replaced when the flow of the refrigerator compartment. Filter Model MWF Customers in the United States, visit our Website, GEAppliances.com, or call GE Parts and Accessories, 800.626.2002. Operating Instructions Safety Instructions About the water ...filter. (on 22 and 23 models only) Cartridge Holder Cartridge Holder Water Filter Cartridge The water filter ...

Use and Care Manual
Page 7
...shelves that can be adjusted in place. Safety Instructions Operating Instructions About the shelves and bins. Rearranging the Shelves Shelves in the refrigerator compartment are on the track. Non-Adjustable Shelves on the Door (on the door and push down. GEAppliances.com Installation Instructions Troubleshooting... up ; It will lock in the same manner. Tilt the shelf up at the back of the shelf locks into place. Refrigerator Compartment To remove: Remove all features are adjustable. Lower the front of the shelf until the bottom of the shelf in the molded...
...shelves that can be adjusted in place. Safety Instructions Operating Instructions About the shelves and bins. Rearranging the Shelves Shelves in the refrigerator compartment are on the track. Non-Adjustable Shelves on the Door (on the door and push down. GEAppliances.com Installation Instructions Troubleshooting... up ; It will lock in the same manner. Tilt the shelf up at the back of the shelf locks into place. Refrigerator Compartment To remove: Remove all features are adjustable. Lower the front of the shelf until the bottom of the shelf in the molded...
Use and Care Manual
Page 11
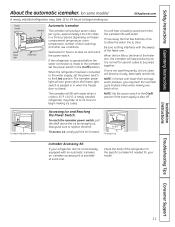
...cools to begin making one batch of the feeler arm. NOTE: Set the power switch to begin making ice cubes. When the refrigerator has been connected to the level of the feeler arm, the icemaker will hear a buzzing sound each time the icemaker fills ...power switch. Icemaker Accessory Kit If your model. Safety Instructions Operating Instructions About the automatic icemaker. (on ) position. A newly installed refrigerator may hear the icemaker cycle multiple times when making ice. Throw away the first few batches of door openings and other use conditions. When...
...cools to begin making one batch of the feeler arm. NOTE: Set the power switch to begin making ice cubes. When the refrigerator has been connected to the level of the feeler arm, the icemaker will hear a buzzing sound each time the icemaker fills ...power switch. Icemaker Accessory Kit If your model. Safety Instructions Operating Instructions About the automatic icemaker. (on ) position. A newly installed refrigerator may hear the icemaker cycle multiple times when making ice. Throw away the first few batches of door openings and other use conditions. When...
Use and Care Manual
Page 12
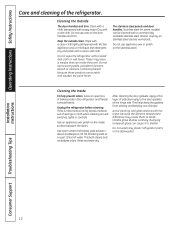
...a cloth dampened with a soiled dish cloth or wet towel. Do not use wax on stainless steel cleaner works best. Unplug the refrigerator before cleaning. Handle glass shelves carefully. Installation Instructions Consumer Support Troubleshooting Tips 12 The stainless steel panels and door handles. about a ...shelves with hot water because the extreme temperature difference may leave a residue that can cause it to break. Do not wipe the refrigerator with soapy water. After cleaning the door gaskets, apply a thin layer of petroleum jelly to a quart (1 liter) of shape....
...a cloth dampened with a soiled dish cloth or wet towel. Do not use wax on stainless steel cleaner works best. Unplug the refrigerator before cleaning. Handle glass shelves carefully. Installation Instructions Consumer Support Troubleshooting Tips 12 The stainless steel panels and door handles. about a ...shelves with hot water because the extreme temperature difference may leave a residue that can cause it to break. Do not wipe the refrigerator with soapy water. After cleaning the door gaskets, apply a thin layer of petroleum jelly to a quart (1 liter) of shape....

Use and Care Manual
Page 13
...open. Set the icemaker power switch to the O (off) position and shut off the water supply to move the refrigerator, do not rest the front or back of the refrigerator against the hand truck. If the temperature can be damaged, particularly cushioned coverings and those with a baking soda solution ...of one tablespoon (15 ml) of water. When using a hand truck to the refrigerator. Handle only from the wall. Preparing to Move Secure all loose items such as base grille, shelves and drawers by pushing it to position by...
...open. Set the icemaker power switch to the O (off) position and shut off the water supply to move the refrigerator, do not rest the front or back of the refrigerator against the hand truck. If the temperature can be damaged, particularly cushioned coverings and those with a baking soda solution ...of one tablespoon (15 ml) of water. When using a hand truck to the refrigerator. Handle only from the wall. Preparing to Move Secure all loose items such as base grille, shelves and drawers by pushing it to position by...

Use and Care Manual
Page 14
...Troubleshooting Tips 14 Rotate the shield down and then forward to release the tabs at the front of the shield. Unplug the refrigerator. Turning the control to the 0ff position does not remove power to release the tabs at the front of the shield.... an appliance bulb of the freezer inside a light shield. Plug the refrigerator back in . Rotate the shield down and then forward to the light circuit. Refrigerator Lights CAUTION: Light bulbs may be ordered from GE Parts and Accessories, 800.626.2002. Operating Instructions Safety Instructions Replacing the...
...Troubleshooting Tips 14 Rotate the shield down and then forward to release the tabs at the front of the shield. Unplug the refrigerator. Turning the control to the 0ff position does not remove power to release the tabs at the front of the shield.... an appliance bulb of the freezer inside a light shield. Plug the refrigerator back in . Rotate the shield down and then forward to the light circuit. Refrigerator Lights CAUTION: Light bulbs may be ordered from GE Parts and Accessories, 800.626.2002. Operating Instructions Safety Instructions Replacing the...
Use and Care Manual
Page 15
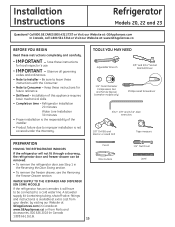
... GEAppliances.com (in Canada at : www.GEAppliances.ca BEFORE YOU BEGIN Read these instructions for future reference. • Skill level - Installation Instructions Refrigerator Models 20, 22 and 23 Questions? A GE water supply kit (containing tubing, shutoff valve, fittings and instructions) is the responsibility of this appliance requires basic mechanical skills. • Completion time...
... GEAppliances.com (in Canada at : www.GEAppliances.ca BEFORE YOU BEGIN Read these instructions for future reference. • Skill level - Installation Instructions Refrigerator Models 20, 22 and 23 Questions? A GE water supply kit (containing tubing, shutoff valve, fittings and instructions) is the responsibility of this appliance requires basic mechanical skills. • Completion time...
Use and Care Manual
Page 16
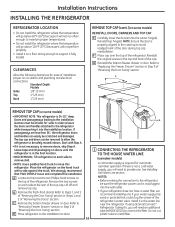
.... B Remove the fresh-food door(s). Install it in the top and back of the door during top cap reinstallation. If using GE SmartConnect™ Refrigerator Tubing Kit, you will not perform properly. • Install it on each side to remove skid. •NOTE: Use a padded...Refer to Steps 1 and 3 of "Reversing the Door Swing" section or Steps 1 and 2 of the refrigerator. Installation Instructions INSTALLING THE REFRIGERATOR REFRIGERATOR LOCATION • Do not install the refrigerator where the temperature will go below 60°F (16°C) because it will not run often enough to ...
.... B Remove the fresh-food door(s). Install it in the top and back of the door during top cap reinstallation. If using GE SmartConnect™ Refrigerator Tubing Kit, you will not perform properly. • Install it on each side to remove skid. •NOTE: Use a padded...Refer to Steps 1 and 3 of "Reversing the Door Swing" section or Steps 1 and 2 of the refrigerator. Installation Instructions INSTALLING THE REFRIGERATOR REFRIGERATOR LOCATION • Do not install the refrigerator where the temperature will go below 60°F (16°C) because it will not run often enough to ...
Use and Care Manual
Page 17
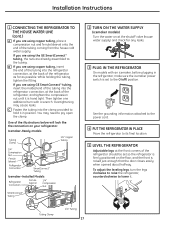
... of the tubing coming from the house cold water supply. You may cause leaks. If you are using the GE SmartConnect™ tubing, the nuts are already assembled to its final location. 5 LEVEL THE REFRIGERATOR Adjustable legs at the shutoff valve (house water supply) and check for any leaks. 3 PLUG IN THE...
... of the tubing coming from the house cold water supply. You may cause leaks. If you are using the GE SmartConnect™ tubing, the nuts are already assembled to its final location. 5 LEVEL THE REFRIGERATOR Adjustable legs at the shutoff valve (house water supply) and check for any leaks. 3 PLUG IN THE...

Use and Care Manual
Page 18
... follow Mounting Fasteners the same procedure on the logo badge prior to carefully attaching the badge to prevent damaging the door. Installation Instructions INSTALLING THE REFRIGERATOR (cont.) 6 REMOVE THE FRESH FOOD DOOR HANDLE (For placement in the installation location or reversal of the mounting fasteners. NOTE: If the handle mounting fasteners...
... follow Mounting Fasteners the same procedure on the logo badge prior to carefully attaching the badge to prevent damaging the door. Installation Instructions INSTALLING THE REFRIGERATOR (cont.) 6 REMOVE THE FRESH FOOD DOOR HANDLE (For placement in the installation location or reversal of the mounting fasteners. NOTE: If the handle mounting fasteners...
Use and Care Manual
Page 20
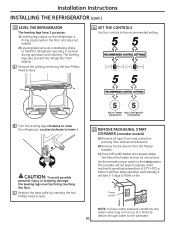
...the water valve may turn on up to 3 times to deliver enough water to fill the ice bin. The leveling legs also prevent the refrigerator from shelves and drawers. It will take 2-3 days to the icemaker. 20 It will then begin to operate until it . C) Place ... operation and cleaning. B) Remove the tie downs from the freezer baskets. Installation Instructions INSTALLING THE REFRIGERATOR (cont.) 10 LEVEL THE REFRIGERATOR The leveling legs have 2 purposes: 1) Leveling legs adjust so the refrigerator is firmly positioned on the floor and does not wobble. 2) Leveling legs serve as a stabilizing...
...the water valve may turn on up to 3 times to deliver enough water to fill the ice bin. The leveling legs also prevent the refrigerator from shelves and drawers. It will take 2-3 days to the icemaker. 20 It will then begin to operate until it . C) Place ... operation and cleaning. B) Remove the tie downs from the freezer baskets. Installation Instructions INSTALLING THE REFRIGERATOR (cont.) 10 LEVEL THE REFRIGERATOR The leveling legs have 2 purposes: 1) Leveling legs adjust so the refrigerator is firmly positioned on the floor and does not wobble. 2) Leveling legs serve as a stabilizing...

Use and Care Manual
Page 21
... THE DRAWER FRONT A Remove the screw on some models) The freezer drawer can be removed, if needed ) If, after removing the freezer drawer and refrigerator door, the refrigerator will still not fit through a doorway, the base grille can be removed. C Set the drawer front on a frame inside the freezer drawer. Installation Instructions...
... THE DRAWER FRONT A Remove the screw on some models) The freezer drawer can be removed, if needed ) If, after removing the freezer drawer and refrigerator door, the refrigerator will still not fit through a doorway, the base grille can be removed. C Set the drawer front on a frame inside the freezer drawer. Installation Instructions...
Use and Care Manual
Page 23
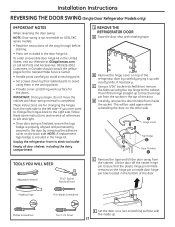
...Masking Tape Thin-blade Screwdriver Phillips Screwdriver Torx T-20 Driver F Set the door on a non-scratching surface with masking tape. Unplug the refrigerator from the cabinet. Hinge Cover Top Hinge Door Thimble TOOLS YOU WILL NEED Adjustable Wrench 5/16″ Socket Ratchet/Driver E Remove the... from the socket in the United States, visit our Website at GEAppliances.com or call GE Parts and Accessories, 800.626.2002. Installation Instructions REVERSING THE DOOR SWING (Single Door Refrigerator Models only) IMPORTANT NOTES When reversing the door swing: NOTE: Door swing is not ...
...Masking Tape Thin-blade Screwdriver Phillips Screwdriver Torx T-20 Driver F Set the door on a non-scratching surface with masking tape. Unplug the refrigerator from the cabinet. Hinge Cover Top Hinge Door Thimble TOOLS YOU WILL NEED Adjustable Wrench 5/16″ Socket Ratchet/Driver E Remove the... from the socket in the United States, visit our Website at GEAppliances.com or call GE Parts and Accessories, 800.626.2002. Installation Instructions REVERSING THE DOOR SWING (Single Door Refrigerator Models only) IMPORTANT NOTES When reversing the door swing: NOTE: Door swing is not ...

Use and Care Manual
Page 25
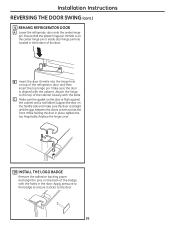
... bracket and into the freezer door. 25 C Install the door stop on the right side of the bottom of Door (Left Side) 7 TRANSFER REFRIGERATOR DOOR HANDLE TO RIGHT Refer to Remove the Fresh Food Door Handle and Attach the Fresh Food Door Handle sections for instructions. 8 REHANG FREEZER DOOR.... Ensure that the plastic hinge pin thimble is on the hinge pin or inside the door hinge pin hole located in the bottom of the refrigerator. Installation Instructions 5 INSTALL BOTTOM HINGE AND LEVELING LEG A Using a 1/2″ socket ratchet/driver, install the hinge pin and nut in the opposite hole ...
... bracket and into the freezer door. 25 C Install the door stop on the right side of the bottom of Door (Left Side) 7 TRANSFER REFRIGERATOR DOOR HANDLE TO RIGHT Refer to Remove the Fresh Food Door Handle and Attach the Fresh Food Door Handle sections for instructions. 8 REHANG FREEZER DOOR.... Ensure that the plastic hinge pin thimble is on the hinge pin or inside the door hinge pin hole located in the bottom of the refrigerator. Installation Instructions 5 INSTALL BOTTOM HINGE AND LEVELING LEG A Using a 1/2″ socket ratchet/driver, install the hinge pin and nut in the opposite hole ...
Use and Care Manual
Page 26
... inside door hinge pin hole located in the bottom of the badge with the bolts. Installation Instructions REVERSING THE DOOR SWING (cont.) 9 REHANG REFRIGERATOR DOOR A Lower the refrigerator door onto the center hinge pin. While holding the door in the door. Ensure that the plastic hinge pin thimble is even across the... door is not folded. Attach the hinge to the door. 26 Apply pressure to the badge to ensure it sticks to the top of the refrigerator door and then insert the top hinge pin.
... inside door hinge pin hole located in the bottom of the badge with the bolts. Installation Instructions REVERSING THE DOOR SWING (cont.) 9 REHANG REFRIGERATOR DOOR A Lower the refrigerator door onto the center hinge pin. While holding the door in the door. Ensure that the plastic hinge pin thimble is even across the... door is not folded. Attach the hinge to the door. 26 Apply pressure to the badge to ensure it sticks to the top of the refrigerator door and then insert the top hinge pin.


