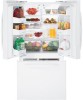
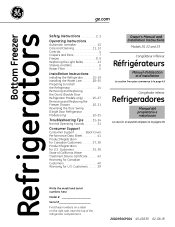
Use and Care Manual
Page 1
...label on the right side, near the top of California Water Treatment Device Certificate 42 Warranty for Canadian Customers 40 Warranty for U.S. Bottom Freezer Refrigerators ge.com Safety Instructions 2, 3 Operating Instructions Automatic Icemaker 10 Care and Cleaning 11, 12 Controls 4 Crispers and Pans 7 Freezer 8, 9 Replacing... only 25-27 Removing and Replacing the Freezer Drawer 20, 21 Reversing the Door Swing (Single Door Refrigerator Models only 22-25 Troubleshooting Tips . . . . . .31-34 Normal Operating Sounds 31 Consumer Support Consumer Support Back Cover Performance Data...
...label on the right side, near the top of California Water Treatment Device Certificate 42 Warranty for Canadian Customers 40 Warranty for U.S. Bottom Freezer Refrigerators ge.com Safety Instructions 2, 3 Operating Instructions Automatic Icemaker 10 Care and Cleaning 11, 12 Controls 4 Crispers and Pans 7 Freezer 8, 9 Replacing... only 25-27 Removing and Replacing the Freezer Drawer 20, 21 Reversing the Door Swing (Single Door Refrigerator Models only 22-25 Troubleshooting Tips . . . . . .31-34 Normal Operating Sounds 31 Consumer Support Consumer Support Back Cover Performance Data...
Use and Care Manual
Page 2
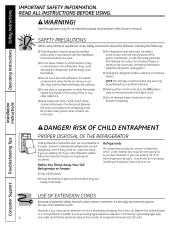
... you are necessarily small. SAFETY PRECAUTIONS When using electrical appliances, basic safety precautions should be followed, including the following: ■ This refrigerator must be removed prior to do. Skin may not easily climb inside. Do not place fingers or hands on the shelves in . ... of potential safety hazards under federal law must use an extension cord, it is absolutely necessary that it is plugged in the refrigerator. Installation Instructions Consumer Support Troubleshooting Tips USE OF EXTENSION CORDS Because of the cord be a UL-listed (in the United States...
... you are necessarily small. SAFETY PRECAUTIONS When using electrical appliances, basic safety precautions should be followed, including the following: ■ This refrigerator must be removed prior to do. Skin may not easily climb inside. Do not place fingers or hands on the shelves in . ... of potential safety hazards under federal law must use an extension cord, it is absolutely necessary that it is plugged in the refrigerator. Installation Instructions Consumer Support Troubleshooting Tips USE OF EXTENSION CORDS Because of the cord be a UL-listed (in the United States...
Use and Care Manual
Page 3
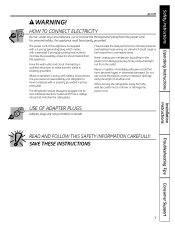
... in Canada. Always grip plug firmly and pull straight out from the power cord. The power cord of electric shock hazard from overheated wires. The refrigerator should always be careful not to make sure the outlet is equipped with a 3-prong (grounding) plug which mates with a properly grounded 3-prong wall.... Do not use a cord that matches the rating plate. SAVE THESE INSTRUCTIONS Installation Instructions Troubleshooting Tips Consumer Support 3 Safety Instructions Operating Instructions ge.com WARNING! For personal safety, this appliance is properly grounded.
... in Canada. Always grip plug firmly and pull straight out from the power cord. The power cord of electric shock hazard from overheated wires. The refrigerator should always be careful not to make sure the outlet is equipped with a 3-prong (grounding) plug which mates with a properly grounded 3-prong wall.... Do not use a cord that matches the rating plate. SAVE THESE INSTRUCTIONS Installation Instructions Troubleshooting Tips Consumer Support 3 Safety Instructions Operating Instructions ge.com WARNING! For personal safety, this appliance is properly grounded.
Use and Care Manual
Page 4
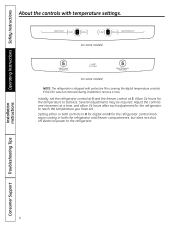
...the controls with temperature settings. (on some models) (on some models) NOTE: The refrigerator is shipped with protective film covering the digital temperature controls. Setting either or both the refrigerator and freezer compartments, but does not shut off electrical power to stabilize. Several adjustments may ...at a time, and allow 24 hours after each adjustment for the refrigerator control knob stops cooling in both controls to 0 for digital and 0 for the refrigerator to reach the temperature you have set the refrigerator control at 5 and the freezer control at 5. If this film ...
...the controls with temperature settings. (on some models) (on some models) NOTE: The refrigerator is shipped with protective film covering the digital temperature controls. Setting either or both the refrigerator and freezer compartments, but does not shut off electrical power to stabilize. Several adjustments may ...at a time, and allow 24 hours after each adjustment for the refrigerator control knob stops cooling in both controls to 0 for digital and 0 for the refrigerator to reach the temperature you have set the refrigerator control at 5 and the freezer control at 5. If this film ...

Use and Care Manual
Page 5
...Operating Instructions About the water filter. (on some models) ge.com Water Filter Cartridge The water filter cartridge is located in the back upper right corner of water may be positioned vertically. A small amount of the refrigerator compartment. Replacement Filters: To order additional filter cartridges in ...are replacing the cartridge, first remove the old one. Filter Model GSWF Customers in the United States, visit our Website, ge.com, or call GE Parts and Accessories, 800.626.2002. Remove the protective foil from the end of the cartridge should be replaced when the ...
...Operating Instructions About the water filter. (on some models) ge.com Water Filter Cartridge The water filter cartridge is located in the back upper right corner of water may be positioned vertically. A small amount of the refrigerator compartment. Replacement Filters: To order additional filter cartridges in ...are replacing the cartridge, first remove the old one. Filter Model GSWF Customers in the United States, visit our Website, ge.com, or call GE Parts and Accessories, 800.626.2002. Remove the protective foil from the end of the cartridge should be replaced when the ...
Use and Care Manual
Page 6
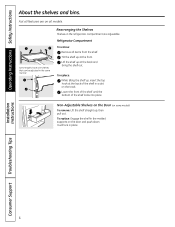
...shelves that can be adjusted in a slot on the door and push down. Non-Adjustable Shelves on the Door (on all items from the shelf. Refrigerator Compartment To remove: Remove all models. To replace: While tilting the shelf up ; then pull out. Lower the front of the shelf until the bottom...and bring the shelf out. To replace: Engage the shelf in place. Tilt the shelf up at the front. Rearranging the Shelves Shelves in the refrigerator compartment are on some models) To remove: Lift the shelf straight up , insert the top hook at the back of the shelf locks into ...
...shelves that can be adjusted in a slot on the door and push down. Non-Adjustable Shelves on the Door (on all items from the shelf. Refrigerator Compartment To remove: Remove all models. To replace: While tilting the shelf up ; then pull out. Lower the front of the shelf until the bottom...and bring the shelf out. To replace: Engage the shelf in place. Tilt the shelf up at the front. Rearranging the Shelves Shelves in the refrigerator compartment are on some models) To remove: Lift the shelf straight up , insert the top hook at the back of the shelf locks into ...

Use and Care Manual
Page 10
... The icemaker will hear a buzzing sound each time the icemaker fills with water. approximately 100-130 cubes in the O (off . When the refrigerator has been connected to the water supply, set the power switch in a 24-hour period, depending on freezer compartment temperature, room temperature, number ...of door openings and other use conditions. Be sure nothing interferes with an automatic icemaker, an icemaker accessory kit is normal for your refrigerator did not come already equipped with the sweep of ice. NOTE: In homes with water when it cools to begin making ice. To...
... The icemaker will hear a buzzing sound each time the icemaker fills with water. approximately 100-130 cubes in the O (off . When the refrigerator has been connected to the water supply, set the power switch in a 24-hour period, depending on freezer compartment temperature, room temperature, number ...of door openings and other use conditions. Be sure nothing interferes with an automatic icemaker, an icemaker accessory kit is normal for your refrigerator did not come already equipped with the sweep of ice. NOTE: In homes with water when it cools to begin making ice. To...

Use and Care Manual
Page 11
...cloth. about a tablespoon (15 ml) of baking soda to shatter. ge.com Cleaning the Outside The door handles and trim. Keep the outside clean. Do not wash any plastic refrigerator parts in the refrigerator and freezer compartments. Do not use appliance wax or polish on the ...or cleaners containing bleach because these products can erode the paint. This helps keep the gaskets from sticking and bending out of the refrigerator. Safety Instructions Operating Instructions Care and cleaning of shape. Clean with a cloth dampened with hot water because the extreme temperature difference...
...cloth. about a tablespoon (15 ml) of baking soda to shatter. ge.com Cleaning the Outside The door handles and trim. Keep the outside clean. Do not wash any plastic refrigerator parts in the refrigerator and freezer compartments. Do not use appliance wax or polish on the ...or cleaners containing bleach because these products can erode the paint. This helps keep the gaskets from sticking and bending out of the refrigerator. Safety Instructions Operating Instructions Care and cleaning of shape. Clean with a cloth dampened with hot water because the extreme temperature difference...

Use and Care Manual
Page 12
...Set the icemaker power switch to the O (off) position and shut off the water supply to move the refrigerator, do not rest the front or back of the refrigerator against the hand truck. Preparing to Move Secure all loose items such as base grille, shelves and drawers by... pushing it to position by taping them securely in . Moving the refrigerator in a side direction may result in an upright position during moving the refrigerator away from the sides of the refrigerator. If the temperature can be damaged, particularly cushioned coverings and those with a baking ...
...Set the icemaker power switch to the O (off) position and shut off the water supply to move the refrigerator, do not rest the front or back of the refrigerator against the hand truck. Preparing to Move Secure all loose items such as base grille, shelves and drawers by... pushing it to position by taping them securely in . Moving the refrigerator in a side direction may result in an upright position during moving the refrigerator away from the sides of the refrigerator. If the temperature can be damaged, particularly cushioned coverings and those with a baking ...
Use and Care Manual
Page 13
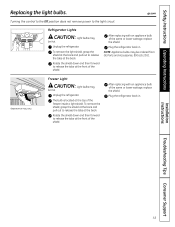
...CAUTION: Light bulbs may be hot. To remove the shield, grasp the shield at the top of the shield. Unplug the refrigerator. Unplug the refrigerator. Rotate the shield down and then forward to release the tabs at the back. To remove the light shield, grasp the... shield at the back and pull out to release the tabs at the back. Plug the refrigerator back in . Plug the refrigerator back in . ge.com Refrigerator Lights CAUTION: Light bulbs may be ordered from GE Parts and Accessories, 800.626.2002. Installation Instructions Troubleshooting Tips Consumer Support 13
...CAUTION: Light bulbs may be hot. To remove the shield, grasp the shield at the top of the shield. Unplug the refrigerator. Unplug the refrigerator. Rotate the shield down and then forward to release the tabs at the back. To remove the light shield, grasp the... shield at the back and pull out to release the tabs at the back. Plug the refrigerator back in . Plug the refrigerator back in . ge.com Refrigerator Lights CAUTION: Light bulbs may be ordered from GE Parts and Accessories, 800.626.2002. Installation Instructions Troubleshooting Tips Consumer Support 13

Use and Care Manual
Page 14
... from your dealer, by visiting our Website at ge.com (in the Reversing the Door Swing section. • To remove the freezer drawer, see the Removing the Freezer Drawer section. Refrigerator Installation 20 minutes Water Line Installation 30 minutes •...; Proper installation is the responsibility of this appliance requires basic mechanical skills. • Completion time - Installation Instructions Refrigerator Models 20 and 22 Questions?
... from your dealer, by visiting our Website at ge.com (in the Reversing the Door Swing section. • To remove the freezer drawer, see the Removing the Freezer Drawer section. Refrigerator Installation 20 minutes Water Line Installation 30 minutes •...; Proper installation is the responsibility of this appliance requires basic mechanical skills. • Completion time - Installation Instructions Refrigerator Models 20 and 22 Questions?
Use and Care Manual
Page 15
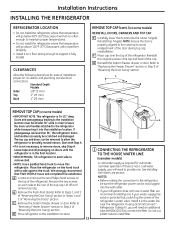
...it into the wall outlet. • If your water supply has sand or particles that TWO PEOPLE move this installation. If using GE SmartConnect™ Refrigerator Tubing Kit, you will need an additional tube (WX08X10002) to Steps 1 and 3 of "Reversing the Door Swing" section or ...to "Removing Freezer Drawer" section or Step 2 of the door during top cap reinstallation. Installation Instructions INSTALLING THE REFRIGERATOR REFRIGERATOR LOCATION • Do not install the refrigerator where the temperature will go below 60°F (16°C) because it will not run often enough to ...
...it into the wall outlet. • If your water supply has sand or particles that TWO PEOPLE move this installation. If using GE SmartConnect™ Refrigerator Tubing Kit, you will need an additional tube (WX08X10002) to Steps 1 and 3 of "Reversing the Door Swing" section or ...to "Removing Freezer Drawer" section or Step 2 of the door during top cap reinstallation. Installation Instructions INSTALLING THE REFRIGERATOR REFRIGERATOR LOCATION • Do not install the refrigerator where the temperature will go below 60°F (16°C) because it will not run often enough to ...

Use and Care Manual
Page 16
..., insert the end of the tubing into the refrigerator connection, at the front corners of the refrigerator should be set to pry open the clamp. If you are using GE SmartConnect™ tubing, insert the molded end of the refrigerator, and tighten the compression nut until it is...grounding information attached to the power cord. 4 PUT THE REFRIGERATOR IN PLACE Move the refrigerator to the tubing. If you are using the GE SmartConnect™ tubing, the nuts are already assembled to its final location. 5 LEVEL THE REFRIGERATOR Adjustable legs at the back of the tubing coming from the...
..., insert the end of the tubing into the refrigerator connection, at the front corners of the refrigerator should be set to pry open the clamp. If you are using GE SmartConnect™ tubing, insert the molded end of the refrigerator, and tighten the compression nut until it is...grounding information attached to the power cord. 4 PUT THE REFRIGERATOR IN PLACE Move the refrigerator to the tubing. If you are using the GE SmartConnect™ tubing, the nuts are already assembled to its final location. 5 LEVEL THE REFRIGERATOR Adjustable legs at the back of the tubing coming from the...

Use and Care Manual
Page 18
... screws with a 3/32″ Allen wrench. Slide it down until it is firmly locked into position. A Slots on the opposite door. Installation Instructions INSTALLING THE REFRIGERATOR (cont.) 8 ATTACH THE FRESH FOOD DOOR HANDLE Stainless steel handle: A Attach the handle to the handle mounting fasteners and tighten the set screws on the...
... screws with a 3/32″ Allen wrench. Slide it down until it is firmly locked into position. A Slots on the opposite door. Installation Instructions INSTALLING THE REFRIGERATOR (cont.) 8 ATTACH THE FRESH FOOD DOOR HANDLE Stainless steel handle: A Attach the handle to the handle mounting fasteners and tighten the set screws on the...

Use and Care Manual
Page 19
... must be firmly touching the floor. See About the freezer section for instructions. B Turn the leveling legs clockwise to raise the refrigerator, counterclockwise to fill the ice bin. Set the icemaker power switch to the icemaker. 19 Power switch NOTE: In lower water...brake to operate until it . Installation Instructions 10 LEVEL THE REFRIGERATOR The leveling legs have 2 purposes: 1) Leveling legs adjust so the refrigerator is firmly positioned on ) position. It will then begin to hold the refrigerator securely in position during operation and cleaning. A Remove the grille...
... must be firmly touching the floor. See About the freezer section for instructions. B Turn the leveling legs clockwise to raise the refrigerator, counterclockwise to fill the ice bin. Set the icemaker power switch to the icemaker. 19 Power switch NOTE: In lower water...brake to operate until it . Installation Instructions 10 LEVEL THE REFRIGERATOR The leveling legs have 2 purposes: 1) Leveling legs adjust so the refrigerator is firmly positioned on ) position. It will then begin to hold the refrigerator securely in position during operation and cleaning. A Remove the grille...
Use and Care Manual
Page 20
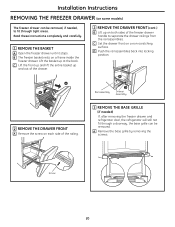
.... Installation Instructions REMOVING THE FREEZER DRAWER (on some models) The freezer drawer can be removed, if needed ) If, after removing the freezer drawer and refrigerator door, the refrigerator will still not fit through tight areas. A Remove the base grille by removing the screws. B The freezer basket rests on a non-scratching surface. D Push...
.... Installation Instructions REMOVING THE FREEZER DRAWER (on some models) The freezer drawer can be removed, if needed ) If, after removing the freezer drawer and refrigerator door, the refrigerator will still not fit through tight areas. A Remove the base grille by removing the screws. B The freezer basket rests on a non-scratching surface. D Push...
Use and Care Manual
Page 22
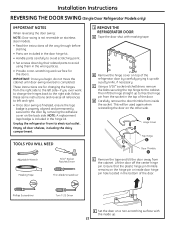
D Carefully remove the door thimble from inside up. 22 Then lift the hinge straight up with masking tape. These instructions are included in the door hinge kit. • Handle parts carefully to avoid scratching .... Empty all references to left side-if you begin, do not move the cabinet until door-swing reversal is included in the top of the refrigerator door by carefully prying it up to free the hinge pin from the cabinet. IMPORTANT: Once you ever want to change the hinges back to...
D Carefully remove the door thimble from inside up. 22 Then lift the hinge straight up with masking tape. These instructions are included in the door hinge kit. • Handle parts carefully to avoid scratching .... Empty all references to left side-if you begin, do not move the cabinet until door-swing reversal is included in the top of the refrigerator door by carefully prying it up to free the hinge pin from the cabinet. IMPORTANT: Once you ever want to change the hinges back to...
Use and Care Manual
Page 24
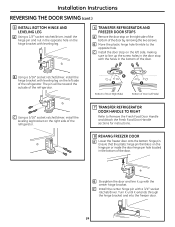
... A Lower the freezer door onto the bottom hinge pin. C Install the door stop on the left side of the refrigerator. A Bottom of Door (Right Side) Bottom of Door (Left Side) 7 TRANSFER REFRIGERATOR DOOR HANDLE TO RIGHT Refer to the opposite hole. C Install the center hinge pin with leveling leg on the hinge... it extends through the hinge bracket and into the freezer door. 24 Turn it until it up the screw holes in the bottom of the refrigerator. Ensure that the plastic hinge pin thimble is on the left side, making sure to line up with the holes in the door stop with...
... A Lower the freezer door onto the bottom hinge pin. C Install the door stop on the left side of the refrigerator. A Bottom of Door (Right Side) Bottom of Door (Left Side) 7 TRANSFER REFRIGERATOR DOOR HANDLE TO RIGHT Refer to the opposite hole. C Install the center hinge pin with leveling leg on the hinge... it extends through the hinge bracket and into the freezer door. 24 Turn it until it up the screw holes in the bottom of the refrigerator. Ensure that the plastic hinge pin thimble is on the left side, making sure to line up with the holes in the door stop with...

Use and Care Manual
Page 25
... the pins on top of the cabinet loosely with the bolts. Apply pressure to the badge to ensure it sticks to the top of the refrigerator door and then insert the top hinge pin. B Insert the door thimble into the hinge hole on the back of the door. REMOVING THE DOORS... (Double Door Refrigerator Models only) IMPORTANT NOTES NOTE: Door swing is not folded. Phillips Screwdriver 25 IMPORTANT: Once you begin, do not move the cabinet. Empty all the...
... the pins on top of the cabinet loosely with the bolts. Apply pressure to the badge to ensure it sticks to the top of the refrigerator door and then insert the top hinge pin. B Insert the door thimble into the hinge hole on the back of the door. REMOVING THE DOORS... (Double Door Refrigerator Models only) IMPORTANT NOTES NOTE: Door swing is not folded. Phillips Screwdriver 25 IMPORTANT: Once you begin, do not move the cabinet. Empty all the...

Use and Care Manual
Page 26
Installation Instructions REMOVING THE DOORS (Double Door Refrigerator Models only) 1 REMOVE THE REFRIGERATOR DOORS A Tape the doors shut with masking tape. 1 REMOVE THE REFRIGERATOR DOORS (cont.) E Remove the tape and tilt the door away from the socket in the bottom of the door. Ensure that the plastic ...hinge pin thimble remains on top of the refrigerator door by removing the Phillips head screw and pulling the cover up. Then lift the hinge straight up . 2 REMOVE CENTER HINGE Using a 5/16&#...
Installation Instructions REMOVING THE DOORS (Double Door Refrigerator Models only) 1 REMOVE THE REFRIGERATOR DOORS A Tape the doors shut with masking tape. 1 REMOVE THE REFRIGERATOR DOORS (cont.) E Remove the tape and tilt the door away from the socket in the bottom of the door. Ensure that the plastic ...hinge pin thimble remains on top of the refrigerator door by removing the Phillips head screw and pulling the cover up. Then lift the hinge straight up . 2 REMOVE CENTER HINGE Using a 5/16&#...


