Use and Care Manual
Page 1
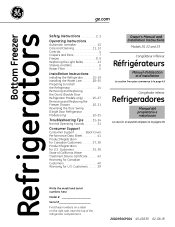
... Icemaker 10 Care and Cleaning 11, 12 Controls 4 Crispers and Pans 7 Freezer 8, 9 Replacing the Light Bulbs 13 Shelves and Bins 6 Water Filter 5 Installation Instructions Installing the Refrigerator 15-19 Installing the Water Line 28-30 Preparing to Install the Refrigerator 14 Removing and Replacing the Doors (Double Door Refrigerator Models only 25-27 Removing and Replacing the Freezer Drawer 20, 21 Reversing the Door Swing (Single Door Refrigerator Models only 22-25 Troubleshooting Tips . . . . . .31-34 Normal Operating Sounds 31 Consumer Support Consumer Support Back Cover...
... Icemaker 10 Care and Cleaning 11, 12 Controls 4 Crispers and Pans 7 Freezer 8, 9 Replacing the Light Bulbs 13 Shelves and Bins 6 Water Filter 5 Installation Instructions Installing the Refrigerator 15-19 Installing the Water Line 28-30 Preparing to Install the Refrigerator 14 Removing and Replacing the Doors (Double Door Refrigerator Models only 25-27 Removing and Replacing the Freezer Drawer 20, 21 Reversing the Door Swing (Single Door Refrigerator Models only 22-25 Troubleshooting Tips . . . . . .31-34 Normal Operating Sounds 31 Consumer Support Consumer Support Back Cover...
Use and Care Manual
Page 2
... both controls to the Off position does not remove power to do. Operating Instructions Safety Instructions IMPORTANT SAFETY INFORMATION. READ ALL INSTRUCTIONS BEFORE USING. WARNING! clearances between the doors and between the doors and cabinet are getting rid of an extension cord. DANGER! Before You Throw Away Your Old Refrigerator or Freezer: ■ Take off the doors. ■ Leave the shelves in the refrigerator. Installation Instructions Consumer Support Troubleshooting Tips USE...
... both controls to the Off position does not remove power to do. Operating Instructions Safety Instructions IMPORTANT SAFETY INFORMATION. READ ALL INSTRUCTIONS BEFORE USING. WARNING! clearances between the doors and between the doors and cabinet are getting rid of an extension cord. DANGER! Before You Throw Away Your Old Refrigerator or Freezer: ■ Take off the doors. ■ Leave the shelves in the refrigerator. Installation Instructions Consumer Support Troubleshooting Tips USE...
Use and Care Manual
Page 4
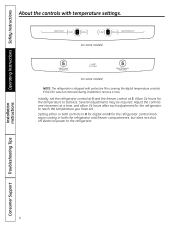
Operating Instructions Safety Instructions Installation Instructions About the controls with temperature settings. (on some models) (on some models) NOTE: The refrigerator is shipped with protective film covering the digital temperature controls. Allow 24 hours for the temperature to the refrigerator. 4 Consumer Support Troubleshooting Tips Several adjustments may be required. Initially, set . Setting either or both controls to 0 for digital and 0 for the refrigerator to reach the temperature you have set the refrigerator control at 5 and the freezer control at a time...
Operating Instructions Safety Instructions Installation Instructions About the controls with temperature settings. (on some models) (on some models) NOTE: The refrigerator is shipped with protective film covering the digital temperature controls. Allow 24 hours for the temperature to the refrigerator. 4 Consumer Support Troubleshooting Tips Several adjustments may be required. Initially, set . Setting either or both controls to 0 for digital and 0 for the refrigerator to reach the temperature you have set the refrigerator control at 5 and the freezer control at a time...

Use and Care Manual
Page 5
... arrow on some models) ge.com Water Filter Cartridge The water filter cartridge is removed. Close the cartridge cover. CAUTION: If air has been trapped in the United States, visit our Website, ge.com, or call GE Parts and Accessories, 800.626.2002. Installation Instructions Troubleshooting Tips Consumer Support 5 Safety Instructions Operating Instructions About the water filter. (on the cartridge and the cartridge holder, slowly rotate the cartridge clockwise until it stops. When to the icemaker decreases, or every...
... arrow on some models) ge.com Water Filter Cartridge The water filter cartridge is removed. Close the cartridge cover. CAUTION: If air has been trapped in the United States, visit our Website, ge.com, or call GE Parts and Accessories, 800.626.2002. Installation Instructions Troubleshooting Tips Consumer Support 5 Safety Instructions Operating Instructions About the water filter. (on the cartridge and the cartridge holder, slowly rotate the cartridge clockwise until it stops. When to the icemaker decreases, or every...

Use and Care Manual
Page 10
... ice is made to the icemaker, set the power switch to replace the shelf. Shelf Ice Bin To reach the power switch. Always be joined together. Shelf Ice Bin To access ice. NOTE: Set the power switch to the O (off . It is shut off ) position if the water supply is normal for several cubes to be sure to the l (on freezer compartment temperature, room temperature, number of the refrigerator for the specific icemaker kit needed for how to begin making ice cubes. A newly installed refrigerator...
... ice is made to the icemaker, set the power switch to replace the shelf. Shelf Ice Bin To reach the power switch. Always be joined together. Shelf Ice Bin To access ice. NOTE: Set the power switch to the O (off . It is shut off ) position if the water supply is normal for several cubes to be sure to the l (on freezer compartment temperature, room temperature, number of the refrigerator for the specific icemaker kit needed for how to begin making ice cubes. A newly installed refrigerator...

Use and Care Manual
Page 12
... interior with embossed surfaces. Raise the leveling legs located at the bottom front of the refrigerator. Operating Instructions Safety Instructions Care and cleaning of the refrigerator. Be sure the refrigerator stays in damage to the refrigerator. Behind the Refrigerator Be careful when moving . All types of floor coverings can drop below freezing, have a qualified servicer drain the water supply system (on some models) to prevent serious property damage due to flooding. Set the icemaker power switch...
... interior with embossed surfaces. Raise the leveling legs located at the bottom front of the refrigerator. Operating Instructions Safety Instructions Care and cleaning of the refrigerator. Be sure the refrigerator stays in damage to the refrigerator. Behind the Refrigerator Be careful when moving . All types of floor coverings can drop below freezing, have a qualified servicer drain the water supply system (on some models) to prevent serious property damage due to flooding. Set the icemaker power switch...

Use and Care Manual
Page 14
... Consumer. • Note to Installer - A GE water supply kit (containing tubing, shutoff valve, fittings and instructions) is not covered under the Warranty. Installation of the installer. • Product failure due to a cold water line. WATER SUPPLY TO THE ICEMAKER AND DISPENSER (ON SOME MODELS) If the refrigerator has an icemaker, it will not fit through a doorway, the refrigerator door and freezer drawer can be connected to improper installation is available at extra cost from Parts and Accessories, 800.626...
... Consumer. • Note to Installer - A GE water supply kit (containing tubing, shutoff valve, fittings and instructions) is not covered under the Warranty. Installation of the installer. • Product failure due to a cold water line. WATER SUPPLY TO THE ICEMAKER AND DISPENSER (ON SOME MODELS) If the refrigerator has an icemaker, it will not fit through a doorway, the refrigerator door and freezer drawer can be connected to improper installation is available at extra cost from Parts and Accessories, 800.626...
Use and Care Manual
Page 15
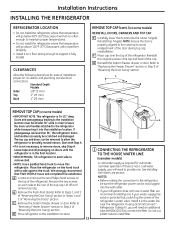
... refrigerator's water valve. Doors and passageways leading to the installation location must be removed to allow the refrigerator to install filter. If using GE SmartConnect™ Refrigerator Tubing Kit, you will need an additional tube (WX08X10002) to connect the filter. Installation Instructions INSTALLING THE REFRIGERATOR REFRIGERATOR LOCATION • Do not install the refrigerator where the temperature will go below 60°F (16°C) because it will not run often enough to maintain proper temperatures. • Do not install the refrigerator where the temperature...
... refrigerator's water valve. Doors and passageways leading to the installation location must be removed to allow the refrigerator to install filter. If using GE SmartConnect™ Refrigerator Tubing Kit, you will need an additional tube (WX08X10002) to connect the filter. Installation Instructions INSTALLING THE REFRIGERATOR REFRIGERATOR LOCATION • Do not install the refrigerator where the temperature will go below 60°F (16°C) because it will not run often enough to maintain proper temperatures. • Do not install the refrigerator where the temperature...

Use and Care Manual
Page 16
... icemaker power switch is raised just enough that the door closes easily when opened about halfway. Installation Instructions INSTALLING THE REFRIGERATOR (cont.) 1 CONNECTING THE REFRIGERATOR TO THE HOUSE WATER LINE (cont.) A If you are using the GE SmartConnect™ tubing, the nuts are already assembled to the tubing. C Fasten the tubing into the clamp provided to hold it is firmly positioned on your refrigerator. To adjust the leveling legs, turn with an icemaker, before plugging...
... icemaker power switch is raised just enough that the door closes easily when opened about halfway. Installation Instructions INSTALLING THE REFRIGERATOR (cont.) 1 CONNECTING THE REFRIGERATOR TO THE HOUSE WATER LINE (cont.) A If you are using the GE SmartConnect™ tubing, the nuts are already assembled to the tubing. C Fasten the tubing into the clamp provided to hold it is firmly positioned on your refrigerator. To adjust the leveling legs, turn with an icemaker, before plugging...
Use and Care Manual
Page 22
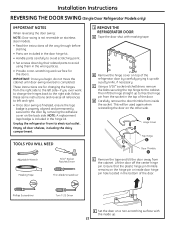
... parts to the cabinet. Installation Instructions REVERSING THE DOOR SWING (Single Door Refrigerator Models only) IMPORTANT NOTES When reversing the door swing: NOTE: Door swing is not reversible on stainless steel models. • Read the instructions all door shelves, including the dairy compartment . 1 REMOVE THE REFRIGERATOR DOOR A Tape the door shut with masking tape. NOTE: A replacement logo badge is included in the door hinge kit. • Handle parts carefully to avoid scratching paint. • Set screws down by removing the adhesive cover...
... parts to the cabinet. Installation Instructions REVERSING THE DOOR SWING (Single Door Refrigerator Models only) IMPORTANT NOTES When reversing the door swing: NOTE: Door swing is not reversible on stainless steel models. • Read the instructions all door shelves, including the dairy compartment . 1 REMOVE THE REFRIGERATOR DOOR A Tape the door shut with masking tape. NOTE: A replacement logo badge is included in the door hinge kit. • Handle parts carefully to avoid scratching paint. • Set screws down by removing the adhesive cover...

Use and Care Manual
Page 26
.... 2 REMOVE CENTER HINGE Using a 5/16″ socket ratchet/driver, remove the bolts securing the center hinge to the Removing the Freezer Drawer section for instructions. 26 Set the hinge and bolts aside. Ensure that the plastic hinge pin thimble remains on a non-scratching surface with the inside door hinge pin hole located in the top of the door. Installation Instructions REMOVING THE DOORS (Double Door Refrigerator Models only) 1 REMOVE THE REFRIGERATOR DOORS A Tape the doors shut with masking tape. 1 REMOVE THE REFRIGERATOR DOORS...
.... 2 REMOVE CENTER HINGE Using a 5/16″ socket ratchet/driver, remove the bolts securing the center hinge to the Removing the Freezer Drawer section for instructions. 26 Set the hinge and bolts aside. Ensure that the plastic hinge pin thimble remains on a non-scratching surface with the inside door hinge pin hole located in the top of the door. Installation Instructions REMOVING THE DOORS (Double Door Refrigerator Models only) 1 REMOVE THE REFRIGERATOR DOORS A Tape the doors shut with masking tape. 1 REMOVE THE REFRIGERATOR DOORS...
Use and Care Manual
Page 28
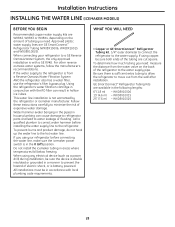
... before connecting the water line, make sure the icemaker power switch is with a GE RVKit. To determine how much tubing you use the refrigerator's filter bypass plug. For other reverse osmosis water systems, follow the manufacturer's recommendations. Approved plastic water supply lines are available in a manner to a GE Reverse Osmosis Water System, the only approved installation is in areas where temperatures fall below freezing. If you need . Installation Instructions INSTALLING THE WATER LINE (ICEMAKER MODELS) BEFORE YOU BEGIN Recommended copper water supply kits are...
... before connecting the water line, make sure the icemaker power switch is with a GE RVKit. To determine how much tubing you use the refrigerator's filter bypass plug. For other reverse osmosis water systems, follow the manufacturer's recommendations. Approved plastic water supply lines are available in a manner to a GE Reverse Osmosis Water System, the only approved installation is in areas where temperatures fall below freezing. If you need . Installation Instructions INSTALLING THE WATER LINE (ICEMAKER MODELS) BEFORE YOU BEGIN Recommended copper water supply kits are...
Use and Care Manual
Page 30
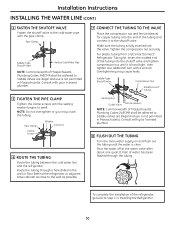
... wall or floor (behind the refrigerator or adjacent base cabinet) as close to the wall as possible. Installation Instructions INSTALLING THE WATER LINE (CONT.) 4 FASTEN THE SHUTOFF VALVE Fasten the shutoff valve to the cold water pipe with a wrench. Saddle valves are illegal and use is clear. Overtightening may crush the tubing. Saddle-Type Shutoff Valve Compression Nut SmartConnect™ Tubing 5 TIGHTEN THE PIPE CLAMP Tighten...
... wall or floor (behind the refrigerator or adjacent base cabinet) as close to the wall as possible. Installation Instructions INSTALLING THE WATER LINE (CONT.) 4 FASTEN THE SHUTOFF VALVE Fasten the shutoff valve to the cold water pipe with a wrench. Saddle valves are illegal and use is clear. Overtightening may crush the tubing. Saddle-Type Shutoff Valve Compression Nut SmartConnect™ Tubing 5 TIGHTEN THE PIPE CLAMP Tighten...

Use and Care Manual
Page 31
... may hear the fans spinning at initial dispense and after dispenser button is released. Leveling legs need to provide optimal cooling and energy savings. ge.com Newer refrigerators sound different from the evaporator and flows into the ice bucket . ■ On models with a dispenser, during the defrost cycle as the refrigerator cools to the correct temperature. ■ The freezer control will click when starting or stopping the compressor. ■ Defrost timer snapping in...
... may hear the fans spinning at initial dispense and after dispenser button is released. Leveling legs need to provide optimal cooling and energy savings. ge.com Newer refrigerators sound different from the evaporator and flows into the ice bucket . ■ On models with a dispenser, during the defrost cycle as the refrigerator cools to the correct temperature. ■ The freezer control will click when starting or stopping the compressor. ■ Defrost timer snapping in...

Use and Care Manual
Page 32
...; Set the power switch to the I (on) position will damage the water valve. • Replace filter cartridge with new cartridge or with more storage space and a larger freezer require more operating time. Door left open . Ice cubes stuck in the I (on . Operating Instructions Safety Instructions Before you call for the refrigerator to completely cool down . • Level cubes by hand. • Turn off the icemaker, remove cubes and turn green when the freezer light switch is pressed in . Troubleshooting Tips Installation Instructions Problem Motor operates...
...; Set the power switch to the I (on) position will damage the water valve. • Replace filter cartridge with new cartridge or with more storage space and a larger freezer require more operating time. Door left open . Ice cubes stuck in the I (on . Operating Instructions Safety Instructions Before you call for the refrigerator to completely cool down . • Level cubes by hand. • Turn off the icemaker, remove cubes and turn green when the freezer light switch is pressed in . Troubleshooting Tips Installation Instructions Problem Motor operates...
Use and Care Manual
Page 33
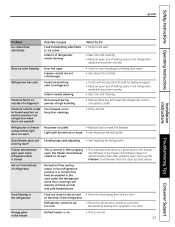
...; See Care and cleaning. • Keep an open . Some floor coverings will discolor at outlet. • Replace fuse or reset the breaker. Interior of baking soda in the refrigerator Food too close by itself , above. Slow ice cube freezing Door left open box of refrigerator needs cleaning. Door/drawer does not Leveling legs need adjusting. • See Installing the Refrigerator. Refrigerator has odor Foods transmitting odor to refrigerator. Moisture collects inside (in the freezer 33 Troubleshooting Tips Consumer Support in...
...; See Care and cleaning. • Keep an open . Some floor coverings will discolor at outlet. • Replace fuse or reset the breaker. Interior of baking soda in the refrigerator Food too close by itself , above. Slow ice cube freezing Door left open box of refrigerator needs cleaning. Door/drawer does not Leveling legs need adjusting. • See Installing the Refrigerator. Refrigerator has odor Foods transmitting odor to refrigerator. Moisture collects inside (in the freezer 33 Troubleshooting Tips Consumer Support in...

Use and Care Manual
Page 34
... some models) Handle is loose / handle has a gap Refrigerator beeping Control setting is the door alarm. • Close door. compartment light up , check to open : remove some of the basket and close : readjust products in the basket or remove any product that it locks into place. Installation Instructions Consumer Support Troubleshooting Tips 34 Troubleshooting Tips Problem No ice cube production (on some models, the light bulbs • If the control settings do not light up the temperature control settings. Doors need...
... some models) Handle is loose / handle has a gap Refrigerator beeping Control setting is the door alarm. • Close door. compartment light up , check to open : remove some of the basket and close : readjust products in the basket or remove any product that it locks into place. Installation Instructions Consumer Support Troubleshooting Tips 34 Troubleshooting Tips Problem No ice cube production (on some models, the light bulbs • If the control settings do not light up the temperature control settings. Doors need...
Use and Care Manual
Page 39
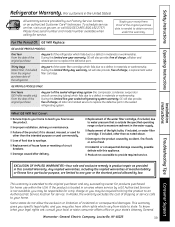
... sealed refrigerating system warranty, GE will also provide, free of charge, all labor and related service to the product caused by law. Installation Instructions Troubleshooting Tips Consumer Support EXCLUSION OF IMPLIED WARRANTIES-Your sole and exclusive remedy is product repair as noted above. ■ Damage to replace the defective part in materials or workmanship. Staple your state's Attorney General. Warrantor: General Electric Company. Any implied warranties, including...
... sealed refrigerating system warranty, GE will also provide, free of charge, all labor and related service to the product caused by law. Installation Instructions Troubleshooting Tips Consumer Support EXCLUSION OF IMPLIED WARRANTIES-Your sole and exclusive remedy is product repair as noted above. ■ Damage to replace the defective part in materials or workmanship. Staple your state's Attorney General. Warrantor: General Electric Company. Any implied warranties, including...
Use and Care Manual
Page 40
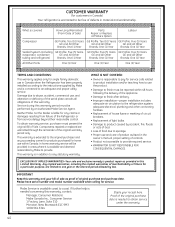
... help is needed to obtain service under the warranty. 40 CUSTOMER WARRANTY (for home use within 48 hours following the delivery of the appliance. • Damage to finish after delivery. • Improper installation-proper installation includes adequate air circulation to the refrigeration system, adequate electrical, plumbing and other connecting facilities. • Replacement of house fuses or resetting of circuit breakers. • Replacement of light bulbs. • Damage...
... help is needed to obtain service under the warranty. 40 CUSTOMER WARRANTY (for home use within 48 hours following the delivery of the appliance. • Damage to finish after delivery. • Improper installation-proper installation includes adequate air circulation to the refrigeration system, adequate electrical, plumbing and other connecting facilities. • Replacement of house fuses or resetting of circuit breakers. • Replacement of light bulbs. • Damage...
Use and Care Manual
Page 41
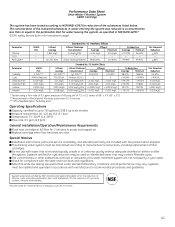
....67% Min. Replace cartridge when flow becomes too slow. Check for : General Electric Company, Louisville, KY 40225 NSF® 41 of cyst, lead, Lindane, Atrazine and turbidity. System tested and certified by this water treatment system are included with the state and local laws and regulations. pH of filter cartridges. Particles used on disinfected water that while the testing was reduced to...
....67% Min. Replace cartridge when flow becomes too slow. Check for : General Electric Company, Louisville, KY 40225 NSF® 41 of cyst, lead, Lindane, Atrazine and turbidity. System tested and certified by this water treatment system are included with the state and local laws and regulations. pH of filter cartridges. Particles used on disinfected water that while the testing was reduced to...

