Use and Care Manual
Page 1
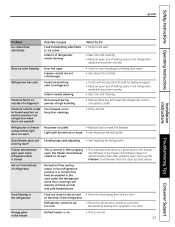
... Icemaker 10 Care and Cleaning 11, 12 Controls 4 Crispers and Pans 7 Freezer 8, 9 Replacing the Light Bulbs 13 Shelves and Bins 6 Water Filter 5 Installation Instructions Installing the Refrigerator 15-19 Installing the Water Line 28-30 Preparing to Install the Refrigerator 14 Removing and Replacing the Doors (Double Door Refrigerator Models only 25-27 Removing and Replacing the Freezer Drawer 20, 21 Reversing the Door Swing (Single Door Refrigerator Models only 22-25 Troubleshooting Tips . . . . . .31-34 Normal Operating Sounds 31 Consumer Support Consumer Support Back Cover...
... Icemaker 10 Care and Cleaning 11, 12 Controls 4 Crispers and Pans 7 Freezer 8, 9 Replacing the Light Bulbs 13 Shelves and Bins 6 Water Filter 5 Installation Instructions Installing the Refrigerator 15-19 Installing the Water Line 28-30 Preparing to Install the Refrigerator 14 Removing and Replacing the Doors (Double Door Refrigerator Models only 25-27 Removing and Replacing the Freezer Drawer 20, 21 Reversing the Door Swing (Single Door Refrigerator Models only 22-25 Troubleshooting Tips . . . . . .31-34 Normal Operating Sounds 31 Consumer Support Consumer Support Back Cover...
Use and Care Manual
Page 2
... a grounding type plug 2 and outlet and that releases the cubes. Installation Instructions Consumer Support Troubleshooting Tips USE OF EXTENSION CORDS Because of this appliance only for "just a few days." WARNING! Use this or any servicing be performed by a qualified individual. ■ Setting either or both controls to the Off position does not remove power to help prevent accidents. SAFETY PRECAUTIONS When using electrical appliances, basic...
... a grounding type plug 2 and outlet and that releases the cubes. Installation Instructions Consumer Support Troubleshooting Tips USE OF EXTENSION CORDS Because of this appliance only for "just a few days." WARNING! Use this or any servicing be performed by a qualified individual. ■ Setting either or both controls to the Off position does not remove power to help prevent accidents. SAFETY PRECAUTIONS When using electrical appliances, basic...
Use and Care Manual
Page 4
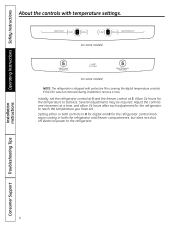
... installation, remove it now. Adjust the controls one increment at 5. Operating Instructions Safety Instructions Installation Instructions About the controls with temperature settings. (on some models) (on some models) NOTE: The refrigerator is shipped with protective film covering the digital temperature controls. Allow 24 hours for the refrigerator to the refrigerator. 4 Consumer Support Troubleshooting Tips Setting either or both controls to 0 for digital and 0 for the refrigerator control knob stops cooling in both the refrigerator and freezer compartments, but does not shut...
... installation, remove it now. Adjust the controls one increment at 5. Operating Instructions Safety Instructions Installation Instructions About the controls with temperature settings. (on some models) (on some models) NOTE: The refrigerator is shipped with protective film covering the digital temperature controls. Allow 24 hours for the refrigerator to the refrigerator. 4 Consumer Support Troubleshooting Tips Setting either or both controls to 0 for digital and 0 for the refrigerator control knob stops cooling in both the refrigerator and freezer compartments, but does not shut...

Use and Care Manual
Page 5
.... Filter Model GSWF Customers in the back upper right corner of the refrigerator compartment. Filter Bypass Plug You must use the filter bypass plug when a replacement filter cartridge is located in Canada should be ejected as it is properly installed, you are replacing the cartridge, first remove the old one. Close the cartridge cover. The icemaker will feel it "click" as it locks into place. Safety Instructions Operating Instructions About the water filter. (on some models) ge.com Water Filter Cartridge The water filter cartridge...
.... Filter Model GSWF Customers in the back upper right corner of the refrigerator compartment. Filter Bypass Plug You must use the filter bypass plug when a replacement filter cartridge is located in Canada should be ejected as it is properly installed, you are replacing the cartridge, first remove the old one. Close the cartridge cover. The icemaker will feel it "click" as it locks into place. Safety Instructions Operating Instructions About the water filter. (on some models) ge.com Water Filter Cartridge The water filter cartridge...

Use and Care Manual
Page 10
... the refrigerator is operated before the water connection is made to the icemaker, set the power switch to the l (on freezer compartment temperature, room temperature, number of the refrigerator for the specific icemaker kit needed for how to clear. It is normal for several cubes to 15°F (-10°C). Accessing Ice and Reaching the Power Switch To reach the icemaker power switch, pull the shelf above the ice bin straight out. Installation Instructions Consumer Support Troubleshooting Tips 10 Operating Instructions Safety Instructions...
... the refrigerator is operated before the water connection is made to the icemaker, set the power switch to the l (on freezer compartment temperature, room temperature, number of the refrigerator for the specific icemaker kit needed for how to clear. It is normal for several cubes to 15°F (-10°C). Accessing Ice and Reaching the Power Switch To reach the icemaker power switch, pull the shelf above the ice bin straight out. Installation Instructions Consumer Support Troubleshooting Tips 10 Operating Instructions Safety Instructions...

Use and Care Manual
Page 12
... to flooding. Handle only from the wall. Behind the Refrigerator Be careful when moving . Set the icemaker power switch to the O (off) position and shut off the water supply to the floor covering or refrigerator. This could damage the refrigerator. Leave the doors open. Operating Instructions Safety Instructions Care and cleaning of the refrigerator. When pushing the refrigerator back, make sure you don't roll over the power cord or icemaker supply line (on some models). Installation Instructions Consumer Support Troubleshooting Tips 12...
... to flooding. Handle only from the wall. Behind the Refrigerator Be careful when moving . Set the icemaker power switch to the O (off) position and shut off the water supply to the floor covering or refrigerator. This could damage the refrigerator. Leave the doors open. Operating Instructions Safety Instructions Care and cleaning of the refrigerator. When pushing the refrigerator back, make sure you don't roll over the power cord or icemaker supply line (on some models). Installation Instructions Consumer Support Troubleshooting Tips 12...

Use and Care Manual
Page 14
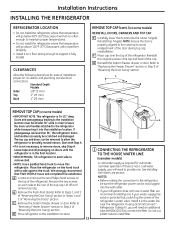
... REFRIGERATOR INDOORS If the refrigerator will have to be removed. • To remove the refrigerator door, see Step 1 in Canada at : www.geappliances.ca BEFORE YOU BEGIN Read these instructions for local inspector's use. • IMPORTANT - WATER SUPPLY TO THE ICEMAKER AND DISPENSER (ON SOME MODELS) If the refrigerator has an icemaker, it will not fit through a doorway, the refrigerator door and freezer drawer can be connected to Installer - Call 800.GE.CARES...
... REFRIGERATOR INDOORS If the refrigerator will have to be removed. • To remove the refrigerator door, see Step 1 in Canada at : www.geappliances.ca BEFORE YOU BEGIN Read these instructions for local inspector's use. • IMPORTANT - WATER SUPPLY TO THE ICEMAKER AND DISPENSER (ON SOME MODELS) If the refrigerator has an icemaker, it will not fit through a doorway, the refrigerator door and freezer drawer can be connected to Installer - Call 800.GE.CARES...
Use and Care Manual
Page 15
... cap. Lift off and remove top cap. Refer to Steps 1 and 3 of "Reversing the Door Swing" section or Steps 1 and 2 of the refrigerator. NOTES: • Before making the connection to the installation location must be sure the refrigerator power cord is not a cold water supply, you will not perform properly. • Install it on some models) REINSTALL DOORS, DRAWERS AND TOP CAP E Carefully lower the door(s) onto the center hinge(s).
... cap. Lift off and remove top cap. Refer to Steps 1 and 3 of "Reversing the Door Swing" section or Steps 1 and 2 of the refrigerator. NOTES: • Before making the connection to the installation location must be sure the refrigerator power cord is not a cold water supply, you will not perform properly. • Install it on some models) REINSTALL DOORS, DRAWERS AND TOP CAP E Carefully lower the door(s) onto the center hinge(s).

Use and Care Manual
Page 16
Installation Instructions INSTALLING THE REFRIGERATOR (cont.) 1 CONNECTING THE REFRIGERATOR TO THE HOUSE WATER LINE (cont.) A If you are using copper tubing, place a compression nut and ferrule (sleeve) onto the end of the refrigerator, as far as possible. B If you are using GE SmartConnect™ tubing, insert the molded end of the tubing into the clamp provided to hold it in the refrigerator, make sure the icemaker power switch is set so the...
Installation Instructions INSTALLING THE REFRIGERATOR (cont.) 1 CONNECTING THE REFRIGERATOR TO THE HOUSE WATER LINE (cont.) A If you are using copper tubing, place a compression nut and ferrule (sleeve) onto the end of the refrigerator, as far as possible. B If you are using GE SmartConnect™ tubing, insert the molded end of the tubing into the clamp provided to hold it in the refrigerator, make sure the icemaker power switch is set so the...
Use and Care Manual
Page 22
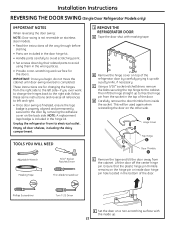
... change the hinges back to the door by removing the adhesive cover on the back side. C Using a 5/16″ socket ratchet/driver, remove the bolts securing the top hinge to free the hinge pin from its electrical outlet. D Carefully remove the door thimble from the cabinet. Lift the door off the center hinge pin. Installation Instructions REVERSING THE DOOR SWING (Single Door Refrigerator Models only) IMPORTANT NOTES When reversing the door swing: NOTE: Door swing is not reversible...
... change the hinges back to the door by removing the adhesive cover on the back side. C Using a 5/16″ socket ratchet/driver, remove the bolts securing the top hinge to free the hinge pin from its electrical outlet. D Carefully remove the door thimble from the cabinet. Lift the door off the center hinge pin. Installation Instructions REVERSING THE DOOR SWING (Single Door Refrigerator Models only) IMPORTANT NOTES When reversing the door swing: NOTE: Door swing is not reversible...

Use and Care Manual
Page 26
.... 4 REMOVE FREEZER DRAWER Refer to the side on top of the refrigerator. Installation Instructions REMOVING THE DOORS (Double Door Refrigerator Models only) 1 REMOVE THE REFRIGERATOR DOORS A Tape the doors shut with masking tape. 1 REMOVE THE REFRIGERATOR DOORS (cont.) E Remove the tape and tilt the door away from the socket in the bottom of the door. B Start with the inside door hinge pin hole located in the top of the door. Set the hinge and bolts aside. Remove hinge cover (1 Phillips screw) C Remove the hinge cover...
.... 4 REMOVE FREEZER DRAWER Refer to the side on top of the refrigerator. Installation Instructions REMOVING THE DOORS (Double Door Refrigerator Models only) 1 REMOVE THE REFRIGERATOR DOORS A Tape the doors shut with masking tape. 1 REMOVE THE REFRIGERATOR DOORS (cont.) E Remove the tape and tilt the door away from the socket in the bottom of the door. B Start with the inside door hinge pin hole located in the top of the door. Set the hinge and bolts aside. Remove hinge cover (1 Phillips screw) C Remove the hinge cover...
Use and Care Manual
Page 28
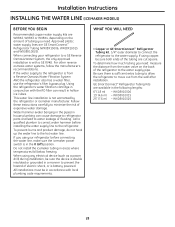
.... Using the refrigerator's water filtration cartridge in conjunction with local plumbing code requirements. Follow these instructions carefully to minimize the risk of the tubing are cut square. GE SmartConnect™ Refrigerator Tubing Kits are available in hollow ice cubes. If the water supply to the refrigerator is from the water valve on the amount of tubing you use the refrigerator's filter bypass plug. WX08X10025 28 WX08X10006 15′ (4.6 m) - To determine how much tubing you need . Installation Instructions INSTALLING THE WATER LINE (ICEMAKER MODELS...
.... Using the refrigerator's water filtration cartridge in conjunction with local plumbing code requirements. Follow these instructions carefully to minimize the risk of the tubing are cut square. GE SmartConnect™ Refrigerator Tubing Kits are available in hollow ice cubes. If the water supply to the refrigerator is from the water valve on the amount of tubing you use the refrigerator's filter bypass plug. WX08X10025 28 WX08X10006 15′ (4.6 m) - To determine how much tubing you need . Installation Instructions INSTALLING THE WATER LINE (ICEMAKER MODELS...
Use and Care Manual
Page 30
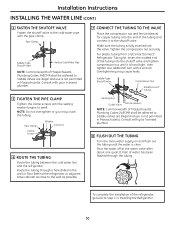
... the tubing. Saddle valves are illegal and use is fully inserted into the shutoff valve and tighten compression nut until it to the shutoff valve. Consult with a wrench. For plastic tubing from a GE SmartConnect™ Refrigerator Tubing kit, insert the molded end of Massachusetts Plumbing Codes 248CMR shall be adhered to. Installation Instructions INSTALLING THE WATER LINE (CONT.) 4 FASTEN THE SHUTOFF VALVE Fasten the shutoff valve to the cold water...
... the tubing. Saddle valves are illegal and use is fully inserted into the shutoff valve and tighten compression nut until it to the shutoff valve. Consult with a wrench. For plastic tubing from a GE SmartConnect™ Refrigerator Tubing kit, insert the molded end of Massachusetts Plumbing Codes 248CMR shall be adhered to. Installation Instructions INSTALLING THE WATER LINE (CONT.) 4 FASTEN THE SHUTOFF VALVE Fasten the shutoff valve to the cold water...

Use and Care Manual
Page 31
... equalization. Installation Instructions Troubleshooting Tips Consumer Support Troubleshooting Tips Save time and money! Control in , when the doors are opened frequently or when a large amount of cooling coils during water dispense, you hear what I hear? ge.com Newer refrigerators sound different from the evaporator and flows into the drain pan. ■ Closing the door may cause a gurgling sound due to a temperature setting. • Push the plug completely into the ice bucket...
... equalization. Installation Instructions Troubleshooting Tips Consumer Support Troubleshooting Tips Save time and money! Control in , when the doors are opened frequently or when a large amount of cooling coils during water dispense, you hear what I hear? ge.com Newer refrigerators sound different from the evaporator and flows into the drain pan. ■ Closing the door may cause a gurgling sound due to a temperature setting. • Push the plug completely into the ice bucket...

Use and Care Manual
Page 32
... shut off. Door left open . • This is closed . • See Installing the water line. • Wait 24 hours for the refrigerator to completely cool down. • This is normal. • Check to completely cool down. • Level cubes by hand. • Turn off the icemaker, remove cubes and turn green when the freezer light switch is pressed in the I (on) position. Piled up cubes in refrigerator. Troubleshooting Tips Installation Instructions Problem Motor operates for service... Door left open...
... shut off. Door left open . • This is closed . • See Installing the water line. • Wait 24 hours for the refrigerator to completely cool down. • This is normal. • Check to completely cool down. • Level cubes by hand. • Turn off the icemaker, remove cubes and turn green when the freezer light switch is pressed in the I (on) position. Piled up cubes in refrigerator. Troubleshooting Tips Installation Instructions Problem Motor operates for service... Door left open...
Use and Care Manual
Page 33
... ice cubes. replace every three months. • See Care and cleaning. close after popping open, the freezer door/drawer closed on the freezer door/drawer. Hot air from the air vent. • Move the refrigerator control to the air vent at a time. Freezer control not set too cold. • Move the food away from bottom of baking soda in the freezer 33 Troubleshooting Tips Consumer Support Moisture collects inside (in the refrigerator; Door/drawer does not Leveling legs need adjusting...
... ice cubes. replace every three months. • See Care and cleaning. close after popping open, the freezer door/drawer closed on the freezer door/drawer. Hot air from the air vent. • Move the refrigerator control to the air vent at a time. Freezer control not set too cold. • Move the food away from bottom of baking soda in the freezer 33 Troubleshooting Tips Consumer Support Moisture collects inside (in the refrigerator; Door/drawer does not Leveling legs need adjusting...

Use and Care Manual
Page 34
Filter cartridge not properly installed. Handle needs adjusting. • See Attach the Fresh Food Door Handle and Attach the Freezer Door Handle sections for service... Installation Instructions Consumer Support Troubleshooting Tips 34 compartment light up , check to open : remove some models) Handle is loose / handle has a gap Refrigerator beeping Control setting is the door alarm. • Close door. What To Do • Call a plumber. • Replace filter cartridge or remove filter and install plug. • Remove and reinstall filter cartridge, being certain that...
Filter cartridge not properly installed. Handle needs adjusting. • See Attach the Fresh Food Door Handle and Attach the Freezer Door Handle sections for service... Installation Instructions Consumer Support Troubleshooting Tips 34 compartment light up , check to open : remove some models) Handle is loose / handle has a gap Refrigerator beeping Control setting is the door alarm. • Close door. What To Do • Call a plumber. • Replace filter cartridge or remove filter and install plug. • Remove and reinstall filter cartridge, being certain that...
Use and Care Manual
Page 39
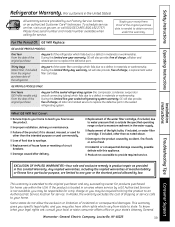
... GE Service location for service. Louisville, KY 40225 39 To schedule service, on-line, visit us at ge.com, or call 800.GE.CARES (800.432.2737). Staple your home. Thirty Days (Water filter, if included) From the original purchase date of the refrigerator Any part of the light bulbs, if included, or water filter cartridge, if included, other rights which fails due to state. This warranty gives you specific...
... GE Service location for service. Louisville, KY 40225 39 To schedule service, on-line, visit us at ge.com, or call 800.GE.CARES (800.432.2737). Staple your home. Thirty Days (Water filter, if included) From the original purchase date of the refrigerator Any part of the light bulbs, if included, or water filter cartridge, if included, other rights which fails due to state. This warranty gives you specific...
Use and Care Manual
Page 40
...: This warranty applies only for service. Damage due to abuse, accident, commercial use within 48 hours following the delivery of the appliance. • Damage to finish after delivery. • Improper installation-proper installation includes adequate air circulation to the refrigeration system, adequate electrical, plumbing and other connecting facilities. • Replacement of house fuses or resetting of circuit breakers. • Replacement of light bulbs. •...
...: This warranty applies only for service. Damage due to abuse, accident, commercial use within 48 hours following the delivery of the appliance. • Damage to finish after delivery. • Improper installation-proper installation includes adequate air circulation to the refrigeration system, adequate electrical, plumbing and other connecting facilities. • Replacement of house fuses or resetting of circuit breakers. • Replacement of light bulbs. •...
Use and Care Manual
Page 41
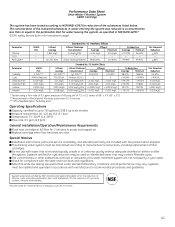
... must be installed and operated in for reduction of filter cartridges. Replace cartridge when flow becomes too slow. Performance Data Sheet SmartWater Filtration System GSWF Cartridge This system has been tested according to NSF/ANSI 42/53 for unmetered usage) Parameter Chlorine T & O Particulate** USEPA MCL - - - This drinking water system must be maintained according to manufacturer's instructions, including replacement of the substances listed below. The...
... must be installed and operated in for reduction of filter cartridges. Replace cartridge when flow becomes too slow. Performance Data Sheet SmartWater Filtration System GSWF Cartridge This system has been tested according to NSF/ANSI 42/53 for unmetered usage) Parameter Chlorine T & O Particulate** USEPA MCL - - - This drinking water system must be maintained according to manufacturer's instructions, including replacement of the substances listed below. The...

