Use and Care Manual
Page 1
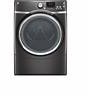
Dryers GEAppliances.com Safety Instructions 2-4 Operating Instructions Controls 4-7 Quick Start 5 Using the Dryer 8 Care and Cleaning 9 Installation Instructions Reversing the Door Swing 10-13 Stacking the Washer/Dryer . . . . .14-16 Troubleshooting Tips 17-20 Consumer Support Consumer Support 22 Warranty 21 Owner's Manual GFDS175 GFDS170 Printed in Mexico Write the model and serial numbers here: Model Serial They are on the label on the front of the dryer behind the door. 234D2270P001 49-90520 04-14 GE
Dryers GEAppliances.com Safety Instructions 2-4 Operating Instructions Controls 4-7 Quick Start 5 Using the Dryer 8 Care and Cleaning 9 Installation Instructions Reversing the Door Swing 10-13 Stacking the Washer/Dryer . . . . .14-16 Troubleshooting Tips 17-20 Consumer Support Consumer Support 22 Warranty 21 Owner's Manual GFDS175 GFDS170 Printed in Mexico Write the model and serial numbers here: Model Serial They are on the label on the front of the dryer behind the door. 234D2270P001 49-90520 04-14 GE
Use and Care Manual
Page 2
... with gasoline, dry-cleaning solvents, or other flammable liquids near children. DO NOT operate the dryer without the lint filter in the Installation Instructions for grounding instructions. Keep dryer area clear and free from items that would obstruct the flow of combustion and ventilation air. „.... IMPORTANT SAFETY INSTRUCTIONS WARNING To reduce the risk of spray cleaner when cleaning dryer interior. This is moving. „ DO NOT install or store this appliance or attempt any time. These words are defined as they give off the circuit breaker before or after each load...
... with gasoline, dry-cleaning solvents, or other flammable liquids near children. DO NOT operate the dryer without the lint filter in the Installation Instructions for grounding instructions. Keep dryer area clear and free from items that would obstruct the flow of combustion and ventilation air. „.... IMPORTANT SAFETY INSTRUCTIONS WARNING To reduce the risk of spray cleaner when cleaning dryer interior. This is moving. „ DO NOT install or store this appliance or attempt any time. These words are defined as they give off the circuit breaker before or after each load...
Use and Care Manual
Page 3
... harm. DO NOT use gasoline or other flammable vapors and liquids in the vicinity of this manual must be performed by a qualified installer, service agency, or the gas supplier. SAVE THESE INSTRUCTIONS 3 Follow the gas supplier's instructions. • If you cannot reach ...injury, or death. - GEAppliances.com ADDITIONAL GAS DRYER WARNINGS WARNING For your safety, the information in this or any other appliance. - Installation and service must be minimized by the incomplete combustion of any occupants. • Immediately call the fire department. - State of California ...
... harm. DO NOT use gasoline or other flammable vapors and liquids in the vicinity of this manual must be performed by a qualified installer, service agency, or the gas supplier. SAVE THESE INSTRUCTIONS 3 Follow the gas supplier's instructions. • If you cannot reach ...injury, or death. - GEAppliances.com ADDITIONAL GAS DRYER WARNINGS WARNING For your safety, the information in this or any other appliance. - Installation and service must be minimized by the incomplete combustion of any occupants. • Immediately call the fire department. - State of California ...
Use and Care Manual
Page 10
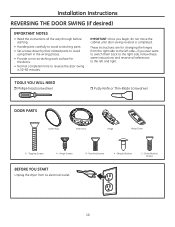
... electrical outlet. 8 - IMPORTANT: Once you begin, do not move the cabinet until door-swing reversal is 30-60 minutes. Beauty Buttons 2 - Strike Bracket Screws 10 Installation Instructions REVERSING THE DOOR SWING (if desired) IMPORTANT NOTES • Read the instructions all references to reverse the door swing is completed.
... electrical outlet. 8 - IMPORTANT: Once you begin, do not move the cabinet until door-swing reversal is 30-60 minutes. Beauty Buttons 2 - Strike Bracket Screws 10 Installation Instructions REVERSING THE DOOR SWING (if desired) IMPORTANT NOTES • Read the instructions all references to reverse the door swing is completed.
Use and Care Manual
Page 11
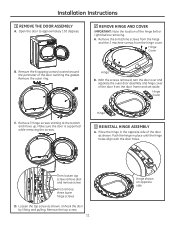
... B. Then loosen top screw, remove door and remove screw First remove three lower hinge screws D. Remove the top screw. 11 Hinge shown on opposite side Installation Instructions 1 REMOVE THE DOOR ASSEMBLY A. Remove the outer ring. Remove 3 hinge screws starting at the bottom and move up. Push the hinge in the opposite...
... B. Then loosen top screw, remove door and remove screw First remove three lower hinge screws D. Remove the top screw. 11 Hinge shown on opposite side Installation Instructions 1 REMOVE THE DOOR ASSEMBLY A. Remove the outer ring. Remove 3 hinge screws starting at the bottom and move up. Push the hinge in the opposite...
Use and Care Manual
Page 12
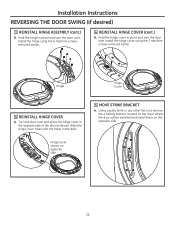
... hinge using the 2 machine screws removed earlier. Turn the door over . Hinge cover shown on the opposite side. 12 Installation Instructions REVERSING THE DOOR SWING (if desired) 3 REINSTALL HINGE ASSEMBLY (cont.) B. Hold the hinge cover in place and turn the door over. Using a putty knife... or any other flat tool, remove the 4 beauty buttons located on the dryer where the door will be installed and install them on opposite side 5 MOVE STRIKE BRACKET A. Align the hinge cover holes with the holes in place and turn the door over and place the...
... hinge using the 2 machine screws removed earlier. Turn the door over . Hinge cover shown on the opposite side. 12 Installation Instructions REVERSING THE DOOR SWING (if desired) 3 REINSTALL HINGE ASSEMBLY (cont.) B. Hold the hinge cover in place and turn the door over. Using a putty knife... or any other flat tool, remove the 4 beauty buttons located on the dryer where the door will be installed and install them on opposite side 5 MOVE STRIKE BRACKET A. Align the hinge cover holes with the holes in place and turn the door over and place the...
Use and Care Manual
Page 13
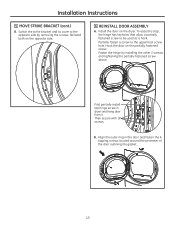
... to the uppermost screw hole. Fasten the hinge by removing the screws. Switch the strike bracket and its cover to the opposite side by installing the other 3 screws and tightening the partially fastened screw above. Hook the door on the opposite side. 6 REINSTALL DOOR ASSEMBLY A. Align ...the outer ring in dryer and hang door from it Then secure with all screws B. First partially install top hinge screw in the door and fasten the 6 tapping screws located around the perimeter of the door outlining the gasket. 13 Reinstall both...
... to the uppermost screw hole. Fasten the hinge by removing the screws. Switch the strike bracket and its cover to the opposite side by installing the other 3 screws and tightening the partially fastened screw above. Hook the door on the opposite side. 6 REINSTALL DOOR ASSEMBLY A. Align ...the outer ring in dryer and hang door from it Then secure with all screws B. First partially install top hinge screw in the door and fasten the 6 tapping screws located around the perimeter of the door outlining the gasket. 13 Reinstall both...
Use and Care Manual
Page 14
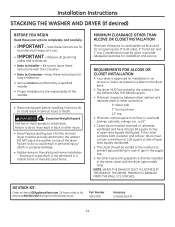
.... • Note to do so could result in personal injury/ death or property damage. • Mobile Home or Manufactured Home Installation - Failure to Installer - NOTE: WHEN THE EXHAUST DUCT IS LOCATED AT THE REAR OF THE DRYER, MINIMUM CLEARANCE FROM THE WALL IS 5.5 INCHES. ...fuel-burning appliance shall be louvered or otherwise ventilated and have at 800.626.2002 during normal business hours. GE STACK KIT: Order on top of Utility Services. Installation Instructions STACKING THE WASHER AND DRYER (if desired) BEFORE YOU BEGIN Read these instructions for future reference. ...
.... • Note to do so could result in personal injury/ death or property damage. • Mobile Home or Manufactured Home Installation - Failure to Installer - NOTE: WHEN THE EXHAUST DUCT IS LOCATED AT THE REAR OF THE DRYER, MINIMUM CLEARANCE FROM THE WALL IS 5.5 INCHES. ...fuel-burning appliance shall be louvered or otherwise ventilated and have at 800.626.2002 during normal business hours. GE STACK KIT: Order on top of Utility Services. Installation Instructions STACKING THE WASHER AND DRYER (if desired) BEFORE YOU BEGIN Read these instructions for future reference. ...
Use and Care Manual
Page 15
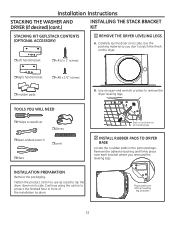
... THE WASHER AND DRYER (if desired) (cont.) INSTALLING THE STACK BRACKET KIT STACKING KIT GEFLSTACK CONTENTS (OPTIONAL ACCESSORY) 1 REMOVE THE DRYER LEVELING LEGS A. Use an open-end wrench or pliers to lay the ... hand bracket ˆ4 #8 x 1/2" screws ˆ 4 rubber pads B. Remove the adhesive backing and firmly place over all 4 leveling legs 2 INSTALL RUBBER PADS TO DRYER BASE Locate the 4 rubber pads in front of the installation location. INSTALLATION PREPARATION Remove the packaging. Continue using the carton to protect the finished floor in the parts package. Carefully...
... THE WASHER AND DRYER (if desired) (cont.) INSTALLING THE STACK BRACKET KIT STACKING KIT GEFLSTACK CONTENTS (OPTIONAL ACCESSORY) 1 REMOVE THE DRYER LEVELING LEGS A. Use an open-end wrench or pliers to lay the ... hand bracket ˆ4 #8 x 1/2" screws ˆ 4 rubber pads B. Remove the adhesive backing and firmly place over all 4 leveling legs 2 INSTALL RUBBER PADS TO DRYER BASE Locate the 4 rubber pads in front of the installation location. INSTALLATION PREPARATION Remove the packaging. Continue using the carton to protect the finished floor in the parts package. Carefully...
Use and Care Manual
Page 16
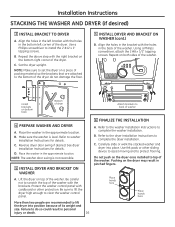
... holes in the bracket with the holes in the bottom left bracket with the brackets. Place the washer in the approximate location. See dryer Installation Instructions for details. More than two people are attached to top of the washer. Using a Phillips screwdriver, attach the 2 #8 x 1/2"...of the dryer. D. Failure to protect flooring. Use felt pads or other protection. Use a Phillips screwdriver to complete the dryer installation. Place the washer in the approximate location. Repeat the above step with cardboard or other sliding device to assist moving and to...
... holes in the bracket with the holes in the bottom left bracket with the brackets. Place the washer in the approximate location. See dryer Installation Instructions for details. More than two people are attached to top of the washer. Using a Phillips screwdriver, attach the 2 #8 x 1/2"...of the dryer. D. Failure to protect flooring. Use felt pads or other protection. Use a Phillips screwdriver to complete the dryer installation. Place the washer in the approximate location. Repeat the above step with cardboard or other sliding device to assist moving and to...

Use and Care Manual
Page 17
... charts on the Start/Pause button is flashing, the dryer is full Blown fuses or tripped circuit breaker Overloading/combining loads Underloading • Check the Installation Instructions to make sure both are drying. • Clean lint filter before every load. • Replace fuses or reset circuit breakers. Exhaust system is blocked...
... charts on the Start/Pause button is flashing, the dryer is full Blown fuses or tripped circuit breaker Overloading/combining loads Underloading • Check the Installation Instructions to make sure both are drying. • Clean lint filter before every load. • Replace fuses or reset circuit breakers. Exhaust system is blocked...

Use and Care Manual
Page 20
... • Ensure Ext Tumble/Wrinkle Care option is not selected. steam into drum Water drips from your water supply • Call 800.GE.CARES to order nozzle replacement kit WE25M71 or to request a technician to valve Hose missing rubber washer at different times in the cycle •...Dryer continues to the load. Water on floor in front of cycle Steam released at connection with valve • Tighten connection. • Install rubber washer provided with debris from door when opened after a Steam Cycle Steam condenses on floor in back of dryer Loose water hose connection ...
... • Ensure Ext Tumble/Wrinkle Care option is not selected. steam into drum Water drips from your water supply • Call 800.GE.CARES to order nozzle replacement kit WE25M71 or to request a technician to valve Hose missing rubber washer at different times in the cycle •...Dryer continues to the load. Water on floor in front of cycle Steam released at connection with valve • Tighten connection. • Install rubber washer provided with debris from door when opened after a Steam Cycle Steam condenses on floor in back of dryer Loose water hose connection ...

Use and Care Manual
Page 21
...132; Service trips to obtain service under the warranty. GEAppliances.com Staple your home to teach you how to use the product. „ Improper installation, delivery or maintenance. „ Failure of the product if it is needed to your receipt here. During this appliance. „ Damage caused ...breakers. „ Damage to a defect in the United States) All warranty service provided by possible defects with this limited one-year warranty, GE will also provide, free of the original purchase date is abused, misused or used for service. Please have serial number and model number ...
...132; Service trips to obtain service under the warranty. GEAppliances.com Staple your home to teach you how to use the product. „ Improper installation, delivery or maintenance. „ Failure of the product if it is needed to your receipt here. During this appliance. „ Damage caused ...breakers. „ Damage to a defect in the United States) All warranty service provided by possible defects with this limited one-year warranty, GE will also provide, free of the original purchase date is abused, misused or used for service. Please have serial number and model number ...

Installation Instructions
Page 1
...with the Consumer. • Note to these instructions with UL-listed duct. Fire Hazard • Clothes dryer installation must be easily crushed and trap lint. Installation Instructions Dryers 01 Questions? This symbol alerts you and others. BEFORE YOU BEGIN Read these instructions for satisfactory ... 800.GE.CARES (800.432.2737) or visit our Web site at: GEAppliances.com This is the responsibility of children is necessary when the appliance is used near children. • Proper installation is the safety alert symbol. All safety messages will obstruct dryer airflow ...
...with the Consumer. • Note to these instructions with UL-listed duct. Fire Hazard • Clothes dryer installation must be easily crushed and trap lint. Installation Instructions Dryers 01 Questions? This symbol alerts you and others. BEFORE YOU BEGIN Read these instructions for satisfactory ... 800.GE.CARES (800.432.2737) or visit our Web site at: GEAppliances.com This is the responsibility of children is necessary when the appliance is used near children. • Proper installation is the safety alert symbol. All safety messages will obstruct dryer airflow ...
Installation Instructions
Page 2
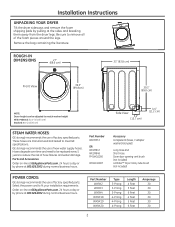
...the sides and breaking them away from the dryer legs. These hoses are manufactured and tested to remove all of factory specified parts. Installation Instructions UNPACKING YOUR DRYER Tilt the dryer sideways and remove the foam shipping pads by pulling at 800.626.2002 during normal business hours...height With Pedestal: 52.1" (132.33 cm) Stacked: 84" (213.36 cm) Side View 5.4" (13.7 cm) 4.4" (11.2 cm) STEAM WATER HOSES: GE strongly recommends the use of hose failures and water damage. Part Number WX9X2 WX9X3 WX9X4 WX9X18 WX9X19 WX9X20 Type 3-Prong 3-Prong 3-Prong 4-Prong 4-Prong 4-Prong...
...the sides and breaking them away from the dryer legs. These hoses are manufactured and tested to remove all of factory specified parts. Installation Instructions UNPACKING YOUR DRYER Tilt the dryer sideways and remove the foam shipping pads by pulling at 800.626.2002 during normal business hours...height With Pedestal: 52.1" (132.33 cm) Stacked: 84" (213.36 cm) Side View 5.4" (13.7 cm) 4.4" (11.2 cm) STEAM WATER HOSES: GE strongly recommends the use of hose failures and water damage. Part Number WX9X2 WX9X3 WX9X4 WX9X18 WX9X19 WX9X20 Type 3-Prong 3-Prong 3-Prong 4-Prong 4-Prong 4-Prong...
Installation Instructions
Page 3
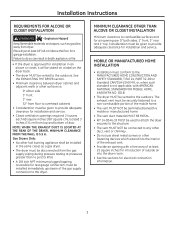
...an alcove or closet, it will be stated on a label on the dryer back. • The dryer MUST be vented to combustible surfaces and for installation and service. • Closet ventilation openings required: 2 louvers each 60 square inches (387 square cm), located 3 inches (7.6 cm) from dryer. Gas ... of outside air into the interior of the gas supply connection to the outdoors. Place dryer at least 25 square inches for a garage installation. The exhaust vent must be given to provide adequate clearance for air opening with AMERICAN NATIONAL STANDARD FOR MOBILE HOME, ANSI/NFPA NO....
...an alcove or closet, it will be stated on a label on the dryer back. • The dryer MUST be vented to combustible surfaces and for installation and service. • Closet ventilation openings required: 2 louvers each 60 square inches (387 square cm), located 3 inches (7.6 cm) from dryer. Gas ... of outside air into the interior of the gas supply connection to the outdoors. Place dryer at least 25 square inches for a garage installation. The exhaust vent must be given to provide adequate clearance for air opening with AMERICAN NATIONAL STANDARD FOR MOBILE HOME, ANSI/NFPA NO....
Installation Instructions
Page 4
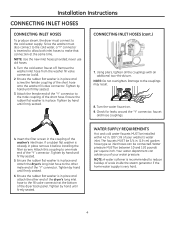
... A water softener is recommended to reduce buildup of your washer's water inlet. If a rubber flat washer is in place remove it before installing the filter screen. Your water department can be between 10 and 120 pounds per square inch. WATER SUPPLY REQUIREMENTS Hot and cold water faucets... of your water pressure. NOTE: Do not overtighten. Ensure the rubber flat washer is in . (107 cm) of the short hose. Installation Instructions CONNECTING INLET HOSES CONNECTING INLET HOSES To produce steam, the dryer must also connect to the cold water, a "Y" connector is inserted ...
... A water softener is recommended to reduce buildup of your washer's water inlet. If a rubber flat washer is in place remove it before installing the filter screen. Your water department can be between 10 and 120 pounds per square inch. WATER SUPPLY REQUIREMENTS Hot and cold water faucets... of your water pressure. NOTE: Do not overtighten. Ensure the rubber flat washer is in . (107 cm) of the short hose. Installation Instructions CONNECTING INLET HOSES CONNECTING INLET HOSES To produce steam, the dryer must also connect to the cold water, a "Y" connector is inserted ...
Installation Instructions
Page 5
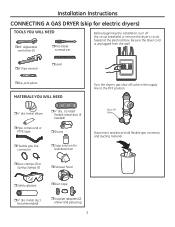
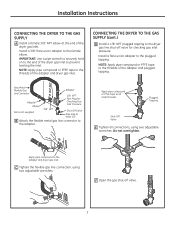
... adapters (2), elbow and pipe plug 5 Shut-off the circuit breaker(s) or remove the dryer's circuit fuse(s) at the electrical box. Installation Instructions CONNECTING A GAS DRYER (skip for leak detection Turn the dryer's gas shut-off valve in the supply line to the OFF position....ˆSoap solution for electric dryers) TOOLS YOU WILL NEED ˆ10" Adjustable wrenches (2) ˆ Flat-blade screwdriver Before beginning the installation, turn off Valve Disconnect and discard old flexible gas connector and ducting material. ˆDuct clamps (2) or Spring clamps (2) ˆExhaust ...
... adapters (2), elbow and pipe plug 5 Shut-off the circuit breaker(s) or remove the dryer's circuit fuse(s) at the electrical box. Installation Instructions CONNECTING A GAS DRYER (skip for leak detection Turn the dryer's gas shut-off valve in the supply line to the OFF position....ˆSoap solution for electric dryers) TOOLS YOU WILL NEED ˆ10" Adjustable wrenches (2) ˆ Flat-blade screwdriver Before beginning the installation, turn off Valve Disconnect and discard old flexible gas connector and ducting material. ˆDuct clamps (2) or Spring clamps (2) ˆExhaust ...
Installation Instructions
Page 6
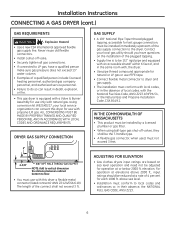
...pipe thread compound appropriate for use with the National Fuel Gas Code, ANSI Z223.1/NFPA 54, or the Natural Gas and Propane Installation Code, CSA B149.1. Installation Instructions CONNECTING A GAS DRYER (cont.) GAS REQUIREMENTS WARNING - The length of a qualified person include: licensed heating personnel, ...at a rate of , and in their absence, the NATIONAL FUEL GAS CODE, ANSI Z223. 6 elevation. Never reuse old flexible connectors. • Install a shut-off valves, they shall be the T-handle type. • A flexible gas connector, when used, must use PTFE tape. •...
...pipe thread compound appropriate for use with the National Fuel Gas Code, ANSI Z223.1/NFPA 54, or the Natural Gas and Propane Installation Code, CSA B149.1. Installation Instructions CONNECTING A GAS DRYER (cont.) GAS REQUIREMENTS WARNING - The length of a qualified person include: licensed heating personnel, ...at a rate of , and in their absence, the NATIONAL FUEL GAS CODE, ANSI Z223. 6 elevation. Never reuse old flexible connectors. • Install a shut-off valves, they shall be the T-handle type. • A flexible gas connector, when used, must use PTFE tape. •...
Installation Instructions
Page 7
... Attach the flexible metal gas line connector to all connections, using two adjustable wrenches. CONNECTING THE DRYER TO THE GAS SUPPLY (cont.) D Install a 1/8" NPT plugged tapping to the adapter and dryer gas inlet. Apply pipe compound to the dryer gas line shut-off valve. 7 ...Tighten the flexible gas line using two adjustable wrenches. Install a flare union adapter to the female elbow. C Tighten the flexible gas line connection, using two adjustable wrenches. Plugged Tapping Shut-Off...
... Attach the flexible metal gas line connector to all connections, using two adjustable wrenches. CONNECTING THE DRYER TO THE GAS SUPPLY (cont.) D Install a 1/8" NPT plugged tapping to the adapter and dryer gas inlet. Apply pipe compound to the dryer gas line shut-off valve. 7 ...Tighten the flexible gas line using two adjustable wrenches. Install a flare union adapter to the female elbow. C Tighten the flexible gas line connection, using two adjustable wrenches. Plugged Tapping Shut-Off...


