Owners Manual
Page 1
Dryers GEAppliances.com Safety Instructions 2-5 Operating Instructions Control Panels 6-8 Cycle Options 9-10 Dryer Features 10 Reversing the Door Swing . . . . 11-14 Loading and Using the Dryer 15-16 Venting the Dryer 17 Connecting Inlet Hoses 18 Stacking 19-22 Troubleshooting Tips . . . . 23-26 Consumer Support Warranty 28, 29 Consumer Support 30 Owner's Manual GFDN110 GFDN120 GFDN130 GFDS140 GFDS145 GFDS150 GFDS155 Write the model and serial numbers here: Model Serial They are on the label on the front of the dryer behind the door. 49-90429 10-11 GE
Dryers GEAppliances.com Safety Instructions 2-5 Operating Instructions Control Panels 6-8 Cycle Options 9-10 Dryer Features 10 Reversing the Door Swing . . . . 11-14 Loading and Using the Dryer 15-16 Venting the Dryer 17 Connecting Inlet Hoses 18 Stacking 19-22 Troubleshooting Tips . . . . 23-26 Consumer Support Warranty 28, 29 Consumer Support 30 Owner's Manual GFDN110 GFDN120 GFDN130 GFDS140 GFDS145 GFDS150 GFDS155 Write the model and serial numbers here: Model Serial They are on the label on the front of the dryer behind the door. 49-90429 10-11 GE
Owners Manual
Page 2
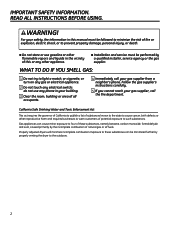
WARNING! Properly adjusted dryers will minimize incomplete combustion. IMPORTANT SAFETY INFORMATION. California Safe Drinking Water and Toxic Enforcement Act This act requires the governor of California to publish a list ... supplier, call your building. 3 Clear the room, building or area of natural gas or LP fuels. Gas appliances can be performed by properly venting the dryer to light a match, or cigarette, or turn on any gas or electrical appliance. 2 Do not touch any other reproductive harm and requires businesses to warn...
WARNING! Properly adjusted dryers will minimize incomplete combustion. IMPORTANT SAFETY INFORMATION. California Safe Drinking Water and Toxic Enforcement Act This act requires the governor of California to publish a list ... supplier, call your building. 3 Clear the room, building or area of natural gas or LP fuels. Gas appliances can be performed by properly venting the dryer to light a match, or cigarette, or turn on any gas or electrical appliance. 2 Do not touch any other reproductive harm and requires businesses to warn...
Owners Manual
Page 3
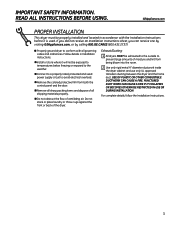
... did not receive an Installation Instructions sheet, you can receive one by visiting GEAppliances.com, or by calling 800.GE.CARES (800.432.2737). „ Properly ground dryer to conform with the Installation Instructions before it will not be exhausted to the outside to avoid electrical overload. &#...large amounts of moisture and lint from both the control panel and the door. „ Remove all sharp packing items and dispose of the dryer. For complete details, follow the Installation Instructions. 3 USE OF PLASTIC OR OTHER COMBUSTIBLE DUCTWORK CAN CAUSE A FIRE. Do not stack or...
... did not receive an Installation Instructions sheet, you can receive one by visiting GEAppliances.com, or by calling 800.GE.CARES (800.432.2737). „ Properly ground dryer to conform with the Installation Instructions before it will not be exhausted to the outside to avoid electrical overload. &#...large amounts of moisture and lint from both the control panel and the door. „ Remove all sharp packing items and dispose of the dryer. For complete details, follow the Installation Instructions. 3 USE OF PLASTIC OR OTHER COMBUSTIBLE DUCTWORK CAN CAUSE A FIRE. Do not stack or...

Owners Manual
Page 4
... load to prevent lint accumulation inside this or any other flammable vapors and liquids. „ Keep the floor around your washer or dryer during subsequent dryer uses. „ To minimize the possibility of electric shock, unplug this appliance is used in beauty salons, restaurants or barber shops... (such as wax, oil, paint, gasoline, degreasers, dry-cleaning solvents, kerosene, etc.) which you see water on the floor around the dryer, call for service. „ Do not spray any maintenance or cleaning (except the removal and cleaning of children, preferably in the room. NOTE...
... load to prevent lint accumulation inside this or any other flammable vapors and liquids. „ Keep the floor around your washer or dryer during subsequent dryer uses. „ To minimize the possibility of electric shock, unplug this appliance is used in beauty salons, restaurants or barber shops... (such as wax, oil, paint, gasoline, degreasers, dry-cleaning solvents, kerosene, etc.) which you see water on the floor around the dryer, call for service. „ Do not spray any maintenance or cleaning (except the removal and cleaning of children, preferably in the room. NOTE...
Owners Manual
Page 5
... this appliance. „ Never attempt to use of these products are the responsibility of the manufacturers of those products, or try a dryer-added product for which the manufacturer gives written assurance on the package that you use either a fabric softener in the wash cycle, according...any servicing unless specifically recommended in this Owner's Manual or in published user-repair instructions that their product can be safely used in your dryer. DO NOT ATTEMPT TO LIGHT WITH A MATCH. SAVE THESE INSTRUCTIONS 5 Burns may wish to soften your laundered fabrics or reduce the...
... this appliance. „ Never attempt to use of these products are the responsibility of the manufacturers of those products, or try a dryer-added product for which the manufacturer gives written assurance on the package that you use either a fabric softener in the wash cycle, according...any servicing unless specifically recommended in this Owner's Manual or in published user-repair instructions that their product can be safely used in your dryer. DO NOT ATTEMPT TO LIGHT WITH A MATCH. SAVE THESE INSTRUCTIONS 5 Burns may wish to soften your laundered fabrics or reduce the...
Owners Manual
Page 6
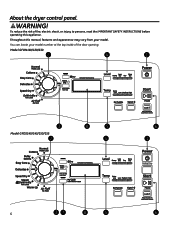
To reduce the risk of the door opening. You can locate your model. About the dryer control panel. Throughout this manual, features and appearance may vary from your model number at the top inside of fire, electric shock, or injury to persons, read the IMPORTANT SAFETY INSTRUCTIONS before operating this appliance. WARNING! Model GFDN110/120/130 2 4 1 3 Model GFDS140/145/150/155 2 8 5 4 6 1 6 37 8 5 6
To reduce the risk of the door opening. You can locate your model. About the dryer control panel. Throughout this manual, features and appearance may vary from your model number at the top inside of fire, electric shock, or injury to persons, read the IMPORTANT SAFETY INSTRUCTIONS before operating this appliance. WARNING! Model GFDN110/120/130 2 4 1 3 Model GFDS140/145/150/155 2 8 5 4 6 1 6 37 8 5 6
Owners Manual
Page 7
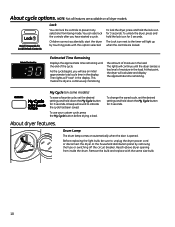
.... At the end of the drying process. Close the door. 5. This cycle is active, press to put the dryer in the cycle to the lowest setting. 3. Time Dry is not opened, the dryer will be used if the previous cycle left some models) Description Press to tumble for 30 minutes. For removing...
.... At the end of the drying process. Close the door. 5. This cycle is active, press to put the dryer in the cycle to the lowest setting. 3. Time Dry is not opened, the dryer will be used if the previous cycle left some models) Description Press to tumble for 30 minutes. For removing...

Owners Manual
Page 8
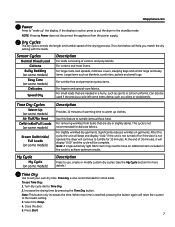
...not always appear when filter needs cleaning. To store a My Cycle combination of moisture in your clothes reaches your selected dry level, the dryer will light up your favorite combination of your selection. Even though you want. 4. For lingerie and special-care fabrics. 6 Start Press to...already cleaned the filter (before drying a load. To change the temperature of settings and save them here for one touch recall. About the dryer control panel. 4 Sensor Dry "Level" The sensor continuously monitors the amount of settings: 1. When the moisture in the load. For synthetics,...
...not always appear when filter needs cleaning. To store a My Cycle combination of moisture in your clothes reaches your selected dry level, the dryer will light up your favorite combination of your selection. Even though you want. 4. For lingerie and special-care fabrics. 6 Start Press to...already cleaned the filter (before drying a load. To change the temperature of settings and save them here for one touch recall. About the dryer control panel. 4 Sensor Dry "Level" The sensor continuously monitors the amount of settings: 1. When the moisture in the load. For synthetics,...
Owners Manual
Page 9
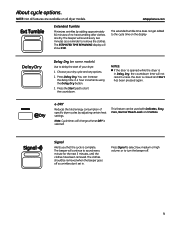
... Dry (on all features are dry. Press Signal to select low, medium or high volume, or to remove the clothes. NOTE: Not all dryer models. The clothes should be used with Delicates, Easy Care, Normal Mixed Loads and Cottons. NOTES: „ If the door is opened while the... dryer is in 1 hour increments using the Delay Dry button. 3. The beeper will show 0:00. GEAppliances.com Extended Tumble Minimizes wrinkles by adjusting certain heat ...
... Dry (on all features are dry. Press Signal to select low, medium or high volume, or to remove the clothes. NOTE: Not all dryer models. The clothes should be used with Delicates, Easy Care, Normal Mixed Loads and Cottons. NOTES: „ If the door is opened while the... dryer is in 1 hour increments using the Delay Dry button. 3. The beeper will show 0:00. GEAppliances.com Extended Tumble Minimizes wrinkles by adjusting certain heat ...
Owners Manual
Page 10
... button before drying a load. Drum Lamp The drum lamp comes on all features are locked. To lock the dryer, press and hold down the My Cycle button for 3 seconds. At that point, the dryer will "race" in the display. A beep will continue until the end of the cycle. Before replacing the...this option selected. You can lock the controls to indicate the cycle has been saved. As the cycle begins, you have started a cycle. Reach above dryer opening from being made. To change the saved cycle, set the desired settings and hold the lock icon for 3 seconds. To unlock the...
... button before drying a load. Drum Lamp The drum lamp comes on all features are locked. To lock the dryer, press and hold down the My Cycle button for 3 seconds. At that point, the dryer will "race" in the display. A beep will continue until the end of the cycle. Before replacing the...this option selected. You can lock the controls to indicate the cycle has been saved. As the cycle begins, you have started a cycle. Reach above dryer opening from being made. To change the saved cycle, set the desired settings and hold the lock icon for 3 seconds. To unlock the...

Owners Manual
Page 11
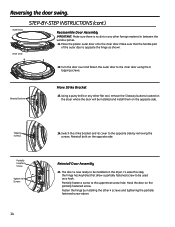
Reversing the door swing. Unplug the dryer from the right side to the left and right. IMPORTANT: Once you ever want to switch them in the wrong places. „ Provide a non-scratching ...
Reversing the door swing. Unplug the dryer from the right side to the left and right. IMPORTANT: Once you ever want to switch them in the wrong places. „ Provide a non-scratching ...
Owners Manual
Page 14
... side. Turn the door over and fasten the outer door to be installed and install them on the partially fastened screw. Reinstall both on the dryer. Using a putty knife or any other foreign material in between the window panes. 11. Switch the strike bracket and its cover to the uppermost screw... door using the 6 tapping screws. Partially fasten a screw to the opposite side by installing the other flat tool, remove the 5 beauty buttons located on the dryer where the door will be used as shown. 12. Fasten the hinge by removing the screws.
... side. Turn the door over and fasten the outer door to be installed and install them on the partially fastened screw. Reinstall both on the dryer. Using a putty knife or any other foreign material in between the window panes. 11. Switch the strike bracket and its cover to the uppermost screw... door using the 6 tapping screws. Partially fasten a screw to the opposite side by installing the other flat tool, remove the 5 beauty buttons located on the dryer where the door will be used as shown. 12. Fasten the hinge by removing the screws.
Owners Manual
Page 15
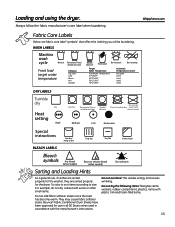
GEAppliances.com Fabric Care Labels Below are sorted properly for the dryer. This wastes energy and causes wrinkling. Loading and using the dryer. Bounce® Fabric Conditioner Dryer Sheets have been approved for the washer, they are fabric care label "symbols" that affect the clothing you ...dry Dry Heat setting High Normal Permanent Press/ Gentle/ wrinkle resistant delicate Do not dry Do not tumble dry (used in all GE Dryers when used with the manufacturer's instructions. They may cause fabric softener stains. Try also to sort items according to dry Drip ...
GEAppliances.com Fabric Care Labels Below are sorted properly for the dryer. This wastes energy and causes wrinkling. Loading and using the dryer. Bounce® Fabric Conditioner Dryer Sheets have been approved for the washer, they are fabric care label "symbols" that affect the clothing you ...dry Dry Heat setting High Normal Permanent Press/ Gentle/ wrinkle resistant delicate Do not dry Do not tumble dry (used in all GE Dryers when used with the manufacturer's instructions. They may cause fabric softener stains. Try also to sort items according to dry Drip ...
Owners Manual
Page 16
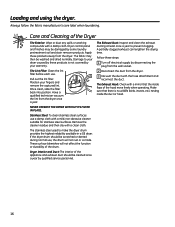
...reconnect the duct. The fabric may be scratched or dented during normal use, the drum will not affect the function or durability of the Dryer The Exterior: Wipe or dust any spills or washing compounds with a mirror that there is not covered by some laundry pretreatment soil and ... Exhaust Duct: Inspect and clean the exhaust ducting at least once a year to make the dryer drum provides the highest reliability available in a GE dryer. Make sure that the inside the duct or hood. 16 Dryer control panel and finishes may then be cleaned once a year by these products is no wildlife...
...reconnect the duct. The fabric may be scratched or dented during normal use, the drum will not affect the function or durability of the Dryer The Exterior: Wipe or dust any spills or washing compounds with a mirror that there is not covered by some laundry pretreatment soil and ... Exhaust Duct: Inspect and clean the exhaust ducting at least once a year to make the dryer drum provides the highest reliability available in a GE dryer. Make sure that the inside the duct or hood. 16 Dryer control panel and finishes may then be cleaned once a year by these products is no wildlife...
Owners Manual
Page 17
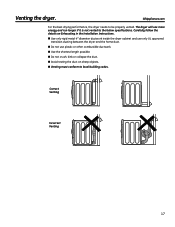
.... „ Venting must conform to local building codes. Correct Venting Incorrect Venting 17 Venting the dryer. GEAppliances.com For the best drying performance, the dryer needs to the below specifications. The dryer will use plastic or other combustible ductwork. „ Use the shortest length possible. „ Do...duct on Exhausting in the Installation Instructions. „ Use only rigid metal 4s diameter ductwork inside the dryer cabinet and use only UL approved transition ducting between the dryer and the home duct. „ Do not use more energy and run longer if it is not ...
.... „ Venting must conform to local building codes. Correct Venting Incorrect Venting 17 Venting the dryer. GEAppliances.com For the best drying performance, the dryer needs to the below specifications. The dryer will use plastic or other combustible ductwork. „ Use the shortest length possible. „ Do...duct on Exhausting in the Installation Instructions. „ Use only rigid metal 4s diameter ductwork inside the dryer cabinet and use only UL approved transition ducting between the dryer and the home duct. „ Do not use more energy and run longer if it is not ...
Owners Manual
Page 18
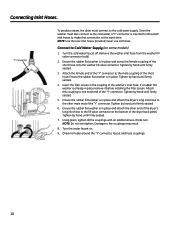
...the couplings may result. 8. Tighten by hand until firmly seated. 3. Turn the water faucet on some models) 1. "Y" Connector To produce steam, the dryer must also connect to the fill valve connector at the same time. Tighten by hand until firmly seated. 4. If a rubber flat washer is in place... Insert the filter screen in place remove it before installing the filter screen. Since the washer must connect to one male end of the dryer back panel. NOTE: Use the new inlet hoses provided; Remove the washer inlet hose from the washer fill valve connector (cold). 2. ...
...the couplings may result. 8. Tighten by hand until firmly seated. 3. Turn the water faucet on some models) 1. "Y" Connector To produce steam, the dryer must also connect to the fill valve connector at the same time. Tighten by hand until firmly seated. 4. If a rubber flat washer is in place... Insert the filter screen in place remove it before installing the filter screen. Since the washer must connect to one male end of the dryer back panel. NOTE: Use the new inlet hoses provided; Remove the washer inlet hose from the washer fill valve connector (cold). 2. ...
Owners Manual
Page 19
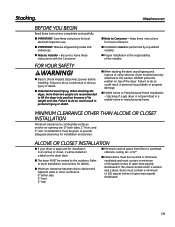
... - MINIMUM CLEARANCE OTHER THAN ALCOVE OR CLOSET INSTALLATION Minimum clearance to combustible surfaces and for details. „ Minimum clearance between dryer cabinet and adjacent walls or other surfaces is approved for installation in an alcove or closet, it will be securely attached to ...or otherwise ventilated and must be given to the outdoors. Disconnect power before installing. DO NOT place the washer on the dryer back. „ The dryer MUST be vented to provide adequate clearance for future reference. „ Installation must be performed by a qualified installer. ...
... - MINIMUM CLEARANCE OTHER THAN ALCOVE OR CLOSET INSTALLATION Minimum clearance to combustible surfaces and for details. „ Minimum clearance between dryer cabinet and adjacent walls or other surfaces is approved for installation in an alcove or closet, it will be securely attached to ...or otherwise ventilated and must be given to the outdoors. Disconnect power before installing. DO NOT place the washer on the dryer back. „ The dryer MUST be vented to provide adequate clearance for future reference. „ Installation must be performed by a qualified installer. ...

Owners Manual
Page 20
Flatten the product carton to use as a pad to protect the finished floor in front of the installation location. Gloves Level 20 KIT CONTENTS (optional kit GE FL STACK) Right Hand Bracket 4 Rubber Pads Left Hand Bracket TOOLS YOU WILL NEED 4 #12 x 1" Screws 4 #8 x 1/2" Screws Phillips Screwdriver Pliers Open-Ended Wrench INSTALLATION PREPARATION Remove the packaging. Continue using the carton to lay the dryer down on its side. Stacking.
Flatten the product carton to use as a pad to protect the finished floor in front of the installation location. Gloves Level 20 KIT CONTENTS (optional kit GE FL STACK) Right Hand Bracket 4 Rubber Pads Left Hand Bracket TOOLS YOU WILL NEED 4 #12 x 1" Screws 4 #8 x 1/2" Screws Phillips Screwdriver Pliers Open-Ended Wrench INSTALLATION PREPARATION Remove the packaging. Continue using the carton to lay the dryer down on its side. Stacking.

Owners Manual
Page 21
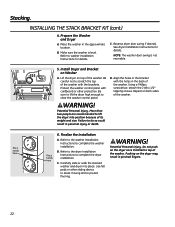
... #12 x 1s tapping screws. Use an open-end wrench or pliers to Dryer A. NOTE: Make sure to set the dryer on the dryer. INSTALLING THE STACK BRACKET KIT 1. Install Bracket to remove the dryer leveling legs. Repeat the above step with the holes in the bottom left bracket ... right bracket on its side. C. Remove the Dryer Leveling Legs A. B. B. Align the holes in the parts package. Use a Phillips screwdriver to the bottom of the dryer. Use the packing material so you removed the leveling legs. 3. Set the dryer upright. GEAppliances.com Back out and remove all...
... #12 x 1s tapping screws. Use an open-end wrench or pliers to Dryer A. NOTE: Make sure to set the dryer on the dryer. INSTALLING THE STACK BRACKET KIT 1. Install Bracket to remove the dryer leveling legs. Repeat the above step with the holes in the bottom left bracket ... right bracket on its side. C. Remove the Dryer Leveling Legs A. B. B. Align the holes in the parts package. Use a Phillips screwdriver to the bottom of the dryer. Use the packing material so you removed the leveling legs. 3. Set the dryer upright. GEAppliances.com Back out and remove all...
Owners Manual
Page 22
...of the washer with the brackets. Be careful not to scratch the top of the washer. Failure to lift the dryer into place. Refer to the dryer Installation Instructions to clear the washer control panel. Protect the washer control panel with the holes in the back of ...its weight and size. Be sure to lift the dryer high enough to complete the dryer installation. More than two people are recommended to do so could result in the approximate location. Finalize the Installation A. Carefully...
...of the washer with the brackets. Be careful not to scratch the top of the washer. Failure to lift the dryer into place. Refer to the dryer Installation Instructions to clear the washer control panel. Protect the washer control panel with the holes in the back of ...its weight and size. Be sure to lift the dryer high enough to complete the dryer installation. More than two people are recommended to do so could result in the approximate location. Finalize the Installation A. Carefully...


