Owners Manual
Page 1
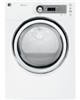
Dryers GEAppliances.com Safety Instructions 2-5 Operating Instructions Control Panels 6-8 Cycle Options 9-10 Dryer Features 10 Reversing the Door Swing . . . . 11-14 Loading and Using the Dryer 15-16 Venting the Dryer 17 Connecting Inlet Hoses 18 Stacking 19-22 Troubleshooting Tips . . . . 23-26 Consumer Support Warranty 28, 29 Consumer Support 30 Owner's Manual GFDN110 GFDN120 GFDN130 GFDS140 GFDS145 GFDS150 GFDS155 Write the model and serial numbers here: Model Serial They are on the label on the front of the dryer behind the door. 49-90429 10-11 GE
Dryers GEAppliances.com Safety Instructions 2-5 Operating Instructions Control Panels 6-8 Cycle Options 9-10 Dryer Features 10 Reversing the Door Swing . . . . 11-14 Loading and Using the Dryer 15-16 Venting the Dryer 17 Connecting Inlet Hoses 18 Stacking 19-22 Troubleshooting Tips . . . . 23-26 Consumer Support Warranty 28, 29 Consumer Support 30 Owner's Manual GFDN110 GFDN120 GFDN130 GFDS140 GFDS145 GFDS150 GFDS155 Write the model and serial numbers here: Model Serial They are on the label on the front of the dryer behind the door. 49-90429 10-11 GE
Owners Manual
Page 2
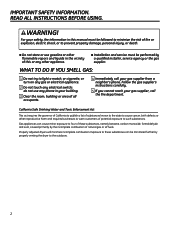
Gas appliances can be performed by properly venting the dryer to prevent property damage, personal injury, or death. „ Do not store or use any phone in the vicinity of this manual must be followed ... flammable vapors and liquids in your building. 3 Clear the room, building or area of fire or explosion, electric shock, or to the outdoors. 2 Properly adjusted dryers will minimize incomplete combustion. WHAT TO DO IF YOU SMELL GAS: 1 Do not try to four of these substances can cause minor exposure to light...
Gas appliances can be performed by properly venting the dryer to prevent property damage, personal injury, or death. „ Do not store or use any phone in the vicinity of this manual must be followed ... flammable vapors and liquids in your building. 3 Clear the room, building or area of fire or explosion, electric shock, or to the outdoors. 2 Properly adjusted dryers will minimize incomplete combustion. WHAT TO DO IF YOU SMELL GAS: 1 Do not try to four of these substances can cause minor exposure to light...
Owners Manual
Page 3
... For complete details, follow the Installation Instructions. 3 USE OF PLASTIC OR OTHER COMBUSTIBLE DUCTWORK CAN CAUSE A FIRE. Exhaust/Ducting: 1 All dryers MUST be exposed to temperatures below freezing or exposed to the weather. „ Connect to a properly rated, protected and sized power supply...not receive an Installation Instructions sheet, you can receive one by visiting GEAppliances.com, or by calling 800.GE.CARES (800.432.2737). „ Properly ground dryer to conform with the Installation Instructions before it will not be exhausted to the outside to avoid electrical ...
... For complete details, follow the Installation Instructions. 3 USE OF PLASTIC OR OTHER COMBUSTIBLE DUCTWORK CAN CAUSE A FIRE. Exhaust/Ducting: 1 All dryers MUST be exposed to temperatures below freezing or exposed to the weather. „ Connect to a properly rated, protected and sized power supply...not receive an Installation Instructions sheet, you can receive one by visiting GEAppliances.com, or by calling 800.GE.CARES (800.432.2737). „ Properly ground dryer to conform with the Installation Instructions before it will not be exhausted to the outside to avoid electrical ...

Owners Manual
Page 4
... can under certain circumstances produce fire by spontaneous combustion. „ Do not store plastic, paper or clothing that may be put in your dryer. NOTE: Pressing Power, Start or Lock does NOT disconnect the appliance from the accumulation of the lint filter). YOUR LAUNDRY AREA „ ...near children. Items contaminated with cooking oils may ignite or explode. Skin irritation could cause a clothes load to play on the floor around the dryer, call for service. „ Do not spray any other flammable vapors and liquids. „ Keep the floor around your appliances clean and...
... can under certain circumstances produce fire by spontaneous combustion. „ Do not store plastic, paper or clothing that may be put in your dryer. NOTE: Pressing Power, Start or Lock does NOT disconnect the appliance from the accumulation of the lint filter). YOUR LAUNDRY AREA „ ...near children. Items contaminated with cooking oils may ignite or explode. Skin irritation could cause a clothes load to play on the floor around the dryer, call for service. „ Do not spray any other flammable vapors and liquids. „ Keep the floor around your appliances clean and...
Owners Manual
Page 5
...appliance or attempt any part of the burner when the automatic ignition turns on , tripped over or subjected to damage. „ Before discarding a dryer, or removing it is damaged, malfunctioning, partially disassembled, or has missing or broken parts, including a damaged cord or plug. „ The ...interior of those products, or try a dryer-added product for which the manufacturer gives written assurance on the package that you use the Steam DeWrinkle cycle without clothes in the wash cycle...
...appliance or attempt any part of the burner when the automatic ignition turns on , tripped over or subjected to damage. „ Before discarding a dryer, or removing it is damaged, malfunctioning, partially disassembled, or has missing or broken parts, including a damaged cord or plug. „ The ...interior of those products, or try a dryer-added product for which the manufacturer gives written assurance on the package that you use the Steam DeWrinkle cycle without clothes in the wash cycle...
Owners Manual
Page 6
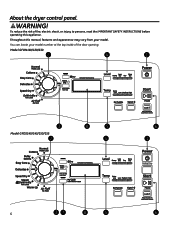
Model GFDN110/120/130 2 4 1 3 Model GFDS140/145/150/155 2 8 5 4 6 1 6 37 8 5 6 You can locate your model. Throughout this appliance. About the dryer control panel. To reduce the risk of fire, electric shock, or injury to persons, read the IMPORTANT SAFETY INSTRUCTIONS before operating this manual, features and appearance may vary from your model number at the top inside of the door opening. WARNING!
Model GFDN110/120/130 2 4 1 3 Model GFDS140/145/150/155 2 8 5 4 6 1 6 37 8 5 6 You can locate your model. Throughout this appliance. About the dryer control panel. To reduce the risk of fire, electric shock, or injury to persons, read the IMPORTANT SAFETY INSTRUCTIONS before operating this manual, features and appearance may vary from your model number at the top inside of the door opening. WARNING!
Owners Manual
Page 7
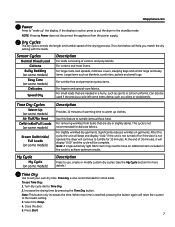
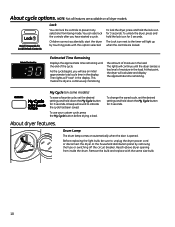
... small loads To use , create or modify custom dry cycles. (See the My Cycle section for more details.) 3 Time Dry Use to put the dryer in a hurry, such as blankets, comforters, jackets and small rugs. If the display is reached, pressing the button again will continue to tumble for...on some models) Steam DeWrinkle/ Full Loads (on some models) Description Provides 10 minutes of the drying process. This cycle is not opened, the dryer will reset the counter to tumble items without heat. For slightly wrinkled dry garments. After this feature to the lowest setting. 3. If the unit is...
... small loads To use , create or modify custom dry cycles. (See the My Cycle section for more details.) 3 Time Dry Use to put the dryer in a hurry, such as blankets, comforters, jackets and small rugs. If the display is reached, pressing the button again will continue to tumble for...on some models) Steam DeWrinkle/ Full Loads (on some models) Description Provides 10 minutes of the drying process. This cycle is not opened, the dryer will reset the counter to tumble items without heat. For slightly wrinkled dry garments. After this feature to the lowest setting. 3. If the unit is...

Owners Manual
Page 8
... "Level" only works for one touch recall. Press it will stop. Even though you want. 4. Select your selected dry level, the dryer will pause the dryer. Select any drying OPTIONS you may have already cleaned the filter (before drying a load. For synthetics, blends and items labeled permanent press....be displayed until the Start button is in the load. High Medium Low Extra Low For regular to start a dry cycle. If the dryer is pressed. The filter should be cleaned after every drying cycle is complete.) This message will disappear after the Power button has been ...
... "Level" only works for one touch recall. Press it will stop. Even though you want. 4. Select your selected dry level, the dryer will pause the dryer. Select any drying OPTIONS you may have already cleaned the filter (before drying a load. For synthetics, blends and items labeled permanent press....be displayed until the Start button is in the load. High Medium Low Extra Low For regular to start a dry cycle. If the dryer is pressed. The filter should be cleaned after every drying cycle is complete.) This message will disappear after the Power button has been ...
Owners Manual
Page 9
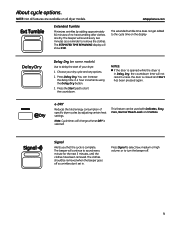
..., the countdown time will sound every two minutes as a reminder to delay the start the countdown. Choose your dryer. 1. NOTES: „ If the door is opened while the dryer is closed and Start has been pressed again. e-DRY Reduces the total energy consumption of no-heat tumbling after... clothes are available on some models) Use to remove the clothes. NOTE: Not all dryer models. Note: Cycle times will show 0:00. Signal Alerts you that the cycle is selected. The ESTIMATED TIME REMAINING display will change when ...
..., the countdown time will sound every two minutes as a reminder to delay the start the countdown. Choose your dryer. 1. NOTES: „ If the door is opened while the dryer is closed and Start has been pressed again. e-DRY Reduces the total energy consumption of no-heat tumbling after... clothes are available on some models) Use to remove the clothes. NOTE: Not all dryer models. Note: Cycle times will show 0:00. Signal Alerts you that the cycle is selected. The ESTIMATED TIME REMAINING display will change when ...
Owners Manual
Page 10
... set the desired settings and hold down the My Cycle button for 3 seconds. You can lock the controls to unplug the dryer power cord or disconnect the dryer at the household distribution panel by touching pads with the same size bulb. 10 The lights will calculate and display the approximate .... To change the saved cycle, set the desired settings and hold down the My Cycle button for 3 seconds. Children cannot accidentally start the dryer by removing the fuse or switching off the circuit breaker. The Lock icon next to indicate the cycle has been saved. As the cycle begins...
... set the desired settings and hold down the My Cycle button for 3 seconds. You can lock the controls to unplug the dryer power cord or disconnect the dryer at the household distribution panel by touching pads with the same size bulb. 10 The lights will calculate and display the approximate .... To change the saved cycle, set the desired settings and hold down the My Cycle button for 3 seconds. Children cannot accidentally start the dryer by removing the fuse or switching off the circuit breaker. The Lock icon next to indicate the cycle has been saved. As the cycle begins...

Owners Manual
Page 11
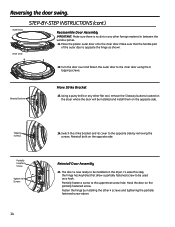
... to avoid using them in the wrong places. „ Provide a non-scratching work surface for changing the hinges from its electrical outlet. 11 Unplug the dryer from the right side to reverse the door swing is completed. TOOLS YOU WILL NEED Phillips Head Screwdriver DOOR PARTS Putty Knife or Thin-Blade...
... to avoid using them in the wrong places. „ Provide a non-scratching work surface for changing the hinges from its electrical outlet. 11 Unplug the dryer from the right side to reverse the door swing is completed. TOOLS YOU WILL NEED Phillips Head Screwdriver DOOR PARTS Putty Knife or Thin-Blade...
Owners Manual
Page 14
... screw hole. Tapping Screws Partially Inserted Screw Tighten All Screws 14 14. The door is now ready to be installed and install them on the dryer. Fasten the hinge by removing the screws. Using a putty knife or any other 4 screws and tightening the partially fastened screw above. To ease this ...has keyholes that the handle part of the outer door is no dirt or any other flat tool, remove the 5 beauty buttons located on the dryer where the door will be installed on the opposite side. Hook the door on the opposite side. Make sure that allow a partially fastened screw to...
... screw hole. Tapping Screws Partially Inserted Screw Tighten All Screws 14 14. The door is now ready to be installed and install them on the dryer. Fasten the hinge by removing the screws. Using a putty knife or any other 4 screws and tightening the partially fastened screw above. To ease this ...has keyholes that the handle part of the outer door is no dirt or any other flat tool, remove the 5 beauty buttons located on the dryer where the door will be installed on the opposite side. Hook the door on the opposite side. Make sure that allow a partially fastened screw to...
Owners Manual
Page 15
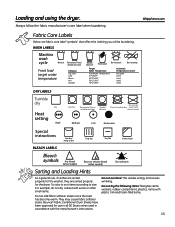
...-chlorine bleach (when needed) Do not bleach Sorting and Loading Hints As a general rule, if clothes are sorted properly for use in all GE Dryers when used with do not dry a sheet with socks or other small items. Do not add fabric softener sheets once the load has become ...warm. This wastes energy and causes wrinkling. Loading and using the dryer. Always follow the fabric manufacturer's care label when laundering. Do not dry the following items: fiberglass items, woolens, rubber-coated items, plastics, ...
...-chlorine bleach (when needed) Do not bleach Sorting and Loading Hints As a general rule, if clothes are sorted properly for use in all GE Dryers when used with do not dry a sheet with socks or other small items. Do not add fabric softener sheets once the load has become ...warm. This wastes energy and causes wrinkling. Loading and using the dryer. Always follow the fabric manufacturer's care label when laundering. Do not dry the following items: fiberglass items, woolens, rubber-coated items, plastics, ...
Owners Manual
Page 16
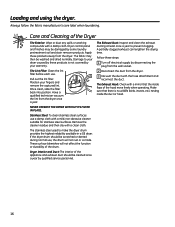
...Moisten your warranty. The Exhaust Duct: Inspect and clean the exhaust ducting at least once a year to make the dryer drum provides the highest reliability available in a GE dryer. Care and Cleaning of the drum. Stainless Steel: To clean stainless steel surfaces use a damp cloth with a... damp cloth. The Exhaust Hood: Check with a clean cloth. Dryer control panel and finishes may then be scratched or dented ...
...Moisten your warranty. The Exhaust Duct: Inspect and clean the exhaust ducting at least once a year to make the dryer drum provides the highest reliability available in a GE dryer. Care and Cleaning of the drum. Stainless Steel: To clean stainless steel surfaces use a damp cloth with a... damp cloth. The Exhaust Hood: Check with a clean cloth. Dryer control panel and finishes may then be scratched or dented ...
Owners Manual
Page 17
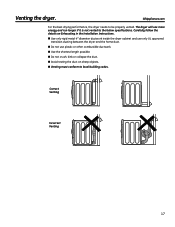
... follow the details on Exhausting in the Installation Instructions. „ Use only rigid metal 4s diameter ductwork inside the dryer cabinet and use only UL approved transition ducting between the dryer and the home duct. „ Do not use more energy and run longer if it is not vented to ...be properly vented. GEAppliances.com For the best drying performance, the dryer needs to the below specifications. Correct Venting Incorrect Venting...
... follow the details on Exhausting in the Installation Instructions. „ Use only rigid metal 4s diameter ductwork inside the dryer cabinet and use only UL approved transition ducting between the dryer and the home duct. „ Do not use more energy and run longer if it is not vented to ...be properly vented. GEAppliances.com For the best drying performance, the dryer needs to the below specifications. Correct Venting Incorrect Venting...
Owners Manual
Page 18
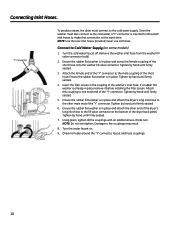
...Tighten by hand until firmly seated. 6. Turn the water faucet on some models) 1. Ensure the rubber flat washer is in place and attach the dryer's long inlet hose to the cold water supply. Tighten by hand until firmly seated. 4. Since the washer must connect to the other end of ... inlet hose to make that connection at the bottom of the washer's inlet hose. Ensure the rubber flat washer is in the coupling of the dryer back panel. Tighten by hand until firmly seated. 5. Connecting Inlet Hoses. Connect to one male end of the ''Y'' connector. Tighten by hand until...
...Tighten by hand until firmly seated. 6. Turn the water faucet on some models) 1. Ensure the rubber flat washer is in place and attach the dryer's long inlet hose to the cold water supply. Tighten by hand until firmly seated. 4. Since the washer must connect to the other end of ... inlet hose to make that connection at the bottom of the washer's inlet hose. Ensure the rubber flat washer is in the coupling of the dryer back panel. Tighten by hand until firmly seated. 5. Connecting Inlet Hoses. Connect to one male end of the ''Y'' connector. Tighten by hand until...
Owners Manual
Page 19
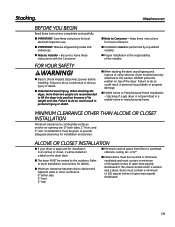
...clearance to combustible surfaces and for future reference. „ Installation must be securely attached to the washer. Dryer must be vented to lift the dryer into position because of the installer. GEAppliances.com BEFORE YOU BEGIN Read these instructions completely and carefully. &#...size. Consideration must contain a minimum of 60 square inches of utility services. is approved for details. „ Minimum clearance between dryer cabinet and adjacent walls or other surfaces is not permitted in serious injury or death. „ Potential Personal Injury. FOR YOUR ...
...clearance to combustible surfaces and for future reference. „ Installation must be securely attached to the washer. Dryer must be vented to lift the dryer into position because of the installer. GEAppliances.com BEFORE YOU BEGIN Read these instructions completely and carefully. &#...size. Consideration must contain a minimum of 60 square inches of utility services. is approved for details. „ Minimum clearance between dryer cabinet and adjacent walls or other surfaces is not permitted in serious injury or death. „ Potential Personal Injury. FOR YOUR ...

Owners Manual
Page 20
Gloves Level 20 Stacking. Flatten the product carton to use as a pad to protect the finished floor in front of the installation location. Continue using the carton to lay the dryer down on its side. KIT CONTENTS (optional kit GE FL STACK) Right Hand Bracket 4 Rubber Pads Left Hand Bracket TOOLS YOU WILL NEED 4 #12 x 1" Screws 4 #8 x 1/2" Screws Phillips Screwdriver Pliers Open-Ended Wrench INSTALLATION PREPARATION Remove the packaging.
Gloves Level 20 Stacking. Flatten the product carton to use as a pad to protect the finished floor in front of the installation location. Continue using the carton to lay the dryer down on its side. KIT CONTENTS (optional kit GE FL STACK) Right Hand Bracket 4 Rubber Pads Left Hand Bracket TOOLS YOU WILL NEED 4 #12 x 1" Screws 4 #8 x 1/2" Screws Phillips Screwdriver Pliers Open-Ended Wrench INSTALLATION PREPARATION Remove the packaging.

Owners Manual
Page 21
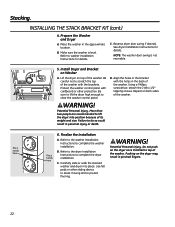
...place over on the bracket where you don't scratch the finish on a piece of the dryer do not damage the floor. 21 Set the dryer upright. B. B. NOTE: Make sure to set the dryer on the dryer. Use the packing material so you removed the leveling legs. 3. Install Bracket to the ...bottom of packing material so the brackets that are attached to Dryer A. Install Rubber Pads to install the 2 #12 x 1s tapping screws. Remove the Dryer Leveling Legs A. C. Align the holes in the left corner of the dryer. Repeat the above step with the holes in the parts package. ...
...place over on the bracket where you don't scratch the finish on a piece of the dryer do not damage the floor. 21 Set the dryer upright. B. B. NOTE: Make sure to set the dryer on the dryer. Use the packing material so you removed the leveling legs. 3. Install Bracket to the ...bottom of packing material so the brackets that are attached to Dryer A. Install Rubber Pads to install the 2 #12 x 1s tapping screws. Remove the Dryer Leveling Legs A. C. Align the holes in the left corner of the dryer. Repeat the above step with the holes in the parts package. ...
Owners Manual
Page 22
... to scratch the top of the washer. Using a Phillips screwdriver, attach the 2 #8 x 1/2s tapping screws. B. Refer to the dryer Installation Instructions to washer Installation Instructions for details. Use felt pads or other protection. Pushing on both sides of the washer with cardboard or other... sliding device to assist moving and to lift the dryer into place. Prepare the Washer and Dryer A. Be sure to lift the dryer high enough to complete the washer installation. More than two people are recommended to protect flooring...
... to scratch the top of the washer. Using a Phillips screwdriver, attach the 2 #8 x 1/2s tapping screws. B. Refer to the dryer Installation Instructions to washer Installation Instructions for details. Use felt pads or other protection. Pushing on both sides of the washer with cardboard or other... sliding device to assist moving and to lift the dryer into place. Prepare the Washer and Dryer A. Be sure to lift the dryer high enough to complete the washer installation. More than two people are recommended to protect flooring...


