
Owners Manual
Page 4
... adjacent surrounding areas free from the power supply or disconnect the dryer at any other flammable vapors and liquids. „ Keep the floor around your washer or dryer during subsequent dryer uses. „ To minimize the possibility of electric shock, unplug this appliance from the accumulation of lint, dust and dirt...
... adjacent surrounding areas free from the power supply or disconnect the dryer at any other flammable vapors and liquids. „ Keep the floor around your washer or dryer during subsequent dryer uses. „ To minimize the possibility of electric shock, unplug this appliance from the accumulation of lint, dust and dirt...
Owners Manual
Page 15
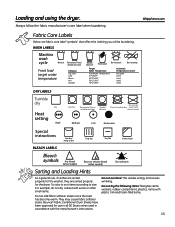
... non-chlorine bleach (when needed) Do not bleach Sorting and Loading Hints As a general rule, if clothes are sorted properly for the washer, they are fabric care label "symbols" that affect the clothing you will be laundering. Bounce® Fabric Conditioner Dryer Sheets have been ...approved for the dryer. GEAppliances.com Fabric Care Labels Below are sorted properly for use in all GE Dryers when used with the manufacturer's instructions. Do not dry the following items: fiberglass items, woolens, rubber-coated items, plastics, items...
... non-chlorine bleach (when needed) Do not bleach Sorting and Loading Hints As a general rule, if clothes are sorted properly for the washer, they are fabric care label "symbols" that affect the clothing you will be laundering. Bounce® Fabric Conditioner Dryer Sheets have been ...approved for the dryer. GEAppliances.com Fabric Care Labels Below are sorted properly for use in all GE Dryers when used with the manufacturer's instructions. Do not dry the following items: fiberglass items, woolens, rubber-coated items, plastics, items...
Owners Manual
Page 18
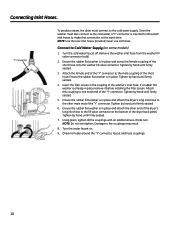
... by hand until firmly seated. 4. Turn the water faucet on some models) 1. Tighten by hand until firmly seated. 5. If a rubber flat washer is in place remove it before installing the filter screen. NOTE: Do not overtighten. Damage to one male end of the short hose. Tighten by... hand until firmly seated. 6. Connecting Inlet Hoses. Turn the cold water faucet off. Ensure the rubber flat washer is already in place and screw the female coupling of the dryer back panel. Attach this coupling to the couplings may result. 8. Tighten...
... by hand until firmly seated. 4. Turn the water faucet on some models) 1. Tighten by hand until firmly seated. 5. If a rubber flat washer is in place remove it before installing the filter screen. NOTE: Do not overtighten. Damage to one male end of the short hose. Tighten by... hand until firmly seated. 6. Connecting Inlet Hoses. Turn the cold water faucet off. Ensure the rubber flat washer is already in place and screw the female coupling of the dryer back panel. Attach this coupling to the couplings may result. 8. Tighten...
Owners Manual
Page 19
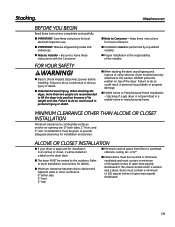
... so could result in personal injury or death. „ When stacking the dryer, avoid tipping and rupture of the dryer. DO NOT place the washer on the dryer back. „ The dryer MUST be securely attached to lift the dryer into position because of a gas dryer is : 0s...governing codes and ordinances. „ Note to overhead cabinets, ceiling, etc. Failure to provide adequate clearance for air opening are recommended to the washer. Consideration must be vented to combustible surfaces and for installation and service. If the closet contains both sides, 1s front, and 3s rear.
... so could result in personal injury or death. „ When stacking the dryer, avoid tipping and rupture of the dryer. DO NOT place the washer on the dryer back. „ The dryer MUST be securely attached to lift the dryer into position because of a gas dryer is : 0s...governing codes and ordinances. „ Note to overhead cabinets, ceiling, etc. Failure to provide adequate clearance for air opening are recommended to the washer. Consideration must be vented to combustible surfaces and for installation and service. If the closet contains both sides, 1s front, and 3s rear.
Owners Manual
Page 22
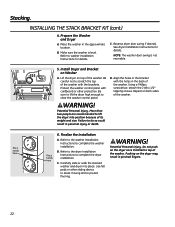
...B. Finalize the Installation A. C. WARNING! C. Lift the dryer on the dryer once installed to top of the washer with the holes in the bracket with the brackets. Protect the washer control panel with cardboard or other sliding device to assist moving and to scratch the top of the... washer. Install Dryer and Bracket on Washer A. Using a Phillips screwdriver, attach the 2 #8 x 1/2s tapping screws. Place hands here Place hands here 6. Refer to the dryer Installation ...
...B. Finalize the Installation A. C. WARNING! C. Lift the dryer on the dryer once installed to top of the washer with the holes in the bracket with the brackets. Protect the washer control panel with cardboard or other sliding device to assist moving and to scratch the top of the... washer. Install Dryer and Bracket on Washer A. Using a Phillips screwdriver, attach the 2 #8 x 1/2s tapping screws. Place hands here Place hands here 6. Refer to the dryer Installation ...
Owners Manual
Page 23
... to see if outside wall damper operates easily. ‡ Separate heavy items from lightweight items (generally, a well-sorted washer load is a well-sorted dryer load). ‡ Large, heavy fabrics contain more than one washer load in -house breaker. ‡ This is pushed completely into smaller loads to speed drying time. ‡ Match...
... to see if outside wall damper operates easily. ‡ Separate heavy items from lightweight items (generally, a well-sorted washer load is a well-sorted dryer load). ‡ Large, heavy fabrics contain more than one washer load in -house breaker. ‡ This is pushed completely into smaller loads to speed drying time. ‡ Match...
Owners Manual
Page 26
manually increase time. ‡ Ensure Extended Tumble option is normal. ‡ Call 800.GE.CARES to order nozzle replacement kit WE25M71 or to request a service technician to valve Hose missing rubber washer at connection with valve Steam condenses on inner door Steam released at different time in cycle ... option was selected What To Do ‡ If using the Steam DeWrinkle cycle, manually reduce cycle time. ‡ Tighten connection. ‡ Install rubber washer provided with hose. ‡ This is normal. ‡ This is not selected. 26 Before you call for you. ‡ Load fewer garments;...
manually increase time. ‡ Ensure Extended Tumble option is normal. ‡ Call 800.GE.CARES to order nozzle replacement kit WE25M71 or to request a service technician to valve Hose missing rubber washer at connection with valve Steam condenses on inner door Steam released at different time in cycle ... option was selected What To Do ‡ If using the Steam DeWrinkle cycle, manually reduce cycle time. ‡ Tighten connection. ‡ Install rubber washer provided with hose. ‡ This is normal. ‡ This is not selected. 26 Before you call for you. ‡ Load fewer garments;...


