
Dimensions
Page 1
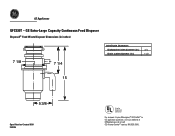
GE Appliances sers-CoGnFCti5n3u0oTu-sGFEeEextdra-Large Capacity Continuous Feed Disposer Disposall® Food Waste Disposer Dimensions (in inches) 7 1/8 7 1/4 Inlet/Outlet Diameters Dishwasher inlet diameter (in.) Drain outlet diameter (in.) 3/4 1-1/2 15 5 3/8 Specification Created 8/10 350746 Listed by Underwriters Laboratories For answers to your Monogram,® GE Profile™ or GE appliance questions, visit our website at GEAppliances.com or call GE Answer Center® service, 800.626.2000.
GE Appliances sers-CoGnFCti5n3u0oTu-sGFEeEextdra-Large Capacity Continuous Feed Disposer Disposall® Food Waste Disposer Dimensions (in inches) 7 1/8 7 1/4 Inlet/Outlet Diameters Dishwasher inlet diameter (in.) Drain outlet diameter (in.) 3/4 1-1/2 15 5 3/8 Specification Created 8/10 350746 Listed by Underwriters Laboratories For answers to your Monogram,® GE Profile™ or GE appliance questions, visit our website at GEAppliances.com or call GE Answer Center® service, 800.626.2000.
Dimensions
Page 2
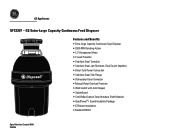
... Continuous Feed Disposer • 2600 RPM Grinding Action • 1/2 Horsepower Motor • 2 Level Precutter • Stainless Steel Turntable • Stainless Steel Jam Resistant, Dual Swivel Impellers • Direct Cord Power Connection • Stainless Steel Sink Flange • Dishwasher Drain Connector • Manual Reset Overload Protector • Wall Switch with Sink Stopper • SplashGuard • Cold-Rolled Carbon Steel Armature Shaft Material • QuietPower™ I Sound Insulation Package • EZ Mount Installation • Model GFC530T Specification...
... Continuous Feed Disposer • 2600 RPM Grinding Action • 1/2 Horsepower Motor • 2 Level Precutter • Stainless Steel Turntable • Stainless Steel Jam Resistant, Dual Swivel Impellers • Direct Cord Power Connection • Stainless Steel Sink Flange • Dishwasher Drain Connector • Manual Reset Overload Protector • Wall Switch with Sink Stopper • SplashGuard • Cold-Rolled Carbon Steel Armature Shaft Material • QuietPower™ I Sound Insulation Package • EZ Mount Installation • Model GFC530T Specification...

Owners Manual
Page 1
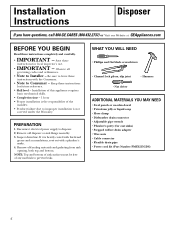
... Electricity . . . . . 2, 3 Safety Precautions 2 Installation Instructions Attaching the Discharge Elbow 6 Components and Installation of Sink Flange 5 Connecting Disposer to Sink Flange 7 Dimensions/Typical Installations 8 Dishwasher Connection 6 Operating Instructions Batch Feed Models 9 Care and Maintenance . . . . . .10 Continuous Feed Models . . . . .9 Troubleshooting Tips Before You Call for Service . . . .11 Consumer Support Warranty 12 Owner's Manual & Installation Instructions Model Line Series GFC320 GFC520 GFC530 GFC720 GFC1020 GFB760 Write the model and serial numbers...
... Electricity . . . . . 2, 3 Safety Precautions 2 Installation Instructions Attaching the Discharge Elbow 6 Components and Installation of Sink Flange 5 Connecting Disposer to Sink Flange 7 Dimensions/Typical Installations 8 Dishwasher Connection 6 Operating Instructions Batch Feed Models 9 Care and Maintenance . . . . . .10 Continuous Feed Models . . . . .9 Troubleshooting Tips Before You Call for Service . . . .11 Consumer Support Warranty 12 Owner's Manual & Installation Instructions Model Line Series GFC320 GFC520 GFC530 GFC720 GFC1020 GFB760 Write the model and serial numbers...
Owners Manual
Page 2
... batch-feed or "TC" model connects to the hot side, while the continuous feed model connects to clear a jam or remove an object from a waste disposer, only use a long wooden object such as bottle caps, tin cans, utensils or aluminum foil. IMPORTANT SAFETY INSTRUCTIONS. INSTRUCTIONS PERTAINING TO A RISK OF FIRE, ELECTRIC SHOCK OR INJURY TO PERSONS WARNING! I Do not put the following : SAFETY PRECAUTIONS I Turn the power switch (normally a wall switch...
... batch-feed or "TC" model connects to the hot side, while the continuous feed model connects to clear a jam or remove an object from a waste disposer, only use a long wooden object such as bottle caps, tin cans, utensils or aluminum foil. IMPORTANT SAFETY INSTRUCTIONS. INSTRUCTIONS PERTAINING TO A RISK OF FIRE, ELECTRIC SHOCK OR INJURY TO PERSONS WARNING! I Do not put the following : SAFETY PRECAUTIONS I Turn the power switch (normally a wall switch...
Owners Manual
Page 3
.... Red Reset Button Ground Screw To House Current or Power Cord Wire Nuts Remove Cover Plate Bottom of electrical plug with all local codes and ordinances. Check with a qualified electrician or serviceman if you use a three-prong plug. or 2. B. Strain Relief Nut GROUNDING INSTRUCTIONS: This appliance must comply with electrical power and procedures, call a qualified electrician. Install the cable connector in two ways: 1. Connect bare ground wire. To Wire Your Disposer Directly...
.... Red Reset Button Ground Screw To House Current or Power Cord Wire Nuts Remove Cover Plate Bottom of electrical plug with all local codes and ordinances. Check with a qualified electrician or serviceman if you use a three-prong plug. or 2. B. Strain Relief Nut GROUNDING INSTRUCTIONS: This appliance must comply with electrical power and procedures, call a qualified electrician. Install the cable connector in two ways: 1. Connect bare ground wire. To Wire Your Disposer Directly...
Owners Manual
Page 4
... sinks) • Stepped rubber drain adapter • Wire nuts • Cable connector • Flexible drain pipe • Power cord kit (Part Number PM3X215GDS) 4 If it is not covered under the Warranty. Disconnect electrical power supply to improper installation is heavily coated with hardened grease and accumulations, rout out with the Consumer. • Note to Installer - Remove old sealing materials and gasketing from sink opening, both top and bottom. PREPARATION 1. Installation Instructions Disposer...
... sinks) • Stepped rubber drain adapter • Wire nuts • Cable connector • Flexible drain pipe • Power cord kit (Part Number PM3X215GDS) 4 If it is not covered under the Warranty. Disconnect electrical power supply to improper installation is heavily coated with hardened grease and accumulations, rout out with the Consumer. • Note to Installer - Remove old sealing materials and gasketing from sink opening, both top and bottom. PREPARATION 1. Installation Instructions Disposer...
Owners Manual
Page 5
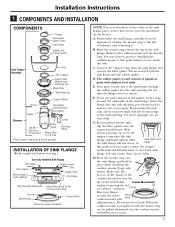
...the sink, slip the fiber gasket onto the exposed sink flange. Make sure the groove on cast iron sinks. Installation Instructions 1 COMPONENTS AND INSTALLATION COMPONENTS *Stopper *Removable Splash Guard Sink Flange Rubber Sink Flange Gasket Sink Flange Assembly Sink Fiber Gasket Support Ring (Note Arrows Indicating Up) Mount Ring Tightening Ears Cushion Mount Groove Hopper Dishwasher Discharge Inlet Elbow Gasket Disposer End Bell (Electrical Connections) Elbow Flange Rating Label in This Area *Not used with batch feed model Screws Discharge Elbow INSTALLATION OF SINK FLANGE...
...the sink, slip the fiber gasket onto the exposed sink flange. Make sure the groove on cast iron sinks. Installation Instructions 1 COMPONENTS AND INSTALLATION COMPONENTS *Stopper *Removable Splash Guard Sink Flange Rubber Sink Flange Gasket Sink Flange Assembly Sink Fiber Gasket Support Ring (Note Arrows Indicating Up) Mount Ring Tightening Ears Cushion Mount Groove Hopper Dishwasher Discharge Inlet Elbow Gasket Disposer End Bell (Electrical Connections) Elbow Flange Rating Label in This Area *Not used with batch feed model Screws Discharge Elbow INSTALLATION OF SINK FLANGE...

Owners Manual
Page 6
... different, you will not damage the disposer in any way, but may require the use a screwdriver or sharp instrument. If the hose size is not to be connected, go on to "Attaching the Discharge Elbow" section. 1 KNOCK OUT PLUG Using a blunt instrument (steel punch or wooden dowel), knock out entire plug. Knock out plug 2 CONNECT HOSE Connect the dishwasher hose using a hose clamp. Rubber Gasket Discharge...
... different, you will not damage the disposer in any way, but may require the use a screwdriver or sharp instrument. If the hose size is not to be connected, go on to "Attaching the Discharge Elbow" section. 1 KNOCK OUT PLUG Using a blunt instrument (steel punch or wooden dowel), knock out entire plug. Knock out plug 2 CONNECT HOSE Connect the dishwasher hose using a hose clamp. Rubber Gasket Discharge...
Owners Manual
Page 7
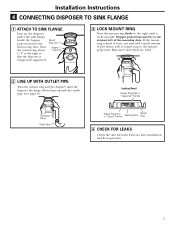
Installation Instructions 4 CONNECTING DISPOSER TO SINK FLANGE 1 ATTACH TO SINK FLANGE Line up with the outlet pipe (see page 8). Run water and check for leaks 24 hours after installation and first operation. 7 Hopper projections must be to the extreme left of petroleum jelly or liquid soap to the hopper projection. If the mount ring is temporarily supported. Mount Ring Slot Hopper Projection 3 LOCK MOUNT RING Turn the mount ring slowly to turn, you...
Installation Instructions 4 CONNECTING DISPOSER TO SINK FLANGE 1 ATTACH TO SINK FLANGE Line up with the outlet pipe (see page 8). Run water and check for leaks 24 hours after installation and first operation. 7 Hopper projections must be to the extreme left of petroleum jelly or liquid soap to the hopper projection. If the mount ring is temporarily supported. Mount Ring Slot Hopper Projection 3 LOCK MOUNT RING Turn the mount ring slowly to turn, you...
Owners Manual
Page 8
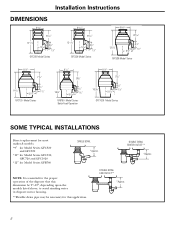
.../2" GFC720 Model Series 8 1/2" 93/8" 165/8" 5 9/16" 4 1/2" 11/2" GFB760 Model Series Batch Feed Operation 8 1/2" 7 1/4" 161/16" 5 9/16" 4 1/2" 11/2" GFC1020 Model Series SOME TYPICAL INSTALLATIONS Direct replacement for most makes & models. *9″ for Model Series GFC320 and GFC520 *10″ for Model Series GFC530, GFC720 and GFC1020 *12″ for this dimension be 9″-12″, depending upon the models listed above, to avoid standing water in disposer motor housing. **Flexible drain pipe may...
.../2" GFC720 Model Series 8 1/2" 93/8" 165/8" 5 9/16" 4 1/2" 11/2" GFB760 Model Series Batch Feed Operation 8 1/2" 7 1/4" 161/16" 5 9/16" 4 1/2" 11/2" GFC1020 Model Series SOME TYPICAL INSTALLATIONS Direct replacement for most makes & models. *9″ for Model Series GFC320 and GFC520 *10″ for Model Series GFC530, GFC720 and GFC1020 *12″ for this dimension be 9″-12″, depending upon the models listed above, to avoid standing water in disposer motor housing. **Flexible drain pipe may...
Owners Manual
Page 9
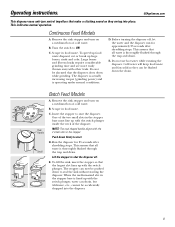
... slot lines up with the 2 small slots in the stopper. C. D. E. C. Push down while grinding. Continuous Feed Models A. Remove the sink stopper and turn on a medium flow of cold water. Turn the switch to shut the disposer off , let the water and the disposer run for 25 seconds after shredding stops. Scrape in food waste. The disposer is actually increasing torque (grinding power) and is lined up large bones, rinds and cobs...
... slot lines up with the 2 small slots in the stopper. C. D. E. C. Push down while grinding. Continuous Feed Models A. Remove the sink stopper and turn on a medium flow of cold water. Turn the switch to shut the disposer off , let the water and the disposer run for 25 seconds after shredding stops. Scrape in food waste. The disposer is actually increasing torque (grinding power) and is lined up large bones, rinds and cobs...
Owners Manual
Page 10
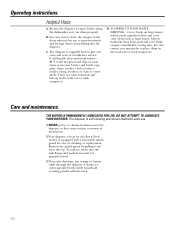
... parts. TO SPEED UP FOOD WASTE DISPOSAL...Cut or break up large bones, melon rinds, grapefruit skins and corn cobs. A dozen ice cubes sprinkled with a removable splash guard for the Batch Feed model, is properly seated. For this reason, you years and years of cleaning or replacement. DO NOT ATTEMPT TO LUBRICATE YOUR DISPOSER. Helpful Hints A. I Your disposer, except for ease of trouble-free service. The disposer...
... parts. TO SPEED UP FOOD WASTE DISPOSAL...Cut or break up large bones, melon rinds, grapefruit skins and corn cobs. A dozen ice cubes sprinkled with a removable splash guard for the Batch Feed model, is properly seated. For this reason, you years and years of cleaning or replacement. DO NOT ATTEMPT TO LUBRICATE YOUR DISPOSER. Helpful Hints A. I Your disposer, except for ease of trouble-free service. The disposer...
Owners Manual
Page 11
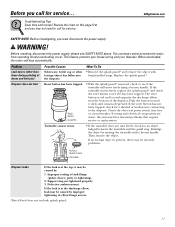
... should overloading occur. Reset Button Serial No. • With the splash guard* removed, check to the disposer. Turntable cannot rotate. • If the turntable does not turn freely, check for service. Support ring not tightened properly. 3. Defective cushion mount. WARNING! Replace the splash guard.* the disposer. Then remove the object. Check the electrical power switch, fuse box or circuit breaker. Improper seating of elbow flange screws. *Batch Feed does not include splash guard. 11 Push the...
... should overloading occur. Reset Button Serial No. • With the splash guard* removed, check to the disposer. Turntable cannot rotate. • If the turntable does not turn freely, check for service. Support ring not tightened properly. 3. Defective cushion mount. WARNING! Replace the splash guard.* the disposer. Then remove the object. Check the electrical power switch, fuse box or circuit breaker. Improper seating of elbow flange screws. *Batch Feed does not include splash guard. 11 Push the...
Owners Manual
Page 12
... installation. I Service trips to your home to teach you will be responsible for home use the product. I Replacement of house fuses or resetting of the original purchase Model Line Series GFC1020: If there is extended to functional parts only (appearance parts are excluded). This warranty is a defect in materials or workmanship relating to functional parts only (appearance parts are excluded). In Alaska, the warranty excludes the cost...
... installation. I Service trips to your home to teach you will be responsible for home use the product. I Replacement of house fuses or resetting of the original purchase Model Line Series GFC1020: If there is extended to functional parts only (appearance parts are excluded). This warranty is a defect in materials or workmanship relating to functional parts only (appearance parts are excluded). In Alaska, the warranty excludes the cost...


