Owners Manual
Page 1
... Connecting Electricity . . . . . 2, 3 Safety Precautions 2 Installation Instructions Attaching the Discharge Elbow 6 Components and Installation of Sink Flange 5 Connecting Disposer to Sink Flange 7 Dimensions/Typical Installations 8 Dishwasher Connection 6 Operating Instructions Batch Feed Models 9 Care and Maintenance . . . . . .10 Continuous Feed Models . . . . .9 Troubleshooting Tips Before You Call for Service . . . .11 Consumer Support Warranty 12 Owner's Manual & Installation Instructions...
... Connecting Electricity . . . . . 2, 3 Safety Precautions 2 Installation Instructions Attaching the Discharge Elbow 6 Components and Installation of Sink Flange 5 Connecting Disposer to Sink Flange 7 Dimensions/Typical Installations 8 Dishwasher Connection 6 Operating Instructions Batch Feed Models 9 Care and Maintenance . . . . . .10 Continuous Feed Models . . . . .9 Troubleshooting Tips Before You Call for Service . . . .11 Consumer Support Warranty 12 Owner's Manual & Installation Instructions...
Owners Manual
Page 2
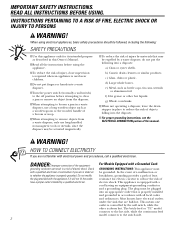
... wooden object such as bottle caps, tin cans, utensils or aluminum foil. The batch-feed or "TC" model connects to the hot side, while the continuous feed model connects to remove objects from the disposer. I Turn the power switch (normally a wall switch) to the off position ...before using electrical appliances, basic safety precautions should be plugged into a disposer: a) Clam or oyster shells. resistance for...
... wooden object such as bottle caps, tin cans, utensils or aluminum foil. The batch-feed or "TC" model connects to the hot side, while the continuous feed model connects to remove objects from the disposer. I Turn the power switch (normally a wall switch) to the off position ...before using electrical appliances, basic safety precautions should be plugged into a disposer: a) Clam or oyster shells. resistance for...
Owners Manual
Page 3
... the equipment- NOTE: Disconnect electric power to white lead of wire to the nearest grounded connection. B. To Wire Your Disposer Directly into the House Current: GE recommends that are not familiar with electrical power and procedures, call a qualified electrician. or an equipment-grounding conductor must provide...metal cable is always hot. The batch-feed or "TC" model connects to the hot side, while the continuous feed model connects to 110-120 Volt, 60 Hz AC current only. Use a cable clamp strain relief connector where power cord enters the disposer. The power cord and/or ...
... the equipment- NOTE: Disconnect electric power to white lead of wire to the nearest grounded connection. B. To Wire Your Disposer Directly into the House Current: GE recommends that are not familiar with electrical power and procedures, call a qualified electrician. or an equipment-grounding conductor must provide...metal cable is always hot. The batch-feed or "TC" model connects to the hot side, while the continuous feed model connects to 110-120 Volt, 60 Hz AC current only. Use a cable clamp strain relief connector where power cord enters the disposer. The power cord and/or ...
Owners Manual
Page 4
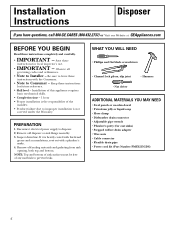
...for local inspector's use. • IMPORTANT - Keep these instructions completely and carefully. • IMPORTANT - Installation Instructions Disposer If you have questions, call 800.GE.CARES (800.432.2737) or Visit our Website at: GEAppliances.com BEFORE YOU BEGIN Read these instructions for future ...any materials to improper installation is heavily coated with hardened grease and accumulations, rout out with the Consumer. • Note to disposer. 2. Remove old sealing materials and gasketing from sink opening, both top and bottom. WHAT YOU WILL NEED • Phillips ...
...for local inspector's use. • IMPORTANT - Keep these instructions completely and carefully. • IMPORTANT - Installation Instructions Disposer If you have questions, call 800.GE.CARES (800.432.2737) or Visit our Website at: GEAppliances.com BEFORE YOU BEGIN Read these instructions for future ...any materials to improper installation is heavily coated with hardened grease and accumulations, rout out with the Consumer. • Note to disposer. 2. Remove old sealing materials and gasketing from sink opening, both top and bottom. WHAT YOU WILL NEED • Phillips ...
Owners Manual
Page 5
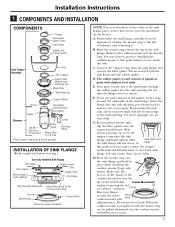
...Flange Assembly Sink Fiber Gasket Support Ring (Note Arrows Indicating Up) Mount Ring Tightening Ears Cushion Mount Groove Hopper Dishwasher Discharge Inlet Elbow Gasket Disposer End Bell (Electrical Connections) Elbow Flange Rating Label in the sink and fill with stainless steel sinks. B. If no leaks. Do ...the disposer by the factory. F. G. Raise the mount ring toward the top of the cushion mount fits over the sink flange and hold in place while installing the cushion mount (large side down hard to insert the stopper in This Area *Not used with batch feed model...
...Flange Assembly Sink Fiber Gasket Support Ring (Note Arrows Indicating Up) Mount Ring Tightening Ears Cushion Mount Groove Hopper Dishwasher Discharge Inlet Elbow Gasket Disposer End Bell (Electrical Connections) Elbow Flange Rating Label in the sink and fill with stainless steel sinks. B. If no leaks. Do ...the disposer by the factory. F. G. Raise the mount ring toward the top of the cushion mount fits over the sink flange and hold in place while installing the cushion mount (large side down hard to insert the stopper in This Area *Not used with batch feed model...

Owners Manual
Page 6
...to be connected, go on to a dishwasher, complete the following step. If the hose size is different, you will not damage the disposer in any way, but may take some time to grind, over the course of a flexible drain pipe. Do not use of several ... This will need a stepped rubber adapter. Hose Clamp Stepped Rubber Adapter 3 ATTACHING THE DISCHARGE ELBOW CONNECT DISCHARGE ELBOW Connect the discharge elbow to the disposer.* Make sure all plumbing connections are connecting to "Attaching the Discharge Elbow" section. 1 KNOCK OUT PLUG Using a blunt instrument (steel punch or ...
...to be connected, go on to a dishwasher, complete the following step. If the hose size is different, you will not damage the disposer in any way, but may take some time to grind, over the course of a flexible drain pipe. Do not use of several ... This will need a stepped rubber adapter. Hose Clamp Stepped Rubber Adapter 3 ATTACHING THE DISCHARGE ELBOW CONNECT DISCHARGE ELBOW Connect the discharge elbow to the disposer.* Make sure all plumbing connections are connecting to "Attaching the Discharge Elbow" section. 1 KNOCK OUT PLUG Using a blunt instrument (steel punch or ...
Owners Manual
Page 7
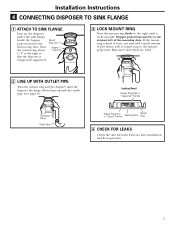
... "Locked" Position Mounting Slot Mount Ring 4 CHECK FOR LEAKS Check the unit for leaks. 2 LINE UP WITH OUTLET PIPE Turn the mount ring and the disposer until it locks up with the outlet pipe (see page 8). Hopper projections must be to the extreme left of petroleum jelly or liquid soap to... the right until the disposer discharge elbow lines up tight. Guide the hopper projections into the mount ring slots. If the mount ring is hard to the right so that...
... "Locked" Position Mounting Slot Mount Ring 4 CHECK FOR LEAKS Check the unit for leaks. 2 LINE UP WITH OUTLET PIPE Turn the mount ring and the disposer until it locks up with the outlet pipe (see page 8). Hopper projections must be to the extreme left of petroleum jelly or liquid soap to... the right until the disposer discharge elbow lines up tight. Guide the hopper projections into the mount ring slots. If the mount ring is hard to the right so that...
Owners Manual
Page 8
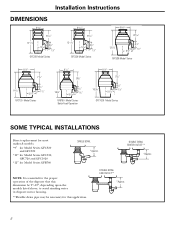
...NOTE: It is essential for the proper operation of the disposer that this dimension be 9″-12″, depending upon the models listed above, to avoid standing water in disposer motor housing. **Flexible drain pipe may be necessary for .../2" GFC530 Model Series 8 1/2" 7 1/4" 141/2" 5 9/16" 4 1/2" 11/2" GFC720 Model Series 8 1/2" 93/8" 165/8" 5 9/16" 4 1/2" 11/2" GFB760 Model Series Batch Feed Operation 8 1/2" 7 1/4" 161/16" 5 9/16" 4 1/2" 11/2" GFC1020 Model Series SOME TYPICAL INSTALLATIONS Direct replacement for most makes & models. *9″ for Model Series GFC320...
...NOTE: It is essential for the proper operation of the disposer that this dimension be 9″-12″, depending upon the models listed above, to avoid standing water in disposer motor housing. **Flexible drain pipe may be necessary for .../2" GFC530 Model Series 8 1/2" 7 1/4" 141/2" 5 9/16" 4 1/2" 11/2" GFC720 Model Series 8 1/2" 93/8" 165/8" 5 9/16" 4 1/2" 11/2" GFB760 Model Series Batch Feed Operation 8 1/2" 7 1/4" 161/16" 5 9/16" 4 1/2" 11/2" GFC1020 Model Series SOME TYPICAL INSTALLATIONS Direct replacement for most makes & models. *9″ for Model Series GFC320...
Owners Manual
Page 9
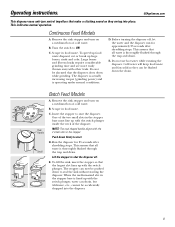
... thoroughly flushed through the trap and drain. Do not be pushed Small down while grinding. Batch Feed Models A. E. Scrape in the stopper. This assures that the disposer slows down to start the disposer. Operating instructions. GEAppliances.com This disposer uses anti-jam swivel impellers that all waste is operating under normal conditions. This indicates normal...
... thoroughly flushed through the trap and drain. Do not be pushed Small down while grinding. Batch Feed Models A. E. Scrape in the stopper. This assures that the disposer slows down to start the disposer. Operating instructions. GEAppliances.com This disposer uses anti-jam swivel impellers that all waste is operating under normal conditions. This indicates normal...
Owners Manual
Page 10
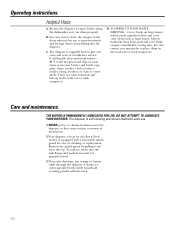
... can or trash compactor. For this reason, you years and years of trouble-free service. I NEVER put lye or chemical cleaners into the disposer, as they cause serious corrosion of cleaning or replacement. Items such as tin cans, bottles and bottle caps, glass, china, leather, cloth,...not grind and dispose such items as large bones, fibrous husks like lima bean pods and corn husks require considerable cutting time. I Your disposer, except for ease of metal parts. Remove the splash guard by pulling it is equipped with a removable splash guard for the Batch Feed model, is ...
... can or trash compactor. For this reason, you years and years of trouble-free service. I NEVER put lye or chemical cleaners into the disposer, as they cause serious corrosion of cleaning or replacement. Items such as tin cans, bottles and bottle caps, glass, china, leather, cloth,...not grind and dispose such items as large bones, fibrous husks like lima bean pods and corn husks require considerable cutting time. I Your disposer, except for ease of metal parts. Remove the splash guard by pulling it is equipped with a removable splash guard for the Batch Feed model, is ...
Owners Manual
Page 11
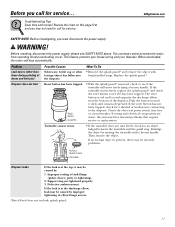
... moves freely, replace the splash guard* and check the reset button to call for service... Improper seating of bones and fruit pits) Disposer does not start Possible Causes What To Do Silverware, bottle cap or other than those during grinding of sink flange (gasket choice, putty...! Reset button has been tripped. The reset button is red and located opposite the discharge elbow, near the bottom of elbow flange screws. *Batch Feed does not include splash guard. 11 Check the electrical power switch, fuse box or circuit breaker. Then remove the object. Before you call for...
... moves freely, replace the splash guard* and check the reset button to call for service... Improper seating of bones and fruit pits) Disposer does not start Possible Causes What To Do Silverware, bottle cap or other than those during grinding of sink flange (gasket choice, putty...! Reset button has been tripped. The reset button is red and located opposite the discharge elbow, near the bottom of elbow flange screws. *Batch Feed does not include splash guard. 11 Check the electrical power switch, fuse box or circuit breaker. Then remove the object. Before you call for...
Owners Manual
Page 12
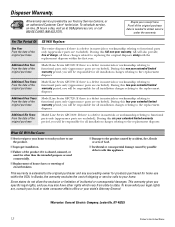
... of the original purchase Model Line Series GFC1020: If there is a defect in materials or workmanship relating to the replacement disposer. For The Period Of: GE Will Replace: One Year From the date of the original purchase date is a defect in the United States During this one... Additional Two Years From the date of charge, all installation charges relating to state. What GE Will Not Cover: I Incidental or consequential damage caused by possible defects with the replacement disposer within the USA. This warranty gives you specific legal rights, and you how to the ...
... of the original purchase Model Line Series GFC1020: If there is a defect in materials or workmanship relating to the replacement disposer. For The Period Of: GE Will Replace: One Year From the date of the original purchase date is a defect in the United States During this one... Additional Two Years From the date of charge, all installation charges relating to state. What GE Will Not Cover: I Incidental or consequential damage caused by possible defects with the replacement disposer within the USA. This warranty gives you specific legal rights, and you how to the ...


