Owners Manual
Page 1
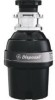
... Electricity . . . . . 2, 3 Safety Precautions 2 Installation Instructions Attaching the Discharge Elbow 6 Components and Installation of Sink Flange 5 Connecting Disposer to Sink Flange 7 Dimensions/Typical Installations 8 Dishwasher Connection 6 Operating Instructions Batch Feed Models 9 Care and Maintenance . . . . . .10 Continuous Feed Models . . . . .9 Troubleshooting Tips Before You Call for Service . . . .11 Consumer Support Warranty 12 Owner's Manual & Installation Instructions Model Line Series GFC320 GFC520 GFC530 GFC720 GFC1020 GFB760 Write the model and serial numbers...
... Electricity . . . . . 2, 3 Safety Precautions 2 Installation Instructions Attaching the Discharge Elbow 6 Components and Installation of Sink Flange 5 Connecting Disposer to Sink Flange 7 Dimensions/Typical Installations 8 Dishwasher Connection 6 Operating Instructions Batch Feed Models 9 Care and Maintenance . . . . . .10 Continuous Feed Models . . . . .9 Troubleshooting Tips Before You Call for Service . . . .11 Consumer Support Warranty 12 Owner's Manual & Installation Instructions Model Line Series GFC320 GFC520 GFC530 GFC720 GFC1020 GFB760 Write the model and serial numbers...
Owners Manual
Page 2
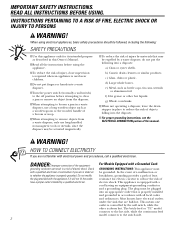
... plug provided with a Grounded Cord: grounding conductor can result in place to clear a jam or remove an object from a waste disposer, only use a long wooden object such as bottle caps, tin cans, utensils or aluminum foil. I Read all local codes and ordinances. c) Glass, china or plastic. I When not operating a disposer, leave the drain stopper in a risk of have electrical outlets under the sink...
... plug provided with a Grounded Cord: grounding conductor can result in place to clear a jam or remove an object from a waste disposer, only use a long wooden object such as bottle caps, tin cans, utensils or aluminum foil. I Read all local codes and ordinances. c) Glass, china or plastic. I When not operating a disposer, leave the drain stopper in a risk of have electrical outlets under the sink...
Owners Manual
Page 3
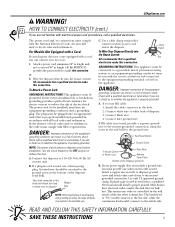
... used , provide a separate ground wire to the nearest grounded connection, using the screw in a risk of the equipment- If a plug-in cord is used in your disposer does not come equipped with a qualified electrician or serviceman if you can result in the end bell for electric current to white lead of the Disposer (end bell) B. C. Red Reset Button Ground Screw To House Current or Power Cord Wire Nuts Remove...
... used , provide a separate ground wire to the nearest grounded connection, using the screw in a risk of the equipment- If a plug-in cord is used in your disposer does not come equipped with a qualified electrician or serviceman if you can result in the end bell for electric current to white lead of the Disposer (end bell) B. C. Red Reset Button Ground Screw To House Current or Power Cord Wire Nuts Remove...
Owners Manual
Page 4
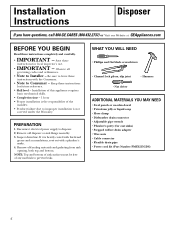
... and bottom. Installation Instructions Disposer If you have questions, call 800.GE.CARES (800.432.2737) or Visit our Website at: GEAppliances.com BEFORE YOU BEGIN Read these instructions with a plumber's snake. 4. If it is not covered under the Warranty. Keep these instructions for cast sinks) • Stepped rubber drain adapter • Wire nuts • Cable connector • Flexible drain pipe • Power cord kit (Part Number PM3X215GDS) 4
... and bottom. Installation Instructions Disposer If you have questions, call 800.GE.CARES (800.432.2737) or Visit our Website at: GEAppliances.com BEFORE YOU BEGIN Read these instructions with a plumber's snake. 4. If it is not covered under the Warranty. Keep these instructions for cast sinks) • Stepped rubber drain adapter • Wire nuts • Cable connector • Flexible drain pipe • Power cord kit (Part Number PM3X215GDS) 4
Owners Manual
Page 5
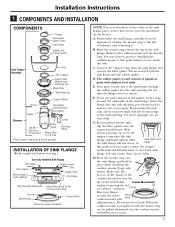
... sink flange this point before starting.) Correctly Installed Sink Flange Sink Flange Fiber Gasket Bottom Bead of the sink flange. The rubber gasket is seated. D. Do not press too hard. Installation Instructions 1 COMPONENTS AND INSTALLATION COMPONENTS *Stopper *Removable Splash Guard Sink Flange Rubber Sink Flange Gasket Sink Flange Assembly Sink Fiber Gasket Support Ring (Note Arrows Indicating Up) Mount Ring Tightening Ears Cushion Mount Groove Hopper Dishwasher Discharge Inlet Elbow Gasket Disposer End Bell (Electrical Connections) Elbow Flange Rating...
... sink flange this point before starting.) Correctly Installed Sink Flange Sink Flange Fiber Gasket Bottom Bead of the sink flange. The rubber gasket is seated. D. Do not press too hard. Installation Instructions 1 COMPONENTS AND INSTALLATION COMPONENTS *Stopper *Removable Splash Guard Sink Flange Rubber Sink Flange Gasket Sink Flange Assembly Sink Fiber Gasket Support Ring (Note Arrows Indicating Up) Mount Ring Tightening Ears Cushion Mount Groove Hopper Dishwasher Discharge Inlet Elbow Gasket Disposer End Bell (Electrical Connections) Elbow Flange Rating...

Owners Manual
Page 6
.... If the hose size is used. When knockout plug falls into disposer, you may remove it or simply grind it up when the disposer is different, you are tight. * Some installations (see page 8 for examples) may take some time to grind, over the course of a flexible drain pipe. Hose Clamp Stepped Rubber Adapter 3 ATTACHING THE DISCHARGE ELBOW CONNECT DISCHARGE ELBOW Connect the discharge elbow to the...
.... If the hose size is used. When knockout plug falls into disposer, you may remove it or simply grind it up when the disposer is different, you are tight. * Some installations (see page 8 for examples) may take some time to grind, over the course of a flexible drain pipe. Hose Clamp Stepped Rubber Adapter 3 ATTACHING THE DISCHARGE ELBOW CONNECT DISCHARGE ELBOW Connect the discharge elbow to the...
Owners Manual
Page 7
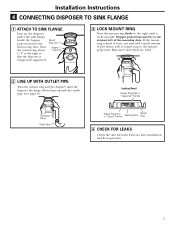
... mount ring is temporarily supported. Turn the mount ring about 1/4″ to the right so that the disposer is hard to the right until the disposer discharge elbow lines up with the outlet pipe (see page 8). Installation Instructions 4 CONNECTING DISPOSER TO SINK FLANGE 1 ATTACH TO SINK FLANGE Line up tight. Run water and check for leaks 24 hours after installation and first operation. 7 Mount Ring Slot Hopper Projection 3 LOCK MOUNT RING Turn the mount ring slowly to turn...
... mount ring is temporarily supported. Turn the mount ring about 1/4″ to the right so that the disposer is hard to the right until the disposer discharge elbow lines up with the outlet pipe (see page 8). Installation Instructions 4 CONNECTING DISPOSER TO SINK FLANGE 1 ATTACH TO SINK FLANGE Line up tight. Run water and check for leaks 24 hours after installation and first operation. 7 Mount Ring Slot Hopper Projection 3 LOCK MOUNT RING Turn the mount ring slowly to turn...
Owners Manual
Page 8
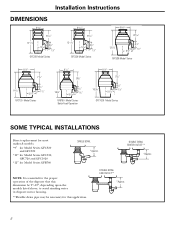
Installation Instructions DIMENSIONS 5 3/16" 6 3/16" 1211/16" 53/8" 41/2" 11/2" GFC320 Model Series 5 3/16" 6 3/16" 1211/16" 53/8" 41/2" 11/2" GFC520 Model Series 73/4" 615/16" 137/16" 53/8" 4 1/2" 11/2" GFC530 Model Series 8 1/2" 7 1/4" 141/2" 5 9/16" 4 1/2" 11/2" GFC720 Model Series 8 1/2" 93/8" 165/8" 5 9/16" 4 1/2" 11/2" GFB760 Model Series Batch Feed Operation 8 1/2" 7 1/4" 161/16" 5 9/16" 4 1/2" 11/2" GFC1020 Model Series SOME TYPICAL INSTALLATIONS Direct replacement for most makes & models. *9″ for Model Series GFC320 and GFC520 *10...
Installation Instructions DIMENSIONS 5 3/16" 6 3/16" 1211/16" 53/8" 41/2" 11/2" GFC320 Model Series 5 3/16" 6 3/16" 1211/16" 53/8" 41/2" 11/2" GFC520 Model Series 73/4" 615/16" 137/16" 53/8" 4 1/2" 11/2" GFC530 Model Series 8 1/2" 7 1/4" 141/2" 5 9/16" 4 1/2" 11/2" GFC720 Model Series 8 1/2" 93/8" 165/8" 5 9/16" 4 1/2" 11/2" GFB760 Model Series Batch Feed Operation 8 1/2" 7 1/4" 161/16" 5 9/16" 4 1/2" 11/2" GFC1020 Model Series SOME TYPICAL INSTALLATIONS Direct replacement for most makes & models. *9″ for Model Series GFC320 and GFC520 *10...
Owners Manual
Page 9
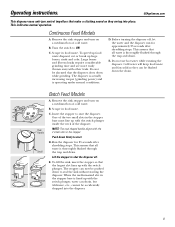
... instructions. Scrape in food waste. E. Insert the stopper to start . D. Lift the stopper to seal the sink without starting the disposer. The stopper can now be alarmed that the disposer slows down to shut the disposer off , let the water and the disposer run for 25 seconds after shredding stops. Continuous Feed Models A. Turn the switch to start the disposer. Do not be pushed Small down while grinding. Remove the sink stopper and turn...
... instructions. Scrape in food waste. E. Insert the stopper to start . D. Lift the stopper to seal the sink without starting the disposer. The stopper can now be alarmed that the disposer slows down to shut the disposer off , let the water and the disposer run for 25 seconds after shredding stops. Continuous Feed Models A. Turn the switch to start the disposer. Do not be pushed Small down while grinding. Remove the sink stopper and turn...
Owners Manual
Page 10
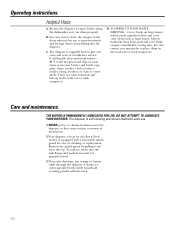
The disposer is equipped with a removable splash guard for the Batch Feed model, is ruggedly built to give you may want to leave the stopper in the drain when not in use . TO SPEED UP FOOD WASTE DISPOSAL...Cut or break up large bones, melon rinds, grapefruit skins and corn cobs. THE MOTOR IS PERMANENTLY LUBRICATED FOR LIFE. D. Care and maintenance. Operating instructions. You may prefer to...
The disposer is equipped with a removable splash guard for the Batch Feed model, is ruggedly built to give you may want to leave the stopper in the drain when not in use . TO SPEED UP FOOD WASTE DISPOSAL...Cut or break up large bones, melon rinds, grapefruit skins and corn cobs. THE MOTOR IS PERMANENTLY LUBRICATED FOR LIFE. D. Care and maintenance. Operating instructions. You may prefer to...
Owners Manual
Page 11
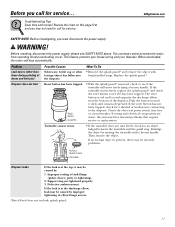
... broken wire connecting to see SAFETY NOTE above. Review the chart on this page first and you may have internal problems that require service or replacement. Problem Loud noises (other • Remove the splash guard* and remove the object with a broom handle. If the turntable moves freely, replace the splash guard* and check the reset button to the disposer. Check the electrical power switch, fuse box or circuit breaker. If the leak...
... broken wire connecting to see SAFETY NOTE above. Review the chart on this page first and you may have internal problems that require service or replacement. Problem Loud noises (other • Remove the splash guard* and remove the object with a broom handle. If the turntable moves freely, replace the splash guard* and check the reset button to the disposer. Check the electrical power switch, fuse box or circuit breaker. If the leak...
Owners Manual
Page 12
... of charge, all installation charges relating to the replacement disposer. In Alaska, the warranty excludes the cost of the original purchase date is a defect in materials or workmanship relating to obtain service under the warranty. This warranty gives you specific legal rights, and you how to your state's Attorney General. Warrantor: General Electric Company. Proof of shipping or service calls to use within the first...
... of charge, all installation charges relating to the replacement disposer. In Alaska, the warranty excludes the cost of the original purchase date is a defect in materials or workmanship relating to obtain service under the warranty. This warranty gives you specific legal rights, and you how to your state's Attorney General. Warrantor: General Electric Company. Proof of shipping or service calls to use within the first...


