Owners Manual
Page 1
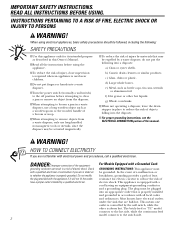
... Connecting Electricity . . . . . 2, 3 Safety Precautions 2 Installation Instructions Attaching the Discharge Elbow 6 Components and Installation of Sink Flange 5 Connecting Disposer to Sink Flange 7 Dimensions/Typical Installations 8 Dishwasher Connection 6 Operating Instructions Batch Feed Models 9 Care and Maintenance . . . . . .10 Continuous Feed Models . . . . .9 Troubleshooting Tips Before You Call for Service . . . .11 Consumer Support Warranty 12 Owner's Manual & Installation Instructions...
... Connecting Electricity . . . . . 2, 3 Safety Precautions 2 Installation Instructions Attaching the Discharge Elbow 6 Components and Installation of Sink Flange 5 Connecting Disposer to Sink Flange 7 Dimensions/Typical Installations 8 Dishwasher Connection 6 Operating Instructions Batch Feed Models 9 Care and Maintenance . . . . . .10 Continuous Feed Models . . . . .9 Troubleshooting Tips Before You Call for Service . . . .11 Consumer Support Warranty 12 Owner's Manual & Installation Instructions...
Owners Manual
Page 2
... be expelled by materials that are half-hot. The batch-feed or "TC" model connects to the hot side, while the continuous feed model connects to reduce the risk of a broom or mop. c) Glass, china or plastic. I When attempting to remove objects from the disposer. For Models Equipped with a Grounded Cord: grounding conductor can...
... be expelled by materials that are half-hot. The batch-feed or "TC" model connects to the hot side, while the continuous feed model connects to reduce the risk of a broom or mop. c) Glass, china or plastic. I When attempting to remove objects from the disposer. For Models Equipped with a Grounded Cord: grounding conductor can...
Owners Manual
Page 3
...lead connected to make this connection. READ AND FOLLOW THIS SAFETY INFORMATION CAREFULLY. The power cord and/or connections must be grounded. GE Kit #PM3X115 provides the parts needed to this blade and attach that a qualified electrician make this connection. In the event of...home, a qualified electrician should be connected to the ground screw in doubt as to disposer circuit before installation. The batch-feed or "TC" model connects to the hot side, while the continuous feed model connects to the OFF position or remove the fuse. NOTE: Disconnect electric power to...
...lead connected to make this connection. READ AND FOLLOW THIS SAFETY INFORMATION CAREFULLY. The power cord and/or connections must be grounded. GE Kit #PM3X115 provides the parts needed to this blade and attach that a qualified electrician make this connection. In the event of...home, a qualified electrician should be connected to the ground screw in doubt as to disposer circuit before installation. The batch-feed or "TC" model connects to the hot side, while the continuous feed model connects to the OFF position or remove the fuse. NOTE: Disconnect electric power to...
Owners Manual
Page 4
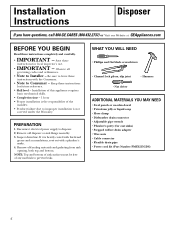
... with hardened grease and accumulations, rout out with the Consumer. • Note to Consumer - Be sure to prevent leaks. Remove old disposer or sink flange assembly. 3. WHAT YOU WILL NEED • Phillips and flat blade screwdrivers • Channel lock pliers, slip joint &#...8226; Cable connector • Flexible drain pipe • Power cord kit (Part Number PM3X215GDS) 4 PREPARATION 1. Installation Instructions Disposer If you have questions, call 800.GE.CARES (800.432.2737) or Visit our Website at: GEAppliances.com BEFORE YOU BEGIN Read these instructions for local inspector's...
... with hardened grease and accumulations, rout out with the Consumer. • Note to Consumer - Be sure to prevent leaks. Remove old disposer or sink flange assembly. 3. WHAT YOU WILL NEED • Phillips and flat blade screwdrivers • Channel lock pliers, slip joint &#...8226; Cable connector • Flexible drain pipe • Power cord kit (Part Number PM3X215GDS) 4 PREPARATION 1. Installation Instructions Disposer If you have questions, call 800.GE.CARES (800.432.2737) or Visit our Website at: GEAppliances.com BEFORE YOU BEGIN Read these instructions for local inspector's...
Owners Manual
Page 5
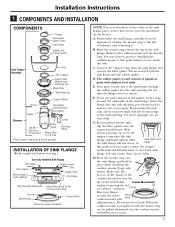
... Up) Mount Ring Tightening Ears Cushion Mount Groove Hopper Dishwasher Discharge Inlet Elbow Gasket Disposer End Bell (Electrical Connections) Elbow Flange Rating Label in This Area *Not used with batch feed model Screws Discharge Elbow INSTALLATION OF SINK FLANGE (Read completely before you use putty instead... the sink, trim off excess putty flush with the bottom edge of the sink flange. D. F. Unscrew the support ring from the disposer by the factory. Do not turn . 5 You may want to practice installing the cushion mount at this point before starting.) Correctly ...
... Up) Mount Ring Tightening Ears Cushion Mount Groove Hopper Dishwasher Discharge Inlet Elbow Gasket Disposer End Bell (Electrical Connections) Elbow Flange Rating Label in This Area *Not used with batch feed model Screws Discharge Elbow INSTALLATION OF SINK FLANGE (Read completely before you use putty instead... the sink, trim off excess putty flush with the bottom edge of the sink flange. D. F. Unscrew the support ring from the disposer by the factory. Do not turn . 5 You may want to practice installing the cushion mount at this point before starting.) Correctly ...

Owners Manual
Page 6
Hose Clamp Stepped Rubber Adapter 3 ATTACHING THE DISCHARGE ELBOW CONNECT DISCHARGE ELBOW Connect the discharge elbow to the disposer.* Make sure all plumbing connections are connecting to a dishwasher, complete the following step. This will need a stepped rubber adapter. Knock out plug ...hose size is used. Rubber Gasket Discharge Elbow 6 Do not use of several uses. When knockout plug falls into disposer, you may remove it or simply grind it up when the disposer is different, you are tight. * Some installations (see page 8 for examples) may take some time to "...
Hose Clamp Stepped Rubber Adapter 3 ATTACHING THE DISCHARGE ELBOW CONNECT DISCHARGE ELBOW Connect the discharge elbow to the disposer.* Make sure all plumbing connections are connecting to a dishwasher, complete the following step. This will need a stepped rubber adapter. Knock out plug ...hose size is used. Rubber Gasket Discharge Elbow 6 Do not use of several uses. When knockout plug falls into disposer, you may remove it or simply grind it up when the disposer is different, you are tight. * Some installations (see page 8 for examples) may take some time to "...
Owners Manual
Page 7
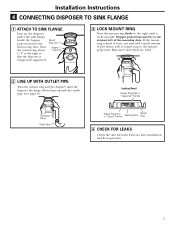
... a small amount of the mounting slots. Hopper projections must be to the extreme left of petroleum jelly or liquid soap to the right until the disposer discharge elbow lines up with the outlet pipe (see page 8). If the mount ring is temporarily supported. Installation Instructions 4 CONNECTING... DISPOSER TO SINK FLANGE 1 ATTACH TO SINK FLANGE Line up tight. Mount Ring Slot Hopper Projection 3 LOCK MOUNT RING Turn the mount ring slowly to the ...
... a small amount of the mounting slots. Hopper projections must be to the extreme left of petroleum jelly or liquid soap to the right until the disposer discharge elbow lines up with the outlet pipe (see page 8). If the mount ring is temporarily supported. Installation Instructions 4 CONNECTING... DISPOSER TO SINK FLANGE 1 ATTACH TO SINK FLANGE Line up tight. Mount Ring Slot Hopper Projection 3 LOCK MOUNT RING Turn the mount ring slowly to the ...
Owners Manual
Page 8
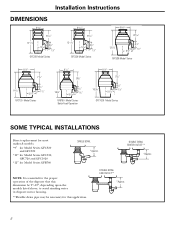
... 4 1/2" 11/2" GFC530 Model Series 8 1/2" 7 1/4" 141/2" 5 9/16" 4 1/2" 11/2" GFC720 Model Series 8 1/2" 93/8" 165/8" 5 9/16" 4 1/2" 11/2" GFB760 Model Series Batch Feed Operation 8 1/2" 7 1/4" 161/16" 5 9/16" 4 1/2" 11/2" GFC1020 Model Series SOME TYPICAL INSTALLATIONS Direct replacement for most makes & models. *9″ for Model Series GFC320 and GFC520 .... DOUBLE BOWL CENTER OUTLET** *Approx. NOTE: It is essential for the proper operation of the disposer that this dimension be 9″-12″, depending upon the models listed above, to avoid standing water in...
... 4 1/2" 11/2" GFC530 Model Series 8 1/2" 7 1/4" 141/2" 5 9/16" 4 1/2" 11/2" GFC720 Model Series 8 1/2" 93/8" 165/8" 5 9/16" 4 1/2" 11/2" GFB760 Model Series Batch Feed Operation 8 1/2" 7 1/4" 161/16" 5 9/16" 4 1/2" 11/2" GFC1020 Model Series SOME TYPICAL INSTALLATIONS Direct replacement for most makes & models. *9″ for Model Series GFC320 and GFC520 .... DOUBLE BOWL CENTER OUTLET** *Approx. NOTE: It is essential for the proper operation of the disposer that this dimension be 9″-12″, depending upon the models listed above, to avoid standing water in...
Owners Manual
Page 9
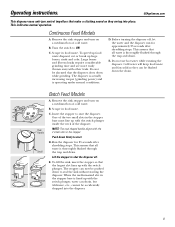
...Push down while grinding. Continuous Feed Models A. Turn the switch to seal the sink without starting the disposer. To speed up food waste disposal, cut or break up with the switch plunger. This assures that the disposer slows down firmly to start the disposer. Batch Feed Models A. Lift the stopper ...to start . To fill the sink, insert the stopper so that the largest slot lines up with the switch plunger inside the neck of the disposer. Remove the sink...
...Push down while grinding. Continuous Feed Models A. Turn the switch to seal the sink without starting the disposer. To speed up food waste disposal, cut or break up with the switch plunger. This assures that the disposer slows down firmly to start the disposer. Batch Feed Models A. Lift the stopper ...to start . To fill the sink, insert the stopper so that the largest slot lines up with the switch plunger inside the neck of the disposer. Remove the sink...
Owners Manual
Page 10
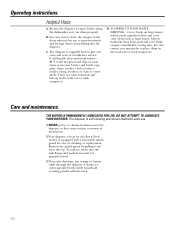
... down until it will not grind and dispose such items as tin cans, bottles and bottle caps, glass, china, leather, cloth, crockery, rubber, string, feathers, or clam or oyster shells. It will also work. 10 I Your disposer, except for the Batch Feed model, is properly seated. B. TO ...SPEED UP FOOD WASTE DISPOSAL...Cut or break up large bones, melon rinds, grapefruit skins and corn cobs. I NEVER put lye or chemical...
... down until it will not grind and dispose such items as tin cans, bottles and bottle caps, glass, china, leather, cloth, crockery, rubber, string, feathers, or clam or oyster shells. It will also work. 10 I Your disposer, except for the Batch Feed model, is properly seated. B. TO ...SPEED UP FOOD WASTE DISPOSAL...Cut or break up large bones, melon rinds, grapefruit skins and corn cobs. I NEVER put lye or chemical...
Owners Manual
Page 11
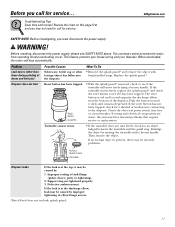
... (other than those during grinding of elbow flange screws. *Batch Feed does not include splash guard. 11 If the turntable moves freely, replace the splash guard* and check the reset button to see if the turntable will stop automatically. Improper seating of the disposer. WARNING! This feature protects your house wiring and your...
... (other than those during grinding of elbow flange screws. *Batch Feed does not include splash guard. 11 If the turntable moves freely, replace the splash guard* and check the reset button to see if the turntable will stop automatically. Improper seating of the disposer. WARNING! This feature protects your house wiring and your...
Owners Manual
Page 12
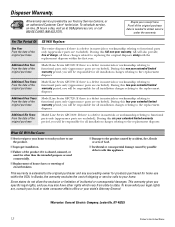
... or state consumer affairs office or your receipt here. I Incidental or consequential damage caused by possible defects with the replacement disposer within the USA. I Improper installation. In Alaska, the warranty excludes the cost of the original purchase Model Line Series ...this appliance. I Damage to functional parts only (appearance parts are excluded). Disposer Warranty. During this one -year warranty, GE will be responsible for all installation charges relating to the replacement disposer. Additional Two Years From the date of shipping or service calls to state...
... or state consumer affairs office or your receipt here. I Incidental or consequential damage caused by possible defects with the replacement disposer within the USA. I Improper installation. In Alaska, the warranty excludes the cost of the original purchase Model Line Series ...this appliance. I Damage to functional parts only (appearance parts are excluded). Disposer Warranty. During this one -year warranty, GE will be responsible for all installation charges relating to the replacement disposer. Additional Two Years From the date of shipping or service calls to state...


