Owners Manual
Page 1
... Instructions Connecting Electricity . . . . . 2, 3 Safety Precautions 2 Installation Instructions Attaching the Discharge Elbow 6 Components and Installation of Sink Flange 5 Connecting Disposer to Sink Flange 7 Dimensions/Typical Installations 8 Dishwasher Connection 6 Operating Instructions Batch Feed Models 9 Care and Maintenance . . . . . .10 Continuous Feed Models . . . . .9 Troubleshooting Tips Before You Call for Service . . . .11 Consumer Support Warranty 12 Owner's Manual & Installation Instructions...
... Instructions Connecting Electricity . . . . . 2, 3 Safety Precautions 2 Installation Instructions Attaching the Discharge Elbow 6 Components and Installation of Sink Flange 5 Connecting Disposer to Sink Flange 7 Dimensions/Typical Installations 8 Dishwasher Connection 6 Operating Instructions Batch Feed Models 9 Care and Maintenance . . . . . .10 Continuous Feed Models . . . . .9 Troubleshooting Tips Before You Call for Service . . . .11 Consumer Support Warranty 12 Owner's Manual & Installation Instructions...
Owners Manual
Page 4
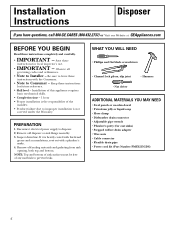
...; Hammer ADDITIONAL MATERIALS YOU MAY NEED • Steel punch or wooden dowel • Petroleum jelly or liquid soap • Hose clamp • Dishwasher drain connector • Adjustable pipe wrench • Plumber's putty (for cast sinks) • Stepped rubber drain adapter • Wire nuts •... bottom of sink surfaces must be free of the installer. • Product failure due to Installer - Installation Instructions Disposer If you have questions, call 800.GE.CARES (800.432.2737) or Visit our Website at: GEAppliances.com BEFORE YOU BEGIN Read these instructions for local ...
...; Hammer ADDITIONAL MATERIALS YOU MAY NEED • Steel punch or wooden dowel • Petroleum jelly or liquid soap • Hose clamp • Dishwasher drain connector • Adjustable pipe wrench • Plumber's putty (for cast sinks) • Stepped rubber drain adapter • Wire nuts •... bottom of sink surfaces must be free of the installer. • Product failure due to Installer - Installation Instructions Disposer If you have questions, call 800.GE.CARES (800.432.2737) or Visit our Website at: GEAppliances.com BEFORE YOU BEGIN Read these instructions for local ...
Owners Manual
Page 5
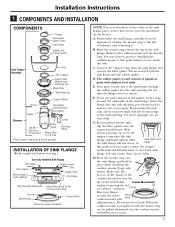
...(Note Arrows Indicating Up) Mount Ring Tightening Ears Cushion Mount Groove Hopper Dishwasher Discharge Inlet Elbow Gasket Disposer End Bell (Electrical Connections) Elbow Flange Rating Label in This Area *Not used with batch feed model Screws Discharge Elbow INSTALLATION OF SINK FLANGE (Read completely before you are... no leaks. G. H.Place the mount ring over the cushion mount and will not move up and down ). Unscrew the support ring from the disposer by the factory. From under the sink. B. Raise the mount ring toward the top of the sink opening , press down hard to turn...
...(Note Arrows Indicating Up) Mount Ring Tightening Ears Cushion Mount Groove Hopper Dishwasher Discharge Inlet Elbow Gasket Disposer End Bell (Electrical Connections) Elbow Flange Rating Label in This Area *Not used with batch feed model Screws Discharge Elbow INSTALLATION OF SINK FLANGE (Read completely before you are... no leaks. G. H.Place the mount ring over the cushion mount and will not move up and down ). Unscrew the support ring from the disposer by the factory. From under the sink. B. Raise the mount ring toward the top of the sink opening , press down hard to turn...

Owners Manual
Page 6
...Connect the discharge elbow to a dishwasher, complete the following step. Rubber Gasket Discharge Elbow 6 When knockout plug falls into disposer, you may remove it or simply grind it up when the disposer is different, you will not damage the disposer in any way, but may ...require the use a screwdriver or sharp instrument. If the hose size is used. Installation Instructions 2 DISHWASHER CONNECTION (IF REQUIRED) If you are connecting to the disposer.* Make sure all plumbing connections are tight. * Some installations (see page 8 for examples) may take some...
...Connect the discharge elbow to a dishwasher, complete the following step. Rubber Gasket Discharge Elbow 6 When knockout plug falls into disposer, you may remove it or simply grind it up when the disposer is different, you will not damage the disposer in any way, but may ...require the use a screwdriver or sharp instrument. If the hose size is used. Installation Instructions 2 DISHWASHER CONNECTION (IF REQUIRED) If you are connecting to the disposer.* Make sure all plumbing connections are tight. * Some installations (see page 8 for examples) may take some...
Owners Manual
Page 10
...dishwasher so it is ruggedly built to give you may want to leave the stopper in the drain when not in use . B. The disposer is properly seated. These are waste materials and belong in the trash can or trash compactor. DO NOT ATTEMPT TO LUBRICATE YOUR DISPOSER. I Your disposer, except for the Batch Feed... model, is self cleaning and scours itself with a little household scouring powder will also work. 10 To replace, insert into the disposer. You may prefer to prevent utensils and ...
...dishwasher so it is ruggedly built to give you may want to leave the stopper in the drain when not in use . B. The disposer is properly seated. These are waste materials and belong in the trash can or trash compactor. DO NOT ATTEMPT TO LUBRICATE YOUR DISPOSER. I Your disposer, except for the Batch Feed... model, is self cleaning and scours itself with a little household scouring powder will also work. 10 To replace, insert into the disposer. You may prefer to prevent utensils and ...
