

Use and Care Manual
Page 1
Trash Compactors GEAppliances.com Safety Instructions 2-3 Operating Instructions Compacting 6 Features 4 Loading 5 Removing a Full Trash Bag 6 Trash Bag Installation 5 Using the Trash Compactor 5-6 Care and Cleaning Cleaning the Unit 7 Troubleshooting Tips 8 Consumer Support Consumer Support 12 Product Registration for Customers in Canada 9, 10 Warranty 11 Owner's Manual GCG1500 GCG1580 GCG1700 Write the model and serial numbers here: Model Serial You can find them on the label on the front of the frame. 165D4700P385 49-55061-1 09-09 JR
Trash Compactors GEAppliances.com Safety Instructions 2-3 Operating Instructions Compacting 6 Features 4 Loading 5 Removing a Full Trash Bag 6 Trash Bag Installation 5 Using the Trash Compactor 5-6 Care and Cleaning Cleaning the Unit 7 Troubleshooting Tips 8 Consumer Support Consumer Support 12 Product Registration for Customers in Canada 9, 10 Warranty 11 Owner's Manual GCG1500 GCG1580 GCG1700 Write the model and serial numbers here: Model Serial You can find them on the label on the front of the frame. 165D4700P385 49-55061-1 09-09 JR
Use and Care Manual
Page 2
... not overload trash bag with care. WARNING! PRECAUTIONS AGAINST UNREASONABLE USE OF YOUR COMPACTOR: I Do not store or use as a toy, or to prevent property damage, personal injury, or death. READ ALL INSTRUCTIONS BEFORE USING. I Do not compact lit cigarettes, cigars, or other appliance. Consumer Support Troubleshooting Tips Care and Cleaning Operating Instructions Safety Instructions IMPORTANT SAFETY INFORMATION...
... not overload trash bag with care. WARNING! PRECAUTIONS AGAINST UNREASONABLE USE OF YOUR COMPACTOR: I Do not store or use as a toy, or to prevent property damage, personal injury, or death. READ ALL INSTRUCTIONS BEFORE USING. I Do not compact lit cigarettes, cigars, or other appliance. Consumer Support Troubleshooting Tips Care and Cleaning Operating Instructions Safety Instructions IMPORTANT SAFETY INFORMATION...
Use and Care Manual
Page 3
... cord set, plug, motor, or after damage in any servicing be properly installed and located in accordance with 120V, 60Hz and connected to whether the appliance is used . I Do not modify the plug with local codes and ordinances. This appliance must be performed by an authorized service technician. If you did not receive an Installation Instruction Manual, you...
... cord set, plug, motor, or after damage in any servicing be properly installed and located in accordance with 120V, 60Hz and connected to whether the appliance is used . I Do not modify the plug with local codes and ordinances. This appliance must be performed by an authorized service technician. If you did not receive an Installation Instruction Manual, you...
Use and Care Manual
Page 4
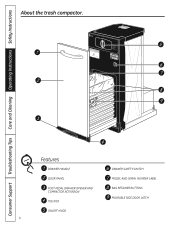
Features DRAWER HANDLE DRAWER SAFETY SWITCH DOOR PANEL MODEL AND SERIAL NUMBER LABEL FOOT PEDAL DRAWER OPENER AND COMPACTOR ACTIVATION TOE KICK BAG RETAINER BUTTONS MOVEABLE SIDE DOOR LATCH ON/OFF KNOB 4 Consumer Support Troubleshooting Tips Care and Cleaning Operating Instructions Safety Instructions About the trash compactor.
Features DRAWER HANDLE DRAWER SAFETY SWITCH DOOR PANEL MODEL AND SERIAL NUMBER LABEL FOOT PEDAL DRAWER OPENER AND COMPACTOR ACTIVATION TOE KICK BAG RETAINER BUTTONS MOVEABLE SIDE DOOR LATCH ON/OFF KNOB 4 Consumer Support Troubleshooting Tips Care and Cleaning Operating Instructions Safety Instructions About the trash compactor.
Use and Care Manual
Page 5
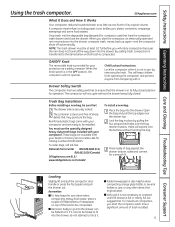
... least 1/2 full before you start the compactor, an electrically-operated ram moves down into the drawer, compacts trash, moves back up again-and the compactor shuts off automatically. Safety Instructions Operating Instructions Care and Cleaning Troubleshooting Tips Consumer Support Using the trash compactor. When the knob switch is in use the specially designed heavy-duty trash bags included with it is added. 5 Child...
... least 1/2 full before you start the compactor, an electrically-operated ram moves down into the drawer, compacts trash, moves back up again-and the compactor shuts off automatically. Safety Instructions Operating Instructions Care and Cleaning Troubleshooting Tips Consumer Support Using the trash compactor. When the knob switch is in use the specially designed heavy-duty trash bags included with it is added. 5 Child...
Use and Care Manual
Page 6
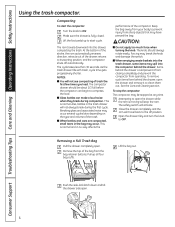
Consumer Support Troubleshooting Tips Care and Cleaning Operating Instructions Safety Instructions Using the trash compactor. The cycle takes less than 30 seconds. As the trash drawer fills with trash, cycle time gets progressively shorter. The knob should be stopped at any time. Removing a Full Trash Bag Pull the drawer completely open . 6 Make sure the drawer is normal. The compactor drawer should always...
Consumer Support Troubleshooting Tips Care and Cleaning Operating Instructions Safety Instructions Using the trash compactor. The cycle takes less than 30 seconds. As the trash drawer fills with trash, cycle time gets progressively shorter. The knob should be stopped at any time. Removing a Full Trash Bag Pull the drawer completely open . 6 Make sure the drawer is normal. The compactor drawer should always...

Use and Care Manual
Page 7
...remove the compactor bag. Liquid spills or wet trash should be away for more than a couple of the drawer until it aside. Painted panels: Apply a coat of the way and set it stops....compactor is needed to give you will be cleaned up liquid. Wear protective gloves. Lift the front to the OFF position and remove it out. Cerama Bryte is available from GE Parts...Note the tracks in which the drawer rollers move. Safety Instructions Operating Instructions Care and Cleaning Troubleshooting Tips Consumer Support Care and cleaning of the cabinet. If you continued satisfaction....
...remove the compactor bag. Liquid spills or wet trash should be away for more than a couple of the drawer until it aside. Painted panels: Apply a coat of the way and set it stops....compactor is needed to give you will be cleaned up liquid. Wear protective gloves. Lift the front to the OFF position and remove it out. Cerama Bryte is available from GE Parts...Note the tracks in which the drawer rollers move. Safety Instructions Operating Instructions Care and Cleaning Troubleshooting Tips Consumer Support Care and cleaning of the cabinet. If you continued satisfaction....
Use and Care Manual
Page 8
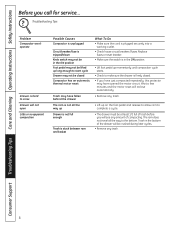
Troubleshooting Tips Problem Compactor won't operate Drawer is hard to complete a cycle. • The drawer must be at least 1/2 full of trash before you will see any trash. 8 The ram does not travel all the way up on the foot pedal and release to allow ram to close Drawer will be in the bottom of compacting. Consumer Support Troubleshooting Tips Care and...
Troubleshooting Tips Problem Compactor won't operate Drawer is hard to complete a cycle. • The drawer must be at least 1/2 full of trash before you will see any trash. 8 The ram does not travel all the way up on the foot pedal and release to allow ram to close Drawer will be in the bottom of compacting. Consumer Support Troubleshooting Tips Care and...
Use and Care Manual
Page 11
...merchantability or fitness for other rights which fails due to an Authorized GE Service location for home use the product. This warranty gives you specific legal rights, and you may be required to bring the product to...serial number and model number available when calling for a trip charge or you how to provide required service. Safety Instructions Operating Instructions Care and Cleaning Troubleshooting Tips Consumer Support Trash Compactor Warranty. I Service trips to replace the defective part. I Improper installation, delivery or maintenance. To schedule service ...
...merchantability or fitness for other rights which fails due to an Authorized GE Service location for home use the product. This warranty gives you specific legal rights, and you may be required to bring the product to...serial number and model number available when calling for a trip charge or you how to provide required service. Safety Instructions Operating Instructions Care and Cleaning Troubleshooting Tips Consumer Support Trash Compactor Warranty. I Service trips to replace the defective part. I Improper installation, delivery or maintenance. To schedule service ...

Use and Care Manual
Page 12
... GE supports the Universal Design concept-products, services and environments that are available while your appliance? For the hearing impaired, please call 1.888.261.2133 Parts and Accessories In the U.S.A. Suite 310, 1 Factory Lane Moncton, N.B. GEAppliances.com Purchase a GE extended warranty and learn about special discounts that can now download Owner's Manuals, order parts or even schedule service...
... GE supports the Universal Design concept-products, services and environments that are available while your appliance? For the hearing impaired, please call 1.888.261.2133 Parts and Accessories In the U.S.A. Suite 310, 1 Factory Lane Moncton, N.B. GEAppliances.com Purchase a GE extended warranty and learn about special discounts that can now download Owner's Manuals, order parts or even schedule service...

Installation Instructions
Page 1
Installation Instructions If you have questions, call 1.800.561.3344 or visit www.GEAppliances.ca. 15" Built-In Compactors GCG1500 BB GCG1500 WW GCG1580 SS GCG1700 II* ZCGP150 II* ZCGS150 SS *For ZCGP150 II and GCG1700 II, also refer to the instructions provided on the template packed with those models. In Canada, call 1.800.GE.Cares (1.800.423.2737) or visit our website at GEAppliances.com in the United States.
Installation Instructions If you have questions, call 1.800.561.3344 or visit www.GEAppliances.ca. 15" Built-In Compactors GCG1500 BB GCG1500 WW GCG1580 SS GCG1700 II* ZCGP150 II* ZCGS150 SS *For ZCGP150 II and GCG1700 II, also refer to the instructions provided on the template packed with those models. In Canada, call 1.800.GE.Cares (1.800.423.2737) or visit our website at GEAppliances.com in the United States.
Installation Instructions
Page 2
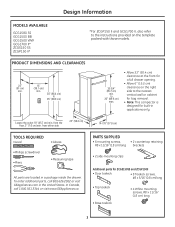
... fall or collect behind the compactor. CONTENTS Design Information Models Available 3 Product Dimensions and Clearances 3 Tools Required 3 Parts Supplied 3 Advance Planning Clearances 4 Models with a Custom Drawer Panel 4 Installation Preparation Electrical Requirements 5 Grounding Requirements 5 Unpacking the Compactor 6 Replacing the Door Toekick 6 Leveling the Compactor 7 Adjusting the Retaining Bracket 7 Adjusting the Base Toekick 7 Installation Instructions Position the Compactor under the Warranty. Do not allow...
... fall or collect behind the compactor. CONTENTS Design Information Models Available 3 Product Dimensions and Clearances 3 Tools Required 3 Parts Supplied 3 Advance Planning Clearances 4 Models with a Custom Drawer Panel 4 Installation Preparation Electrical Requirements 5 Grounding Requirements 5 Unpacking the Compactor 6 Replacing the Door Toekick 6 Leveling the Compactor 7 Adjusting the Retaining Bracket 7 Adjusting the Base Toekick 7 Installation Instructions Position the Compactor under the Warranty. Do not allow...
Installation Instructions
Page 3
... at the front for a full drawer opening. • Allow 6″ (15.2 cm) clearance on the template packed with those models. from the floor, 3" (7.6 cm) min. PARTS SUPPLIED • 6 mounting screws, #8 x 11/16" (1.8 cm) long • 2 countertop retaining brackets • 2 side-mounting clips Additional...II and GCG1700 II, also refer to the instructions provided on the right side to the nearest vertical wall or cabinet for bag removal. • Note: This compactor is designed for built-in a package inside the drawer. To order additional parts, call 1.800.561.3344 or visit www...
... at the front for a full drawer opening. • Allow 6″ (15.2 cm) clearance on the template packed with those models. from the floor, 3" (7.6 cm) min. PARTS SUPPLIED • 6 mounting screws, #8 x 11/16" (1.8 cm) long • 2 countertop retaining brackets • 2 side-mounting clips Additional...II and GCG1700 II, also refer to the instructions provided on the right side to the nearest vertical wall or cabinet for bag removal. • Note: This compactor is designed for built-in a package inside the drawer. To order additional parts, call 1.800.561.3344 or visit www...
Installation Instructions
Page 4
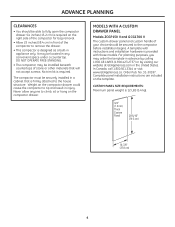
... side of the compactor for bag removal. • Allow 23 inches (58.4 cm) in front of stone or other materials that is 12 LBS (5.4 kg). 3/4" (1.9 cm) Thick Custom Panel 29-5/16" (74.5 cm) 14-7/8" (37.8 cm) 4 No trim kit is provided with instructions and installation hardware is required. Complete panel installation instructions are included on the compactor drawer. Order...
... side of the compactor for bag removal. • Allow 23 inches (58.4 cm) in front of stone or other materials that is 12 LBS (5.4 kg). 3/4" (1.9 cm) Thick Custom Panel 29-5/16" (74.5 cm) 14-7/8" (37.8 cm) 4 No trim kit is provided with instructions and installation hardware is required. Complete panel installation instructions are included on the compactor drawer. Order...
Installation Instructions
Page 5
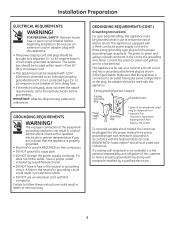
...service representative if you are in use an extension cord or adapter plug with this appliance. 3-prong grounding-type wall receptacle 3-prong grounding plug Grounded outlet Power supply cord Grounding plug Copies of the customer to have a properly grounded three-prong wall receptacle installed...not use to follow these instructions could result in the cord is for use an extension cord with this compactor. • DO NOT ground...to fit the proper grounding-type receptacle. IMPORTANT: Observe all local codes and ordinances. Make sure that the appliance is properly grounded. ...
...service representative if you are in use an extension cord or adapter plug with this appliance. 3-prong grounding-type wall receptacle 3-prong grounding plug Grounded outlet Power supply cord Grounding plug Copies of the customer to have a properly grounded three-prong wall receptacle installed...not use to follow these instructions could result in the cord is for use an extension cord with this compactor. • DO NOT ground...to fit the proper grounding-type receptacle. IMPORTANT: Observe all local codes and ordinances. Make sure that the appliance is properly grounded. ...
Installation Instructions
Page 6
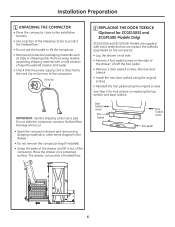
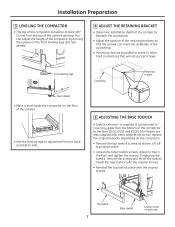
...compactor. Place the drawer on replacing the top toekick and base toekick. Damage will occur. • Open the compactor drawer and remove any shipping materials or other items shipped in the drawer. • Do not remove the compactor bag (if installed)....Check that can scratch a finished floor. 2 REPLACING THE DOOR TOEKICK (Optional for instructions on a protected surface. Lift off the foot pedal. • Remove 2 door toekick screws. Installation Preparation 1 UNPACKING THE COMPACTOR • Move the compactor close to the installation location. • Use a section of the...
...compactor. Place the drawer on replacing the top toekick and base toekick. Damage will occur. • Open the compactor drawer and remove any shipping materials or other items shipped in the drawer. • Do not remove the compactor bag (if installed)....Check that can scratch a finished floor. 2 REPLACING THE DOOR TOEKICK (Optional for instructions on a protected surface. Lift off the foot pedal. • Remove 2 door toekick screws. Installation Preparation 1 UNPACKING THE COMPACTOR • Move the compactor close to the installation location. • Use a section of the...
Installation Instructions
Page 7
...tighten the screws. ZCGS150SS and ZCGP150II Models are provided for stone or other hard countertops that will not accept screws. It can replace the original toekicks assembled on each side Top toekick 7 Base toekick Loosen screw on the compactor. • Remove the top toekick ...leveling legs Countertop Retaining bracket Rear wheels • Place a level inside the compactor on the front leveling legs and rear wheels. 4 ADJUST THE RETAINING BRACKET • Determine installation depth of the compactor beneath the countertop. • Adjust the position of the retaining brackets so...
...tighten the screws. ZCGS150SS and ZCGP150II Models are provided for stone or other hard countertops that will not accept screws. It can replace the original toekicks assembled on each side Top toekick 7 Base toekick Loosen screw on the compactor. • Remove the top toekick ...leveling legs Countertop Retaining bracket Rear wheels • Place a level inside the compactor on the front leveling legs and rear wheels. 4 ADJUST THE RETAINING BRACKET • Determine installation depth of the compactor beneath the countertop. • Adjust the position of the retaining brackets so...
Installation Instructions
Page 9
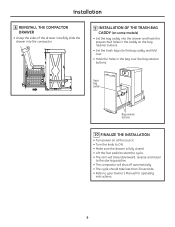
...compactor. 9 INSTALLATION OF THE TRASH BAG CADDY (on some models) • Set the bag caddy into the bag caddy and fold over. • Hook the holes in the caddy on at the source. • Turn the knob to ON. • Make sure the drawer is fully closed. • Lift the foot pedal... to start the cycle. • The ram will travel downward, reverse and return to the starting position. • The compactor will shut off automatically. • The cycle should take less than 30 seconds. • Refer to your Owner's Manual for operating instructions. 9
...compactor. 9 INSTALLATION OF THE TRASH BAG CADDY (on some models) • Set the bag caddy into the bag caddy and fold over. • Hook the holes in the caddy on at the source. • Turn the knob to ON. • Make sure the drawer is fully closed. • Lift the foot pedal... to start the cycle. • The ram will travel downward, reverse and return to the starting position. • The compactor will shut off automatically. • The cycle should take less than 30 seconds. • Refer to your Owner's Manual for operating instructions. 9
Dimensions
Page 1
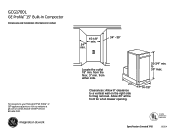
... a full drawer opening. 33-3/4" min. GCG1700L GE Profile™ 15" Built-In Compactor Dimensions and Installation Information (in inches) For answers to your Monogram,® GE Profile™ or GE® appliance questions, visit our website at the front for bag removal. Allow 23" at ge.com or call GE Answer Center® service, 800.626.2000. 15-1/8" min. 24" min...
... a full drawer opening. 33-3/4" min. GCG1700L GE Profile™ 15" Built-In Compactor Dimensions and Installation Information (in inches) For answers to your Monogram,® GE Profile™ or GE® appliance questions, visit our website at the front for bag removal. Allow 23" at ge.com or call GE Answer Center® service, 800.626.2000. 15-1/8" min. 24" min...

Dimensions
Page 2
... custom panel GCG1700LII Specification Created 7/05 250304 The controls are hidden behind the compactor door, lending a beautiful designer appearance • Built-In Only - Powerful motor provides maximum compacting power • Removable Key Lock - Hands-free toe pedal drawer makes it simple to adjacent cabinetry for an upscale appearance • 1.4 Cu. Allow easy movement and installation •...
... custom panel GCG1700LII Specification Created 7/05 250304 The controls are hidden behind the compactor door, lending a beautiful designer appearance • Built-In Only - Powerful motor provides maximum compacting power • Removable Key Lock - Hands-free toe pedal drawer makes it simple to adjacent cabinetry for an upscale appearance • 1.4 Cu. Allow easy movement and installation •...

