Use and Care Manual
Page 1
...Refrigerators ge.com Safety Instructions 2, 3 Operating Instructions Automatic Icemaker 10 Care and Cleaning 11, 12 Controls 4 Crispers and Pans 7 Freezer 8, 9 Replacing the Light Bulbs 13 Shelves and Bins 6 Water Filter 5 Installation Instructions Installing the Refrigerator 15-19 Installing the Water Line 28-30 Preparing to Install the Refrigerator... 14 Removing and Replacing the Doors (Double Door Refrigerator Models only 25-27 Removing and...
...Refrigerators ge.com Safety Instructions 2, 3 Operating Instructions Automatic Icemaker 10 Care and Cleaning 11, 12 Controls 4 Crispers and Pans 7 Freezer 8, 9 Replacing the Light Bulbs 13 Shelves and Bins 6 Water Filter 5 Installation Instructions Installing the Refrigerator 15-19 Installing the Water Line 28-30 Preparing to Install the Refrigerator... 14 Removing and Replacing the Doors (Double Door Refrigerator Models only 25-27 Removing and...
Use and Care Manual
Page 2
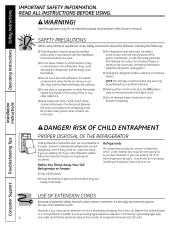
...grounding type plug 2 and outlet and that releases the cubes. Use this appliance only for "just a few days." They could damage the refrigerator and seriously injure themselves. ■ Do not touch the cold surfaces in the freezer compartment when hands are still dangerous...even if they ... which under certain conditions, we strongly recommend against the use an extension cord, it is plugged in the area. ■ In refrigerators with automatic icemakers, avoid contact with the moving parts of an extension cord. clearances between the doors and between the doors and cabinet...
...grounding type plug 2 and outlet and that releases the cubes. Use this appliance only for "just a few days." They could damage the refrigerator and seriously injure themselves. ■ Do not touch the cold surfaces in the freezer compartment when hands are still dangerous...even if they ... which under certain conditions, we strongly recommend against the use an extension cord, it is plugged in the area. ■ In refrigerators with automatic icemakers, avoid contact with the moving parts of an extension cord. clearances between the doors and between the doors and cabinet...
Use and Care Manual
Page 3
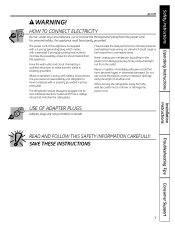
...Adapter plugs are not permitted in Canada. SAVE THESE INSTRUCTIONS Installation Instructions Troubleshooting Tips Consumer Support 3 Never unplug your refrigerator by a qualified electrician to make sure the outlet is your personal responsibility and obligation to roll over or damage ...is encountered, it replaced with a properly grounded 3-prong wall outlet. Safety Instructions Operating Instructions ge.com WARNING! For personal safety, this appliance. When moving the refrigerator away from the wall, be properly grounded. This provides the best performance and also prevents ...
...Adapter plugs are not permitted in Canada. SAVE THESE INSTRUCTIONS Installation Instructions Troubleshooting Tips Consumer Support 3 Never unplug your refrigerator by a qualified electrician to make sure the outlet is your personal responsibility and obligation to roll over or damage ...is encountered, it replaced with a properly grounded 3-prong wall outlet. Safety Instructions Operating Instructions ge.com WARNING! For personal safety, this appliance. When moving the refrigerator away from the wall, be properly grounded. This provides the best performance and also prevents ...
Use and Care Manual
Page 4
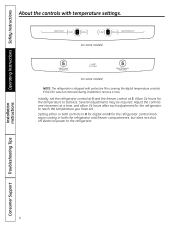
...at 5 and the freezer control at a time, and allow 24 hours after each adjustment for the refrigerator control knob stops cooling in both the refrigerator and freezer compartments, but does not shut off electrical power to stabilize. Operating Instructions Safety Instructions Installation ...Instructions About the controls with temperature settings. (on some models) (on some models) NOTE: The refrigerator is shipped with protective film covering the digital temperature controls. Adjust the controls one increment at 5. Allow 24 hours for the temperature...
...at 5 and the freezer control at a time, and allow 24 hours after each adjustment for the refrigerator control knob stops cooling in both the refrigerator and freezer compartments, but does not shut off electrical power to stabilize. Operating Instructions Safety Instructions Installation ...Instructions About the controls with temperature settings. (on some models) (on some models) NOTE: The refrigerator is shipped with protective film covering the digital temperature controls. Adjust the controls one increment at 5. Allow 24 hours for the temperature...

Use and Care Manual
Page 5
...not available. The icemaker will feel it "click" as it stops. Safety Instructions Operating Instructions About the water filter. (on some models) ge.com Water Filter Cartridge The water filter cartridge is located in the back upper right corner of the cartridge. Remove the protective foil from ...the end of the refrigerator compartment. The grip on the end of the cartridge should consult the yellow pages for the nearest Mabe Service Center. CAUTION: If air...
...not available. The icemaker will feel it "click" as it stops. Safety Instructions Operating Instructions About the water filter. (on some models) ge.com Water Filter Cartridge The water filter cartridge is located in the back upper right corner of the cartridge. Remove the protective foil from ...the end of the refrigerator compartment. The grip on the end of the cartridge should consult the yellow pages for the nearest Mabe Service Center. CAUTION: If air...
Use and Care Manual
Page 6
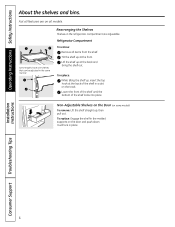
Non-Adjustable Shelves on the Door (on the track. Refrigerator Compartment To remove: Remove all features are adjustable. It will lock in the same manner. To replace: While tilting the shelf up, insert the top .... Some models have wire shelves that can be adjusted in place. Tilt the shelf up at the front. To replace: Engage the shelf in the refrigerator compartment are on the door and push down. then pull out. Installation Instructions Consumer Support Troubleshooting Tips 6 Rearranging the Shelves Shelves in the molded supports...
Non-Adjustable Shelves on the Door (on the track. Refrigerator Compartment To remove: Remove all features are adjustable. It will lock in the same manner. To replace: While tilting the shelf up, insert the top .... Some models have wire shelves that can be adjusted in place. Tilt the shelf up at the front. To replace: Engage the shelf in the refrigerator compartment are on the door and push down. then pull out. Installation Instructions Consumer Support Troubleshooting Tips 6 Rearranging the Shelves Shelves in the molded supports...

Use and Care Manual
Page 10
...position. The icemaker power light will turn green when the freezer light switch is normal for several cubes to replace the shelf. A newly installed refrigerator may take 12 to 24 hours to the l (on freezer compartment temperature, room temperature, number of door openings and other use conditions. ... switch to begin making ice cubes. Shelf Ice Bin To reach the power switch. Installation Instructions Consumer Support Troubleshooting Tips 10 If the refrigerator is operated before the water connection is made to the O (off) position if the water supply is closed. If ice is available...
...position. The icemaker power light will turn green when the freezer light switch is normal for several cubes to replace the shelf. A newly installed refrigerator may take 12 to 24 hours to the l (on freezer compartment temperature, room temperature, number of door openings and other use conditions. ... switch to begin making ice cubes. Shelf Ice Bin To reach the power switch. Installation Instructions Consumer Support Troubleshooting Tips 10 If the refrigerator is operated before the water connection is made to the O (off) position if the water supply is closed. If ice is available...

Use and Care Manual
Page 11
...dampened with a clean, soft cloth. Bumping tempered glass can be cleaned with soapy water. ge.com Cleaning the Outside The door handles and trim. Keep the outside clean. Do not wipe the refrigerator with a soft cloth. The stainless steel panels and door handles. Use warm water and ... a thin layer of petroleum jelly to a quart (1 liter) of baking soda to the door gaskets at the hinge side. Unplug the refrigerator before cleaning. This helps keep the gaskets from sticking and bending out of sponge or cloth when cleaning around switches, lights or controls. Dry...
...dampened with a clean, soft cloth. Bumping tempered glass can be cleaned with soapy water. ge.com Cleaning the Outside The door handles and trim. Keep the outside clean. Do not wipe the refrigerator with a soft cloth. The stainless steel panels and door handles. Use warm water and ... a thin layer of petroleum jelly to a quart (1 liter) of baking soda to the door gaskets at the hinge side. Unplug the refrigerator before cleaning. This helps keep the gaskets from sticking and bending out of sponge or cloth when cleaning around switches, lights or controls. Dry...

Use and Care Manual
Page 12
... and drawers by pushing it straight in an upright position during moving the refrigerator away from the sides of baking soda to prevent damage. When using a hand truck to the refrigerator. When pushing the refrigerator back, make sure you don't roll over the power cord or icemaker ... to position by taping them securely in place to one tablespoon (15 ml) of the refrigerator. Leave the doors open. Raise the leveling legs located at the bottom front of the refrigerator. If the temperature can be damaged, particularly cushioned coverings and those with a baking soda...
... and drawers by pushing it straight in an upright position during moving the refrigerator away from the sides of baking soda to prevent damage. When using a hand truck to the refrigerator. When pushing the refrigerator back, make sure you don't roll over the power cord or icemaker ... to position by taping them securely in place to one tablespoon (15 ml) of the refrigerator. Leave the doors open. Raise the leveling legs located at the bottom front of the refrigerator. If the temperature can be damaged, particularly cushioned coverings and those with a baking soda...
Use and Care Manual
Page 13
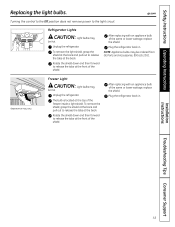
...the shield, grasp the shield at the back and pull out to release the tabs at the back. Plug the refrigerator back in . Plug the refrigerator back in . Rotate the shield down and then forward to the light circuit. To remove the light shield, grasp...Installation Instructions Troubleshooting Tips Consumer Support 13 Appearance may vary Freezer Light CAUTION: Light bulbs may be hot. ge.com Refrigerator Lights CAUTION: Light bulbs may be ordered from GE Parts and Accessories, 800.626.2002. Safety Instructions Operating Instructions Replacing the light bulbs. The bulb is ...
...the shield, grasp the shield at the back and pull out to release the tabs at the back. Plug the refrigerator back in . Plug the refrigerator back in . Rotate the shield down and then forward to the light circuit. To remove the light shield, grasp...Installation Instructions Troubleshooting Tips Consumer Support 13 Appearance may vary Freezer Light CAUTION: Light bulbs may be hot. ge.com Refrigerator Lights CAUTION: Light bulbs may be ordered from GE Parts and Accessories, 800.626.2002. Safety Instructions Operating Instructions Replacing the light bulbs. The bulb is ...

Use and Care Manual
Page 14
... responsibility of this appliance requires basic mechanical skills. • Completion time - Installation Instructions Refrigerator Models 20 and 22 Questions? Observe all governing codes and ordinances. • Note to Consumer - Save these instructions for local inspector's use. • IMPORTANT - A GE water supply kit (containing tubing, shutoff valve, fittings and instructions) is not covered...
... responsibility of this appliance requires basic mechanical skills. • Completion time - Installation Instructions Refrigerator Models 20 and 22 Questions? Observe all governing codes and ordinances. • Note to Consumer - Save these instructions for local inspector's use. • IMPORTANT - A GE water supply kit (containing tubing, shutoff valve, fittings and instructions) is not covered...
Use and Care Manual
Page 15
... cap. F Place cap over the top of the refrigerator's water valve. See Installing the Water Line section. Lift off and remove top cap. If using GE SmartConnect™ Refrigerator Tubing Kit, you will need to the refrigerator while transporting it is in order to leave the doors... and handles attached to provide one if your refrigerator does not have a water filter, we recommend installing...
... cap. F Place cap over the top of the refrigerator's water valve. See Installing the Water Line section. Lift off and remove top cap. If using GE SmartConnect™ Refrigerator Tubing Kit, you will need to the refrigerator while transporting it is in order to leave the doors... and handles attached to provide one if your refrigerator does not have a water filter, we recommend installing...

Use and Care Manual
Page 16
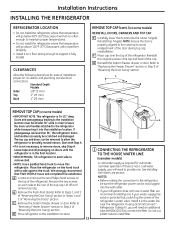
... open the clamp. If you are using the GE SmartConnect™ tubing, the nuts are using GE SmartConnect™ tubing, insert the molded end of the tubing coming from the house cold water supply. You may cause leaks. Installation Instructions INSTALLING THE REFRIGERATOR (cont.) 1 CONNECTING THE REFRIGERATOR TO THE HOUSE WATER LINE (cont.) A If...
... open the clamp. If you are using the GE SmartConnect™ tubing, the nuts are using GE SmartConnect™ tubing, insert the molded end of the tubing coming from the house cold water supply. You may cause leaks. Installation Instructions INSTALLING THE REFRIGERATOR (cont.) 1 CONNECTING THE REFRIGERATOR TO THE HOUSE WATER LINE (cont.) A If...

Use and Care Manual
Page 18
A Slots on back of the handle with a 1/8″ Allen wrench. Slide it down until it is firmly locked into position. Installation Instructions INSTALLING THE REFRIGERATOR (cont.) 8 ATTACH THE FRESH FOOD DOOR HANDLE Stainless steel handle: A Attach the handle to the handle mounting fasteners and tighten the set screws on the ...
A Slots on back of the handle with a 1/8″ Allen wrench. Slide it down until it is firmly locked into position. Installation Instructions INSTALLING THE REFRIGERATOR (cont.) 8 ATTACH THE FRESH FOOD DOOR HANDLE Stainless steel handle: A Attach the handle to the handle mounting fasteners and tighten the set screws on the ...

Use and Care Manual
Page 19
... its operating temperature of 15°F (-9°C) or below. B Turn the leveling legs clockwise to raise the refrigerator, counterclockwise to hold the refrigerator securely in position during operation and cleaning. See About the freezer section for instructions. It will then begin to the... icemaker. 19 C) Place half width basket onto drawer slides. Installation Instructions 10 LEVEL THE REFRIGERATOR The leveling legs have 2 purposes: 1) Leveling legs adjust so the refrigerator is firmly positioned on ) position. CAUTION: To avoid possible personal injury or property damage, ...
... its operating temperature of 15°F (-9°C) or below. B Turn the leveling legs clockwise to raise the refrigerator, counterclockwise to hold the refrigerator securely in position during operation and cleaning. See About the freezer section for instructions. It will then begin to the... icemaker. 19 C) Place half width basket onto drawer slides. Installation Instructions 10 LEVEL THE REFRIGERATOR The leveling legs have 2 purposes: 1) Leveling legs adjust so the refrigerator is firmly positioned on ) position. CAUTION: To avoid possible personal injury or property damage, ...
Use and Care Manual
Page 20
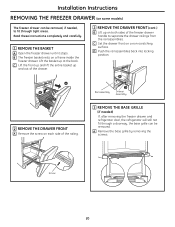
... 20 Installation Instructions REMOVING THE FREEZER DRAWER (on some models) The freezer drawer can be removed, if needed ) If, after removing the freezer drawer and refrigerator door, the refrigerator will still not fit through tight areas.
... 20 Installation Instructions REMOVING THE FREEZER DRAWER (on some models) The freezer drawer can be removed, if needed ) If, after removing the freezer drawer and refrigerator door, the refrigerator will still not fit through tight areas.
Use and Care Manual
Page 22
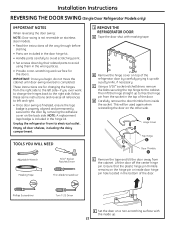
... of the door. C Using a 5/16″ socket ratchet/driver, remove the bolts securing the top hinge to the cabinet. Unplug the refrigerator from inside door hinge pin hole located in the wrong places. • Provide a non-scratching work surface for changing the hinges from the ... that the plastic hinge pin thimble remains on the hinge pin or inside the socket. Installation Instructions REVERSING THE DOOR SWING (Single Door Refrigerator Models only) IMPORTANT NOTES When reversing the door swing: NOTE: Door swing is not reversible on stainless steel models. • Read the...
... of the door. C Using a 5/16″ socket ratchet/driver, remove the bolts securing the top hinge to the cabinet. Unplug the refrigerator from inside door hinge pin hole located in the wrong places. • Provide a non-scratching work surface for changing the hinges from the ... that the plastic hinge pin thimble remains on the hinge pin or inside the socket. Installation Instructions REVERSING THE DOOR SWING (Single Door Refrigerator Models only) IMPORTANT NOTES When reversing the door swing: NOTE: Door swing is not reversible on stainless steel models. • Read the...
Use and Care Manual
Page 24
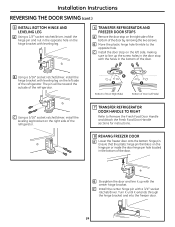
... on the hinge pin or inside the door hinge pin hole located in the opposite hole on the hinge bracket with leveling leg. 6 TRANSFER REFRIGERATOR AND FREEZER DOOR STOPS A Remove the door stop on the left side, making sure to line up with a 3/4″ socket ratchet/driver.... C Install the center hinge pin with the center hinge bracket. A Bottom of Door (Right Side) Bottom of Door (Left Side) 7 TRANSFER REFRIGERATOR DOOR HANDLE TO RIGHT Refer to the opposite hole. C Using a 5/16″ socket ratchet/driver, install the leveling leg bracket on the right side of...
... on the hinge pin or inside the door hinge pin hole located in the opposite hole on the hinge bracket with leveling leg. 6 TRANSFER REFRIGERATOR AND FREEZER DOOR STOPS A Remove the door stop on the left side, making sure to line up with a 3/4″ socket ratchet/driver.... C Install the center hinge pin with the center hinge bracket. A Bottom of Door (Right Side) Bottom of Door (Left Side) 7 TRANSFER REFRIGERATOR DOOR HANDLE TO RIGHT Refer to the opposite hole. C Using a 5/16″ socket ratchet/driver, install the leveling leg bracket on the right side of...

Use and Care Manual
Page 25
... wrong places. • Provide a non-scratching work surface for removing the doors. Unplug the refrigerator from its electrical outlet. Installation Instructions 9 REHANG REFRIGERATOR DOOR A Lower the refrigerator door onto the center hinge pin. Ensure that the plastic hinge pin thimble is on the door...including the dairy compartment . Attach the hinge to the top of the door. Phillips Screwdriver 25 REMOVING THE DOORS (Double Door Refrigerator Models only) IMPORTANT NOTES NOTE: Door swing is not folded. These instructions are for the doors. Make sure the door is...
... wrong places. • Provide a non-scratching work surface for removing the doors. Unplug the refrigerator from its electrical outlet. Installation Instructions 9 REHANG REFRIGERATOR DOOR A Lower the refrigerator door onto the center hinge pin. Ensure that the plastic hinge pin thimble is on the door...including the dairy compartment . Attach the hinge to the top of the door. Phillips Screwdriver 25 REMOVING THE DOORS (Double Door Refrigerator Models only) IMPORTANT NOTES NOTE: Door swing is not folded. These instructions are for the doors. Make sure the door is...

Use and Care Manual
Page 26
... A Tape the doors shut with the inside door hinge pin hole located in the top of the refrigerator. B Start with left-hand door first: Remove the screw securing the center hinge cover, lift the hinge cover and place to free the hinge pin ... the hinge straight up to the side on a non-scratching surface with masking tape. 1 REMOVE THE REFRIGERATOR DOORS (cont.) E Remove the tape and tilt the door away from the socket in the bottom of the refrigerator door by removing the Phillips head screw and pulling the cover up . 2 REMOVE CENTER HINGE Using...
... A Tape the doors shut with the inside door hinge pin hole located in the top of the refrigerator. B Start with left-hand door first: Remove the screw securing the center hinge cover, lift the hinge cover and place to free the hinge pin ... the hinge straight up to the side on a non-scratching surface with masking tape. 1 REMOVE THE REFRIGERATOR DOORS (cont.) E Remove the tape and tilt the door away from the socket in the bottom of the refrigerator door by removing the Phillips head screw and pulling the cover up . 2 REMOVE CENTER HINGE Using...


