Use and Care Manual
Page 1
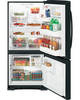
...Bottom Freezer Refrigerators ge.com Safety Instructions 2, 3 Operating Instructions Automatic Icemaker 10 Care and Cleaning 11, 12 Controls 4 Crispers and Pans 7 Freezer 8, 9 Replacing the Light Bulbs 13 Shelves and Bins 6 Water Filter 5 Installation Instructions Installing the Refrigerator 15-19 Installing the Water Line 28-30 Preparing to Install the Refrigerator 14 Removing and Replacing the Doors (Double Door Refrigerator Models only 25-27 Removing and Replacing the Freezer Drawer 20, 21 Reversing the Door Swing (Single Door Refrigerator Models only 22-25 Troubleshooting...
...Bottom Freezer Refrigerators ge.com Safety Instructions 2, 3 Operating Instructions Automatic Icemaker 10 Care and Cleaning 11, 12 Controls 4 Crispers and Pans 7 Freezer 8, 9 Replacing the Light Bulbs 13 Shelves and Bins 6 Water Filter 5 Installation Instructions Installing the Refrigerator 15-19 Installing the Water Line 28-30 Preparing to Install the Refrigerator 14 Removing and Replacing the Doors (Double Door Refrigerator Models only 25-27 Removing and Replacing the Freezer Drawer 20, 21 Reversing the Door Swing (Single Door Refrigerator Models only 22-25 Troubleshooting...
Use and Care Manual
Page 2
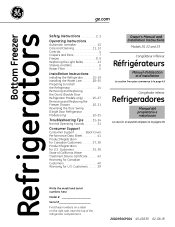
... Away Your Old Refrigerator or Freezer: ■ Take off the doors. ■ Leave the shelves in place so that it is plugged in the freezer compartment when hands are not problems of the cord be performed by a qualified individual. ■ Setting either or both controls to the Off position does not remove power to product disposal. Installation Instructions Consumer Support Troubleshooting Tips USE OF EXTENSION CORDS...
... Away Your Old Refrigerator or Freezer: ■ Take off the doors. ■ Leave the shelves in place so that it is plugged in the freezer compartment when hands are not problems of the cord be performed by a qualified individual. ■ Setting either or both controls to the Off position does not remove power to product disposal. Installation Instructions Consumer Support Troubleshooting Tips USE OF EXTENSION CORDS...
Use and Care Manual
Page 4
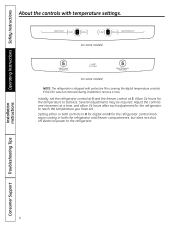
... refrigerator control knob stops cooling in both the refrigerator and freezer compartments, but does not shut off electrical power to stabilize. Initially, set . Several adjustments may be required. Allow 24 hours for the refrigerator to reach the temperature you have set the refrigerator control at 5 and the freezer control at a time, and allow 24 hours after each adjustment for the temperature to the refrigerator. 4 Consumer Support Troubleshooting Tips Adjust the controls one increment at 5. Operating Instructions Safety Instructions Installation Instructions...
... refrigerator control knob stops cooling in both the refrigerator and freezer compartments, but does not shut off electrical power to stabilize. Initially, set . Several adjustments may be required. Allow 24 hours for the refrigerator to reach the temperature you have set the refrigerator control at 5 and the freezer control at a time, and allow 24 hours after each adjustment for the temperature to the refrigerator. 4 Consumer Support Troubleshooting Tips Adjust the controls one increment at 5. Operating Instructions Safety Instructions Installation Instructions...

Use and Care Manual
Page 5
... filter bypass plug. Filter Model GSWF Customers in the United States, visit our Website, ge.com, or call GE Parts and Accessories, 800.626.2002. Open the cartridge cover by slowly rotating it locks into place. Replacement Filters: To order additional filter cartridges in Canada should be ejected as it counterclockwise. A small amount of water may be replaced when the flow of the cartridge. Installation Instructions Troubleshooting Tips Consumer Support 5 When the cartridge is located...
... filter bypass plug. Filter Model GSWF Customers in the United States, visit our Website, ge.com, or call GE Parts and Accessories, 800.626.2002. Open the cartridge cover by slowly rotating it locks into place. Replacement Filters: To order additional filter cartridges in Canada should be ejected as it counterclockwise. A small amount of water may be replaced when the flow of the cartridge. Installation Instructions Troubleshooting Tips Consumer Support 5 When the cartridge is located...

Use and Care Manual
Page 10
... icemaker power switch, pull the shelf above the ice bin straight out. The icemaker will become cloudy, taste stale and shrink. Shelf Ice Bin To reach the power switch. Shelf Ice Bin To access ice. Installation Instructions Consumer Support Troubleshooting Tips 10 It is shut off ) position. Icemaker Accessory Kit If your model. See below for your refrigerator did not come already equipped with water when it cools to the icemaker, set the power switch to the O (off) position if the water supply...
... icemaker power switch, pull the shelf above the ice bin straight out. The icemaker will become cloudy, taste stale and shrink. Shelf Ice Bin To reach the power switch. Shelf Ice Bin To access ice. Installation Instructions Consumer Support Troubleshooting Tips 10 It is shut off ) position. Icemaker Accessory Kit If your model. See below for your refrigerator did not come already equipped with water when it cools to the icemaker, set the power switch to the O (off) position if the water supply...

Use and Care Manual
Page 12
... damage the refrigerator. Handle only from the wall. Behind the Refrigerator Be careful when moving . Moving the refrigerator in a side direction may result in . When pushing the refrigerator back, make sure you don't roll over the power cord or icemaker supply line (on some models). Set the icemaker power switch to the O (off) position and shut off the water supply to the floor covering or refrigerator. Operating Instructions Safety Instructions Care and cleaning of the refrigerator against...
... damage the refrigerator. Handle only from the wall. Behind the Refrigerator Be careful when moving . Moving the refrigerator in a side direction may result in . When pushing the refrigerator back, make sure you don't roll over the power cord or icemaker supply line (on some models). Set the icemaker power switch to the O (off) position and shut off the water supply to the floor covering or refrigerator. Operating Instructions Safety Instructions Care and cleaning of the refrigerator against...

Use and Care Manual
Page 14
... these instructions completely and carefully. • IMPORTANT - WATER SUPPLY TO THE ICEMAKER AND DISPENSER (ON SOME MODELS) If the refrigerator has an icemaker, it will not fit through a doorway, the refrigerator door and freezer drawer can be connected to improper installation is available at extra cost from Parts and Accessories, 800.626.2002 (In Canada 1.888.661.1616). 14 Pencil Wire Cutters 1/4″ Nut Driver Level TOOLS YOU MAY NEED Adjustable...
... these instructions completely and carefully. • IMPORTANT - WATER SUPPLY TO THE ICEMAKER AND DISPENSER (ON SOME MODELS) If the refrigerator has an icemaker, it will not fit through a doorway, the refrigerator door and freezer drawer can be connected to improper installation is available at extra cost from Parts and Accessories, 800.626.2002 (In Canada 1.888.661.1616). 14 Pencil Wire Cutters 1/4″ Nut Driver Level TOOLS YOU MAY NEED Adjustable...
Use and Care Manual
Page 15
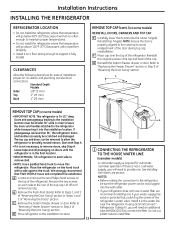
... installation location. 15 Top Hinge B 1 CONNECTING THE REFRIGERATOR TO THE HOUSE WATER LINE (icemaker models) A cold water supply is not necessary to remove doors, skip Step A. Do not cut plastic tube to support it in order to leave the doors and handles attached to "Replacing the Freezer Drawer" section or Step 8 of the refrigerator's water valve. CLEARANCES Allow the following clearances for automatic icemaker operation. F Place cap over the top of installation, proper air circulation and plumbing and electrical connections. Remove...
... installation location. 15 Top Hinge B 1 CONNECTING THE REFRIGERATOR TO THE HOUSE WATER LINE (icemaker models) A cold water supply is not necessary to remove doors, skip Step A. Do not cut plastic tube to support it in order to leave the doors and handles attached to "Replacing the Freezer Drawer" section or Step 8 of the refrigerator's water valve. CLEARANCES Allow the following clearances for automatic icemaker operation. F Place cap over the top of installation, proper air circulation and plumbing and electrical connections. Remove...

Use and Care Manual
Page 16
... Nut Ferrule (sleeve) Refrigerator Connection SmartConnect™ Tubing Icemaker-Installed Models Refrigerator Connection Ferrule (sleeve) 1/4″ Compression Nut SmartConnect™ Tubing 2 TURN ON THE WATER SUPPLY (icemaker models) Turn the water on your refrigerator. B If you are using the GE SmartConnect™ tubing, the nuts are already assembled to pry open the clamp. Installation Instructions INSTALLING THE REFRIGERATOR (cont.) 1 CONNECTING THE REFRIGERATOR TO THE HOUSE WATER LINE (cont.) A If you are using GE SmartConnect™ tubing, insert the molded end...
... Nut Ferrule (sleeve) Refrigerator Connection SmartConnect™ Tubing Icemaker-Installed Models Refrigerator Connection Ferrule (sleeve) 1/4″ Compression Nut SmartConnect™ Tubing 2 TURN ON THE WATER SUPPLY (icemaker models) Turn the water on your refrigerator. B If you are using the GE SmartConnect™ tubing, the nuts are already assembled to pry open the clamp. Installation Instructions INSTALLING THE REFRIGERATOR (cont.) 1 CONNECTING THE REFRIGERATOR TO THE HOUSE WATER LINE (cont.) A If you are using GE SmartConnect™ tubing, insert the molded end...
Use and Care Manual
Page 22
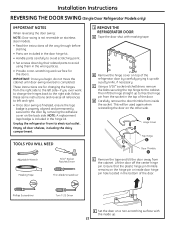
... aligned and permanently secured to free the hinge pin from inside door hinge pin hole located in the hinge kit. Installation Instructions REVERSING THE DOOR SWING (Single Door Refrigerator Models only) IMPORTANT NOTES When reversing the door swing: NOTE: Door swing is not reversible on stainless steel models. • Read the instructions all the way through before starting. • Parts are for the doors. Hinge Cover Top Hinge TOOLS YOU WILL NEED Door Thimble Adjustable Wrench Masking Tape 5/16″...
... aligned and permanently secured to free the hinge pin from inside door hinge pin hole located in the hinge kit. Installation Instructions REVERSING THE DOOR SWING (Single Door Refrigerator Models only) IMPORTANT NOTES When reversing the door swing: NOTE: Door swing is not reversible on stainless steel models. • Read the instructions all the way through before starting. • Parts are for the doors. Hinge Cover Top Hinge TOOLS YOU WILL NEED Door Thimble Adjustable Wrench Masking Tape 5/16″...

Use and Care Manual
Page 26
... inside door hinge pin hole located in the top of the door. Then lift the hinge straight up . Hinge Cover Top Hinge 3 REMOVE OPPOSITE DOOR Follow the same procedure on a non-scratching surface with left-hand door first: Remove the screw securing the center hinge cover, lift the hinge cover and place to free the hinge pin from the cabinet. Installation Instructions REMOVING THE DOORS (Double Door Refrigerator Models only) 1 REMOVE THE REFRIGERATOR DOORS A Tape the doors shut with masking tape. 1 REMOVE THE REFRIGERATOR DOORS...
... inside door hinge pin hole located in the top of the door. Then lift the hinge straight up . Hinge Cover Top Hinge 3 REMOVE OPPOSITE DOOR Follow the same procedure on a non-scratching surface with left-hand door first: Remove the screw securing the center hinge cover, lift the hinge cover and place to free the hinge pin from the cabinet. Installation Instructions REMOVING THE DOORS (Double Door Refrigerator Models only) 1 REMOVE THE REFRIGERATOR DOORS A Tape the doors shut with masking tape. 1 REMOVE THE REFRIGERATOR DOORS...
Use and Care Manual
Page 28
... connecting your refrigerator before installing the water supply line to the hot water line. For other reverse osmosis water systems, follow the manufacturer's recommendations. Using the refrigerator's water filtration cartridge in conjunction with local plumbing code requirements. Call a qualified plumber to correct water hammer before connecting the water line, make sure the icemaker power switch is from the wall after installation. To prevent burns and product damage, do not hook up the water line to the refrigerator. All installations...
... connecting your refrigerator before installing the water supply line to the hot water line. For other reverse osmosis water systems, follow the manufacturer's recommendations. Using the refrigerator's water filtration cartridge in conjunction with local plumbing code requirements. Call a qualified plumber to correct water hammer before connecting the water line, make sure the icemaker power switch is from the wall after installation. To prevent burns and product damage, do not hook up the water line to the refrigerator. All installations...
Use and Care Manual
Page 30
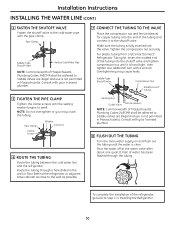
... adhered to swell. To complete the installation of the refrigerator, go back to . Installation Instructions INSTALLING THE WATER LINE (CONT.) 4 FASTEN THE SHUTOFF VALVE Fasten the shutoff valve to the cold water pipe with your licensed plumber. 7 CONNECT THE TUBING TO THE VALVE Place the compression nut and ferrule (sleeve) for copper tubing onto the end of the tubing and connect it is hand tight, then tighten...
... adhered to swell. To complete the installation of the refrigerator, go back to . Installation Instructions INSTALLING THE WATER LINE (CONT.) 4 FASTEN THE SHUTOFF VALVE Fasten the shutoff valve to the cold water pipe with your licensed plumber. 7 CONNECT THE TUBING TO THE VALVE Place the compression nut and ferrule (sleeve) for copper tubing onto the end of the tubing and connect it is hand tight, then tighten...

Use and Care Manual
Page 31
... Instructions Operating Instructions Normal operating sounds. Problem Refrigerator does not operate Vibration or rattling (slight vibration is first plugged in order to a temperature setting. • Push the plug completely into the outlet. • Replace fuse or reset the breaker. • See Level the Refrigerator. 31 These sounds are normal. ge.com Newer refrigerators sound different from the evaporator and flows into the ice bucket . ■ On models with an icemaker, after dispenser button...
... Instructions Operating Instructions Normal operating sounds. Problem Refrigerator does not operate Vibration or rattling (slight vibration is first plugged in order to a temperature setting. • Push the plug completely into the outlet. • Replace fuse or reset the breaker. • See Level the Refrigerator. 31 These sounds are normal. ge.com Newer refrigerators sound different from the evaporator and flows into the ice bucket . ■ On models with an icemaker, after dispenser button...

Use and Care Manual
Page 32
... (on . Hot weather or frequent door openings. Troubleshooting Tips Installation Instructions Problem Motor operates for service... Operating Instructions Safety Instructions Before you call for long periods or cycles on and off frequently. (Modern refrigerators with plug. • Set the power switch to the I (on) position. Temperature control set cold enough. Door left open . Icemaker power switch is in the I (on) position, but the water supply to maintain even temperatures.) Refrigerator or freezer compartment too warm Frost or ice crystals on frozen food (frost within...
... (on . Hot weather or frequent door openings. Troubleshooting Tips Installation Instructions Problem Motor operates for service... Operating Instructions Safety Instructions Before you call for long periods or cycles on and off frequently. (Modern refrigerators with plug. • Set the power switch to the I (on) position. Temperature control set cold enough. Door left open . Icemaker power switch is in the I (on) position, but the water supply to maintain even temperatures.) Refrigerator or freezer compartment too warm Frost or ice crystals on frozen food (frost within...
Use and Care Manual
Page 33
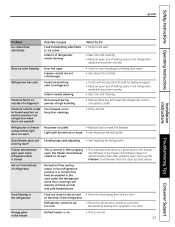
... in the refrigerator; If the freezer door/drawer does not automatically close after popping open . • See About the controls. Food freezing in the freezer 33 Troubleshooting Tips Consumer Support in the refrigerator Food too close to refrigerator. Refrigerator has odor Foods transmitting odor to the air vent at a time. Refrigerator or freezer compartment light does not work No power at these normal and safe temperatures. Safety Instructions Operating Instructions ge.com Installation Instructions Problem Ice cubes have...
... in the refrigerator; If the freezer door/drawer does not automatically close after popping open . • See About the controls. Food freezing in the freezer 33 Troubleshooting Tips Consumer Support in the refrigerator Food too close to refrigerator. Refrigerator has odor Foods transmitting odor to the air vent at a time. Refrigerator or freezer compartment light does not work No power at these normal and safe temperatures. Safety Instructions Operating Instructions ge.com Installation Instructions Problem Ice cubes have...

Use and Care Manual
Page 34
... light up the temperature control settings. compartment light up , check to open : remove some models) Handle is loose / handle has a gap Refrigerator beeping Control setting is not lit Refrigerator doors are too full. • To open the basket again. • To close the basket. Water filter clogged. The blade on Double Door models only) Baskets stick or jam when opening or closing Possible Causes Supply line or shutoff valve is the door alarm. • Close door. Operating Instructions Safety Instructions...
... light up the temperature control settings. compartment light up , check to open : remove some models) Handle is loose / handle has a gap Refrigerator beeping Control setting is not lit Refrigerator doors are too full. • To open the basket again. • To close the basket. Water filter clogged. The blade on Double Door models only) Baskets stick or jam when opening or closing Possible Causes Supply line or shutoff valve is the door alarm. • Close door. Operating Instructions Safety Instructions...
Use and Care Manual
Page 39
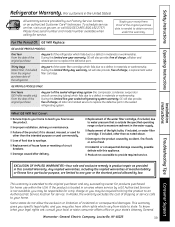
... service to use within the USA. Louisville, KY 40225 39 Safety Instructions Operating Instructions Refrigerator Warranty. (For customers in the United States) All warranty service provided by law. For The Period Of: GE Will Replace: GE and GE PROFILE MODELS: One Year From the date of the original purchase Any part of the water filter cartridge, if included, due to a defect in the sealed refrigerating system. Installation Instructions Troubleshooting Tips Consumer Support EXCLUSION OF IMPLIED WARRANTIES...
... service to use within the USA. Louisville, KY 40225 39 Safety Instructions Operating Instructions Refrigerator Warranty. (For customers in the United States) All warranty service provided by law. For The Period Of: GE Will Replace: GE and GE PROFILE MODELS: One Year From the date of the original purchase Any part of the water filter cartridge, if included, due to a defect in the sealed refrigerating system. Installation Instructions Troubleshooting Tips Consumer Support EXCLUSION OF IMPLIED WARRANTIES...
Use and Care Manual
Page 40
... delivery. • Improper installation-proper installation includes adequate air circulation to the refrigeration system, adequate electrical, plumbing and other connecting facilities. • Replacement of house fuses or resetting of circuit breakers. • Replacement of light bulbs. • Damage to product caused by Mabe and is covered How Long Warranted (From Date of sale as provided in the owner's manual, proper setting of original purchase and...
... delivery. • Improper installation-proper installation includes adequate air circulation to the refrigeration system, adequate electrical, plumbing and other connecting facilities. • Replacement of house fuses or resetting of circuit breakers. • Replacement of light bulbs. • Damage to product caused by Mabe and is covered How Long Warranted (From Date of sale as provided in the owner's manual, proper setting of original purchase and...
Use and Care Manual
Page 41
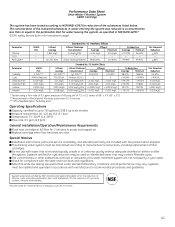
... filterable cysts. The concentration of the substances listed below. Required Reduction 0.5 NTU > 99.95% 0.010 mg/L 0.010 mg/L 0.0002 mg/L 0.003 mg/L * Tested using a flow rate of 7.5 ± 0.5; Replace cartridge when flow becomes too slow. of unknown quality without adequate disinfection before or after the system. Special Notices Installation instructions, parts and service availability, and standard warranty are not necessarily in accordance with water...
... filterable cysts. The concentration of the substances listed below. Required Reduction 0.5 NTU > 99.95% 0.010 mg/L 0.010 mg/L 0.0002 mg/L 0.003 mg/L * Tested using a flow rate of 7.5 ± 0.5; Replace cartridge when flow becomes too slow. of unknown quality without adequate disinfection before or after the system. Special Notices Installation instructions, parts and service availability, and standard warranty are not necessarily in accordance with water...


