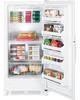
Use and Care Manual
Page 2
... sufficiently low temperatures in the freezer. s Do not refreeze frozen foods which have thawed completely. s The maximum amount of freezer capacity. Installation Instructions Consumer Support Troubleshooting Tips 2 READ ALL INSTRUCTIONS BEFORE USING. WARNING! SAFETY PRECAUTIONS When using electrical appliances, basic safety precautions should be performed by a qualified individual. Skin may stick...
... sufficiently low temperatures in the freezer. s Do not refreeze frozen foods which have thawed completely. s The maximum amount of freezer capacity. Installation Instructions Consumer Support Troubleshooting Tips 2 READ ALL INSTRUCTIONS BEFORE USING. WARNING! SAFETY PRECAUTIONS When using electrical appliances, basic safety precautions should be performed by a qualified individual. Skin may stick...
Use and Care Manual
Page 3
... extension cord, it is absolutely necessary that it be 15 amperes (minimum) and 120 volts. Safety Instructions Operating Instructions ge.com DANGER! USE OF EXTENSION CORDS Because of the past. Installation Instructions Troubleshooting Tips Consumer Support 3 Junked or abandoned refrigerators and freezers are not problems of potential safety hazards under federal law...
... extension cord, it is absolutely necessary that it be 15 amperes (minimum) and 120 volts. Safety Instructions Operating Instructions ge.com DANGER! USE OF EXTENSION CORDS Because of the past. Installation Instructions Troubleshooting Tips Consumer Support 3 Junked or abandoned refrigerators and freezers are not problems of potential safety hazards under federal law...
Use and Care Manual
Page 4
... AND FOLLOW THIS SAFETY INFORMATION CAREFULLY. For personal safety, this appliance. The freezer should always be properly grounded. SAVE THESE INSTRUCTIONS Installation Instructions Consumer Support Troubleshooting Tips 4 Never unplug your freezer by a qualified electrician to make sure the outlet is your personal responsibility and obligation to have become frayed or otherwise...
... AND FOLLOW THIS SAFETY INFORMATION CAREFULLY. For personal safety, this appliance. The freezer should always be properly grounded. SAVE THESE INSTRUCTIONS Installation Instructions Consumer Support Troubleshooting Tips 4 Never unplug your freezer by a qualified electrician to make sure the outlet is your personal responsibility and obligation to have become frayed or otherwise...
Use and Care Manual
Page 5
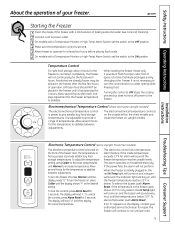
... door. The electromechanical temperature control is set at a time. The alarm operates on and a buzzer will continue to stabilize. ge.com Starting the Freezer 1 Clean the inside of the freezer with a Temperature Monitor or High-Temp Alarm Switch, set the...a range of space at 4. 5 Allow freezer to operate for the freezer temperature to run continuously for repair. Installation Instructions Troubleshooting Tips Consumer Support Electronic Temperature Control (some Upright models) The electromechanical temperature control is initially plugged in the freezer until the ...
... door. The electromechanical temperature control is set at a time. The alarm operates on and a buzzer will continue to stabilize. ge.com Starting the Freezer 1 Clean the inside of the freezer with a Temperature Monitor or High-Temp Alarm Switch, set the...a range of space at 4. 5 Allow freezer to operate for the freezer temperature to run continuously for repair. Installation Instructions Troubleshooting Tips Consumer Support Electronic Temperature Control (some Upright models) The electromechanical temperature control is initially plugged in the freezer until the ...
Use and Care Manual
Page 6
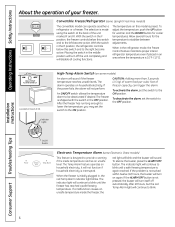
... buzzer, press the ALARM OFF button. The indicator light will continue to blink until the freezer has reached a safe freezing temperature. Installation Instructions Consumer Support Troubleshooting Tips 6 CAUTION: Adding more than 3 pounds (1.5 kg) of warm food per cubic foot of your freezer. To activate the alarm, set the switch to be...
... buzzer, press the ALARM OFF button. The indicator light will continue to blink until the freezer has reached a safe freezing temperature. Installation Instructions Consumer Support Troubleshooting Tips 6 CAUTION: Adding more than 3 pounds (1.5 kg) of warm food per cubic foot of your freezer. To activate the alarm, set the switch to be...
Use and Care Manual
Page 7
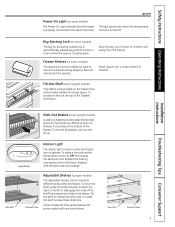
... install the shelf, reverse these directions. It is turned off. Glass Shelf Placement Holes 7 Remove and discard the spacers. Installation Instructions Troubleshooting Tips Consumer Support Slide-Out Basket (some Upright models) A slide-out basket provides separate storage space for the spring-loaded lock is .... Some models will have glass shelves and some models will not remain in lock in the freezer. Safety Instructions Operating Instructions ge.com Power-On Light (on some models) The Power-On Light indicates that are difficult to different levels within the freezer....
... install the shelf, reverse these directions. It is turned off. Glass Shelf Placement Holes 7 Remove and discard the spacers. Installation Instructions Troubleshooting Tips Consumer Support Slide-Out Basket (some Upright models) A slide-out basket provides separate storage space for the spring-loaded lock is .... Some models will have glass shelves and some models will not remain in lock in the freezer. Safety Instructions Operating Instructions ge.com Power-On Light (on some models) The Power-On Light indicates that are difficult to different levels within the freezer....
Use and Care Manual
Page 8
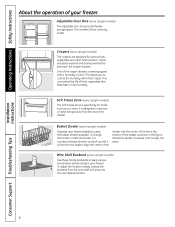
... (some Upright models) Organize your freezer basket by model. Rotate the divider clockwise until it snaps into the next desired location. Installation Instructions Consumer Support Troubleshooting Tips 8 Items should be washed and drained well before placing in the figure. Hi Soft Freeze Zone (some Upright models) Use these handy bookends to...
... (some Upright models) Organize your freezer basket by model. Rotate the divider clockwise until it snaps into the next desired location. Installation Instructions Consumer Support Troubleshooting Tips 8 Items should be washed and drained well before placing in the figure. Hi Soft Freeze Zone (some Upright models) Use these handy bookends to...
Use and Care Manual
Page 9
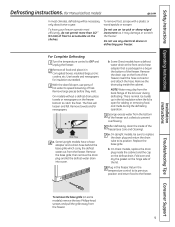
... position. To have a defrost water drain at the front and a hose adapter that is normal. b. Drain Hose 4 a. Installation Instructions Troubleshooting Tips Consumer Support To remove the base grille (on some models), remove the two Phillips-head screws and pull the grille away from the back... the hose. On Upright models, be necessary only about twice a year. Safety Instructions Operating Instructions Defrosting instructions. (for Manual Defrost models) ge.com In most efficiently, do not permit more than 1/2 ″ (13 mm) of frost to accumulate on the shelves. NOTE: Water...
... position. To have a defrost water drain at the front and a hose adapter that is normal. b. Drain Hose 4 a. Installation Instructions Troubleshooting Tips Consumer Support To remove the base grille (on some models), remove the two Phillips-head screws and pull the grille away from the back... the hose. On Upright models, be necessary only about twice a year. Safety Instructions Operating Instructions Defrosting instructions. (for Manual Defrost models) ge.com In most efficiently, do not permit more than 1/2 ″ (13 mm) of frost to accumulate on the shelves. NOTE: Water...
Use and Care Manual
Page 10
... separate and remove. It has been pre-set at the factory to avoid electrical hazard from power source when defrosting unit. Installation Instructions Consumer Support Troubleshooting Tips 10 The finish on No-Frost models) You never have to remove tape residue from the wall. Appliance polish wax also works well to...
... separate and remove. It has been pre-set at the factory to avoid electrical hazard from power source when defrosting unit. Installation Instructions Consumer Support Troubleshooting Tips 10 The finish on No-Frost models) You never have to remove tape residue from the wall. Appliance polish wax also works well to...
Use and Care Manual
Page 11
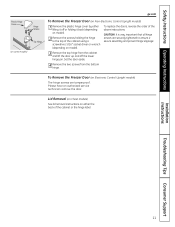
... a secure assembly and prevent hinge slippage. 3 Remove the top hinge from the bottom hinge. Installation Instructions Troubleshooting Tips Consumer Support 11 Safety Instructions Operating Instructions Plastic Hinge Cover (on some models) Hinge Screws Top Hinge ge.com To Remove the Freezer Door (on Non-Electronic Control Upright models) 1 Remove the plastic hinge...
... a secure assembly and prevent hinge slippage. 3 Remove the top hinge from the bottom hinge. Installation Instructions Troubleshooting Tips Consumer Support 11 Safety Instructions Operating Instructions Plastic Hinge Cover (on some models) Hinge Screws Top Hinge ge.com To Remove the Freezer Door (on Non-Electronic Control Upright models) 1 Remove the plastic hinge...
Use and Care Manual
Page 12
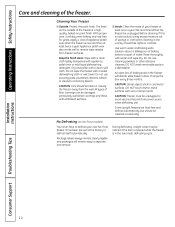
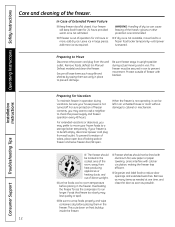
... room temperature before placing them securely in the freezer. The freezer must be located in the coolest area of direct sunlight. Installation Instructions Consumer Support Troubleshooting Tips Preparing for 24 hours provided warm air is restored. To prevent formation of odors, place open . s The freezer should not be lined with cold...
... room temperature before placing them securely in the freezer. The freezer must be located in the coolest area of direct sunlight. Installation Instructions Consumer Support Troubleshooting Tips Preparing for 24 hours provided warm air is restored. To prevent formation of odors, place open . s The freezer should not be lined with cold...
Use and Care Manual
Page 13
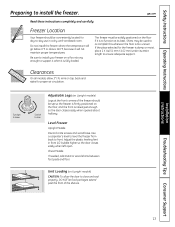
If the place selected for the freezer is too uneven. Use a carpenter's level to level the freezer from back to install the freezer. Installation Instructions Troubleshooting Tips Consumer Support 13 Level Freezer Upright Models: Discard crate screws and wood base. Clearances On all models, allow the door to close and seal ... the floor if it will not maintain proper temperatures. Freezer Location Your freezer should be used to function at the front corners of the shelves. ge.com Read these instructions completely and carefully.
If the place selected for the freezer is too uneven. Use a carpenter's level to level the freezer from back to install the freezer. Installation Instructions Troubleshooting Tips Consumer Support 13 Level Freezer Upright Models: Discard crate screws and wood base. Clearances On all models, allow the door to close and seal ... the floor if it will not maintain proper temperatures. Freezer Location Your freezer should be used to function at the front corners of the shelves. ge.com Read these instructions completely and carefully.
Use and Care Manual
Page 14
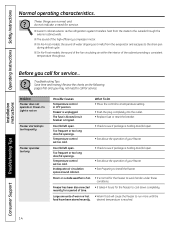
...Instructions Installation Instructions Normal operating characteristics. s On No-Frost models, the sound of the cabinet providing a consistent temperature throughout. Troubleshooting Tips Save time and money! What To Do • Move the control to work harder under these conditions. Room or... outside through the exterior cabinet walls. desired temperature is unplugged. Consumer Support Troubleshooting Tips 14 s On No-Frost models, the sound of the fan circulating air within the interior of water dripping as the ...
...Instructions Installation Instructions Normal operating characteristics. s On No-Frost models, the sound of the cabinet providing a consistent temperature throughout. Troubleshooting Tips Save time and money! What To Do • Move the control to work harder under these conditions. Room or... outside through the exterior cabinet walls. desired temperature is unplugged. Consumer Support Troubleshooting Tips 14 s On No-Frost models, the sound of the fan circulating air within the interior of water dripping as the ...

Use and Care Manual
Page 15
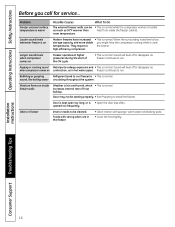
... is on. Temperature control set too warm. •Turn control to a colder setting. Package holding door/lid open . Safety Instructions Operating Instructions ge.com Installation Instructions Problem Noisy operation or cabinet vibrates Freezer temperature too warm Foods defrosting Freezer temperature too cold Moisture forms on outside . Not unusual... during periods of your freezer. Freezer has been disconnected •Freezer requires 4 hours to install the freezer. Door/lid left open . 15 Troubleshooting Tips Consumer Support Freezer is holding door/lid open .
... is on. Temperature control set too warm. •Turn control to a colder setting. Package holding door/lid open . Safety Instructions Operating Instructions ge.com Installation Instructions Problem Noisy operation or cabinet vibrates Freezer temperature too warm Foods defrosting Freezer temperature too cold Moisture forms on outside . Not unusual... during periods of your freezer. Freezer has been disconnected •Freezer requires 4 hours to install the freezer. Door/lid left open . 15 Troubleshooting Tips Consumer Support Freezer is holding door/lid open .
Use and Care Manual
Page 16
... Refrigerant (used to run . increases internal rate of the ON cycle. •This is normal while the compressor works to run . Installation Instructions Consumer Support Troubleshooting Tips 16 sound, like boiling water circulating throughout the system. Moisture forms on contraction, as freezer continues to transfer as much as when compressor comes...
... Refrigerant (used to run . increases internal rate of the ON cycle. •This is normal while the compressor works to run . Installation Instructions Consumer Support Troubleshooting Tips 16 sound, like boiling water circulating throughout the system. Moisture forms on contraction, as freezer continues to transfer as much as when compressor comes...
Use and Care Manual
Page 21
Notes. 21 Safety Instructions Operating Instructions Installation Instructions Troubleshooting Tips Consumer Support
Notes. 21 Safety Instructions Operating Instructions Installation Instructions Troubleshooting Tips Consumer Support
Use and Care Manual
Page 22
Notes. 22 Consumer Support Troubleshooting Tips Installation Instructions Operating Instructions Safety Instructions
Notes. 22 Consumer Support Troubleshooting Tips Installation Instructions Operating Instructions Safety Instructions
Use and Care Manual
Page 23
Notes. 23 Safety Instructions Operating Instructions Installation Instructions Troubleshooting Tips Consumer Support
Notes. 23 Safety Instructions Operating Instructions Installation Instructions Troubleshooting Tips Consumer Support
Use and Care Manual
Page 24
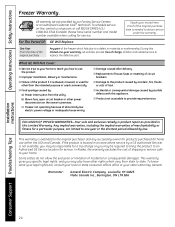
... 800.GE.CARES (U.S.), 1.800.561.3344 (Canada). Some states do not allow the exclusion or limitation of abnormally low electric power voltage or inadequate house wiring. Louisville, KY 40225 Mabe Canada Inc., Burlington, ON L7R 5B6 Installation Instructions Consumer Support Troubleshooting Tips 24... or an authorized Customer Care® technician. EXCLUSION OF IMPLIED WARRANTIES-Your sole and exclusive remedy is extended to an Authorized GE Service location for service. This warranty is product repair as provided in materials or workmanship. Warrantor: General Electric Company. b) ...
... 800.GE.CARES (U.S.), 1.800.561.3344 (Canada). Some states do not allow the exclusion or limitation of abnormally low electric power voltage or inadequate house wiring. Louisville, KY 40225 Mabe Canada Inc., Burlington, ON L7R 5B6 Installation Instructions Consumer Support Troubleshooting Tips 24... or an authorized Customer Care® technician. EXCLUSION OF IMPLIED WARRANTIES-Your sole and exclusive remedy is extended to an Authorized GE Service location for service. This warranty is product repair as provided in materials or workmanship. Warrantor: General Electric Company. b) ...