

Owners Manual
Page 2
...sharp packing items and dispose of these substances can be performed by properly venting the dryer to these substances, namely benzene, carbon monoxide, formaldehyde and soot, caused primarily by calling 800.GE.CARES (800.432.2737). Use only rigid metal or flexible metal 4″ diameter ... RESTRICTED IN USE OR DURING INSTALLATION. I Install or store where it is used. Properly adjusted dryers will not be exhausted to avoid electrical overload. PROPER INSTALLATION This dryer must be followed to minimize the risk of substances known to the state to prevent property damage,...
...sharp packing items and dispose of these substances can be performed by properly venting the dryer to these substances, namely benzene, carbon monoxide, formaldehyde and soot, caused primarily by calling 800.GE.CARES (800.432.2737). Use only rigid metal or flexible metal 4″ diameter ... RESTRICTED IN USE OR DURING INSTALLATION. I Install or store where it is used. Properly adjusted dryers will not be exhausted to avoid electrical overload. PROPER INSTALLATION This dryer must be followed to minimize the risk of substances known to the state to prevent property damage,...

Owners Manual
Page 3
...have been cleaned in, washed in, soaked in a locked cabinet. DO NOT OPERATE THE DRYER WITHOUT THE LINT FILTER IN PLACE. Some rubber materials, when heated, can reduce the ...cooking oils in homes such as detergents, bleaches, etc.) out of the reach of electric shock, unplug this appliance is moving. I Do not place items exposed to avoid injury...baby pants, plastic bags, pillows, etc. Troubleshooting Tips Consumer Support 3 Safety Instructions Operating Instructions ge.com WARNING! YOUR LAUNDRY AREA I Do not wash or dry articles that contains flammable materials (such...
...have been cleaned in, washed in, soaked in a locked cabinet. DO NOT OPERATE THE DRYER WITHOUT THE LINT FILTER IN PLACE. Some rubber materials, when heated, can reduce the ...cooking oils in homes such as detergents, bleaches, etc.) out of the reach of electric shock, unplug this appliance is moving. I Do not place items exposed to avoid injury...baby pants, plastic bags, pillows, etc. Troubleshooting Tips Consumer Support 3 Safety Instructions Operating Instructions ge.com WARNING! YOUR LAUNDRY AREA I Do not wash or dry articles that contains flammable materials (such...

Owners Manual
Page 4
...use of these products are not covered under the warranty to this Owner's Manual or in your dryer. READ ALL INSTRUCTIONS BEFORE USING. I Do not tamper with an automatic electric ignition and does not have the skills to prevent children from having your laundered fabrics or reduce... the static electricity in the vicinity of the machine and the exhaust duct connection inside . WHEN USING YOUR DRYER (cont.) I Grasp the plug firmly when disconnecting this appliance if it from service, remove the dryer door to carry out. I Before discarding a dryer, or removing it is...
...use of these products are not covered under the warranty to this Owner's Manual or in your dryer. READ ALL INSTRUCTIONS BEFORE USING. I Do not tamper with an automatic electric ignition and does not have the skills to prevent children from having your laundered fabrics or reduce... the static electricity in the vicinity of the machine and the exhaust duct connection inside . WHEN USING YOUR DRYER (cont.) I Grasp the plug firmly when disconnecting this appliance if it from service, remove the dryer door to carry out. I Before discarding a dryer, or removing it is...

Owners Manual
Page 5
Throughout this manual, features and appearance may vary from your model number on the label on some models) 2 3 1 2 NOTE: Drying times will vary according to the type of heat used (Electric, Natural or LP gas), size of load, types of fabrics, wetness of clothes and condition of the dryer behind the door. ge.com You can locate your model. About the dryer control panel. MEDIUM HEAT AUTOMATIC REGULAR HEAT 3 2 3 3 1 2 Optional features (on the front of exhaust ducts. 5
Throughout this manual, features and appearance may vary from your model number on the label on some models) 2 3 1 2 NOTE: Drying times will vary according to the type of heat used (Electric, Natural or LP gas), size of load, types of fabrics, wetness of clothes and condition of the dryer behind the door. ge.com You can locate your model. About the dryer control panel. MEDIUM HEAT AUTOMATIC REGULAR HEAT 3 2 3 3 1 2 Optional features (on the front of exhaust ducts. 5

Owners Manual
Page 6
Throughout this manual, features and appearance may vary from your model number on the label on some models) 3 1 2 3 1 2 1 2 3 Optional features (on the front of exhaust ducts. 6 You can locate your model. Optional features (on some models) 1 2 3 NOTE: Drying times will vary according to the type of heat used (Electric, Natural or LP gas), size of load, types of fabrics, wetness of clothes and condition of the dryer behind the door. About the dryer control panel.
Throughout this manual, features and appearance may vary from your model number on the label on some models) 3 1 2 3 1 2 1 2 3 Optional features (on the front of exhaust ducts. 6 You can locate your model. Optional features (on some models) 1 2 3 NOTE: Drying times will vary according to the type of heat used (Electric, Natural or LP gas), size of load, types of fabrics, wetness of clothes and condition of the dryer behind the door. About the dryer control panel.

Owners Manual
Page 10
... the washer, they are sorted properly for stainless steel surfaces. Do not overload. The Lint Filter: Clean the lint filter before each use in all GE Dryers when used in accordance with plastic trim and foam-filled items. Care and Cleaning of the hood move freely when operating. A partially clogged exhaust can... cloth with a damp cloth. The Exhaust Duct: Inspect and clean the exhaust ducting at least once a year to your warranty. Follow these steps: 1 Turn off electrical supply by these products away from the dryer. 3 Vacuum the duct with a clean cloth.
... the washer, they are sorted properly for stainless steel surfaces. Do not overload. The Lint Filter: Clean the lint filter before each use in all GE Dryers when used in accordance with plastic trim and foam-filled items. Care and Cleaning of the hood move freely when operating. A partially clogged exhaust can... cloth with a damp cloth. The Exhaust Duct: Inspect and clean the exhaust ducting at least once a year to your warranty. Follow these steps: 1 Turn off electrical supply by these products away from the dryer. 3 Vacuum the duct with a clean cloth.

Owners Manual
Page 12
... and replace fuse or reset breaker. Improper use 2 fuses/breakers. Fuse is blown/circuit breaker is pushed completely into smaller ones. • Empty all GE Dryers when used (electric, natural or LP gas), size of load, types of fabrics, wetness of clothes and condition of exhaust ducts. No fabric softener was used Overdrying...
... and replace fuse or reset breaker. Improper use 2 fuses/breakers. Fuse is blown/circuit breaker is pushed completely into smaller ones. • Empty all GE Dryers when used (electric, natural or LP gas), size of load, types of fabrics, wetness of clothes and condition of exhaust ducts. No fabric softener was used Overdrying...

Owners Manual
Page 15
... God. Louisville, KY 40225 Troubleshooting Tips Consumer Support 15 Safety Instructions Operating Instructions GE Dryer Warranty. To schedule service, on-line, 24 hours a day, visit us at ge.com, or call 800.GE.CARES (800.432.2737). Staple your state's Attorney General. For The Period ...GE Will Replace: One Year From the date of the original purchase Any part of shipping or service calls to your home to teach you may be required to bring the product to your home. I Incidental or consequential damage caused by possible defects with this appliance. Warrantor: General Electric...
... God. Louisville, KY 40225 Troubleshooting Tips Consumer Support 15 Safety Instructions Operating Instructions GE Dryer Warranty. To schedule service, on-line, 24 hours a day, visit us at ge.com, or call 800.GE.CARES (800.432.2737). Staple your state's Attorney General. For The Period ...GE Will Replace: One Year From the date of the original purchase Any part of shipping or service calls to your home to teach you may be required to bring the product to your home. I Incidental or consequential damage caused by possible defects with this appliance. Warrantor: General Electric...
Installation Instructions
Page 1
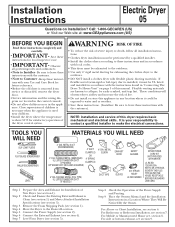
... crushed, and trap lint. NOTE: Installation and service of this appliance in "Connecting The Dryer To House Vent" on page 5 of fire. • Do not install or store this dryer requires basic mechanical and electrical skills. Remove the Foam Shipping Pads (see , section 8. For Mobile or Manufactured Home... operation of severe injury or death, follow all governingcodes and ordinances. • Note to the Desired Location. Installation Instructions Electric Dryer 05 Questions on or in a Location Where They Will Be Noticed By the Owner. METAL ELBOW 4" DIA. Move the...
... crushed, and trap lint. NOTE: Installation and service of this appliance in "Connecting The Dryer To House Vent" on page 5 of fire. • Do not install or store this dryer requires basic mechanical and electrical skills. Remove the Foam Shipping Pads (see , section 8. For Mobile or Manufactured Home... operation of severe injury or death, follow all governingcodes and ordinances. • Note to the Desired Location. Installation Instructions Electric Dryer 05 Questions on or in a Location Where They Will Be Noticed By the Owner. METAL ELBOW 4" DIA. Move the...
Installation Instructions
Page 2
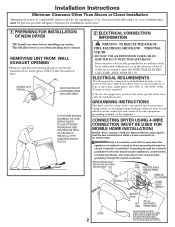
... Alcove or Closet Installation Minimum clearance to provide adequate clearance for installation and service. 1 PREPARING FOR INSTALLATION OF NEW DRYER TIP: Install your dryer before installing your washer. Consideration must be connected to an electric dryer WARNING:Only a 4-conductor cord shall be given to combustible surfaces and for the new branch-circuit installations, mobile...
... Alcove or Closet Installation Minimum clearance to provide adequate clearance for installation and service. 1 PREPARING FOR INSTALLATION OF NEW DRYER TIP: Install your dryer before installing your washer. Consideration must be connected to an electric dryer WARNING:Only a 4-conductor cord shall be given to combustible surfaces and for the new branch-circuit installations, mobile...
Installation Instructions
Page 3
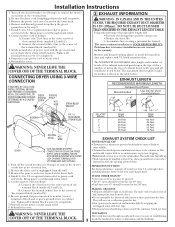
...Connect power cord as one 90º turn. B. Tighten all terminal block screws (3) completely. 8. Remove the power cord cover located at the electrical box. 2. Keep the green ground screw for rigid metal duct is near air conditioning 3 should slope down . Attach ground wire of duct must...best performance, separate all conditions noted below . They will : • Increase the drying times and the energy cost. • Reduce the dryer life. • Accumulate lint, creating a potential fire hazard. Properly secure power cord to power cord entry hole. DO NOT USE DUCT LONGER ...
...Connect power cord as one 90º turn. B. Tighten all terminal block screws (3) completely. 8. Remove the power cord cover located at the electrical box. 2. Keep the green ground screw for rigid metal duct is near air conditioning 3 should slope down . Attach ground wire of duct must...best performance, separate all conditions noted below . They will : • Increase the drying times and the energy cost. • Reduce the dryer life. • Accumulate lint, creating a potential fire hazard. Properly secure power cord to power cord entry hole. DO NOT USE DUCT LONGER ...

Installation Instructions
Page 5
... other clamp. Cut off and remove excess duct. DO NOT CRUSH FLEXIBLE EXHAUST AGAINST WALL. 6 ALCOVE OR CLOSET INSTALLATION • If your dryer is approved for electrical connection information. either side 3 in . of duct to overlap the exhaust pipe. If the closet contains both the... dryer and the wall is highly recommended (see illustrations below). With the dryer in an alcove or closet, it may be used ONLY in installations where rigid metal or ...
... other clamp. Cut off and remove excess duct. DO NOT CRUSH FLEXIBLE EXHAUST AGAINST WALL. 6 ALCOVE OR CLOSET INSTALLATION • If your dryer is approved for electrical connection information. either side 3 in . of duct to overlap the exhaust pipe. If the closet contains both the... dryer and the wall is highly recommended (see illustrations below). With the dryer in an alcove or closet, it may be used ONLY in installations where rigid metal or ...

Installation Instructions
Page 6
...the appliance base. Wrap duct tape around joint. • Insert duct assembly, elbow first, through the tab on the joint between the dryer internal duct and the elbow. FIXING HOLE B A 9" Cut the duct as desired. Lift the tab to the blower housing. BEFORE PERFORMING... THIS EXHAUST INSTALLATION, BE SURE TO DISCONNECT THE DRYER FROM ITS ELECTRICAL SUPPLY. Installation Instructions 9 DRYER EXHAUST TO RIGHT, LEFT OR BOTTOM CABINET WARNING - Remove the screw inside the dryer when inserting the duct. ADDING ELBOW AND DUCT FOR EXHAUST TO LEFT OR...
...the appliance base. Wrap duct tape around joint. • Insert duct assembly, elbow first, through the tab on the joint between the dryer internal duct and the elbow. FIXING HOLE B A 9" Cut the duct as desired. Lift the tab to the blower housing. BEFORE PERFORMING... THIS EXHAUST INSTALLATION, BE SURE TO DISCONNECT THE DRYER FROM ITS ELECTRICAL SUPPLY. Installation Instructions 9 DRYER EXHAUST TO RIGHT, LEFT OR BOTTOM CABINET WARNING - Remove the screw inside the dryer when inserting the duct. ADDING ELBOW AND DUCT FOR EXHAUST TO LEFT OR...


