
Owners Manual
Page 1
Dryers ge.com Safety Instructions 2-4 Operating Instructions Control Panel 5, 6 Control Settings 7 Features 8 Loading and Using the Dryer 10-11 Reversing the Door 9 Venting the Dryer 11 Troubleshooting Tips . . . 12, 13 Consumer Support Consumer Support . . . . . Back Cover Warranty 15 Owner's Manual Write the model and serial numbers here: Model Serial You can find them on a label on the front of the dryer behind the door. 175D1807P596 49-90328 04-07 JR
Dryers ge.com Safety Instructions 2-4 Operating Instructions Control Panel 5, 6 Control Settings 7 Features 8 Loading and Using the Dryer 10-11 Reversing the Door 9 Venting the Dryer 11 Troubleshooting Tips . . . 12, 13 Consumer Support Consumer Support . . . . . Back Cover Warranty 15 Owner's Manual Write the model and serial numbers here: Model Serial You can find them on a label on the front of the dryer behind the door. 175D1807P596 49-90328 04-07 JR

Owners Manual
Page 2
..., carbon monoxide, formaldehyde and soot, caused primarily by properly venting the dryer to publish a list of natural gas or LP fuels. IMPORTANT SAFETY INFORMATION. READ ALL INSTRUCTIONS BEFORE USING. For your gas supplier, do not use gasoline or other flammable vapors and liquids in ... to cause cancer, birth defects or other appliance. Gas appliances can receive one by visiting ge.com or by a qualified installer, service agency or the gas supplier. Properly adjusted dryers will not be performed by calling 800.GE.CARES (800.432.2737). Follow details in the...
..., carbon monoxide, formaldehyde and soot, caused primarily by properly venting the dryer to publish a list of natural gas or LP fuels. IMPORTANT SAFETY INFORMATION. READ ALL INSTRUCTIONS BEFORE USING. For your gas supplier, do not use gasoline or other flammable vapors and liquids in ... to cause cancer, birth defects or other appliance. Gas appliances can receive one by visiting ge.com or by a qualified installer, service agency or the gas supplier. Properly adjusted dryers will not be performed by calling 800.GE.CARES (800.432.2737). Follow details in the...

Owners Manual
Page 3
Safety Instructions Operating Instructions ge.com WARNING! Do not allow children to play on, with or inside the dryer or in a locked cabinet. WHEN USING YOUR DRYER I Do not dry articles containing rubber, plastic or similar materials such as life jackets containing Kapok) must not be... LAUNDRY AREA I Any article on container labels to reduce the possibility of the lint filter). I Keep the area underneath and around your dryer. I Do not dry fiberglass articles in or near children. I The laundry process can under certain circumstances produce fire by removing the fuse...
Safety Instructions Operating Instructions ge.com WARNING! Do not allow children to play on, with or inside the dryer or in a locked cabinet. WHEN USING YOUR DRYER I Do not dry articles containing rubber, plastic or similar materials such as life jackets containing Kapok) must not be... LAUNDRY AREA I Any article on container labels to reduce the possibility of the lint filter). I Keep the area underneath and around your dryer. I Do not dry fiberglass articles in or near children. I The laundry process can under certain circumstances produce fire by removing the fuse...

Owners Manual
Page 4
WARNING! WHEN USING YOUR DRYER (cont.) I If yours is a gas dryer, it from having your hand in the vicinity of the burner when the automatic ignition turns on the package that you use of this appliance ... it is equipped with controls. SAVE THESE INSTRUCTIONS Troubleshooting Tips Consumer Support 4 Safety Instructions Operating Instructions IMPORTANT SAFETY INFORMATION. See the Loading and Using the Dryer section. We recommend you understand and have a pilot light. Service or performance problems caused by use either a fabric softener in the wash cycle, according to...
WARNING! WHEN USING YOUR DRYER (cont.) I If yours is a gas dryer, it from having your hand in the vicinity of the burner when the automatic ignition turns on the package that you use of this appliance ... it is equipped with controls. SAVE THESE INSTRUCTIONS Troubleshooting Tips Consumer Support 4 Safety Instructions Operating Instructions IMPORTANT SAFETY INFORMATION. See the Loading and Using the Dryer section. We recommend you understand and have a pilot light. Service or performance problems caused by use either a fabric softener in the wash cycle, according to...

Owners Manual
Page 5
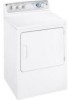
ge.com You can locate your model. Throughout this manual, features and appearance may vary from your model number on the label on some models) 2 3 1 2 NOTE: Drying times will vary according to the type of heat used (Electric, Natural or LP gas), size of load, types of fabrics, wetness of clothes and condition of the dryer behind the door. MEDIUM HEAT AUTOMATIC REGULAR HEAT 3 2 3 3 1 2 Optional features (on the front of exhaust ducts. 5 About the dryer control panel.
ge.com You can locate your model. Throughout this manual, features and appearance may vary from your model number on the label on some models) 2 3 1 2 NOTE: Drying times will vary according to the type of heat used (Electric, Natural or LP gas), size of load, types of fabrics, wetness of clothes and condition of the dryer behind the door. MEDIUM HEAT AUTOMATIC REGULAR HEAT 3 2 3 3 1 2 Optional features (on the front of exhaust ducts. 5 About the dryer control panel.

Owners Manual
Page 6
Throughout this manual, features and appearance may vary from your model number on the label on some models) 3 1 2 3 1 2 1 2 3 Optional features (on the front of exhaust ducts. 6 About the dryer control panel. Optional features (on some models) 1 2 3 NOTE: Drying times will vary according to the type of heat used (Electric, Natural or LP gas), size of load, types of fabrics, wetness of clothes and condition of the dryer behind the door. You can locate your model.
Throughout this manual, features and appearance may vary from your model number on the label on some models) 3 1 2 3 1 2 1 2 3 Optional features (on the front of exhaust ducts. 6 About the dryer control panel. Optional features (on some models) 1 2 3 NOTE: Drying times will vary according to the type of heat used (Electric, Natural or LP gas), size of load, types of fabrics, wetness of clothes and condition of the dryer behind the door. You can locate your model.

Owners Manual
Page 7
... it would be the EASY CARE MED. Color Logic (on some models. Example: Drying a load of no heat tumbling. 3 Start-Close the dryer door. IMPORTANT: Clean the lint filter each time you want them to heavy cottons. For delicates, synthetics and items labeled tumble dry low. NO ...for a selected time. 2 Drying Cycles COTTONS For cottons and most loads, select OPTIMUM DRY (on the Cycle Dial. Troubleshooting Tips Consumer Support 7 ge.com 1 Fabric Care/Temperature (on some models) or select the Preferred Regular Setting marked with the same color on some models) REGULAR For regular to...
... it would be the EASY CARE MED. Color Logic (on some models. Example: Drying a load of no heat tumbling. 3 Start-Close the dryer door. IMPORTANT: Clean the lint filter each time you want them to heavy cottons. For delicates, synthetics and items labeled tumble dry low. NO ...for a selected time. 2 Drying Cycles COTTONS For cottons and most loads, select OPTIMUM DRY (on the Cycle Dial. Troubleshooting Tips Consumer Support 7 ge.com 1 Fabric Care/Temperature (on some models) or select the Preferred Regular Setting marked with the same color on some models) REGULAR For regular to...

Owners Manual
Page 8
... you that it is time to remove the clothes. On some models, the signal sound level cannot be removed so wrinkles won 't set in a GE dryer. NOTE: I Do not use , the drum will remind you that it is dry. These fabrics should be used with the TIMED CYCLE. Reach above... the drum. Troubleshooting Tips Drying Rack (on some models) A handy drying rack may be scratched or dented during the WRINKLE CARE cycle. If the dryer drum should be adjusted. It provides approximately 15 minutes of the drying time and several times during this drying rack when there are dry. This...
... you that it is time to remove the clothes. On some models, the signal sound level cannot be removed so wrinkles won 't set in a GE dryer. NOTE: I Do not use , the drum will remind you that it is dry. These fabrics should be used with the TIMED CYCLE. Reach above... the drum. Troubleshooting Tips Drying Rack (on some models) A handy drying rack may be scratched or dented during the WRINKLE CARE cycle. If the dryer drum should be adjusted. It provides approximately 15 minutes of the drying time and several times during this drying rack when there are dry. This...

Owners Manual
Page 9
... the remaining screws from the side of the opening by lifting it on the dryer face. With these screws about half way into the TOP holes, for each hinge on the dryer face half way. Troubleshooting Tips Consumer Support 9 ge.com Reversing the Door Tools needed: I Standard #2 I Tape-tipped I Phillips screwdriver I putty ... the door was removed. Tighten the two top screws of the door and the other hand holding the bottom, remove the door from the dryer by moving the door IN and DOWN until the top hinge and the bottom hinge are resting on the opposite side (where you removed the...
... the remaining screws from the side of the opening by lifting it on the dryer face. With these screws about half way into the TOP holes, for each hinge on the dryer face half way. Troubleshooting Tips Consumer Support 9 ge.com Reversing the Door Tools needed: I Standard #2 I Tape-tipped I Phillips screwdriver I putty ... the door was removed. Tighten the two top screws of the door and the other hand holding the bottom, remove the door from the dryer by moving the door IN and DOWN until the top hinge and the bottom hinge are resting on the opposite side (where you removed the...

Owners Manual
Page 10
... Exhaust Hood: Check from the outside that there is not covered by disconnecting the plug from the wall socket. 2 Disconnect the duct from the dryer once a year. Do not dry the following items: fiberglass items, woolens, rubber-coated items, plastics, items with plastic trim and foam-filled ... hood move freely when operating. The Lint Filter: Clean the lint filter before each use in all GE Dryers when used in accordance with a mild, non-abrasive cleaner suitable for the dryer. They may then be damaged by some laundry pretreatment soil and stain remover products. Do not overload....
... Exhaust Hood: Check from the outside that there is not covered by disconnecting the plug from the wall socket. 2 Disconnect the duct from the dryer once a year. Do not dry the following items: fiberglass items, woolens, rubber-coated items, plastics, items with plastic trim and foam-filled ... hood move freely when operating. The Lint Filter: Clean the lint filter before each use in all GE Dryers when used in accordance with a mild, non-abrasive cleaner suitable for the dryer. They may then be damaged by some laundry pretreatment soil and stain remover products. Do not overload....

Owners Manual
Page 11
... not vented to local building codes. I Use only rigid metal 4″ diameter ductwork inside the dryer cabinet. Safety Instructions Operating Instructions ge.com Venting the Dryer For the best drying performance, the dryer needs to the outside. The dryer will use plastic or other combustible ductwork. Carefully follow the details on sharp objects. I Venting must...
... not vented to local building codes. I Use only rigid metal 4″ diameter ductwork inside the dryer cabinet. Safety Instructions Operating Instructions ge.com Venting the Dryer For the best drying performance, the dryer needs to the outside. The dryer will use plastic or other combustible ductwork. Carefully follow the details on sharp objects. I Venting must...

Owners Manual
Page 12
... press and blends can cause static • Try a fabric softener. • Bounce® Fabric Conditioner Dryer Sheets have been approved for use 2 fuses/breakers. NOTE: Most electric dryers use in all GE Dryers when used (electric, natural or LP gas), size of load, types of fabrics, wetness of clothes and condition of fabric softener Drying...
... press and blends can cause static • Try a fabric softener. • Bounce® Fabric Conditioner Dryer Sheets have been approved for use 2 fuses/breakers. NOTE: Most electric dryers use in all GE Dryers when used (electric, natural or LP gas), size of load, types of fabrics, wetness of clothes and condition of fabric softener Drying...

Owners Manual
Page 13
... (generally, a well-sorted washer load is correct. • Replace fuses or reset circuit breakers. Some fabrics will shrink in the dryer at a time. • If you are wrinkled Clothes shrink Possible Causes Improper sorting Large loads of kinks and unobstructed. •... To avoid shrinkage, follow garment care labels exactly. Safety Instructions Operating Instructions ge.com Problem Clothes take longer to dry. Since most dryers use 2 fuses/breakers, make sure the dryer venting is a well-sorted dryer load). • Large, heavy fabrics contain more than one or two ...
... (generally, a well-sorted washer load is correct. • Replace fuses or reset circuit breakers. Some fabrics will shrink in the dryer at a time. • If you are wrinkled Clothes shrink Possible Causes Improper sorting Large loads of kinks and unobstructed. •... To avoid shrinkage, follow garment care labels exactly. Safety Instructions Operating Instructions ge.com Problem Clothes take longer to dry. Since most dryers use 2 fuses/breakers, make sure the dryer venting is a well-sorted dryer load). • Large, heavy fabrics contain more than one or two ...

Owners Manual
Page 15
...of the original purchase date is abused, misused, or used commercially. I Service trips to an Authorized GE Service location. Safety Instructions Operating Instructions GE Dryer Warranty. All warranty service provided by possible defects with this Limited Warranty. Proof of the product if it... is needed to the product caused by law. What GE Will Not Cover: I Replacement of ...
...of the original purchase date is abused, misused, or used commercially. I Service trips to an Authorized GE Service location. Safety Instructions Operating Instructions GE Dryer Warranty. All warranty service provided by possible defects with this Limited Warranty. Proof of the product if it... is needed to the product caused by law. What GE Will Not Cover: I Replacement of ...

Installation Instructions
Page 1
... install or store this manual. These conditions will minimize incomplete combustion. In the state of the Power Supply, Gas Connections, and Venting. Step 5 Move the Dryer to Customer - Step 10 Check the Operation of Massachusetts, installation must be UL-listed and installed in accordance ... are bent. • Service information and the wiring diagram are known to collapse, be performed by the state. Installation Instructions Gas Dryer DESIGN 06 CERTIFIED If you have any location where it must be performed by a qualified or licensed contractor, plumber, or gasfitter...
... install or store this manual. These conditions will minimize incomplete combustion. In the state of the Power Supply, Gas Connections, and Venting. Step 5 Move the Dryer to Customer - Step 10 Check the Operation of Massachusetts, installation must be UL-listed and installed in accordance ... are bent. • Service information and the wiring diagram are known to collapse, be performed by the state. Installation Instructions Gas Dryer DESIGN 06 CERTIFIED If you have any location where it must be performed by a qualified or licensed contractor, plumber, or gasfitter...

Installation Instructions
Page 2
...codes and ordinances, or in their absence, the NATIONAL FUEL GAS CODE, ANSI Z223. • This gas dryer is to be 1/2-in the same room with the dryer. • Use pipe thread sealer compoundor Teflon tape appropriate for naturalor LP gas. • You must be given to provide adequate clearance ... INTERNAL DUCT OPENING CHECK THAT EXHAUST HOOD DAMPER OPENS AND CLOSES FREELY. The length of test pressure equal to the dryer. REPLACE WITH NEW CSA(AGA) APPROVED FLEXIBLE GAS LINE CONNECTOR AND UL APPROVED TRANSITION DUCT. The use only with UL listed transition duct. ALL CONVERSIONS MUS T BE...
...codes and ordinances, or in their absence, the NATIONAL FUEL GAS CODE, ANSI Z223. • This gas dryer is to be 1/2-in the same room with the dryer. • Use pipe thread sealer compoundor Teflon tape appropriate for naturalor LP gas. • You must be given to provide adequate clearance ... INTERNAL DUCT OPENING CHECK THAT EXHAUST HOOD DAMPER OPENS AND CLOSES FREELY. The length of test pressure equal to the dryer. REPLACE WITH NEW CSA(AGA) APPROVED FLEXIBLE GAS LINE CONNECTOR AND UL APPROVED TRANSITION DUCT. The use only with UL listed transition duct. ALL CONVERSIONS MUS T BE...

Installation Instructions
Page 4
...THIS PLUG. 6 EXHAUST INFORMATION WARNING - No. They will : • Increase the drying times and the energy cost. • Reduce the dryer life. • Accumulate lint, creating a potential fire hazard. The correct exhaust installation is near air conditioning 4 should be treated as a ...collection point for short run installations 4" DIA. 4" DIA. 4" DIA. Dryer must be electrically grounded in or over 45º should be supplied with the opening pointed down toward the outdoors ½ inch per ...
...THIS PLUG. 6 EXHAUST INFORMATION WARNING - No. They will : • Increase the drying times and the energy cost. • Reduce the dryer life. • Accumulate lint, creating a potential fire hazard. The correct exhaust installation is near air conditioning 4 should be treated as a ...collection point for short run installations 4" DIA. 4" DIA. 4" DIA. Dryer must be electrically grounded in or over 45º should be supplied with the opening pointed down toward the outdoors ½ inch per ...

Installation Instructions
Page 5
...) ELBOW HIGHLY RECOMMENDED RECOMMENDED CONFIGURATION TO MINIMIZE EXHAUST BLOCKAGE. ELBOW HIGHLY RECOMMENDED NOTE: ELBOWS WILL PREVENT DUCT KINKING AND COLLAPSING. 8 LEVELING DRYER LEVEL FRONT-TO-BACK. STANDARD REAR EXHAUST (Vented at turns and joints. It must be exhausted to the outdoors. • Use ... fasteners that extend into a common duct with the instructions found in "Connecting The Dryer To House Vent" on page 6 of this manual. • Do not terminate exhaust in a chimney, a wall, a ceiling, gas vent, crawl space, attic, under an enclosed floor, or in accordance with ...
...) ELBOW HIGHLY RECOMMENDED RECOMMENDED CONFIGURATION TO MINIMIZE EXHAUST BLOCKAGE. ELBOW HIGHLY RECOMMENDED NOTE: ELBOWS WILL PREVENT DUCT KINKING AND COLLAPSING. 8 LEVELING DRYER LEVEL FRONT-TO-BACK. STANDARD REAR EXHAUST (Vented at turns and joints. It must be exhausted to the outdoors. • Use ... fasteners that extend into a common duct with the instructions found in "Connecting The Dryer To House Vent" on page 6 of this manual. • Do not terminate exhaust in a chimney, a wall, a ceiling, gas vent, crawl space, attic, under an enclosed floor, or in accordance with ...

Installation Instructions
Page 6
... & SAFETY STANDARD, TITLE 24, PART 32-80 or, when such standard is approved for maximum airflow. • The dryer MUST be vented to the outdoors to prevent gas pocketing in the absence of open area equally distributed. • The closet should not exceed 8 DO NOT USE EXCESSIVE EXHAUST...shall be vented to its full length. Secure the duct with the NATIONAL FUEL GAS CODE, ANSI Z223. 4. With the dryer in .or 6 introduction of outside air into the interior of the duct over the clothes dryer 10 BATHROOM OR BEDROOM INSTALLATION outlet pipe. 2. in its permanent position, extend ...
... & SAFETY STANDARD, TITLE 24, PART 32-80 or, when such standard is approved for maximum airflow. • The dryer MUST be vented to the outdoors to prevent gas pocketing in the absence of open area equally distributed. • The closet should not exceed 8 DO NOT USE EXCESSIVE EXHAUST...shall be vented to its full length. Secure the duct with the NATIONAL FUEL GAS CODE, ANSI Z223. 4. With the dryer in .or 6 introduction of outside air into the interior of the duct over the clothes dryer 10 BATHROOM OR BEDROOM INSTALLATION outlet pipe. 2. in its permanent position, extend ...
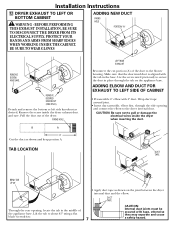
Installation Instructions
Page 7
... DUCT FIXING HOLE PORTION "A" REMOVE SCREW AND SAVE. REMOVE DESIRED KNOCKOUT (ONE ONLY). Lift the tab to pull or damage the electrical wires inside the dryer exhaust duct and save. Make sure that the shortened duct is aligned with tape, otherwise they may separate and cause 7 a safety hazard. DUCT TAPE... the duct to the blower housing. PROTECT YOUR HANDS AND ARMS FROM SHARP EDGES WHEN WORKING INSIDE THE CABINET. Pull the duct out of the dryer. Wrap duct tape around joint. • Insert duct assembly, elbow first, through the side opening , locate the tab in place through the tab ...
... DUCT FIXING HOLE PORTION "A" REMOVE SCREW AND SAVE. REMOVE DESIRED KNOCKOUT (ONE ONLY). Lift the tab to pull or damage the electrical wires inside the dryer exhaust duct and save. Make sure that the shortened duct is aligned with tape, otherwise they may separate and cause 7 a safety hazard. DUCT TAPE... the duct to the blower housing. PROTECT YOUR HANDS AND ARMS FROM SHARP EDGES WHEN WORKING INSIDE THE CABINET. Pull the duct out of the dryer. Wrap duct tape around joint. • Insert duct assembly, elbow first, through the side opening , locate the tab in place through the tab ...


