
Owners Manual
Page 1
Back Cover Warranty 15 Owner's Manual Write the model and serial numbers here: Model Serial You can find them on a label on the front of the dryer behind the door. 175D1807P596 49-90328 04-07 JR Dryers ge.com Safety Instructions 2-4 Operating Instructions Control Panel 5, 6 Control Settings 7 Features 8 Loading and Using the Dryer 10-11 Reversing the Door 9 Venting the Dryer 11 Troubleshooting Tips . . . 12, 13 Consumer Support Consumer Support . . . . .
Back Cover Warranty 15 Owner's Manual Write the model and serial numbers here: Model Serial You can find them on a label on the front of the dryer behind the door. 175D1807P596 49-90328 04-07 JR Dryers ge.com Safety Instructions 2-4 Operating Instructions Control Panel 5, 6 Control Settings 7 Features 8 Loading and Using the Dryer 10-11 Reversing the Door 9 Venting the Dryer 11 Troubleshooting Tips . . . 12, 13 Consumer Support Consumer Support . . . . .

Owners Manual
Page 2
... of natural gas or LP fuels. Properly adjusted dryers will not be minimized further by calling 800.GE.CARES (800.432.2737). Use only rigid metal or flexible metal 4″ diameter ductwork for exhausting to the outdoors. Troubleshooting Tips Consumer Support 2 READ ALL INSTRUCTIONS BEFORE USING. Exposure to these substances, namely benzene, carbon monoxide, formaldehyde and soot, caused primarily by a qualified installer, service...
... of natural gas or LP fuels. Properly adjusted dryers will not be minimized further by calling 800.GE.CARES (800.432.2737). Use only rigid metal or flexible metal 4″ diameter ductwork for exhausting to the outdoors. Troubleshooting Tips Consumer Support 2 READ ALL INSTRUCTIONS BEFORE USING. Exposure to these substances, namely benzene, carbon monoxide, formaldehyde and soot, caused primarily by a qualified installer, service...

Owners Manual
Page 3
... your dryer. NOTE: Turning the Cycle Selector knob to a chemical reaction that could result from the remaining particles that may melt or burn. Troubleshooting Tips Consumer Support 3 DO NOT OPERATE THE DRYER WITHOUT THE LINT FILTER IN PLACE. To avoid such a result, carefully follow the garment manufacturer's care instructions. I To minimize the possibility of the dryer during operation. I Garments labeled Dry Away from the power supply...
... your dryer. NOTE: Turning the Cycle Selector knob to a chemical reaction that could result from the remaining particles that may melt or burn. Troubleshooting Tips Consumer Support 3 DO NOT OPERATE THE DRYER WITHOUT THE LINT FILTER IN PLACE. To avoid such a result, carefully follow the garment manufacturer's care instructions. I To minimize the possibility of the dryer during operation. I Garments labeled Dry Away from the power supply...

Owners Manual
Page 4
... areas so it from service, remove the dryer door to operate this appliance to avoid damage to the cord while pulling. Burns may wish to this Owner's Manual or in published user-repair instructions that their product can be stepped on, tripped over or subjected to repair or replace any part of the machine and the exhaust duct connection inside . SAVE THESE INSTRUCTIONS Troubleshooting Tips Consumer Support 4 DO NOT ATTEMPT...
... areas so it from service, remove the dryer door to operate this appliance to avoid damage to the cord while pulling. Burns may wish to this Owner's Manual or in published user-repair instructions that their product can be stepped on, tripped over or subjected to repair or replace any part of the machine and the exhaust duct connection inside . SAVE THESE INSTRUCTIONS Troubleshooting Tips Consumer Support 4 DO NOT ATTEMPT...

Owners Manual
Page 5
About the dryer control panel. ge.com You can locate your model. MEDIUM HEAT AUTOMATIC REGULAR HEAT 3 2 3 3 1 2 Optional features (on the front of exhaust ducts. 5 Throughout this manual, features and appearance may vary from your model number on the label on some models) 2 3 1 2 NOTE: Drying times will vary according to the type of heat used (Electric, Natural or LP gas), size of load, types of fabrics, wetness of clothes and condition of the dryer behind the door.
About the dryer control panel. ge.com You can locate your model. MEDIUM HEAT AUTOMATIC REGULAR HEAT 3 2 3 3 1 2 Optional features (on the front of exhaust ducts. 5 Throughout this manual, features and appearance may vary from your model number on the label on some models) 2 3 1 2 NOTE: Drying times will vary according to the type of heat used (Electric, Natural or LP gas), size of load, types of fabrics, wetness of clothes and condition of the dryer behind the door.

Owners Manual
Page 7
... with FLUFF NO HEAT. HEAT, EASY CARE or PERMA PRESS MED. LOW HEAT FLUFF For fluffing items without heat. Timed cycles run for a selected time. 2 Drying Cycles COTTONS For cottons and most loads, select OPTIMUM DRY (on the Cycle Dial. Opening the door during operation will stop the dryer. Use the TIMED DRY cycle. Troubleshooting Tips Consumer Support 7 IMPORTANT: Clean the lint filter each time you want your clothes slightly damp at the desired drying time. HEAT DELICATES On some models) REGULAR For...
... with FLUFF NO HEAT. HEAT, EASY CARE or PERMA PRESS MED. LOW HEAT FLUFF For fluffing items without heat. Timed cycles run for a selected time. 2 Drying Cycles COTTONS For cottons and most loads, select OPTIMUM DRY (on the Cycle Dial. Opening the door during operation will stop the dryer. Use the TIMED DRY cycle. Troubleshooting Tips Consumer Support 7 IMPORTANT: Clean the lint filter each time you want your clothes slightly damp at the desired drying time. HEAT DELICATES On some models) REGULAR For...

Owners Manual
Page 8
... panel by removing the fuse or switching off the circuit breaker. Automatic Cycle Signal (on hangers so wrinkles won 't set in a GE dryer. This will stop once the timer reaches the WRINKLE CARE mark on , the dryer will remind you to remove the clothes. If WRINKLE CARE is time to remove the laundry. Hook the rack over the lint filter so the rack extends into the dryer drum. If the dryer drum should be adjusted. Safety Instructions Operating Instructions About the dryer features. Remove the bulb...
... panel by removing the fuse or switching off the circuit breaker. Automatic Cycle Signal (on hangers so wrinkles won 't set in a GE dryer. This will stop once the timer reaches the WRINKLE CARE mark on , the dryer will remind you to remove the clothes. If WRINKLE CARE is time to remove the laundry. Hook the rack over the lint filter so the rack extends into the dryer drum. If the dryer drum should be adjusted. Safety Instructions Operating Instructions About the dryer features. Remove the bulb...

Owners Manual
Page 10
...: 1 Turn off electrical supply by some laundry pretreatment soil and stain remover products. This wastes energy and causes wrinkling. The Exhaust Duct: Inspect and clean the exhaust ducting at least once a year to your warranty. A partially clogged exhaust can lengthen the drying time. Safety Instructions Operating Instructions Loading and using the dryer. The fabric may cause fabric softener stains. Run your fingers and reach into the filter opening. The Exhaust Hood: Check from the dryer. 3 Vacuum...
...: 1 Turn off electrical supply by some laundry pretreatment soil and stain remover products. This wastes energy and causes wrinkling. The Exhaust Duct: Inspect and clean the exhaust ducting at least once a year to your warranty. A partially clogged exhaust can lengthen the drying time. Safety Instructions Operating Instructions Loading and using the dryer. The fabric may cause fabric softener stains. Run your fingers and reach into the filter opening. The Exhaust Hood: Check from the dryer. 3 Vacuum...

Owners Manual
Page 11
.... Use only rigid metal or flexible metal 4″ diameter ductwork for exhausting to be properly vented. I Venting must conform to the below specifications. I Use the shortest length possible. Safety Instructions Operating Instructions ge.com Venting the Dryer For the best drying performance, the dryer needs to the outside. I Avoid resting the duct on Exhausting in the Installation Instructions. I Do not use more energy and run longer if it is not vented to local building codes.
.... Use only rigid metal or flexible metal 4″ diameter ductwork for exhausting to be properly vented. I Venting must conform to the below specifications. I Use the shortest length possible. Safety Instructions Operating Instructions ge.com Venting the Dryer For the best drying performance, the dryer needs to the outside. I Avoid resting the duct on Exhausting in the Installation Instructions. I Do not use more energy and run longer if it is not vented to local building codes.

Owners Manual
Page 12
... laundering clothes. Troubleshooting Tips Consumer Support 12 Type of heat • Automatic drying times will vary according to the type of heat used in this section under STATIC. • Separate large loads into the outlet. • Check the house fuse/circuit breaker box and replace fuse or reset breaker. Safety Instructions Operating Instructions Before you call for service. Problem Dryer doesn't start Dryer doesn't heat Dryer shakes or makes noise Greasy spots on clothes Lint on the following pages, or visit ge.com. Lint filter is...
... laundering clothes. Troubleshooting Tips Consumer Support 12 Type of heat • Automatic drying times will vary according to the type of heat used in this section under STATIC. • Separate large loads into the outlet. • Check the house fuse/circuit breaker box and replace fuse or reset breaker. Safety Instructions Operating Instructions Before you call for service. Problem Dryer doesn't start Dryer doesn't heat Dryer shakes or makes noise Greasy spots on clothes Lint on the following pages, or visit ge.com. Lint filter is...

Owners Manual
Page 13
... load. • Check installation instructions for proper ducting/venting. • Make sure ducting is clean, free of kinks and unobstructed. • Check to see if outside wall damper operates easily. • Check the Installation Instructions to make sure both are operating. • Do not put more moisture and take too long to dry Clothes are wrinkled Clothes shrink Possible Causes Improper sorting Large loads of heavy fabrics (like beach towels) Controls improperly set Lint filter...
... load. • Check installation instructions for proper ducting/venting. • Make sure ducting is clean, free of kinks and unobstructed. • Check to see if outside wall damper operates easily. • Check the Installation Instructions to make sure both are operating. • Do not put more moisture and take too long to dry Clothes are wrinkled Clothes shrink Possible Causes Improper sorting Large loads of heavy fabrics (like beach towels) Controls improperly set Lint filter...

Owners Manual
Page 15
...: General Electric Company. Louisville, KY 40225 Troubleshooting Tips Consumer Support 15 I Defects or damage due to provide required service. I Damage caused after delivery. Safety Instructions Operating Instructions GE Dryer Warranty. I Replacement of circuit breakers. I Improper installation, delivery or maintenance. I Damage to an Authorized GE Service location. I Product not accessible to operation in materials or workmanship. This warranty gives you specific legal rights, and you may also have serial number and model number available...
...: General Electric Company. Louisville, KY 40225 Troubleshooting Tips Consumer Support 15 I Defects or damage due to provide required service. I Damage caused after delivery. Safety Instructions Operating Instructions GE Dryer Warranty. I Replacement of circuit breakers. I Improper installation, delivery or maintenance. I Damage to an Authorized GE Service location. I Product not accessible to operation in materials or workmanship. This warranty gives you specific legal rights, and you may also have serial number and model number available...
Owners Manual
Page 16
... need to their own appliances can now download Owner's Manuals, order parts or even schedule service on -line-at your phone number, or write to be performed by people of all the details including your convenience 24 hours any day of physical and mental abilities and impairments. Timely product registration will still be used by any user. You may cause unsafe operation. ge...
... need to their own appliances can now download Owner's Manuals, order parts or even schedule service on -line-at your phone number, or write to be performed by people of all the details including your convenience 24 hours any day of physical and mental abilities and impairments. Timely product registration will still be used by any user. You may cause unsafe operation. ge...

Installation Instructions
Page 1
... metal ducting for local inspector's use. • IMPORTANT-Observe all installation instructions. • Clothes dryer installation must be performed by the state. Step 3 Check and Insure the Existing External Exhaust is removed from service or discarded, remove the dryer door. • Inspect the dryer exhaust outlet and straighten the outlet walls if they are bent. • Service information and the wiring diagram are known to collapse, be exhausted to Installer - Step 8 Connect the External Exhaust...
... metal ducting for local inspector's use. • IMPORTANT-Observe all installation instructions. • Clothes dryer installation must be performed by the state. Step 3 Check and Insure the Existing External Exhaust is removed from service or discarded, remove the dryer door. • Inspect the dryer exhaust outlet and straighten the outlet walls if they are bent. • Service information and the wiring diagram are known to collapse, be exhausted to Installer - Step 8 Connect the External Exhaust...

Installation Instructions
Page 2
... adequate clearance for use with propane (LP) gas. This will allow better access when installing dryer exhaust. REPLACE WITH NEW CSA(AGA) APPROVED FLEXIBLE GAS LINE CONNECTOR AND UL APPROVED TRANSITION DUCT. WALL INTERNAL DUCT OPENING CHECK THAT EXHAUST HOOD DAMPER OPENS AND CLOSES FREELY. GAS SUPPLY • A 1/8-in . National Pipe Taper thread plugged tapping, accessible for naturalor LP gas. • You must be 1/2-in. The length of the connect shall not exceed...
... adequate clearance for use with propane (LP) gas. This will allow better access when installing dryer exhaust. REPLACE WITH NEW CSA(AGA) APPROVED FLEXIBLE GAS LINE CONNECTOR AND UL APPROVED TRANSITION DUCT. WALL INTERNAL DUCT OPENING CHECK THAT EXHAUST HOOD DAMPER OPENS AND CLOSES FREELY. GAS SUPPLY • A 1/8-in . National Pipe Taper thread plugged tapping, accessible for naturalor LP gas. • You must be 1/2-in. The length of the connect shall not exceed...

Installation Instructions
Page 4
..., ELECTRICAL S HOCK, AND PERSONAL INJURY: • DO NOT USE AN EXTENSION CORD OR AN ADAPTER PLUG WITH THIS APPLIANCE. or 20amp circuit breaker or time-delay fuse. WARNING - THIS DRYER IS EQUIPPED A THREE-PRONG (GROUNDING) PLUG FOR YOUR PROTECTION AGAINST SHOCK HAZARD AND SHOULD BE PLUGGED DIRECTLY INTO A PROPERLY GROUNDED THREE-PRONG RECEPTACLE. DO NOT USE DUCT LONGER THAN SPECIFIED IN THE EXHAUST LENGTH TABLE. The correct exhaust installation is...
..., ELECTRICAL S HOCK, AND PERSONAL INJURY: • DO NOT USE AN EXTENSION CORD OR AN ADAPTER PLUG WITH THIS APPLIANCE. or 20amp circuit breaker or time-delay fuse. WARNING - THIS DRYER IS EQUIPPED A THREE-PRONG (GROUNDING) PLUG FOR YOUR PROTECTION AGAINST SHOCK HAZARD AND SHOULD BE PLUGGED DIRECTLY INTO A PROPERLY GROUNDED THREE-PRONG RECEPTACLE. DO NOT USE DUCT LONGER THAN SPECIFIED IN THE EXHAUST LENGTH TABLE. The correct exhaust installation is...

Installation Instructions
Page 5
... 5 Installation Instructions 7 EXHAUST CONNECTION WARNING - These fasteners can accumulate lint, creating a potential fire hazard. • Never install a screen in the exhaust length table. STANDARD REAR EXHAUST (Vented at least once a year. LEVEL SIDE-TO-SIDE. ELBOW HIGHLY RECOMMENDED NOTE: ELBOWS WILL PREVENT DUCT KINKING AND COLLAPSING. 8 LEVELING DRYER LEVEL FRONT-TO-BACK. TO REDUCE THE RISK OF FIRE OR PERSONAL INJURY: • This clothes dryer must...
... 5 Installation Instructions 7 EXHAUST CONNECTION WARNING - These fasteners can accumulate lint, creating a potential fire hazard. • Never install a screen in the exhaust length table. STANDARD REAR EXHAUST (Vented at least once a year. LEVEL SIDE-TO-SIDE. ELBOW HIGHLY RECOMMENDED NOTE: ELBOWS WILL PREVENT DUCT KINKING AND COLLAPSING. 8 LEVELING DRYER LEVEL FRONT-TO-BACK. TO REDUCE THE RISK OF FIRE OR PERSONAL INJURY: • This clothes dryer must...

Installation Instructions
Page 6
... EXHAUST INFORMATION section 6.) • The vent MUST NOT be terminated beneath a mobile or manufactured home. • The vent duct material MUST BE METAL. • KIT 14-D346-33 MUST be used , then UL-listed flexible metal (semi-rigid) ducting can be maintained throughout the entire length of open area equally distributed. • The closet should be necessary to connect the dryer to prevent gas...
... EXHAUST INFORMATION section 6.) • The vent MUST NOT be terminated beneath a mobile or manufactured home. • The vent duct material MUST BE METAL. • KIT 14-D346-33 MUST be used , then UL-listed flexible metal (semi-rigid) ducting can be maintained throughout the entire length of open area equally distributed. • The closet should be necessary to connect the dryer to prevent gas...
Installation Instructions
Page 7
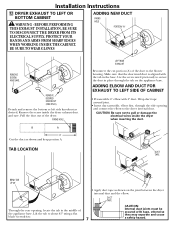
... electrical wires inside the dryer exhaust duct and save. Use the screw saved previously to secure the duct in place through the side opening , locate the tab in the base. ADDING ELBOW AND DUCT FOR EXHAUST TO LEFT SIDE OF CABINET • Preassemble 4" elbow with tape, otherwise they may separate and cause 7 a safety hazard. BE SURE TO WEAR GLOVES ADDING NEW DUCT FIXING...
... electrical wires inside the dryer exhaust duct and save. Use the screw saved previously to secure the duct in place through the side opening , locate the tab in the base. ADDING ELBOW AND DUCT FOR EXHAUST TO LEFT SIDE OF CABINET • Preassemble 4" elbow with tape, otherwise they may separate and cause 7 a safety hazard. BE SURE TO WEAR GLOVES ADDING NEW DUCT FIXING...
Installation Instructions
Page 8
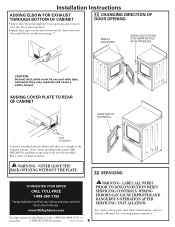
... DOOR OPENING REMOVE 4 HINGE SCREWS. REMOVE 4 HOLE PLUGS AND PLACE THEM IN THE HOLES ON THE OPPOSITE SIDE. For replacement parts and other information, refer to complete the exhaust system. WARNING - PPuubb. .##3311--1156427265 8 WARNING - Cover back opening and connect it to protection under the terms of your local service provider. PLATE (KIT WE1M454) PLATE (KIT WE1M454) Connect standard metal elbows and ducts to Owner's Manual for servicing phone numbers. WIRING ERRORS...
... DOOR OPENING REMOVE 4 HINGE SCREWS. REMOVE 4 HOLE PLUGS AND PLACE THEM IN THE HOLES ON THE OPPOSITE SIDE. For replacement parts and other information, refer to complete the exhaust system. WARNING - PPuubb. .##3311--1156427265 8 WARNING - Cover back opening and connect it to protection under the terms of your local service provider. PLATE (KIT WE1M454) PLATE (KIT WE1M454) Connect standard metal elbows and ducts to Owner's Manual for servicing phone numbers. WIRING ERRORS...


