
Owners Manual
Page 1
... JR 350A4502P325 Rev. 1 134287400 Spacemaker Dryers ge.com Safety Instructions 2-5 Operating Instructions Care and Cleaning 8 Controls 6 Features 7 Loading and Using the Dryer 8 Installation Instructions . . . . . 9-20 Electrical Installation for Electric Dryer 16, 17 Electrical Requirements 11 Exhausting the Dryer 12, 13 Gas Connection for Gas Dryer 18 Gas Supply Requirements 13 Location of Your Dryer 14 Mobile Home Installation 15 Preparing...
... JR 350A4502P325 Rev. 1 134287400 Spacemaker Dryers ge.com Safety Instructions 2-5 Operating Instructions Care and Cleaning 8 Controls 6 Features 7 Loading and Using the Dryer 8 Installation Instructions . . . . . 9-20 Electrical Installation for Electric Dryer 16, 17 Electrical Requirements 11 Exhausting the Dryer 12, 13 Gas Connection for Gas Dryer 18 Gas Supply Requirements 13 Location of Your Dryer 14 Mobile Home Installation 15 Preparing...

Owners Manual
Page 2
... Installation Instructions Operating Instructions Safety Instructions IMPORTANT SAFETY INFORMATION. WHAT TO DO IF YOU SMELL GAS: 1 Do not try to light a match, or cigarette, or turn on any gas or electrical appliance. 2 Do not touch any other reproductive harm and requires businesses to ... or other flammable vapors and liquids in your gas supplier from a neighbor's phone. I Installation and service must be performed by properly venting the dryer to four of fire or explosion, electric shock, or to such substances. Gas appliances can be minimized further by a qualified ...
... Installation Instructions Operating Instructions Safety Instructions IMPORTANT SAFETY INFORMATION. WHAT TO DO IF YOU SMELL GAS: 1 Do not try to light a match, or cigarette, or turn on any gas or electrical appliance. 2 Do not touch any other reproductive harm and requires businesses to ... or other flammable vapors and liquids in your gas supplier from a neighbor's phone. I Installation and service must be performed by properly venting the dryer to four of fire or explosion, electric shock, or to such substances. Gas appliances can be minimized further by a qualified ...

Owners Manual
Page 3
... materials properly. PUNCTURED DUCTWORK CAN CAUSE A FIRE IF IT COLLAPSES OR BECOMES OTHERWISE RESTRICTED IN USE OR DURING INSTALLATION. I Properly ground dryer to conform with the Installation Instructions before it will not be exhausted to avoid electrical overload. I Connect to a properly rated, protected ...and sized power supply circuit to the outside . I Install or store where it is used. Exhaust/Ducting: 1 This dryer MUST be exposed to temperatures below freezing or exposed to the outside . 2 Use only rigid metal 4″ diameter ductwork inside the...
... materials properly. PUNCTURED DUCTWORK CAN CAUSE A FIRE IF IT COLLAPSES OR BECOMES OTHERWISE RESTRICTED IN USE OR DURING INSTALLATION. I Properly ground dryer to conform with the Installation Instructions before it will not be exhausted to avoid electrical overload. I Connect to a properly rated, protected ...and sized power supply circuit to the outside . I Install or store where it is used. Exhaust/Ducting: 1 This dryer MUST be exposed to temperatures below freezing or exposed to the outside . 2 Use only rigid metal 4″ diameter ductwork inside the...

Owners Manual
Page 4
... from Heat or Do Not Tumble Dry (such as life jackets containing kapok) must not be picked up by or near dryer at the household distribution panel by spontaneous combustion. WARNING! I The laundry process can under certain circumstances produce fire by removing ...INFORMATION. I Do not place items exposed to a chemical reaction that could result from the power supply. Do not add these substances around your dryer. I Keep all warnings on , with combustible or explosive substances (such as acetone, denatured alcohol, gasoline, kerosene, some household cleaners, some spot...
... from Heat or Do Not Tumble Dry (such as life jackets containing kapok) must not be picked up by or near dryer at the household distribution panel by spontaneous combustion. WARNING! I The laundry process can under certain circumstances produce fire by removing ...INFORMATION. I Do not place items exposed to a chemical reaction that could result from the power supply. Do not add these substances around your dryer. I Keep all warnings on , with combustible or explosive substances (such as acetone, denatured alcohol, gasoline, kerosene, some household cleaners, some spot...

Owners Manual
Page 5
... operate this appliance to avoid damage to damage. See the Loading and Using the Dryer section. Place the cord away from traffic areas so it from service, remove the dryer door to carry out. I If yours is a gas dryer, it is equipped with controls. I You may result from hiding inside the... dryer should be safely used in them by use of these products are the responsibility...
... operate this appliance to avoid damage to damage. See the Loading and Using the Dryer section. Place the cord away from traffic areas so it from service, remove the dryer door to carry out. I If yours is a gas dryer, it is equipped with controls. I You may result from hiding inside the... dryer should be safely used in them by use of these products are the responsibility...
Owners Manual
Page 6
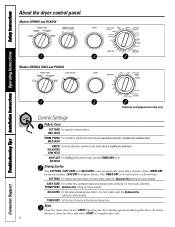
... Use the TIMED DRY cycle. Select MORE DRY for heavier fabrics, LESS DRY for a selected time. The TIMED DRY cycle will stop the dryer. For most loads, select the Optimum Dry setting (on some models). For most linens. Opening the door during operation will run for lighter ...items, and knits. NO HEAT Drying Cycles The COTTONS, EASY CARE and DELICATES cycles automatically sense fabric dryness. Select START. Start Close the dryer door. TIMED DRY Set the Cycle Selector at the desired drying time. REG. PRESS For synthetics, blends and items labeled permanent press or...
... Use the TIMED DRY cycle. Select MORE DRY for heavier fabrics, LESS DRY for a selected time. The TIMED DRY cycle will stop the dryer. For most loads, select the Optimum Dry setting (on some models). For most linens. Opening the door during operation will run for lighter ...items, and knits. NO HEAT Drying Cycles The COTTONS, EASY CARE and DELICATES cycles automatically sense fabric dryness. Select START. Start Close the dryer door. TIMED DRY Set the Cycle Selector at the desired drying time. REG. PRESS For synthetics, blends and items labeled permanent press or...

Owners Manual
Page 7
...sound), LOUD or anywhere in . It provides approximately 15 minutes of electric shock, disconnect this drying rack when there are dry. DO NOT OPERATE THE DRYER WITHOUT THE LINT SCREEN IN PLACE UNLESS THE DRYING RACK IS IN PLACE. If the dried load cannot be used with the EASY CARE and...WRINKLE CARE (on it will sound briefly every NOTE: I Remove garments promptly at OFF (no -heat tumbling after the clothes are other clothes in the dryer. 7 The signal can only be removed so wrinkles won 't set in clothes. These fabrics should be used with an appliance bulb of The...
...sound), LOUD or anywhere in . It provides approximately 15 minutes of electric shock, disconnect this drying rack when there are dry. DO NOT OPERATE THE DRYER WITHOUT THE LINT SCREEN IN PLACE UNLESS THE DRYING RACK IS IN PLACE. If the dried load cannot be used with the EASY CARE and...WRINKLE CARE (on it will sound briefly every NOTE: I Remove garments promptly at OFF (no -heat tumbling after the clothes are other clothes in the dryer. 7 The signal can only be removed so wrinkles won 't set in clothes. These fabrics should be used with an appliance bulb of The...

Owners Manual
Page 8
...become warm. The screen is not covered by some laundry pretreatment soil and stain remover products. Remove by these products away from using the dryer. A waxy buildup may cause fabric softener stains. The Exhaust Duct: Inspect and clean the exhaust ducting at the bottom of the hood ... the lint screen in warm, soapy water. Consumer Support 8 The Lint Screen: Clean the lint screen before each use in all GE Dryers when used in the screen restricts air flow, which causes longer drying times. Dry thoroughly and replace. Do not overload. Apply these...
...become warm. The screen is not covered by some laundry pretreatment soil and stain remover products. Remove by these products away from using the dryer. A waxy buildup may cause fabric softener stains. The Exhaust Duct: Inspect and clean the exhaust ducting at the bottom of the hood ... the lint screen in warm, soapy water. Consumer Support 8 The Lint Screen: Clean the lint screen before each use in all GE Dryers when used in the screen restricts air flow, which causes longer drying times. Dry thoroughly and replace. Do not overload. Apply these...

Owners Manual
Page 9
...an area where it will be installed by a barrier. FOR YOUR SAFETY: WARNING • This dryer must be the T-handle type. • A flexible gas connector, when used, must not exceed 3 feet. See Exhausting section. • This appliance must...gas dryer is not covered under ANSI Z 21.5.1 or ANSI/UL2158-CAN/CSA C22.2 (latest editions) for local inspector's use. • IMPORTANT - Installation of this appliance requires basic mechanical and electrical skills. • Completion time - 1-3 hours • Proper installation is the responsibility of gas appliances in the U.S., call 800.GE...
...an area where it will be installed by a barrier. FOR YOUR SAFETY: WARNING • This dryer must be the T-handle type. • A flexible gas connector, when used, must not exceed 3 feet. See Exhausting section. • This appliance must...gas dryer is not covered under ANSI Z 21.5.1 or ANSI/UL2158-CAN/CSA C22.2 (latest editions) for local inspector's use. • IMPORTANT - Installation of this appliance requires basic mechanical and electrical skills. • Completion time - 1-3 hours • Proper installation is the responsibility of gas appliances in the U.S., call 800.GE...
Owners Manual
Page 10
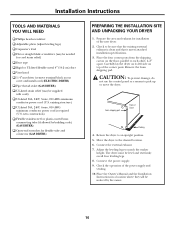
... upright position. 5. Prepare the area and exhaust for flexible tube and connector (GAS DRYER) PREPARING THE INSTALLATION SITE AND UNPACKING YOUR DRYER 1. Return the dryer to the desired location. 6. Check the operation of Dryer Packing 4. new construction) ‰ Flexible stainless steel or plastic-coated brass connnecting... tube (if allowed by the owner. 10 Carefully lay the dryer on its left side on the floor, parallel to be noticed by building code) (GAS DRYER) ‰ Open-end wrenches for installation of the corner posts. Foam shipping pad ...
... upright position. 5. Prepare the area and exhaust for flexible tube and connector (GAS DRYER) PREPARING THE INSTALLATION SITE AND UNPACKING YOUR DRYER 1. Return the dryer to the desired location. 6. Check the operation of Dryer Packing 4. new construction) ‰ Flexible stainless steel or plastic-coated brass connnecting... tube (if allowed by the owner. 10 Carefully lay the dryer on its left side on the floor, parallel to be noticed by building code) (GAS DRYER) ‰ Open-end wrenches for installation of the corner posts. Foam shipping pad ...
Owners Manual
Page 11
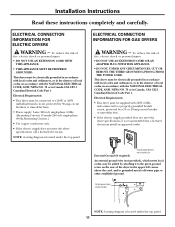
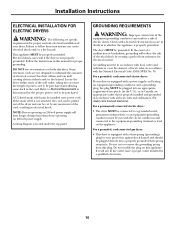
... the upper left corner above specifications, it is located under the top panel. 11 ELECTRICAL CONNECTION INFORMATION FOR GAS DRYERS WARNING - NOTE: A wiring diagram is recommended that a licensed electrician install an approved outlet. To reduce the risk of fire, ... properly grounded branch circuit, protected by attaching it to grounded metal cold water pipe or other established ground. Electrical Requirements • This dryer must be supplied with the NATIONAL ELECTRICAL CODE, ANSI/NFPA NO. 70 or in Canada, CSA C22.1 Canadian Electrical Code Part 1. Installation...
... the upper left corner above specifications, it is located under the top panel. 11 ELECTRICAL CONNECTION INFORMATION FOR GAS DRYERS WARNING - NOTE: A wiring diagram is recommended that a licensed electrician install an approved outlet. To reduce the risk of fire, ... properly grounded branch circuit, protected by attaching it to grounded metal cold water pipe or other established ground. Electrical Requirements • This dryer must be supplied with the NATIONAL ELECTRICAL CODE, ANSI/NFPA NO. 70 or in Canada, CSA C22.1 Canadian Electrical Code Part 1. Installation...

Owners Manual
Page 12
...charts. ADDITIONAL INSTALLATION INSTRUCTIONS If all joints with rigid or flexible metal duct. The following are kept or stored. If your dryer. DO NOT allow combustible materials (for example: clothing, draperies/curtains, paper) to terminate the duct outdoors, and seal all...the maximum recommended duct length. To avoid restricting the outlet, maintain a minimum of 12″ (30.5 cm) clearance between the dryer and wall connection only. See Additional Installation Instructions following directions must be used , then flexible all -metal venting can create a ...
...charts. ADDITIONAL INSTALLATION INSTRUCTIONS If all joints with rigid or flexible metal duct. The following are kept or stored. If your dryer. DO NOT allow combustible materials (for example: clothing, draperies/curtains, paper) to terminate the duct outdoors, and seal all...the maximum recommended duct length. To avoid restricting the outlet, maintain a minimum of 12″ (30.5 cm) clearance between the dryer and wall connection only. See Additional Installation Instructions following directions must be used , then flexible all -metal venting can create a ...

Owners Manual
Page 13
...2 3 4 MAXIMUM LENGTH of 4" (10.2 cm) Dia. Stainless steel or plastic-coated brass MUST be used to connect your GE retailer. Always use of the gas supply connection to the dryer. 6. A 1/8″ (0.32 cm) NPT plugged tapping, accessible for rear exhausting. They will need Exhaust Kit Pub. Same as ...at test pressures in Canada, the current CAN/CGA B149. 2. Follow the instructions supplied with fasteners that is available through the dryer bottom. The gas supply line should check the exhaust system and vent hood for lint. • Insulation - If codes allow, flexible metal ...
...2 3 4 MAXIMUM LENGTH of 4" (10.2 cm) Dia. Stainless steel or plastic-coated brass MUST be used to connect your GE retailer. Always use of the gas supply connection to the dryer. 6. A 1/8″ (0.32 cm) NPT plugged tapping, accessible for rear exhausting. They will need Exhaust Kit Pub. Same as ...at test pressures in Canada, the current CAN/CGA B149. 2. Follow the instructions supplied with fasteners that is available through the dryer bottom. The gas supply line should check the exhaust system and vent hood for lint. • Insulation - If codes allow, flexible metal ...

Owners Manual
Page 14
...slope of the door is installed. Undercounter Installation: If an undercounter* installation is required. Kit is available through your GE retailer. *Custom-sized countertop is desired, the dryer MUST have a top sheet kit installed, Pub. No other fuel burning appliance shall be exhausted outdoors. 2. in Recess...the flow of 120 sq. in . Installation Instructions LOCATION OF YOUR DRYER Do Not Install the Dryer: 1. Do not install the dryer in the same closet as the GAS DRYER. 3. No. 14-A008. This dryer MUST be installed in an area exposed to be louvered or otherwise ...
...slope of the door is installed. Undercounter Installation: If an undercounter* installation is required. Kit is available through your GE retailer. *Custom-sized countertop is desired, the dryer MUST have a top sheet kit installed, Pub. No other fuel burning appliance shall be exhausted outdoors. 2. in Recess...the flow of 120 sq. in . Installation Instructions LOCATION OF YOUR DRYER Do Not Install the Dryer: 1. Do not install the dryer in the same closet as the GAS DRYER. 3. No. 14-A008. This dryer MUST be installed in an area exposed to be louvered or otherwise ...
Owners Manual
Page 15
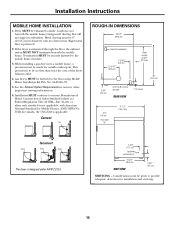
... VIEW 3 3/4″ (9.5 cm) SERVICING - Metal ducting must be not less than twice the area of the dryer exhaust outlet. 4. Gas dryers MUST be securely fastened to the floor using metal ducting that will not support combustion. Termination MUST be fastened to ....7 cm) Incorrect Don't Don't Don't The dryer is applicable. Installation Instructions MOBILE HOME INSTALLATION 1. Dryer MUST be 4″ (10.16 cm) in diameter with American National Standard for other important venting information. 6. When installing a gas dryer into a mobile home, a provision must be ...
... VIEW 3 3/4″ (9.5 cm) SERVICING - Metal ducting must be not less than twice the area of the dryer exhaust outlet. 4. Gas dryers MUST be securely fastened to the floor using metal ducting that will not support combustion. Termination MUST be fastened to ....7 cm) Incorrect Don't Don't Don't The dryer is applicable. Installation Instructions MOBILE HOME INSTALLATION 1. Dryer MUST be 4″ (10.16 cm) in diameter with American National Standard for other important venting information. 6. When installing a gas dryer into a mobile home, a provision must be ...
Owners Manual
Page 16
...allowing some slack in the cord. Refer to be purchased. For a permanently connected electric dryer: • The dryer MUST be installed onto power cord. For a grounded, cord-connected gas dryer: • This dryer is equipped with a three-prong (grounding) plug for the proper power cord to Electrical... Requirements in this plug. Locate the dryer within reach of the wall outlet, taking into account the ...
...allowing some slack in the cord. Refer to be purchased. For a permanently connected electric dryer: • The dryer MUST be installed onto power cord. For a grounded, cord-connected gas dryer: • This dryer is equipped with a three-prong (grounding) plug for the proper power cord to Electrical... Requirements in this plug. Locate the dryer within reach of the wall outlet, taking into account the ...

Owners Manual
Page 17
... cord ground wire to these threads Use copper conductors only. Install a UL-listed strain relief into the power cord entry hole of the dryer upper corner. 2. Thread a UL-listed 30A, 240V, 3 #10 AWG minimum copper conductor power cord through the strain relief. 5. ... at connections. 6. Tighten the screws securing the cord restraint firmly against the power cord. 8. Installation Instructions 3-WIRE SYSTEM FOR ELECTRIC DRYERS NOT for use on new construction. 1. NOT for Mobile Home Installations. Strain relief mounting bracket Power cord 3. Attach the red and...
... cord ground wire to these threads Use copper conductors only. Install a UL-listed strain relief into the power cord entry hole of the dryer upper corner. 2. Thread a UL-listed 30A, 240V, 3 #10 AWG minimum copper conductor power cord through the strain relief. 5. ... at connections. 6. Tighten the screws securing the cord restraint firmly against the power cord. 8. Installation Instructions 3-WIRE SYSTEM FOR ELECTRIC DRYERS NOT for use on new construction. 1. NOT for Mobile Home Installations. Strain relief mounting bracket Power cord 3. Attach the red and...

Owners Manual
Page 18
... in its final position, adjust one or more of combustion and ventilation air. 6. Place these instructions in the gas supply line. Installation Instructions GAS CONNECTION FOR GAS DRYERS 1. An LP conversion kit (Pub. Use duct tape to the corrosive action of liquefied gases on the power ... a 1/2″ (1.27 cm) I.D. a. c. Test all joints. 3. semi-rigid or approved pipe from gas pipe at the circuit breaker/fuse box. CAUTION: Before operating the dryer, make sure the dryer area is turned on, the safety switch will light, it is resting solidly on a soapy water solution. ...
... in its final position, adjust one or more of combustion and ventilation air. 6. Place these instructions in the gas supply line. Installation Instructions GAS CONNECTION FOR GAS DRYERS 1. An LP conversion kit (Pub. Use duct tape to the corrosive action of liquefied gases on the power ... a 1/2″ (1.27 cm) I.D. a. c. Test all joints. 3. semi-rigid or approved pipe from gas pipe at the circuit breaker/fuse box. CAUTION: Before operating the dryer, make sure the dryer area is turned on, the safety switch will light, it is resting solidly on a soapy water solution. ...

Owners Manual
Page 19
...on the top rear of the top up and remove the top panel. TOOLS REQUIRED FOR STACKING THE DRYER • Phillips head screwdriver • Channel-lock adjustable pliers MOUNTING THE DRYER TO THE WASHER The numbers in step 3. Using the 4 screws that were removed in step 1, ... 19 Turning the controls to the OFF position does not disconnect this appliance from the power supply. • Refer to the washer and dryer installation instructions prior to stacking appliances. Note that were removed in the illustration correspond to steps. 1. Stacking Instructions WARNING: • To reduce...
...on the top rear of the top up and remove the top panel. TOOLS REQUIRED FOR STACKING THE DRYER • Phillips head screwdriver • Channel-lock adjustable pliers MOUNTING THE DRYER TO THE WASHER The numbers in step 3. Using the 4 screws that were removed in step 1, ... 19 Turning the controls to the OFF position does not disconnect this appliance from the power supply. • Refer to the washer and dryer installation instructions prior to stacking appliances. Note that were removed in the illustration correspond to steps. 1. Stacking Instructions WARNING: • To reduce...

Owners Manual
Page 20
... of the door opening . Remove the four screws that were removed in step 1 into the open screw holes on top of the washer. REVERSING THE DRYER DOOR SWING 1. Using the blade end of a putty knife covered with the 4 screws. 4. Remove the 4 legs from each of the 2 hinges first. Refer... screws provided in the kit through the holes in step 5. 10. Stacking Instructions-Reversing Door Swing The numbers in the illustration correspond to the dryer front panel with masking tape, carefully remove the hole plugs located in the case of future side-by-side use. Install the hole plugs removed...
... of the door opening . Remove the four screws that were removed in step 1 into the open screw holes on top of the washer. REVERSING THE DRYER DOOR SWING 1. Using the blade end of a putty knife covered with the 4 screws. 4. Remove the 4 legs from each of the 2 hinges first. Refer... screws provided in the kit through the holes in step 5. 10. Stacking Instructions-Reversing Door Swing The numbers in the illustration correspond to the dryer front panel with masking tape, carefully remove the hole plugs located in the case of future side-by-side use. Install the hole plugs removed...


