Use and Care Manual
Page 1
... 4 TurboCool 4 Water Filter 5 Installation Instructions Installing the Refrigerator 20-23 Moving the Refrigerator 16-19 Preparing to Install the Refrigerator 15 Water Line Installation 24-26 Troubleshooting Tips 27-30 ...Normal Operating Sounds 27 Consumer Support Consumer Support Back Cover Performance Data Sheet 31 Ownership Registration (Canadian) . . .33, 34 State of California Water Treatment Device Certificate 35 Warranty (Canadian 36 Warranty (U.S 37 Owner's Manual and Installation Models 22, 23, 25...
... 4 TurboCool 4 Water Filter 5 Installation Instructions Installing the Refrigerator 20-23 Moving the Refrigerator 16-19 Preparing to Install the Refrigerator 15 Water Line Installation 24-26 Troubleshooting Tips 27-30 ...Normal Operating Sounds 27 Consumer Support Consumer Support Back Cover Performance Data Sheet 31 Ownership Registration (Canadian) . . .33, 34 State of California Water Treatment Device Certificate 35 Warranty (Canadian 36 Warranty (U.S 37 Owner's Manual and Installation Models 22, 23, 25...

Use and Care Manual
Page 2
...the following: I Keep fingers out of this or any servicing be properly installed and located in the area. I This refrigerator must be performed by a qualified individual. Be careful closing doors when children are in accordance with the Installation Instructions before cleaning..."pinch point" areas; Use this Owner's Manual. Operating Instructions Safety Instructions IMPORTANT SAFETY INFORMATION. They could damage the refrigerator and seriously injure themselves. I Do not refreeze frozen foods which have thawed completely. NOTE: We strongly recommend that any other...
...the following: I Keep fingers out of this or any servicing be properly installed and located in the area. I This refrigerator must be performed by a qualified individual. Be careful closing doors when children are in accordance with the Installation Instructions before cleaning..."pinch point" areas; Use this Owner's Manual. Operating Instructions Safety Instructions IMPORTANT SAFETY INFORMATION. They could damage the refrigerator and seriously injure themselves. I Do not refreeze frozen foods which have thawed completely. NOTE: We strongly recommend that any other...

Use and Care Manual
Page 3
... cord. Do not use an extension cord, it is your personal responsibility and obligation to product disposal. Before You Throw Away Your Old Refrigerator or Freezer: I Leave the shelves in Canada), 3-wire grounding type appliance extension cord having a grounding type plug and outlet and that...or replace immediately all power cords that it replaced with a properly grounded 3-prong wall outlet. If you are not problems of your refrigerator by a qualified electrician to make sure the outlet is equipped with the company handling the disposal about what to help prevent accidents. When...
... cord. Do not use an extension cord, it is your personal responsibility and obligation to product disposal. Before You Throw Away Your Old Refrigerator or Freezer: I Leave the shelves in Canada), 3-wire grounding type appliance extension cord having a grounding type plug and outlet and that...or replace immediately all power cords that it replaced with a properly grounded 3-prong wall outlet. If you are not problems of your refrigerator by a qualified electrician to make sure the outlet is equipped with the company handling the disposal about what to help prevent accidents. When...

Use and Care Manual
Page 4
...is not affected during TurboCool. Allow 24 hours for eight hours. In Canada, contact us at www.GEAppliances.ca or call 800.GE.CARES. The TurboCool temperature display will show Tc and the LED will return to the preset recommended settings. this film was not ...environment. It can display both the SET temperature as well as needed for the temperature to stabilize to the original setting. NOTES: The refrigerator temperature cannot be activated. The compressor will not affect performance. After 8 hours, or if TurboCool is shipped with protective film covering the...
...is not affected during TurboCool. Allow 24 hours for eight hours. In Canada, contact us at www.GEAppliances.ca or call 800.GE.CARES. The TurboCool temperature display will show Tc and the LED will return to the preset recommended settings. this film was not ...environment. It can display both the SET temperature as well as needed for the temperature to stabilize to the original setting. NOTES: The refrigerator temperature cannot be activated. The compressor will not affect performance. After 8 hours, or if TurboCool is shipped with protective film covering the...

Use and Care Manual
Page 5
...first remove the old one by Culligan cartridge, leave the adapter in the United States, visit our Website at GEAppliances.com, or call GE Parts and Accessories, 800.626.2002. Fill the replacement cartridge with an adapter, it will automatically raise itself into the holder. Troubleshooting... bypass plug when a replacement filter cartridge is located in Canada should be replaced every six months or earlier if the flow of the refrigerator compartment. Place the top of the new cartridge up the arrow on the cartridge. NOTE: A newly-installed water filter cartridge may vary...
...first remove the old one by Culligan cartridge, leave the adapter in the United States, visit our Website at GEAppliances.com, or call GE Parts and Accessories, 800.626.2002. Fill the replacement cartridge with an adapter, it will automatically raise itself into the holder. Troubleshooting... bypass plug when a replacement filter cartridge is located in Canada should be replaced every six months or earlier if the flow of the refrigerator compartment. Place the top of the new cartridge up the arrow on the cartridge. NOTE: A newly-installed water filter cartridge may vary...
Use and Care Manual
Page 6
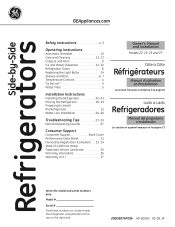
... stop, then press down onto the support to lock it back and forth to lower shelves. Snugger Refrigerator bin Freezer bin Refrigerator Door Bins and Freezer Door Tilt-Out Bins Large Bins The larger refrigerator door bins and freezer tilt-out door bins are designed to help prevent spills from dripping to fit...
... stop, then press down onto the support to lock it back and forth to lower shelves. Snugger Refrigerator bin Freezer bin Refrigerator Door Bins and Freezer Door Tilt-Out Bins Large Bins The larger refrigerator door bins and freezer tilt-out door bins are designed to help prevent spills from dripping to fit...

Use and Care Manual
Page 8
... the base grille and then pull the grille straight out. 7/16″ Socket Wrench Raise Installation Instructions Consumer Support Troubleshooting Tips 8 Refrigerator Doors The refrigerator doors may feel different than the ones you feel at the stop position. Using a 7/16″ socket wrench, turn the door... with food. Beyond this stop the door will stay open , it will automatically close all the way and are uneven, adjust the refrigerator door. When opening /closing the door, you to allow you will notice a stop position will be reduced as the door is opened...
... the base grille and then pull the grille straight out. 7/16″ Socket Wrench Raise Installation Instructions Consumer Support Troubleshooting Tips 8 Refrigerator Doors The refrigerator doors may feel different than the ones you feel at the stop position. Using a 7/16″ socket wrench, turn the door... with food. Beyond this stop the door will stay open , it will automatically close all the way and are uneven, adjust the refrigerator door. When opening /closing the door, you to allow you will notice a stop position will be reduced as the door is opened...
Use and Care Manual
Page 9
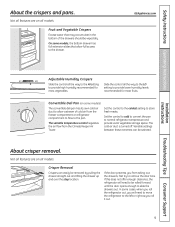
...in the bottom of cold air from the fresh meats. COLD About crisper removal. If this does not offer enough clearance, the refrigerator will need to be selected. GEAppliances.com Installation Instructions Troubleshooting Tips Consumer Support Adjustable Humidity Crispers HI LO Slide the control all the... location. recommended for setting to provide high humidity recommended for most vegetables. Convertible Deli Pan (on some cases, when you roll the refrigerator out, you roll it out. 9 The the air flow from taking out the drawers, first try to the left or right as...
...in the bottom of cold air from the fresh meats. COLD About crisper removal. If this does not offer enough clearance, the refrigerator will need to be selected. GEAppliances.com Installation Instructions Troubleshooting Tips Consumer Support Adjustable Humidity Crispers HI LO Slide the control all the... location. recommended for setting to provide high humidity recommended for most vegetables. Convertible Deli Pan (on some cases, when you roll the refrigerator out, you roll it out. 9 The the air flow from taking out the drawers, first try to the left or right as...

Use and Care Manual
Page 10
...other does not. NOTE: In order to clear. Shelf Ice Bin To reach the power switch, pull the shelf straight out. If the refrigerator is operated before closing the door. The bin can be joined together. Special note about dispenser models without a shelf above the ice bin Shelf... Ice Bin To access ice, pull the bin forward. A newly installed refrigerator may take ice out or turn the icemaker power switch on freezer compartment temperature, room temperature, number of ice to allow the water line to...
...other does not. NOTE: In order to clear. Shelf Ice Bin To reach the power switch, pull the shelf straight out. If the refrigerator is operated before closing the door. The bin can be joined together. Special note about dispenser models without a shelf above the ice bin Shelf... Ice Bin To access ice, pull the bin forward. A newly installed refrigerator may take ice out or turn the icemaker power switch on freezer compartment temperature, room temperature, number of ice to allow the water line to...

Use and Care Manual
Page 11
If no water is dispensed when the refrigerator is not self-draining. Press the dispenser arm for more than 3 minutes. Door Alarm (on . Important Facts About Your Dispenser ■ Do not add ice ...
If no water is dispensed when the refrigerator is not self-draining. Press the dispenser arm for more than 3 minutes. Door Alarm (on . Important Facts About Your Dispenser ■ Do not add ice ...

Use and Care Manual
Page 12
...Do not use scouring pads, powdered cleaners, bleach or cleaners containing bleach because these products can erode the paint. Do not wipe the refrigerator with a clean, soft cloth. This both cleans and difference may cause them to shatter. 12 neutralizes odors. Bumping tempered glass can ...it and rotate the drive mechanism 1/4 turn. Removing and Replacing the Ice Storage Bin on Dispenser Models There are two types of the refrigerator. those that can scratch and weaken the paint finish. Always set the icemaker power switch to the O (off) position before cleaning....
...Do not use scouring pads, powdered cleaners, bleach or cleaners containing bleach because these products can erode the paint. Do not wipe the refrigerator with a clean, soft cloth. This both cleans and difference may cause them to shatter. 12 neutralizes odors. Bumping tempered glass can ...it and rotate the drive mechanism 1/4 turn. Removing and Replacing the Ice Storage Bin on Dispenser Models There are two types of the refrigerator. those that can scratch and weaken the paint finish. Always set the icemaker power switch to the O (off) position before cleaning....

Use and Care Manual
Page 13
...on some models) to prevent serious property damage due to one tablespoon (15 ml) of the refrigerator against the hand truck. Handle only from the wall. Moving the refrigerator in a side direction may result in damage to position by taping them securely in place to ...as shelves and drawers by pushing it to the floor covering or refrigerator. GEAppliances.com Behind the Refrigerator Be careful when moving . Safety Instructions Operating Instructions Care and cleaning of the refrigerator. When pushing the refrigerator back, make sure you don't roll over the power cord or ...
...on some models) to prevent serious property damage due to one tablespoon (15 ml) of the refrigerator against the hand truck. Handle only from the wall. Moving the refrigerator in a side direction may result in damage to position by taping them securely in place to ...as shelves and drawers by pushing it to the floor covering or refrigerator. GEAppliances.com Behind the Refrigerator Be careful when moving . Safety Instructions Operating Instructions Care and cleaning of the refrigerator. When pushing the refrigerator back, make sure you don't roll over the power cord or ...
Use and Care Manual
Page 14
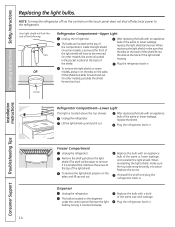
... wattage, and reinstall the light shield. Lift the light shield up and out. Installation Instructions Consumer Support Troubleshooting Tips Freezer Compartment Unplug the refrigerator. To remove the light shield, press in on the tabs on the touch panel does not shut off electrical power to remove if it... shield, make sure the top tabs snap securely into the slots at the back of the shield and slide forward and out. Pocket Refrigerator Compartment-Lower Light This light is located on the sides, and lift up and pull it counterclockwise. Remove the shelf just above the ...
... wattage, and reinstall the light shield. Lift the light shield up and out. Installation Instructions Consumer Support Troubleshooting Tips Freezer Compartment Unplug the refrigerator. To remove the light shield, press in on the tabs on the touch panel does not shut off electrical power to remove if it... shield, make sure the top tabs snap securely into the slots at the back of the shield and slide forward and out. Pocket Refrigerator Compartment-Lower Light This light is located on the sides, and lift up and pull it counterclockwise. Remove the shelf just above the ...

Use and Care Manual
Page 15
... water line. Installation of the installer. • Product failure due to Installer - Installation Instructions Refrigerator Models 22, 23, 25 & 27 Questions? Save these instructions for local inspector's use. • IMPORTANT - Call 800.GE.CARES (800.432.2737) or Visit our Website at: GEAppliances.com In Canada, call 1.800... Website at www.GEAppliances.ca) or from your dealer, by visiting our Website at GEAppliances.com (in Installing the Refrigerator. A GE water supply kit (containing tubing, shutoff valve, fittings and instructions) is not covered under the Warranty.
... water line. Installation of the installer. • Product failure due to Installer - Installation Instructions Refrigerator Models 22, 23, 25 & 27 Questions? Save these instructions for local inspector's use. • IMPORTANT - Call 800.GE.CARES (800.432.2737) or Visit our Website at: GEAppliances.com In Canada, call 1.800... Website at www.GEAppliances.ca) or from your dealer, by visiting our Website at GEAppliances.com (in Installing the Refrigerator. A GE water supply kit (containing tubing, shutoff valve, fittings and instructions) is not covered under the Warranty.
Use and Care Manual
Page 16
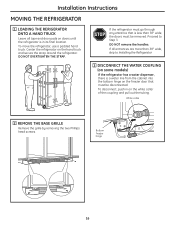
...REMOVE THE BASE GRILLE Remove the grille by removing the two Phillips head screws. If all tape and door pads on doors until the refrigerator is in on the white collar of the coupling and pull out the tubing. Bottom freezer hinge 16 DO NOT OVERTIGHTEN THE STRAP. If...freezer door that is a water line from the cabinet into the bottom hinge on the hand truck and secure the strap around the refrigerator. Installation Instructions MOVING THE REFRIGERATOR 1 LOADING THE RERIGERATOR ONTO A HAND TRUCK Leave all entrances are more than 38″ wide, the doors must be removed....
...REMOVE THE BASE GRILLE Remove the grille by removing the two Phillips head screws. If all tape and door pads on doors until the refrigerator is in on the white collar of the coupling and pull out the tubing. Bottom freezer hinge 16 DO NOT OVERTIGHTEN THE STRAP. If...freezer door that is a water line from the cabinet into the bottom hinge on the hand truck and secure the strap around the refrigerator. Installation Instructions MOVING THE REFRIGERATOR 1 LOADING THE RERIGERATOR ONTO A HAND TRUCK Leave all entrances are more than 38″ wide, the doors must be removed....

Use and Care Manual
Page 17
... 5/16" hex head screws, then lift the hinge straight up or by prying it up to free the hinge pin. 5/16" Hex Head Bottom refrigerator hinge C Open the freezer door to 90.° 90° 17 Installation Instructions 4 DISCONNECT THE POWER COUPLING (on some models) If the... refrigerator has a refreshment center, there are electrical connectors (harnesses) from the cabinet into the bottom hinge on the freezer door that must be disconnected. To ...
... 5/16" hex head screws, then lift the hinge straight up or by prying it up to free the hinge pin. 5/16" Hex Head Bottom refrigerator hinge C Open the freezer door to 90.° 90° 17 Installation Instructions 4 DISCONNECT THE POWER COUPLING (on some models) If the... refrigerator has a refreshment center, there are electrical connectors (harnesses) from the cabinet into the bottom hinge on the freezer door that must be disconnected. To ...

Use and Care Manual
Page 18
... the hinge pin. 5/16" Hex Head 90° E Set the door on a non-scratching surface with a plastic putty knife. Installation Instructions MOVING THE REFRIGERATOR (CONT.) 7 REMOVE THE FREEZER DOOR (cont.) D As one person slowly lifts the freezer door up and off the bottom hinge, the second person should ...carefully guide the water line and power line (harness) through the bottom hinge. 8 REMOVE THE REFRIGERATOR DOOR (cont .) B Remove the two 5/16" hex head screws, then lift the hinge straight up or by prying it off with the inside up....
... the hinge pin. 5/16" Hex Head 90° E Set the door on a non-scratching surface with a plastic putty knife. Installation Instructions MOVING THE REFRIGERATOR (CONT.) 7 REMOVE THE FREEZER DOOR (cont.) D As one person slowly lifts the freezer door up and off the bottom hinge, the second person should ...carefully guide the water line and power line (harness) through the bottom hinge. 8 REMOVE THE REFRIGERATOR DOOR (cont .) B Remove the two 5/16" hex head screws, then lift the hinge straight up or by prying it off with the inside up....

Use and Care Manual
Page 19
...pinch the tubing and harnesses when placing the doors on a non-scratching surface with the inside up and off the bottom hinge. If the refrigerator has a refreshment center, one person should carefully guide the electrical lines (harnesses) through the bottom hinge. 9 REPLACING THE DOORS To replace ...electrical lines (refreshment center models only), be sure that the connectors are seated together fully. 19 Installation Instructions 8 REMOVE THE REFRIGERATOR DOOR (cont .) D Lift the refrigerator door up and off the bottom hinge and the second person should slowly lift the door up .
...pinch the tubing and harnesses when placing the doors on a non-scratching surface with the inside up and off the bottom hinge. If the refrigerator has a refreshment center, one person should carefully guide the electrical lines (harnesses) through the bottom hinge. 9 REPLACING THE DOORS To replace ...electrical lines (refreshment center models only), be sure that the connectors are seated together fully. 19 Installation Instructions 8 REMOVE THE REFRIGERATOR DOOR (cont .) D Lift the refrigerator door up and off the bottom hinge and the second person should slowly lift the door up .

Use and Care Manual
Page 20
... the temperature will go below 60°F (16°C) because it will not run often enough to maintain proper temperatures. • Do not install the refrigerator where the temperature will go above 100°F (37°C) because it will not perform properly. • Install it on a floor strong enough to support... it fully loaded. CLEARANCES Allow the following clearances for ease of installation, proper air circulation and plumbing and electrical connections: Sides 1/8″ (4 mm) Top 1″ (25 mm) Back 1″ (25 mm) 20
... the temperature will go below 60°F (16°C) because it will not run often enough to maintain proper temperatures. • Do not install the refrigerator where the temperature will go above 100°F (37°C) because it will not perform properly. • Install it on a floor strong enough to support... it fully loaded. CLEARANCES Allow the following clearances for ease of installation, proper air circulation and plumbing and electrical connections: Sides 1/8″ (4 mm) Top 1″ (25 mm) Back 1″ (25 mm) 20

Use and Care Manual
Page 21
... and ferrule (sleeve) onto the end of the refrigerator, as far as possible. NOTES: • Before making the connection to the refrigerator, be sure the refrigerator power cord is set to install filter. A If you are using the GE SmartConnect™ tubing, the nuts are using copper ...may need to the power cord. 21 If using GE SmartConnect™ tubing, insert the molded end of the tubing into the refrigerator connection, at the back of the refrigerator's water valve. B If you are using GE SmartConnect™ Refrigerator Tubing Kit, you will need an additional tube (...
... and ferrule (sleeve) onto the end of the refrigerator, as far as possible. NOTES: • Before making the connection to the refrigerator, be sure the refrigerator power cord is set to install filter. A If you are using the GE SmartConnect™ tubing, the nuts are using copper ...may need to the power cord. 21 If using GE SmartConnect™ tubing, insert the molded end of the tubing into the refrigerator connection, at the back of the refrigerator's water valve. B If you are using GE SmartConnect™ Refrigerator Tubing Kit, you will need an additional tube (...


