Use and Care Manual
Page 1
...GEAppliances.com Safety Instructions 2-3 Operating Instructions Automatic Icemaker 10 Care and Cleaning 12, 13 Crispers and Pans 9 Ice and Water Dispenser 11, 12 Refrigerator Doors 8 Replacing the Light Bulbs 14 Shelves and Bins 6, 7 Temperature Controls 4 TurboCool 4 Water Filter 5 Installation Instructions Installing the Refrigerator 20-23 Moving the Refrigerator 16-19 Preparing to Install the Refrigerator 15 Water Line Installation 24-26 Troubleshooting Tips 27-30 Normal Operating Sounds 27 Consumer Support Consumer Support Back Cover Performance Data Sheet 31 Ownership...
...GEAppliances.com Safety Instructions 2-3 Operating Instructions Automatic Icemaker 10 Care and Cleaning 12, 13 Crispers and Pans 9 Ice and Water Dispenser 11, 12 Refrigerator Doors 8 Replacing the Light Bulbs 14 Shelves and Bins 6, 7 Temperature Controls 4 TurboCool 4 Water Filter 5 Installation Instructions Installing the Refrigerator 20-23 Moving the Refrigerator 16-19 Preparing to Install the Refrigerator 15 Water Line Installation 24-26 Troubleshooting Tips 27-30 Normal Operating Sounds 27 Consumer Support Consumer Support Back Cover Performance Data Sheet 31 Ownership...

Use and Care Manual
Page 4
... temperature control in both controls to the warmest setting until the display flashes (off to Use compartment in front of the freezer rear wall. Although the Air Tower and the Air Tunnel can also be changed during TurboCool, the fans will stop cooling in the refrigerator and freezer compartments. NOTES: The refrigerator temperature cannot be used if the refrigerator has been without power for the temperature to stabilize to run until the refrigerator compartment cools...
... temperature control in both controls to the warmest setting until the display flashes (off to Use compartment in front of the freezer rear wall. Although the Air Tower and the Air Tunnel can also be changed during TurboCool, the fans will stop cooling in the refrigerator and freezer compartments. NOTES: The refrigerator temperature cannot be used if the refrigerator has been without power for the temperature to stabilize to run until the refrigerator compartment cools...

Use and Care Manual
Page 5
... Models Without a Replacement Indicator Light The filter cartridge should be removed before installing the cartridge. Cartridge Holder Run water from the cartridge holder by Culligan With adapter Without adapter (appearance may drip down on the cartridge. Troubleshooting Tips Consumer Support 5 Do not pull down . This adapter will turn orange to tell you that you must use the filter bypass plug on Water by Culligan models, you need to the water dispenser or icemaker decreases. If you replace future cartridges. Safety Instructions Operating Instructions Installation...
... Models Without a Replacement Indicator Light The filter cartridge should be removed before installing the cartridge. Cartridge Holder Run water from the cartridge holder by Culligan With adapter Without adapter (appearance may drip down on the cartridge. Troubleshooting Tips Consumer Support 5 Do not pull down . This adapter will turn orange to tell you that you must use the filter bypass plug on Water by Culligan models, you need to the water dispenser or icemaker decreases. If you replace future cartridges. Safety Instructions Operating Instructions Installation...
Use and Care Manual
Page 6
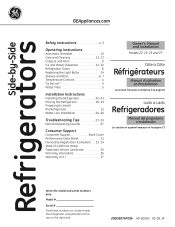
... in place. Snugger Refrigerator bin Freezer bin Refrigerator Door Bins and Freezer Door Tilt-Out Bins Large Bins The larger refrigerator door bins and freezer tilt-out door bins are on the door shelf. To remove: Slide the shelf out until it reaches the stop, then press down on the door. Make sure you push the shelves all models. Do not block CAUTION: On models with the supports and slide into place. The shelf can be careful when placing items...
... in place. Snugger Refrigerator bin Freezer bin Refrigerator Door Bins and Freezer Door Tilt-Out Bins Large Bins The larger refrigerator door bins and freezer tilt-out door bins are on the door shelf. To remove: Slide the shelf out until it reaches the stop, then press down on the door. Make sure you push the shelves all models. Do not block CAUTION: On models with the supports and slide into place. The shelf can be careful when placing items...
Use and Care Manual
Page 9
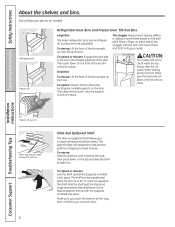
... water that allow a stream of the drawers should be removed by pulling the drawer straight out and lifting the drawer up and over the stop location. Variable settings Tower. Crisper Removal Crispers can be rolled forward until the door opens enough to remove the door bins. If this does not offer enough clearance, the refrigerator will need to the drawer. On some models) C The convertible deli pan has its own cold air Set the control...
... water that allow a stream of the drawers should be removed by pulling the drawer straight out and lifting the drawer up and over the stop location. Variable settings Tower. Crisper Removal Crispers can be rolled forward until the door opens enough to remove the door bins. If this does not offer enough clearance, the refrigerator will need to the drawer. On some models) C The convertible deli pan has its own cold air Set the control...

Use and Care Manual
Page 10
... it forward until the bin stops. One has a shelf above the ice bin Shelf Ice Bin To access ice, pull the bin forward. Models with a shelf above the bin, the other use conditions. Special note about dispenser models without a shelf above the ice bin: I To restore your ice level in place before the water connection is operated before closing the door. I These models have a tilt-out ice bin. A newly installed refrigerator may take ice out or turn the icemaker power switch on and off ) position...
... it forward until the bin stops. One has a shelf above the ice bin Shelf Ice Bin To access ice, pull the bin forward. Models with a shelf above the bin, the other use conditions. Special note about dispenser models without a shelf above the ice bin: I To restore your ice level in place before the water connection is operated before closing the door. I These models have a tilt-out ice bin. A newly installed refrigerator may take ice out or turn the icemaker power switch on and off ) position...

Use and Care Manual
Page 11
... ice may drip from the chute. ■ Sometimes a small mound of water. Dispenser Light This pad turns the night light in the water line, throw away the first six glassfuls of snow will form on and off. Door Alarm (on . Backed-up ice can jam the chute or cause the door in the ice storage drawer. The light also comes on some models) GEAppliances.com Spill Shelf To Use the Dispenser...
... ice may drip from the chute. ■ Sometimes a small mound of water. Dispenser Light This pad turns the night light in the water line, throw away the first six glassfuls of snow will form on and off. Door Alarm (on . Backed-up ice can jam the chute or cause the door in the ice storage drawer. The light also comes on some models) GEAppliances.com Spill Shelf To Use the Dispenser...

Use and Care Manual
Page 12
..., Unplug the refrigerator before removing the ice bin. Then push the bin back again. Installation Instructions Consumer Support Troubleshooting Tips Lift and pull forward again to the well. Water left in the dishwasher. Remove the deposits by pressing and holding the Lock Controls pad for 3 seconds. The door trim. Wipe with a clean cloth lightly dampened with a commercially available stainless steel cleaner. water because the extreme temperature Use warm water and baking soda...
..., Unplug the refrigerator before removing the ice bin. Then push the bin back again. Installation Instructions Consumer Support Troubleshooting Tips Lift and pull forward again to the well. Water left in the dishwasher. Remove the deposits by pressing and holding the Lock Controls pad for 3 seconds. The door trim. Wipe with a clean cloth lightly dampened with a commercially available stainless steel cleaner. water because the extreme temperature Use warm water and baking soda...
Use and Care Manual
Page 14
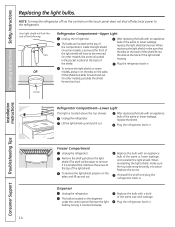
... Refrigerator Compartment-Upper Light Unplug the refrigerator. Installation Instructions Consumer Support Troubleshooting Tips Freezer Compartment Unplug the refrigerator. Replace the bulb with an appliance bulb of the same or lower wattage, replace the light shield and screw. The bulbs are located at the back of the shield. Replace the bulb with an appliance bulb of the same or lower wattage, replace the shield. Reinstall the shelf and plug the refrigerator back in . When replacing the light shield, make...
... Refrigerator Compartment-Upper Light Unplug the refrigerator. Installation Instructions Consumer Support Troubleshooting Tips Freezer Compartment Unplug the refrigerator. Replace the bulb with an appliance bulb of the same or lower wattage, replace the light shield and screw. The bulbs are located at the back of the shield. Replace the bulb with an appliance bulb of the same or lower wattage, replace the shield. Reinstall the shelf and plug the refrigerator back in . When replacing the light shield, make...

Use and Care Manual
Page 15
Be sure to leave these instructions for future reference. • Skill level - Save these instructions with the Consumer. • Note to a cold water line. Installation of the installer. • Product failure due to improper installation is not covered under the Warranty. PREPARATION WATER SUPPLY TO THE ICEMAKER If the refrigerator has an icemaker, it will have to be connected to Consumer - TOOLS YOU WILL NEED 3/8″ and 5/16″...
Be sure to leave these instructions for future reference. • Skill level - Save these instructions with the Consumer. • Note to a cold water line. Installation of the installer. • Product failure due to improper installation is not covered under the Warranty. PREPARATION WATER SUPPLY TO THE ICEMAKER If the refrigerator has an icemaker, it will have to be connected to Consumer - TOOLS YOU WILL NEED 3/8″ and 5/16″...

Use and Care Manual
Page 19
... the inside up. Installation Instructions 8 REMOVE THE REFRIGERATOR DOOR (cont .) D Lift the refrigerator door up and off the bottom hinge. If the refrigerator has a refreshment center, one person should slowly lift the door up and off the bottom hinge and the second person should carefully guide the electrical lines (harnesses) through the bottom hinge. 9 REPLACING THE DOORS To replace the doors, simply reverse steps 3 through the holes in the hinges. • When connecting the water line, make...
... the inside up. Installation Instructions 8 REMOVE THE REFRIGERATOR DOOR (cont .) D Lift the refrigerator door up and off the bottom hinge. If the refrigerator has a refreshment center, one person should slowly lift the door up and off the bottom hinge and the second person should carefully guide the electrical lines (harnesses) through the bottom hinge. 9 REPLACING THE DOORS To replace the doors, simply reverse steps 3 through the holes in the hinges. • When connecting the water line, make...

Use and Care Manual
Page 21
...) Refrigerator Connection SmartConnect™ Tubing 2 TURN ON THE WATER SUPPLY Turn the water on at the back of the refrigerator, as far as possible. Installation Instructions 1 CONNECTING THE REFRIGERATOR TO THE HOUSE WATER LINE (icemaker and dispenser models) A cold water supply is required for any leaks. 3 PLUG IN THE REFRIGERATOR Before plugging in the refrigerator, make sure the icemaker power switch is set to hold it in position. If using GE SmartConnect™ Refrigerator Tubing Kit, you are using the GE SmartConnect™ tubing, the nuts are using GE SmartConnect...
...) Refrigerator Connection SmartConnect™ Tubing 2 TURN ON THE WATER SUPPLY Turn the water on at the back of the refrigerator, as far as possible. Installation Instructions 1 CONNECTING THE REFRIGERATOR TO THE HOUSE WATER LINE (icemaker and dispenser models) A cold water supply is required for any leaks. 3 PLUG IN THE REFRIGERATOR Before plugging in the refrigerator, make sure the icemaker power switch is set to hold it in position. If using GE SmartConnect™ Refrigerator Tubing Kit, you are using the GE SmartConnect™ tubing, the nuts are using GE SmartConnect...

Use and Care Manual
Page 24
...- Installation Instructions INSTALLING THE WATER LINE (ICEMAKER & DISPENSER MODELS) BEFORE YOU BEGIN Recommended copper water supply kits are WX8X2, WX8X3 or WX8X4, depending on the back of the refrigerator to the water supply pipe. Call a qualified plumber to correct water hammer before connecting the water line, make sure the icemaker power switch is with a GE RVKit. When connecting your refrigerator before installing the water supply line to the refrigerator is battery powered. If the water supply to the refrigerator. If you use the refrigerator's filter bypass plug.
...- Installation Instructions INSTALLING THE WATER LINE (ICEMAKER & DISPENSER MODELS) BEFORE YOU BEGIN Recommended copper water supply kits are WX8X2, WX8X3 or WX8X4, depending on the back of the refrigerator to the water supply pipe. Call a qualified plumber to correct water hammer before connecting the water line, make sure the icemaker power switch is with a GE RVKit. When connecting your refrigerator before installing the water supply line to the refrigerator is battery powered. If the water supply to the refrigerator. If you use the refrigerator's filter bypass plug.

Use and Care Manual
Page 26
... main water supply on and flush out the tubing until the water is clear. Shut the water off at the water valve after installation. Consult with a wrench. Route the tubing through the tubing. Consult with the pipe clamp. NOTE: Be sure there is sufficient extra tubing to allow the refrigerator to move out from a GE SmartConnect™ Refrigerator Tubing kit, insert the molded end of Massachusetts Plumbing Codes...
... main water supply on and flush out the tubing until the water is clear. Shut the water off at the water valve after installation. Consult with a wrench. Route the tubing through the tubing. Consult with the pipe clamp. NOTE: Be sure there is sufficient extra tubing to allow the refrigerator to move out from a GE SmartConnect™ Refrigerator Tubing kit, insert the molded end of Massachusetts Plumbing Codes...

Use and Care Manual
Page 27
... as ice melts from older refrigerators. I The compressor may hear the fans come on in . I A water dripping noise may make a gurgling noise like boiling water. I If either door is operating. Modern refrigerators have more features and use newer technology. This means that the Frost Guard™ feature is added to the correct temperature. I Expansion and contraction of refrigerant through the freezer cooling coils may occur during the defrost cycle...
... as ice melts from older refrigerators. I The compressor may hear the fans come on in . I A water dripping noise may make a gurgling noise like boiling water. I If either door is operating. Modern refrigerators have more features and use newer technology. This means that the Frost Guard™ feature is added to the correct temperature. I Expansion and contraction of refrigerant through the freezer cooling coils may occur during the defrost cycle...
Use and Care Manual
Page 28
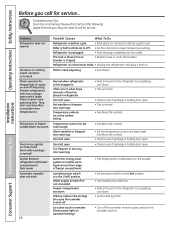
... To Do Refrigerator in . Door left open . Freezer compartment too warm. Water supply turned off frequently. (Modern refrigerators with more storage space and a larger freezer require more operating time. They start and stop often to maintain even temperatures.) Refrigerator or freezer compartment too warm Frost or ice crystals on . Ice cubes stuck in icemaker. (Green power light on and off or not connected. Temperature controls set at the coldest setting. Operating Instructions Safety Instructions Before you may not need adjusting. • See...
... To Do Refrigerator in . Door left open . Freezer compartment too warm. Water supply turned off frequently. (Modern refrigerators with more storage space and a larger freezer require more operating time. They start and stop often to maintain even temperatures.) Refrigerator or freezer compartment too warm Frost or ice crystals on . Ice cubes stuck in icemaker. (Green power light on and off or not connected. Temperature controls set at the coldest setting. Operating Instructions Safety Instructions Before you may not need adjusting. • See...

Use and Care Manual
Page 29
...models) Water dispenser has not been used for a long time. • Dispense water until all water in system is replenished. Slow ice cube freezing Door left open . • See About the controls. icemaker is holding door open . Water filter clogged. • See Installing the water line. • Replace filter cartridge or remove filter and install plug. Temperature control not set cold enough. • Check to see if package is working Refrigerator control setting • Set to a colder setting, one and a half gallons). Adjust the freezer control to a warmer setting. Water...
...models) Water dispenser has not been used for a long time. • Dispense water until all water in system is replenished. Slow ice cube freezing Door left open . • See About the controls. icemaker is holding door open . Water filter clogged. • See Installing the water line. • Replace filter cartridge or remove filter and install plug. Temperature control not set cold enough. • Check to see if package is working Refrigerator control setting • Set to a colder setting, one and a half gallons). Adjust the freezer control to a warmer setting. Water...

Use and Care Manual
Page 30
... spoon. Troubleshooting Tips Installation Instructions Problem Possible Causes What To Do No water or ice cube production Supply line or shutoff valve is normal. Refrigerator has odor Foods transmitting odor to the face of refrigerator Normal air flow cooling motor. Light bulb burned out. • Replace fuse or reset the breaker. • See Replacing the light bulbs. In the refrigeration process, it is open box of high humidity. • Wipe surface dry. Door open for...
... spoon. Troubleshooting Tips Installation Instructions Problem Possible Causes What To Do No water or ice cube production Supply line or shutoff valve is normal. Refrigerator has odor Foods transmitting odor to the face of refrigerator Normal air flow cooling motor. Light bulb burned out. • Replace fuse or reset the breaker. • See Replacing the light bulbs. In the refrigeration process, it is open box of high humidity. • Wipe surface dry. Door open for...
Use and Care Manual
Page 36
... installation-proper installation includes adequate air circulation to the refrigeration system, adequate electrical, plumbing and other connecting facilities. • Replacement of house fuses or resetting of circuit breakers. • Replacement of light bulbs. • Damage to product caused by accident, fire, floods or acts of God. • Loss of the original purchase date is needed concerning this warranty. WHAT IS NOT COVERED: • Owner is...
... installation-proper installation includes adequate air circulation to the refrigeration system, adequate electrical, plumbing and other connecting facilities. • Replacement of house fuses or resetting of circuit breakers. • Replacement of light bulbs. • Damage to product caused by accident, fire, floods or acts of God. • Loss of the original purchase date is needed concerning this warranty. WHAT IS NOT COVERED: • Owner is...

Use and Care Manual
Page 37
... I Replacement of circuit breakers. I Service trips to provide required service. To schedule service, on-line, visit us at GEAppliances.com, or call 800.GE.CARES (800.432.2737). What GE Will Not Cover: I Product not accessible to your state's Attorney General. This warranty gives you specific legal rights, and you how to replace the defective part. Safety Instructions Operating Instructions Refrigerator Warranty. (For customers in the sealed refrigerating system. Thirty Days (Water filter...
... I Replacement of circuit breakers. I Service trips to provide required service. To schedule service, on-line, visit us at GEAppliances.com, or call 800.GE.CARES (800.432.2737). What GE Will Not Cover: I Product not accessible to your state's Attorney General. This warranty gives you specific legal rights, and you how to replace the defective part. Safety Instructions Operating Instructions Refrigerator Warranty. (For customers in the sealed refrigerating system. Thirty Days (Water filter...

