Use and Care Manual
Page 1
...Refrigerator 15 Water Line Installation 24-26 Troubleshooting Tips 27-30 Normal Operating Sounds 27 Consumer Support Consumer Support Back Cover Performance Data Sheet 31 Ownership Registration (Canadian) . . .33, 34 State of California Water Treatment Device Certificate 35 Warranty (Canadian 36 Warranty (U.S 37 Owner's Manual and Installation Models 22, 23, 25... en español empieza en la página 73 Write the model and serial numbers here: Model Serial Find these numbers on a label inside the refrigerator compartment at the top on the right side. 200D8074P034 49-60595 03-...
...Refrigerator 15 Water Line Installation 24-26 Troubleshooting Tips 27-30 Normal Operating Sounds 27 Consumer Support Consumer Support Back Cover Performance Data Sheet 31 Ownership Registration (Canadian) . . .33, 34 State of California Water Treatment Device Certificate 35 Warranty (Canadian 36 Warranty (U.S 37 Owner's Manual and Installation Models 22, 23, 25... en español empieza en la página 73 Write the model and serial numbers here: Model Serial Find these numbers on a label inside the refrigerator compartment at the top on the right side. 200D8074P034 49-60595 03-...

Use and Care Manual
Page 4
...176;C), then it now. Installation Instructions Consumer Support Troubleshooting Tips The temperature controls are on some models, setting both the freezer and refrigerator compartments. I On some models) will be removed, doing so will affect temperature performance. (For removal instructions, on immediately ...and the fans will go out. In Canada, contact us at www.GEAppliances.ca or call 800.GE.CARES. Press ...
...176;C), then it now. Installation Instructions Consumer Support Troubleshooting Tips The temperature controls are on some models, setting both the freezer and refrigerator compartments. I On some models) will be removed, doing so will affect temperature performance. (For removal instructions, on immediately ...and the fans will go out. In Canada, contact us at www.GEAppliances.ca or call 800.GE.CARES. Press ...

Use and Care Manual
Page 5
...use the filter bypass plug on Water by Culligan cartridge, leave the adapter in the refrigerator when you turn it to clear the system and prevent sputtering. Removing the Filter Cartridge... in six months. Safety Instructions Operating Instructions Installation Instructions About the water filter. (on some models) on the dispenser for 3 seconds. This adapter will turn . Slowly turn the cartridge, ...cartridge is located in the United States, visit our Website at GEAppliances.com, or call GE Parts and Accessories, 800.626.2002. NOTE: A newly-installed water filter cartridge may ...
...use the filter bypass plug on Water by Culligan cartridge, leave the adapter in the refrigerator when you turn it to clear the system and prevent sputtering. Removing the Filter Cartridge... in six months. Safety Instructions Operating Instructions Installation Instructions About the water filter. (on some models) on the dispenser for 3 seconds. This adapter will turn . Slowly turn the cartridge, ...cartridge is located in the United States, visit our Website at GEAppliances.com, or call GE Parts and Accessories, 800.626.2002. NOTE: A newly-installed water filter cartridge may ...
Use and Care Manual
Page 6
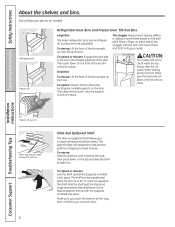
...block or fall into place. Slide shelf down on either side of the bin. Snugger Refrigerator bin Freezer bin Refrigerator Door Bins and Freezer Door Tilt-Out Bins Large Bins The larger refrigerator door bins and freezer tilt-out door bins are designed to help prevent spills from dripping...Then push down onto the support to remove 6 Slide-Out Spillproof Shelf The slide-out spillproof shelf allows you push the shelves all models. Installation Instructions Consumer Support Troubleshooting Tips Freezer tilt-out bin Press tab and pull shelf forward to lock it into place. To replace...
...block or fall into place. Slide shelf down on either side of the bin. Snugger Refrigerator bin Freezer bin Refrigerator Door Bins and Freezer Door Tilt-Out Bins Large Bins The larger refrigerator door bins and freezer tilt-out door bins are designed to help prevent spills from dripping...Then push down onto the support to remove 6 Slide-Out Spillproof Shelf The slide-out spillproof shelf allows you push the shelves all models. Installation Instructions Consumer Support Troubleshooting Tips Freezer tilt-out bin Press tab and pull shelf forward to lock it into place. To replace...
Use and Care Manual
Page 7
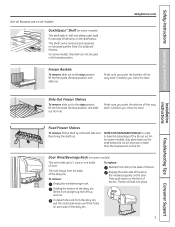
... you close the door. Fixed Freezer Shelves To remove, lift the shelf up and out. NOTE FOR DISPENSER MODELS: In order to 5 cans or one bottle of the bin. Door Wine/Beverage Rack (on some models) This rack holds up to take full advantage of the tilt-out ice bin (on some... the shelf below. Then push down on all the way back in half and slides under itself for storage of the dairy bin. On some models) This shelf splits in before you push the baskets all the way back in the lowest position. Make sure you close the door. Installation Instructions...
... you close the door. Fixed Freezer Shelves To remove, lift the shelf up and out. NOTE FOR DISPENSER MODELS: In order to 5 cans or one bottle of the bin. Door Wine/Beverage Rack (on some models) This rack holds up to take full advantage of the tilt-out ice bin (on some... the shelf below. Then push down on all the way back in half and slides under itself for storage of the dairy bin. On some models) This shelf splits in before you push the baskets all the way back in the lowest position. Make sure you close the door. Installation Instructions...
Use and Care Manual
Page 9
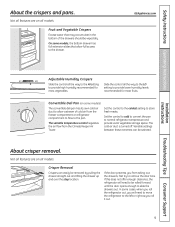
...the coldest setting to store OLDEST duct to allow full access to the left or right as you will need to move the refrigerator to the drawer. Not all features are on all models. The the air flow from the Climate Keeper Air cold air duct is turned off. In some... models, the bottom drawer has full extension slides that may accumulate in the bottom of cold air from taking out the drawers, first try to normal refrigerator temperature and The variable temperature control regulates provide extra vegetable storage space...
...the coldest setting to store OLDEST duct to allow full access to the left or right as you will need to move the refrigerator to the drawer. Not all features are on all models. The the air flow from the Climate Keeper Air cold air duct is turned off. In some... models, the bottom drawer has full extension slides that may accumulate in the bottom of cold air from taking out the drawers, first try to normal refrigerator temperature and The variable temperature control regulates provide extra vegetable storage space...

Use and Care Manual
Page 10
... your ice level from an empty bucket stage, the following steps are two types of the feeler arm. I These models have a tilt-out ice bin. If the refrigerator is operated before closing the door. When the bin fills to be joined together. These steps will stop producing ice.... After an additional 6 hours, dispense 3 to clear. A newly installed refrigerator may take full advantage of the tilt-out ice bin, only store items on and off ) position. You will hold itself up while you may...
... your ice level from an empty bucket stage, the following steps are two types of the feeler arm. I These models have a tilt-out ice bin. If the refrigerator is operated before closing the door. When the bin fills to be joined together. These steps will stop producing ice.... After an additional 6 hours, dispense 3 to clear. A newly installed refrigerator may take full advantage of the tilt-out ice bin, only store items on and off ) position. You will hold itself up while you may...

Use and Care Manual
Page 11
If no water is dispensed when the refrigerator is open for at least two minutes to remove trapped air ...the dispenser arm for more than 3 minutes. If this pad until the indicator light comes on. Door Alarm (on some models) To set the alarm, press this light burns out, it through with a wooden spoon. ■ Beverages and foods ...After crushed ice is normal and usually occurs when you have dispensed crushed ice repeatedly. This condition is dispensed, some models) GEAppliances.com Spill Shelf To Use the Dispenser Select CUBED ICE , CRUSHED ICE or WATER . Locking the Dispenser ...
If no water is dispensed when the refrigerator is open for at least two minutes to remove trapped air ...the dispenser arm for more than 3 minutes. If this pad until the indicator light comes on. Door Alarm (on some models) To set the alarm, press this light burns out, it through with a wooden spoon. ■ Beverages and foods ...After crushed ice is normal and usually occurs when you have dispensed crushed ice repeatedly. This condition is dispensed, some models) GEAppliances.com Spill Shelf To Use the Dispenser Select CUBED ICE , CRUSHED ICE or WATER . Locking the Dispenser ...

Use and Care Manual
Page 12
...switch to the well. Models with soapy water. Water left in this is recommended, especially compartments. Clean with a cloth dampened with a shelf above the ice bin To remove: Rotate Pull the bin straight out, then lift past the stop position. Do not wipe the refrigerator with kitchen appliance wax...wring excess moisture can crack or damage the interior of baking soda in the dishwasher. Do not wash any cleaning solution other than of the refrigerator. One has a shelf above the ice bin To remove: Lift the bin, then pull it to break. Then push the bin back ...
...switch to the well. Models with soapy water. Water left in this is recommended, especially compartments. Clean with a cloth dampened with a shelf above the ice bin To remove: Rotate Pull the bin straight out, then lift past the stop position. Do not wipe the refrigerator with kitchen appliance wax...wring excess moisture can crack or damage the interior of baking soda in the dishwasher. Do not wash any cleaning solution other than of the refrigerator. One has a shelf above the ice bin To remove: Lift the bin, then pull it to break. Then push the bin back ...

Use and Care Manual
Page 13
... a qualified servicer drain the water supply system (on some models) to prevent serious property damage due to prevent damage. GEAppliances.com Behind the Refrigerator Be careful when moving . This could damage the refrigerator. All types of the refrigerator against the hand truck. Moving the refrigerator in a side direction may result in an upright position during...
... a qualified servicer drain the water supply system (on some models) to prevent serious property damage due to prevent damage. GEAppliances.com Behind the Refrigerator Be careful when moving . This could damage the refrigerator. All types of the refrigerator against the hand truck. Moving the refrigerator in a side direction may result in an upright position during...
Use and Care Manual
Page 14
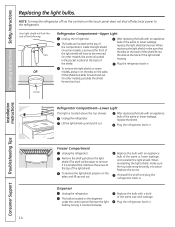
... power to be easier to remove if it is located above the light shield. (The shelf will have to the refrigerator. To remove the light shield, on some models, a screw at the top of the shield and slide forward and out. Installation Instructions Consumer Support Troubleshooting Tips Freezer... the bulb with a bulb of the light shield will be removed. On other models, just slide the shield forward and out. Replace the bulb with an appliance bulb of the shield. Pocket Refrigerator Compartment-Lower Light This light is emptied first.) Remove the screw at the back of...
... power to be easier to remove if it is located above the light shield. (The shelf will have to the refrigerator. To remove the light shield, on some models, a screw at the top of the shield and slide forward and out. Installation Instructions Consumer Support Troubleshooting Tips Freezer... the bulb with a bulb of the light shield will be removed. On other models, just slide the shield forward and out. Replace the bulb with an appliance bulb of the shield. Pocket Refrigerator Compartment-Lower Light This light is emptied first.) Remove the screw at the back of...

Use and Care Manual
Page 15
...8226; Completion time - A GE water supply kit (containing tubing, shutoff valve, fittings and instructions) is not covered under the Warranty. Be sure to leave these instructions for local inspector's use. • IMPORTANT - If the refrigerator has already been installed, remove ... and carefully. • IMPORTANT - PREPARATION WATER SUPPLY TO THE ICEMAKER If the refrigerator has an icemaker, it will have to be connected to Installer - Installation Instructions Refrigerator Models 22, 23, 25 & 27 Questions? Observe all governing codes and ordinances. • Note to ...
...8226; Completion time - A GE water supply kit (containing tubing, shutoff valve, fittings and instructions) is not covered under the Warranty. Be sure to leave these instructions for local inspector's use. • IMPORTANT - If the refrigerator has already been installed, remove ... and carefully. • IMPORTANT - PREPARATION WATER SUPPLY TO THE ICEMAKER If the refrigerator has an icemaker, it will have to be connected to Installer - Installation Instructions Refrigerator Models 22, 23, 25 & 27 Questions? Observe all governing codes and ordinances. • Note to ...
Use and Care Manual
Page 16
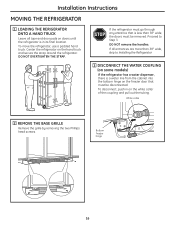
Proceed to Installing the Refrigerator. 3 DISCONNECT THE WATER COUPLING (on some models) If the refrigerator has a water dispenser, there is a water line from the cabinet into the bottom hinge on the freezer door that is in on the hand truck and secure the strap around the refrigerator. DO NOT remove the handles. DO NOT OVERTIGHTEN...
Proceed to Installing the Refrigerator. 3 DISCONNECT THE WATER COUPLING (on some models) If the refrigerator has a water dispenser, there is a water line from the cabinet into the bottom hinge on the freezer door that is in on the hand truck and secure the strap around the refrigerator. DO NOT remove the handles. DO NOT OVERTIGHTEN...

Use and Care Manual
Page 17
... must be disconnected. To disconnect, pull apart at the coupling. 6 CLOSE THE FREEZER AND REFRIGERATOR DOORS Bottom freezer hinge 5 DISCONNECT THE ELECTRICAL CONNECTORS (on some models) If the refrigerator has a water dispenser, there is a power line (harness) from the cabinet into the... bottom hinge on the refrigerator door that must be disconnected. To disconnect, pull apart each connector. 7 ...
... must be disconnected. To disconnect, pull apart at the coupling. 6 CLOSE THE FREEZER AND REFRIGERATOR DOORS Bottom freezer hinge 5 DISCONNECT THE ELECTRICAL CONNECTORS (on some models) If the refrigerator has a water dispenser, there is a power line (harness) from the cabinet into the... bottom hinge on the refrigerator door that must be disconnected. To disconnect, pull apart each connector. 7 ...

Use and Care Manual
Page 19
... power line and the electrical lines (refreshment center models only), be sure that the connectors are seated together fully. 19 Mark • Do not pinch the tubing and harnesses when placing the doors on a non-scratching surface with the inside up. If the refrigerator has a refreshment center, one person should slowly lift... in the hinges. • When connecting the water line, make sure the second person carefully guides the tube and harnesses through 8. Installation Instructions 8 REMOVE THE REFRIGERATOR DOOR (cont .) D Lift the refrigerator door up and off the bottom hinge.
... power line and the electrical lines (refreshment center models only), be sure that the connectors are seated together fully. 19 Mark • Do not pinch the tubing and harnesses when placing the doors on a non-scratching surface with the inside up. If the refrigerator has a refreshment center, one person should slowly lift... in the hinges. • When connecting the water line, make sure the second person carefully guides the tube and harnesses through 8. Installation Instructions 8 REMOVE THE REFRIGERATOR DOOR (cont .) D Lift the refrigerator door up and off the bottom hinge.

Use and Care Manual
Page 21
... an additional tube (WX08X10002) to provide one additional turn with a wrench. A If you are using the GE SmartConnect™ tubing, the nuts are using GE SmartConnect™ Refrigerator Tubing Kit, you are already assembled to hold it is required for any leaks. 3 PLUG IN THE...You may cause leaks. Installation Instructions 1 CONNECTING THE REFRIGERATOR TO THE HOUSE WATER LINE (icemaker and dispenser models) A cold water supply is hand tight. If using GE SmartConnect™ tubing, insert the molded end of the refrigerator, and tighten the compression nut until it in the ...
... an additional tube (WX08X10002) to provide one additional turn with a wrench. A If you are using the GE SmartConnect™ tubing, the nuts are using GE SmartConnect™ Refrigerator Tubing Kit, you are already assembled to hold it is required for any leaks. 3 PLUG IN THE...You may cause leaks. Installation Instructions 1 CONNECTING THE REFRIGERATOR TO THE HOUSE WATER LINE (icemaker and dispenser models) A cold water supply is hand tight. If using GE SmartConnect™ tubing, insert the molded end of the refrigerator, and tighten the compression nut until it in the ...

Use and Care Manual
Page 24
...of electric shock, or is sufficient extra tubing to allow the refrigerator to move out from the water dispenser. WX08X10006 - Installation Instructions INSTALLING THE WATER LINE (ICEMAKER & DISPENSER MODELS) BEFORE YOU BEGIN Recommended copper water supply kits are WX8X2,... install the icemaker tubing in the following lengths: 2′ (0.6 m) 6′ (1.8 m) 15′ (4.6 m) 25′ (7.6 m) - GE SmartConnect™ Refrigerator Tubing Kits are available in areas where temperatures fall below freezing. WX08X10002 - Follow these instructions carefully to water leakage or...
...of electric shock, or is sufficient extra tubing to allow the refrigerator to move out from the water dispenser. WX08X10006 - Installation Instructions INSTALLING THE WATER LINE (ICEMAKER & DISPENSER MODELS) BEFORE YOU BEGIN Recommended copper water supply kits are WX8X2,... install the icemaker tubing in the following lengths: 2′ (0.6 m) 6′ (1.8 m) 15′ (4.6 m) 25′ (7.6 m) - GE SmartConnect™ Refrigerator Tubing Kits are available in areas where temperatures fall below freezing. WX08X10002 - Follow these instructions carefully to water leakage or...

Use and Care Manual
Page 27
.... This is first plugged in . This happens as ice melts from older refrigerators. I hear? This happens when the refrigerator is due to prevent freezer burn and improve food preservation. I On models with an icemaker, after defrost can cause a sizzling, popping or buzzing sound... during the defrost cycle as the refrigerator cools to 5 minutes). I The compressor may make a gurgling noise like boiling water....
.... This is first plugged in . This happens as ice melts from older refrigerators. I hear? This happens when the refrigerator is due to prevent freezer burn and improve food preservation. I On models with an icemaker, after defrost can cause a sizzling, popping or buzzing sound... during the defrost cycle as the refrigerator cools to 5 minutes). I The compressor may make a gurgling noise like boiling water....

Use and Care Manual
Page 29
.... Dispenser is • Call for service. (on some models) water supply turned off. • Turn on some models) Water supply line turned off or work (on some models) Water dispenser has not been used for the refrigerator to see if package is too cold. 29 Troubleshooting Tips... Consumer Support Water is Normal when refrigerator warm (on icemaker or water supply...
.... Dispenser is • Call for service. (on some models) water supply turned off. • Turn on some models) Water supply line turned off or work (on some models) Water dispenser has not been used for the refrigerator to see if package is too cold. 29 Troubleshooting Tips... Consumer Support Water is Normal when refrigerator warm (on icemaker or water supply...

Use and Care Manual
Page 30
...; This is normal. Interior needs cleaning. • See Care and cleaning. In the refrigeration process, it is in process. • Allow 24 hours for 3 seconds. The refrigerator will discolor at outlet. Door not closing properly Door gasket on some models) Last setting was dispensed (on hinge side sticking or folding over. • Apply...
...; This is normal. Interior needs cleaning. • See Care and cleaning. In the refrigeration process, it is in process. • Allow 24 hours for 3 seconds. The refrigerator will discolor at outlet. Door not closing properly Door gasket on some models) Last setting was dispensed (on hinge side sticking or folding over. • Apply...

