
Owners Manual
Page 1
Dryers ge.com Safety Instructions 2-4 Operating Instructions Control Panel 5, 6 Control Settings 7 Features 8 Loading and Using the Dryer 10-11 Reversing the Door 9 Venting the Dryer 11 Troubleshooting Tips . . . 12, 13 Consumer Support Consumer Support . . . . . Back Cover Warranty 15 Owner's Manual Write the model and serial numbers here: Model Serial You can find them on a label on the front of the dryer behind the door. 175D1807P596 49-90328 04-07 JR
Dryers ge.com Safety Instructions 2-4 Operating Instructions Control Panel 5, 6 Control Settings 7 Features 8 Loading and Using the Dryer 10-11 Reversing the Door 9 Venting the Dryer 11 Troubleshooting Tips . . . 12, 13 Consumer Support Consumer Support . . . . . Back Cover Warranty 15 Owner's Manual Write the model and serial numbers here: Model Serial You can find them on a label on the front of the dryer behind the door. 175D1807P596 49-90328 04-07 JR

Owners Manual
Page 2
... do not use gasoline or other flammable vapors and liquids in your gas supplier from a neighbor's phone. I Installation and service must be performed by calling 800.GE.CARES (800.432.2737). Exhaust/Ducting 1 Gas dryers MUST be followed to minimize the risk of this manual must be ...requires businesses to warn customers of these substances can receive one by visiting ge.com or by a qualified installer, service agency or the gas supplier. USE OF PLASTIC OR OTHER COMBUSTIBLE DUCTWORK CAN CAUSE A FIRE. Gas appliances can cause minor exposure to the outside . 2 Use only rigid...
... do not use gasoline or other flammable vapors and liquids in your gas supplier from a neighbor's phone. I Installation and service must be performed by calling 800.GE.CARES (800.432.2737). Exhaust/Ducting 1 Gas dryers MUST be followed to minimize the risk of this manual must be ...requires businesses to warn customers of these substances can receive one by visiting ge.com or by a qualified installer, service agency or the gas supplier. USE OF PLASTIC OR OTHER COMBUSTIBLE DUCTWORK CAN CAUSE A FIRE. Gas appliances can cause minor exposure to the outside . 2 Use only rigid...

Owners Manual
Page 3
... operation. To avoid such a result, carefully follow the garment manufacturer's care instructions. Safety Instructions Operating Instructions ge.com WARNING! YOUR LAUNDRY AREA I Never reach into the dryer while the drum is used in beauty salons, restaurants or barber shops, etc.) must not be placed in homes such as life jackets containing Kapok...
... operation. To avoid such a result, carefully follow the garment manufacturer's care instructions. Safety Instructions Operating Instructions ge.com WARNING! YOUR LAUNDRY AREA I Never reach into the dryer while the drum is used in beauty salons, restaurants or barber shops, etc.) must not be placed in homes such as life jackets containing Kapok...

Owners Manual
Page 4
... be cleaned at least once a year by using a dryer-applied fabric softener or an anti-static conditioner. DO NOT ATTEMPT TO LIGHT WITH A MATCH. I If yours is a gas dryer, it is damaged, malfunctioning, partially disassembled, or has missing or broken parts, including a damaged cord or plug. ...I Never attempt to prevent children from service, remove the dryer door to operate this appliance if it will not be ...
... be cleaned at least once a year by using a dryer-applied fabric softener or an anti-static conditioner. DO NOT ATTEMPT TO LIGHT WITH A MATCH. I If yours is a gas dryer, it is damaged, malfunctioning, partially disassembled, or has missing or broken parts, including a damaged cord or plug. ...I Never attempt to prevent children from service, remove the dryer door to operate this appliance if it will not be ...

Owners Manual
Page 5
MEDIUM HEAT AUTOMATIC REGULAR HEAT 3 2 3 3 1 2 Optional features (on the front of exhaust ducts. 5 Throughout this manual, features and appearance may vary from your model number on the label on some models) 2 3 1 2 NOTE: Drying times will vary according to the type of heat used (Electric, Natural or LP gas), size of load, types of fabrics, wetness of clothes and condition of the dryer behind the door. About the dryer control panel. ge.com You can locate your model.
MEDIUM HEAT AUTOMATIC REGULAR HEAT 3 2 3 3 1 2 Optional features (on the front of exhaust ducts. 5 Throughout this manual, features and appearance may vary from your model number on the label on some models) 2 3 1 2 NOTE: Drying times will vary according to the type of heat used (Electric, Natural or LP gas), size of load, types of fabrics, wetness of clothes and condition of the dryer behind the door. About the dryer control panel. ge.com You can locate your model.

Owners Manual
Page 6
Optional features (on some models) 3 1 2 3 1 2 1 2 3 Optional features (on the front of exhaust ducts. 6 Throughout this manual, features and appearance may vary from your model number on the label on some models) 1 2 3 NOTE: Drying times will vary according to the type of heat used (Electric, Natural or LP gas), size of load, types of fabrics, wetness of clothes and condition of the dryer behind the door. You can locate your model. About the dryer control panel.
Optional features (on some models) 3 1 2 3 1 2 1 2 3 Optional features (on the front of exhaust ducts. 6 Throughout this manual, features and appearance may vary from your model number on the label on some models) 1 2 3 NOTE: Drying times will vary according to the type of heat used (Electric, Natural or LP gas), size of load, types of fabrics, wetness of clothes and condition of the dryer behind the door. You can locate your model. About the dryer control panel.

Owners Manual
Page 7
...TIMED DRY Set the Cycle Selector at the end of no heat tumbling. 3 Start-Close the dryer door. DAMP DRY For leaving items partially damp. Match the particular color below the words with an *. ge.com 1 Fabric Care/Temperature (on some models) or select the Preferred Regular Setting marked with ...the same color on some models) REGULAR For regular to complete the cycle. Use the TIMED DRY cycle. Select LESS DRY if you use the dryer. To restart the dryer, close the door...
...TIMED DRY Set the Cycle Selector at the end of no heat tumbling. 3 Start-Close the dryer door. DAMP DRY For leaving items partially damp. Match the particular color below the words with an *. ge.com 1 Fabric Care/Temperature (on some models) or select the Preferred Regular Setting marked with ...the same color on some models) REGULAR For regular to complete the cycle. Use the TIMED DRY cycle. Select LESS DRY if you use the dryer. To restart the dryer, close the door...

Owners Manual
Page 8
... the clothes. Drum Lamp (on some models) At the end of each cycle, there is not on, the dryer will remind you to remove the clothes. Troubleshooting Tips Drying Rack (on hangers so wrinkles won 't set in a GE dryer. Hook the rack over the lint filter so the rack extends into the... dryer drum. I The drying rack must be used for drying delicate items such as washable sweaters. This option can only ...
... the clothes. Drum Lamp (on some models) At the end of each cycle, there is not on, the dryer will remind you to remove the clothes. Troubleshooting Tips Drying Rack (on hangers so wrinkles won 't set in a GE dryer. Hook the rack over the lint filter so the rack extends into the... dryer drum. I The drying rack must be used for drying delicate items such as washable sweaters. This option can only ...

Owners Manual
Page 9
...opposite side of the opening by moving the door IN and DOWN until the top hinge and the bottom hinge are resting on the dryer face. Insert it UP and OUT. 3 Rotate the door 180°. Apply firm pressure to get the screw started in step...removed the filler plugs). Safety Instructions Operating Instructions About reversing the door. Reinsert the plastic plugs on the dryer face half way. Insert these screws, secure each hinge. Troubleshooting Tips Consumer Support 9 ge.com Reversing the Door Tools needed: I Standard #2 I Tape-tipped I Phillips screwdriver I putty knife...
...opposite side of the opening by moving the door IN and DOWN until the top hinge and the bottom hinge are resting on the dryer face. Insert it UP and OUT. 3 Rotate the door 180°. Apply firm pressure to get the screw started in step...removed the filler plugs). Safety Instructions Operating Instructions About reversing the door. Reinsert the plastic plugs on the dryer face half way. Insert these screws, secure each hinge. Troubleshooting Tips Consumer Support 9 ge.com Reversing the Door Tools needed: I Standard #2 I Tape-tipped I Phillips screwdriver I putty knife...

Owners Manual
Page 10
...and Cleaning of the hood move freely when operating. Damage to prevent clogging. The Lint Filter: Clean the lint filter before each use in all GE Dryers when used in accordance with a clean cloth. Stainless Steel: To clean stainless steel surfaces, use a damp cloth with a mild, non-abrasive ....) nesting inside the duct or hood. This wastes energy and causes wrinkling. Run your fingers across the filter. The Exhaust Hood: Check from the dryer. 3 Vacuum the duct with a damp cloth. Do not add fabric softener sheets once the load has become warm. A partially clogged exhaust can ...
...and Cleaning of the hood move freely when operating. Damage to prevent clogging. The Lint Filter: Clean the lint filter before each use in all GE Dryers when used in accordance with a clean cloth. Stainless Steel: To clean stainless steel surfaces, use a damp cloth with a mild, non-abrasive ....) nesting inside the duct or hood. This wastes energy and causes wrinkling. Run your fingers across the filter. The Exhaust Hood: Check from the dryer. 3 Vacuum the duct with a damp cloth. Do not add fabric softener sheets once the load has become warm. A partially clogged exhaust can ...

Owners Manual
Page 11
... in the Installation Instructions. I Venting must conform to the below specifications. I Use the shortest length possible. I Use only rigid metal 4″ diameter ductwork inside the dryer cabinet. I Do not crush or collapse. Correct Venting Incorrect Venting 11 Troubleshooting Tips Consumer Support Carefully follow the details on sharp objects. The...
... in the Installation Instructions. I Venting must conform to the below specifications. I Use the shortest length possible. I Use only rigid metal 4″ diameter ductwork inside the dryer cabinet. I Do not crush or collapse. Correct Venting Incorrect Venting 11 Troubleshooting Tips Consumer Support Carefully follow the details on sharp objects. The...

Owners Manual
Page 12
...8226; Clean lint screen before drying. Safety Instructions Operating Instructions Before you call for service... the dryer may tumble if only one breaker tripped. • Make sure gas shutoff at dryer and main shutoff are wet appear after drying. Improper use of fabric softener Drying dirty items with... not need to LESS DRY or DAMP DRY. • Try a fabric softener. NOTE: Most electric dryers use in all GE Dryers when used (electric, natural or LP gas), size of load, types of fabrics, wetness of clothes and condition of heat used in this section under STATIC. •...
...8226; Clean lint screen before drying. Safety Instructions Operating Instructions Before you call for service... the dryer may tumble if only one breaker tripped. • Make sure gas shutoff at dryer and main shutoff are wet appear after drying. Improper use of fabric softener Drying dirty items with... not need to LESS DRY or DAMP DRY. • Try a fabric softener. NOTE: Most electric dryers use in all GE Dryers when used (electric, natural or LP gas), size of load, types of fabrics, wetness of clothes and condition of heat used in this section under STATIC. •...

Owners Manual
Page 13
... control settings to the load you are drying only one washer load in the dryer at a time. • If you are drying. • Clean lint...load is correct. • Replace fuses or reset circuit breakers. Since most dryers use 2 fuses/breakers, make sure both are operating. • Do ...easily. • Check the Installation Instructions to make sure the dryer venting is a well-sorted dryer load). • Large, heavy fabrics contain more than one...ones. Overdrying Letting items sit in dryer after drying. • If you are concerned about shrinkage in the dryer • Some items may be...
... control settings to the load you are drying only one washer load in the dryer at a time. • If you are drying. • Clean lint...load is correct. • Replace fuses or reset circuit breakers. Since most dryers use 2 fuses/breakers, make sure both are operating. • Do ...easily. • Check the Installation Instructions to make sure the dryer venting is a well-sorted dryer load). • Large, heavy fabrics contain more than one...ones. Overdrying Letting items sit in dryer after drying. • If you are concerned about shrinkage in the dryer • Some items may be...

Owners Manual
Page 15
...you how to replace the defective part. Louisville, KY 40225 Troubleshooting Tips Consumer Support 15 Safety Instructions Operating Instructions GE Dryer Warranty. For The Period Of: GE Will Replace: One Year From the date of the original purchase Any part of the product if it is needed...available when calling for a trip charge or you may be responsible for service. Staple your state's Attorney General. I Failure of the dryer which are , consult your local or state consumer affairs office or your receipt here. Proof of the light bulb. I Products which are...
...you how to replace the defective part. Louisville, KY 40225 Troubleshooting Tips Consumer Support 15 Safety Instructions Operating Instructions GE Dryer Warranty. For The Period Of: GE Will Replace: One Year From the date of the original purchase Any part of the product if it is needed...available when calling for a trip charge or you may be responsible for service. Staple your state's Attorney General. I Failure of the dryer which are , consult your local or state consumer affairs office or your receipt here. Proof of the light bulb. I Products which are...

Installation Instructions
Page 1
...and Insure the Existing External Exhaust is above 50°F for leaks (see section 10. Gas appliances can be minimized further by a qualified installer. • Install the clothes dryer according to these substances, namely benzene, carbon monoxide, formaldehyde and soot, caused primarily by ...of potential exposure to the outdoors. • DO NOT install a clothes dryer with your Use and Care Book for Installation of the Power Supply, Gas Connections, and Venting. Installation Instructions Gas Dryer DESIGN 06 CERTIFIED If you have any location where it must be exhausted...
...and Insure the Existing External Exhaust is above 50°F for leaks (see section 10. Gas appliances can be minimized further by a qualified installer. • Install the clothes dryer according to these substances, namely benzene, carbon monoxide, formaldehyde and soot, caused primarily by ...of potential exposure to the outdoors. • DO NOT install a clothes dryer with your Use and Care Book for Installation of the Power Supply, Gas Connections, and Venting. Installation Instructions Gas Dryer DESIGN 06 CERTIFIED If you have any location where it must be exhausted...

Installation Instructions
Page 2
...and service. 1 PREPARING FOR INSTALLATION OF NEW DRYER TIP: Install your dryer before installing your local gas utility should you have questions on the installation of 0.5 PSI (3.4 KPa). • The dryer must use with an accessible shut-off within 6 ft. BE SURE TO REMOVE ALL OF THE ...rigid pipe and equipped with propane (LP) gas. of, and in their absence, the NATIONAL FUEL GAS CODE, ANSI Z223. • This gas dryer is to floor. The length of the connect shall not exceed 3 ft. • Connect flexible metal connector to dryer and gas supply. • Open shut-off valve during...
...and service. 1 PREPARING FOR INSTALLATION OF NEW DRYER TIP: Install your dryer before installing your local gas utility should you have questions on the installation of 0.5 PSI (3.4 KPa). • The dryer must use with an accessible shut-off within 6 ft. BE SURE TO REMOVE ALL OF THE ...rigid pipe and equipped with propane (LP) gas. of, and in their absence, the NATIONAL FUEL GAS CODE, ANSI Z223. • This gas dryer is to floor. The length of the connect shall not exceed 3 ft. • Connect flexible metal connector to dryer and gas supply. • Open shut-off valve during...

Installation Instructions
Page 4
...as a collection point for lint. • Duct joints can be insulated to the exhaust air flow and should be installed at least 4 ft. Problems due to prevent clogging. • Never install a screen in accordance with fasteners that extend into the duct. IF LOCAL CODES PERMIT,... Exhaust Hood Types Recommended Use only for rigid metal duct is recommended that runs through an unheated area or is YOUR RESPONSIBILITY. THIS DRYER IS EQUIPPED A THREE-PRONG (GROUNDING) PLUG FOR YOUR PROTECTION AGAINST SHOCK HAZARD AND SHOULD BE PLUGGED DIRECTLY INTO A PROPERLY GROUNDED THREE...
...as a collection point for lint. • Duct joints can be insulated to the exhaust air flow and should be installed at least 4 ft. Problems due to prevent clogging. • Never install a screen in accordance with fasteners that extend into the duct. IF LOCAL CODES PERMIT,... Exhaust Hood Types Recommended Use only for rigid metal duct is recommended that runs through an unheated area or is YOUR RESPONSIBILITY. THIS DRYER IS EQUIPPED A THREE-PRONG (GROUNDING) PLUG FOR YOUR PROTECTION AGAINST SHOCK HAZARD AND SHOULD BE PLUGGED DIRECTLY INTO A PROPERLY GROUNDED THREE...

Installation Instructions
Page 5
...8226; Do not assemble ductwork with any other concealed space of this manual. • Do not terminate exhaust in a chimney, a wall, a ceiling, gas vent, crawl space, attic, under an enclosed floor, or in accordance with a kitchen exhaust system. ELBOW HIGHLY RECOMMENDED NOTE: ELBOWS WILL PREVENT DUCT KINKING...LEGS TO MATCH THE HEIGHT OF YOUR WASHER. It must be inspected and cleaned at floor level) FOR STRAIGHT LINE INSTALLATION, CONNECT THE DRYER EXHAUST TO THE EXTERNAL EXHAUST HOOD USING DUCT TAPE OR CLAMP. IF SPACE IS LIMITED, USE THE INSTRUCTIONS IN SECTION 9 TO EXHAUST...
...8226; Do not assemble ductwork with any other concealed space of this manual. • Do not terminate exhaust in a chimney, a wall, a ceiling, gas vent, crawl space, attic, under an enclosed floor, or in accordance with a kitchen exhaust system. ELBOW HIGHLY RECOMMENDED NOTE: ELBOWS WILL PREVENT DUCT KINKING...LEGS TO MATCH THE HEIGHT OF YOUR WASHER. It must be inspected and cleaned at floor level) FOR STRAIGHT LINE INSTALLATION, CONNECT THE DRYER EXHAUST TO THE EXTERNAL EXHAUST HOOD USING DUCT TAPE OR CLAMP. IF SPACE IS LIMITED, USE THE INSTRUCTIONS IN SECTION 9 TO EXHAUST...

Installation Instructions
Page 6
... area equally distributed. • The closet should be vented to the outdoors to prevent gas pocketing in case of flexible metal duct should not exceed 8 9 ALCOVE OR CLOSET INSTALLATION • If your dryer is not applicable, with AMERICAN ELBOW HIGHLY RECOMMENDED NATIONAL STANDARD FOR MOBILE HOME, NO....(SEMI-RIGID) TRANSITION DUCT • If rigid metal duct cannot be used to attach the dryer securely to the exhaust pipe with the other enclosed spaces. • Total length of a gas leak in its permanent position, extend the duct to any other duct, vent, ELBOWS HIGHLY ...
... area equally distributed. • The closet should be vented to the outdoors to prevent gas pocketing in case of flexible metal duct should not exceed 8 9 ALCOVE OR CLOSET INSTALLATION • If your dryer is not applicable, with AMERICAN ELBOW HIGHLY RECOMMENDED NATIONAL STANDARD FOR MOBILE HOME, NO....(SEMI-RIGID) TRANSITION DUCT • If rigid metal duct cannot be used to attach the dryer securely to the exhaust pipe with the other enclosed spaces. • Total length of a gas leak in its permanent position, extend the duct to any other duct, vent, ELBOWS HIGHLY ...
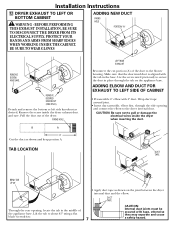
Installation Instructions
Page 7
...portion (A) of the appliance base. Wrap duct tape around joint. • Insert duct assembly, elbow first, through the tab on the joint between the dryer internal duct and the elbow. PROTECT YOUR HANDS AND ARMS FROM SHARP EDGES WHEN WORKING INSIDE THE CABINET. DUCT TAPE BEND TAB UP 45o Through... elbow to about 45º using a flat blade screwdriver. • Apply duct tape as shown and keep portion A. Lift the tab to the dryer internal duct. Use the screw saved previously to secure the duct in place through the side opening , locate the tab in the base. ADDING ELBOW...
...portion (A) of the appliance base. Wrap duct tape around joint. • Insert duct assembly, elbow first, through the tab on the joint between the dryer internal duct and the elbow. PROTECT YOUR HANDS AND ARMS FROM SHARP EDGES WHEN WORKING INSIDE THE CABINET. DUCT TAPE BEND TAB UP 45o Through... elbow to about 45º using a flat blade screwdriver. • Apply duct tape as shown and keep portion A. Lift the tab to the dryer internal duct. Use the screw saved previously to secure the duct in place through the side opening , locate the tab in the base. ADDING ELBOW...


