
Owners Manual
Page 1
...Profile Dryers Safety Instructions 2-4 Operating Instructions Controls 5-8 Cycle Options 9, 10 Demand Response 13 Dryer Features 10, 11 Quick Start Guide 5 Settings Option 10 Using the Dryer 12 Installation Instructions Before You Begin 14, 15 Connecting the Inlet Hoses 17 Connecting a Gas Dryer 18-21 Connecting an Electric Dryer 22-24 Exhausting the Dryer...49 Owner's Manual & Installation Instructions DPVH891 DPVH890 UPVH890 Sécheuses Profile Manuel d'utilisation et d'installation La section française commence à la page 51 Secadoras Profile Manual del propietario e...
...Profile Dryers Safety Instructions 2-4 Operating Instructions Controls 5-8 Cycle Options 9, 10 Demand Response 13 Dryer Features 10, 11 Quick Start Guide 5 Settings Option 10 Using the Dryer 12 Installation Instructions Before You Begin 14, 15 Connecting the Inlet Hoses 17 Connecting a Gas Dryer 18-21 Connecting an Electric Dryer 22-24 Exhausting the Dryer...49 Owner's Manual & Installation Instructions DPVH891 DPVH890 UPVH890 Sécheuses Profile Manuel d'utilisation et d'installation La section française commence à la page 51 Secadoras Profile Manual del propietario e...

Owners Manual
Page 2
...formaldehyde and soot, caused primarily by properly venting the dryer to -puncture ductwork. Exposure to these substances can cause minor exposure to four of this manual. ■ Properly ground dryer to conform with the Installation Instructions before it will ...electric shock, or to prevent property damage, personal injury, or death. ■ Do not store or use gasoline or other appliance. ■ Installation and service must be exhausted to the outside to warn customers of all occupants. PROPER INSTALLATION This dryer must be properly installed and located in this manual...
...formaldehyde and soot, caused primarily by properly venting the dryer to -puncture ductwork. Exposure to these substances can cause minor exposure to four of this manual. ■ Properly ground dryer to conform with the Installation Instructions before it will ...electric shock, or to prevent property damage, personal injury, or death. ■ Do not store or use gasoline or other appliance. ■ Installation and service must be exhausted to the outside to warn customers of all occupants. PROPER INSTALLATION This dryer must be properly installed and located in this manual...

Owners Manual
Page 4
... Support 4 The steam is equipped with items such as wool, leather, silk, lingerie, foam products or electric blankets. ■ Do not use steam cycles on . ■ Do not open the dryer door during steam cycles. Burns may result from the port for large loads may wish to carry out. ...controls. ■ Do not attempt to repair or replace any part of this appliance or attempt any servicing unless specifically recommended in this Owner's Manual or in published user-repair instructions that their product can be cleaned at least once a year by use either a fabric softener in the drum...
... Support 4 The steam is equipped with items such as wool, leather, silk, lingerie, foam products or electric blankets. ■ Do not use steam cycles on . ■ Do not open the dryer door during steam cycles. Burns may result from the port for large loads may wish to carry out. ...controls. ■ Do not attempt to repair or replace any part of this appliance or attempt any servicing unless specifically recommended in this Owner's Manual or in published user-repair instructions that their product can be cleaned at least once a year by use either a fabric softener in the drum...

Owners Manual
Page 5
... screen is active, press to turn the dryer off. select your heat setting and the amount of fire, electric shock, or injury to "wake up " the display. If the display is dark, press the POWER button to persons, read the IMPORTANT SAFETY INSTRUCTIONS before operating this manual, features and appearance may vary from... Support 2 3 1 6 7 5 1 Power Press to dry by turning the Cycle Knob. 3 If you want your model. If you selected a TIMED DRY CYCLE - Safety Instructions About the dryer control panel. To reduce the risk of time you selected a SENSOR CYCLE -
... screen is active, press to turn the dryer off. select your heat setting and the amount of fire, electric shock, or injury to "wake up " the display. If the display is dark, press the POWER button to persons, read the IMPORTANT SAFETY INSTRUCTIONS before operating this manual, features and appearance may vary from... Support 2 3 1 6 7 5 1 Power Press to dry by turning the Cycle Knob. 3 If you want your model. If you selected a TIMED DRY CYCLE - Safety Instructions About the dryer control panel. To reduce the risk of time you selected a SENSOR CYCLE -

Owners Manual
Page 14
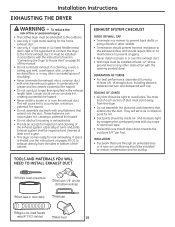
... exceed 3 feet. 14 In the Commonwealth of this manual. These conditions will minimize incomplete combustion. If flexible metal (semi-rigid or foil-type) duct is above 50°F for exhausting the clothes dryer to these instructions and in the appliance. Risk of ...for local electrical inspector's use. • IMPORTANT - Keep these substances, namely benzene, carbon monoxide, formaldehyde and soot, caused primarily by properly venting the dryer to four of natural gas or LP fuels. Installation Instructions Dryer DPVH891, DPVH890, UPVH890 Questions? Call 800.GE.CARES (...
... exceed 3 feet. 14 In the Commonwealth of this manual. These conditions will minimize incomplete combustion. If flexible metal (semi-rigid or foil-type) duct is above 50°F for exhausting the clothes dryer to these instructions and in the appliance. Risk of ...for local electrical inspector's use. • IMPORTANT - Keep these substances, namely benzene, carbon monoxide, formaldehyde and soot, caused primarily by properly venting the dryer to four of natural gas or LP fuels. Installation Instructions Dryer DPVH891, DPVH890, UPVH890 Questions? Call 800.GE.CARES (...
Owners Manual
Page 25
...a screen in the exhaust length table. of grease and lint creates a potential fire hazard. • Do not use the instructions on page 26 of this manual. • Do not terminate exhaust in a chimney, a wall, a ceiling, gas vent, crawl space, attic, under an enclosed floor, or in ... with any other wildlife. • Termination should present minimal resistance to the exhaust airflow and should be tight to exhaust directly from the dryer. • Do not assemble the ductwork with a kitchen exhaust system. This will serve as a collection point for rear exhausting. To ...
...a screen in the exhaust length table. of grease and lint creates a potential fire hazard. • Do not use the instructions on page 26 of this manual. • Do not terminate exhaust in a chimney, a wall, a ceiling, gas vent, crawl space, attic, under an enclosed floor, or in ... with any other wildlife. • Termination should present minimal resistance to the exhaust airflow and should be tight to exhaust directly from the dryer. • Do not assemble the ductwork with a kitchen exhaust system. This will serve as a collection point for rear exhausting. To ...

Owners Manual
Page 47
...Lint on inner drum • Select a shorter cycle. Paper, tissue, etc., left in pockets • Empty all GE Dryers when used in metallic color This is normal • Due to dry only clean items. Dirty items can cause static...Overdrying Synthetics, permanent press and blends can stain clean items and the dryer. • Sometimes stains which cannot be pressed back into smaller ones. Static electricity can be safely washed, but will naturally shrink • To ... cycle Cycle or cycle time selected too • Manually reduce cycle time for this section under STATIC.
...Lint on inner drum • Select a shorter cycle. Paper, tissue, etc., left in pockets • Empty all GE Dryers when used in metallic color This is normal • Due to dry only clean items. Dirty items can cause static...Overdrying Synthetics, permanent press and blends can stain clean items and the dryer. • Sometimes stains which cannot be pressed back into smaller ones. Static electricity can be safely washed, but will naturally shrink • To ... cycle Cycle or cycle time selected too • Manually reduce cycle time for this section under STATIC.

Owners Manual
Page 48
...water hose connection to tumble after steam cycle Dryer continues to valve Hose missing rubber washer at different time in cycle Too many garments Extend Tumble was selected • This is normal. • Load fewer garments; Manually reduce cycle time for service... manually increase time. • Ensure Extend Tumble ...call for given cycle. Operating Instructions Troubleshooting Tips Consumer Support 48 PROBLEM Small amount of water on floor in back of dryer Dryer makes water noises Water drips from door when opened after a Steam Cycle Cannot see steam at beginning of...
...water hose connection to tumble after steam cycle Dryer continues to valve Hose missing rubber washer at different time in cycle Too many garments Extend Tumble was selected • This is normal. • Load fewer garments; Manually reduce cycle time for service... manually increase time. • Ensure Extend Tumble ...call for given cycle. Operating Instructions Troubleshooting Tips Consumer Support 48 PROBLEM Small amount of water on floor in back of dryer Dryer makes water noises Water drips from door when opened after a Steam Cycle Cannot see steam at beginning of...

Owners Manual
Page 156
...your phone number, or write to: General Manager, Customer Relations GE Appliances, Appliance Park Louisville, KY 40225 In Canada: www.GEAppliances.ca, or write to qualified service personnel. Instructions contained in this manual cover procedures to be referred to : Director, Consumer Relations, Mabe... Canada Inc. Try the GE Appliances Website 24 hours a day, any day of your warranty is only one ...
...your phone number, or write to: General Manager, Customer Relations GE Appliances, Appliance Park Louisville, KY 40225 In Canada: www.GEAppliances.ca, or write to qualified service personnel. Instructions contained in this manual cover procedures to be referred to : Director, Consumer Relations, Mabe... Canada Inc. Try the GE Appliances Website 24 hours a day, any day of your warranty is only one ...

