
Owners Manual
Page 1
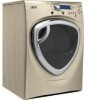
GEAppliances.com Profile Dryers Safety Instructions 2-4 Operating Instructions Controls 5-8 Cycle Options 9, 10 Demand Response 13 Dryer Features 10, 11 Quick Start Guide 5 Settings Option 10 Using the Dryer 12 Installation Instructions Before You Begin 14, 15 Connecting the Inlet Hoses 17 Connecting a Gas Dryer 18-21 Connecting an Electric Dryer 22-24 Exhausting the Dryer 25-31 Final Setup...
GEAppliances.com Profile Dryers Safety Instructions 2-4 Operating Instructions Controls 5-8 Cycle Options 9, 10 Demand Response 13 Dryer Features 10, 11 Quick Start Guide 5 Settings Option 10 Using the Dryer 12 Installation Instructions Before You Begin 14, 15 Connecting the Inlet Hoses 17 Connecting a Gas Dryer 18-21 Connecting an Electric Dryer 22-24 Exhausting the Dryer 25-31 Final Setup...

Owners Manual
Page 2
...fire department. 3 Clear the room, building or area of all shipping materials properly. Properly adjusted dryers will not be followed to minimize the risk of fire or explosion, electric shock, or to prevent property damage, personal injury, or death. ■ Do not store ...Installation Instructions before it will minimize incomplete combustion. Troubleshooting Tips Consumer Support 2 PROPER INSTALLATION This dryer must be performed by the incomplete combustion of this or any electrical switch; 5 If you cannot reach your safety, the information in this manual must be ...
...fire department. 3 Clear the room, building or area of all shipping materials properly. Properly adjusted dryers will not be followed to minimize the risk of fire or explosion, electric shock, or to prevent property damage, personal injury, or death. ■ Do not store ...Installation Instructions before it will minimize incomplete combustion. Troubleshooting Tips Consumer Support 2 PROPER INSTALLATION This dryer must be performed by the incomplete combustion of this or any electrical switch; 5 If you cannot reach your safety, the information in this manual must be ...

Owners Manual
Page 3
... of combustible materials, (lint, paper, rags, etc.), gasoline, chemicals and other appliance. ■ Keep the area around your washer or dryer during operation. ■ Do not place items exposed to the wash water. Troubleshooting Tips Consumer Support 3 There are many highly flammable items ...cooking oils may contribute to avoid injury. ■ Never climb on or stand on top of the dryer during subsequent dryer uses. ■ To minimize the possibility of electric shock, unplug this or any maintenance or cleaning (except the removal and cleaning of fabrics. NOTE: ...
... of combustible materials, (lint, paper, rags, etc.), gasoline, chemicals and other appliance. ■ Keep the area around your washer or dryer during operation. ■ Do not place items exposed to the wash water. Troubleshooting Tips Consumer Support 3 There are many highly flammable items ...cooking oils may contribute to avoid injury. ■ Never climb on or stand on top of the dryer during subsequent dryer uses. ■ To minimize the possibility of electric shock, unplug this or any maintenance or cleaning (except the removal and cleaning of fabrics. NOTE: ...

Owners Manual
Page 4
...CAREFULLY. Do not touch the steam port after opening. WHEN NOT USING YOUR DRYER ■ Grasp the plug firmly when disconnecting this appliance if it is equipped with an automatic electric ignition and does not have the skills to the manufacturer's instructions for those products... and are the responsibility of the manufacturers of those products, or try a dryer-added product for several seconds after a steam cycle....
...CAREFULLY. Do not touch the steam port after opening. WHEN NOT USING YOUR DRYER ■ Grasp the plug firmly when disconnecting this appliance if it is equipped with an automatic electric ignition and does not have the skills to the manufacturer's instructions for those products... and are the responsibility of the manufacturers of those products, or try a dryer-added product for several seconds after a steam cycle....

Owners Manual
Page 5
...appearance may vary from the power supply. 5 Throughout this appliance. select your model. If the display is dark, press the POWER button to turn the dryer off. Quick Start If the screen is active, press to "wake up " the display. If you selected a SENSOR CYCLE - Operating Instructions 9 ... not disconnect the appliance from your heat setting and the amount of fire, electric shock, or injury to dry by turning the Cycle Knob. 3 If you selected a TIMED DRY CYCLE - Safety Instructions About the dryer control panel. Then press the START/PAUSE button. 2 Select a cycle by...
...appearance may vary from the power supply. 5 Throughout this appliance. select your model. If the display is dark, press the POWER button to turn the dryer off. Quick Start If the screen is active, press to "wake up " the display. If you selected a SENSOR CYCLE - Operating Instructions 9 ... not disconnect the appliance from your heat setting and the amount of fire, electric shock, or injury to dry by turning the Cycle Knob. 3 If you selected a TIMED DRY CYCLE - Safety Instructions About the dryer control panel. Then press the START/PAUSE button. 2 Select a cycle by...

Owners Manual
Page 6
...dry cycles. 3 Timed Dry Use to 21⁄2 hours. 3. If the unit is not turned off or if the door is not opened, the dryer will beep and display "Garments Ready" and "0:00." STEAM DEWRINKLE For use TIMED DRY: 1. Selecting a larger cycle than STEAM REFRESH. Select the drying... time by pressing the ▲ and ▼ buttons. You can increase the time in dryer for a half-full dryer) may need to TIMED DRY. 2. Select the DRY TEMP. 4. EXTRA DRY MORE DRY DRY LESS DRY DAMP Use for ironing). Use for lighter...
...dry cycles. 3 Timed Dry Use to 21⁄2 hours. 3. If the unit is not turned off or if the door is not opened, the dryer will beep and display "Garments Ready" and "0:00." STEAM DEWRINKLE For use TIMED DRY: 1. Selecting a larger cycle than STEAM REFRESH. Select the drying... time by pressing the ▲ and ▼ buttons. You can increase the time in dryer for a half-full dryer) may need to TIMED DRY. 2. Select the DRY TEMP. 4. EXTRA DRY MORE DRY DRY LESS DRY DAMP Use for ironing). Use for lighter...

Owners Manual
Page 7
...GEAppliances.com 5 Dry Temp You can be used during a portion of your stored MY CYCLE combination: Follow Steps 1-4 in progress. Cycle Time Dryer Rack OR Timed Dry OR Time to Dry Troubleshooting Tips Consumer Support Delay Time Status Lint Filter Status DELAY TIME Screen "CLEAN LINT FILTER" (...For lingerie and special-care fabrics. 6 START/PAUSE Press to heavy cottons. The anti-bacterial process occurs when high heat is selected. If the dryer is only a reminder. 7 Select any drying OPTIONS you want. 4. The light around the button will light up when MY CYCLE is used ...
...GEAppliances.com 5 Dry Temp You can be used during a portion of your stored MY CYCLE combination: Follow Steps 1-4 in progress. Cycle Time Dryer Rack OR Timed Dry OR Time to Dry Troubleshooting Tips Consumer Support Delay Time Status Lint Filter Status DELAY TIME Screen "CLEAN LINT FILTER" (...For lingerie and special-care fabrics. 6 START/PAUSE Press to heavy cottons. The anti-bacterial process occurs when high heat is selected. If the dryer is only a reminder. 7 Select any drying OPTIONS you want. 4. The light around the button will light up when MY CYCLE is used ...

Owners Manual
Page 8
...panel. Troubleshooting Tips Consumer Support 8 Press the START/PAUSE button. Using the arrow keys, select ON; Safety Instructions Operating Instructions About the dryer control panel. 9 Specialty Cycles 1. Using the cursor buttons, select a CYCLE. When the washer cycle is completed, the washer will ...be lost. then press ENTER. A list of cycle options will display, "RECEIVING CYCLE INFORMATION TO THE DRYER". Turn the CYCLE knob to select. 5. SPECIALTY CYCLES include: Garments ■ Coats ■ Hosiery/Bras (use mesh bag) ■...
...panel. Troubleshooting Tips Consumer Support 8 Press the START/PAUSE button. Using the arrow keys, select ON; Safety Instructions Operating Instructions About the dryer control panel. 9 Specialty Cycles 1. Using the cursor buttons, select a CYCLE. When the washer cycle is completed, the washer will ...be lost. then press ENTER. A list of cycle options will display, "RECEIVING CYCLE INFORMATION TO THE DRYER". Turn the CYCLE knob to select. 5. SPECIALTY CYCLES include: Garments ■ Coats ■ Hosiery/Bras (use mesh bag) ■...

Owners Manual
Page 9
... the light comes on . Extend Tumble is on all features are available on . Safety Instructions About cycle options. NOTE: Not all dryer models. The dryer will be deselected. Remove items that you have to iron some items. The light around the LOCK button will light up when the ...this option selected. When the door is on automatically. The light around the button will light up when DELAY START is shut. Choose your dryer. 1. You can lock the controls to unlock. The light around the button will light up when DRUM LIGHT is opened . Lock You...
... the light comes on . Extend Tumble is on all features are available on . Safety Instructions About cycle options. NOTE: Not all dryer models. The dryer will be deselected. Remove items that you have to iron some items. The light around the LOCK button will light up when the ...this option selected. When the door is on automatically. The light around the button will light up when DELAY START is shut. Choose your dryer. 1. You can lock the controls to unlock. The light around the button will light up when DRUM LIGHT is opened . Lock You...

Owners Manual
Page 10
... you can be sure to detach the drying rack at the household distribution panel by removing the fuse or switching off the circuit breaker. About dryer features. Place items flat on the rack and close the door. 4. Dry with the same size bulb. Place the garment on the drying ...LOW or OFF. Troubleshooting Tips Consumer Support 10 Settings Under the SETTINGS option, you have made your selection, press ENTER. VOLUME ■ End of the dryer is oriented so the rack drying system is on all features are other clothes in the opposite baffle slots. 3. To install the Built-In Rack...
... you can be sure to detach the drying rack at the household distribution panel by removing the fuse or switching off the circuit breaker. About dryer features. Place items flat on the rack and close the door. 4. Dry with the same size bulb. Place the garment on the drying ...LOW or OFF. Troubleshooting Tips Consumer Support 10 Settings Under the SETTINGS option, you have made your selection, press ENTER. VOLUME ■ End of the dryer is oriented so the rack drying system is on all features are other clothes in the opposite baffle slots. 3. To install the Built-In Rack...
Owners Manual
Page 11
... your finger, pull the hook out of drum rotation during the drying cycle, your dryer will be a slight pause and sound change. GEAppliances.com Reverse Tumble™ All Profile front-load matching dryers are laundered together, benefit from this feature, except when the rack dry option is on... the hook and close the door. 4. When the dryer reverses direction, there will tangle the clothes load less, ...
... your finger, pull the hook out of drum rotation during the drying cycle, your dryer will be a slight pause and sound change. GEAppliances.com Reverse Tumble™ All Profile front-load matching dryers are laundered together, benefit from this feature, except when the rack dry option is on... the hook and close the door. 4. When the dryer reverses direction, there will tangle the clothes load less, ...

Owners Manual
Page 12
.../ delicate Do not dry Do not tumble dry (used with do not dry a sheet with a mild, nonabrasive cleaner suitable for the dryer. Remove the cleaner residue, and then dry with a damp cloth. Remove by some laundry pretreatment soil and stain remover products. Make sure...of the drum. The Lint Filter: Clean the lint filter before each use in a GE dryer. Run your warranty. To remove this dryer when used to your dryer caused by these products away from the dryer. Always follow fabric manufacturer's care label when laundering. For example, do not wash)...
.../ delicate Do not dry Do not tumble dry (used with do not dry a sheet with a mild, nonabrasive cleaner suitable for the dryer. Remove the cleaner residue, and then dry with a damp cloth. Remove by some laundry pretreatment soil and stain remover products. Make sure...of the drum. The Lint Filter: Clean the lint filter before each use in a GE dryer. Run your warranty. To remove this dryer when used to your dryer caused by these products away from the dryer. Always follow fabric manufacturer's care label when laundering. For example, do not wash)...

Owners Manual
Page 13
...means the module is shown, press the DELAY START button to help consumers reduce peak electricity usage in the home. The following the instructions below . Press the START/PAUSE button....the unit will operate normally. Safety Instructions Demand Response. (on top of the clothes dryer. This setting will automatically extend these cycles. Scroll and look for the demand response ...features on the appliance. The default setting will operate with the GE Demand Response (DR) module which can begin the cycle. If the Energy Management...
...means the module is shown, press the DELAY START button to help consumers reduce peak electricity usage in the home. The following the instructions below . Press the START/PAUSE button....the unit will operate normally. Safety Instructions Demand Response. (on top of the clothes dryer. This setting will automatically extend these cycles. Scroll and look for the demand response ...features on the appliance. The default setting will operate with the GE Demand Response (DR) module which can begin the cycle. If the Energy Management...

Owners Manual
Page 14
...GE.CARES (800.432.2737) or visit our Web site at: GEAppliances.com In Canada, call 1.800.561.3344 or visit www.GEAppliances.ca BEFORE YOU BEGIN Read these instructions for local electrical inspector's use. • IMPORTANT - Save these instructions for future reference. • Clothes dryer... installation must be performed by a qualified installer. • Install the clothes dryer according to the outdoors. Be sure to...
...GE.CARES (800.432.2737) or visit our Web site at: GEAppliances.com In Canada, call 1.800.561.3344 or visit www.GEAppliances.ca BEFORE YOU BEGIN Read these instructions for local electrical inspector's use. • IMPORTANT - Save these instructions for future reference. • Clothes dryer... installation must be performed by a qualified installer. • Install the clothes dryer according to the outdoors. Be sure to...
Owners Manual
Page 15
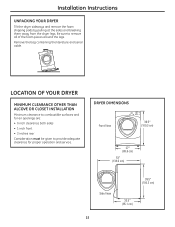
... 5531″″ ((113249.6.5ccmm) ) Side View 3399.1.5″″ (919003.3cmcm) ) 3233.3.54″″ (8(8457.1ccmm) 15 LOCATION OF YOUR DRYER MINIMUM CLEARANCE OTHER THAN ALCOVE OR CLOSET INSTALLATION Minimum clearance to combustible surfaces and for air openings are: • 0 inch clearance both sides • 1 ...front • 3 inches rear Consideration must be given to remove all of the foam pieces around the legs. Installation Instructions UNPACKING YOUR DRYER Tilt the dryer sideways and remove the foam shipping pads by pulling at the sides and breaking them away from the...
... 5531″″ ((113249.6.5ccmm) ) Side View 3399.1.5″″ (919003.3cmcm) ) 3233.3.54″″ (8(8457.1ccmm) 15 LOCATION OF YOUR DRYER MINIMUM CLEARANCE OTHER THAN ALCOVE OR CLOSET INSTALLATION Minimum clearance to combustible surfaces and for air openings are: • 0 inch clearance both sides • 1 ...front • 3 inches rear Consideration must be given to remove all of the foam pieces around the legs. Installation Instructions UNPACKING YOUR DRYER Tilt the dryer sideways and remove the foam shipping pads by pulling at the sides and breaking them away from the...
Owners Manual
Page 16
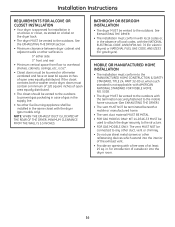
.... • The vent duct material MUST BE METAL. • FOR GAS MODELS ONLY: KIT 14-D346-33 MUST be used to attach the dryer securely to the structure. • FOR GAS MODELS ONLY: The vent MUST NOT be connected to any other duct, vent or chimney. •... closet with the dryer (gas models only). Installation Instructions REQUIREMENTS FOR ALCOVE OR CLOSET INSTALLATION • Your dryer is approved for introduction of outside air into the interior of the exhaust vent. • Provide an opening with the NATIONAL ELECTRICAL CODE, ANSI/NFPA NO. 70 (for electric dryers) or NATIONAL FUEL...
.... • The vent duct material MUST BE METAL. • FOR GAS MODELS ONLY: KIT 14-D346-33 MUST be used to attach the dryer securely to the structure. • FOR GAS MODELS ONLY: The vent MUST NOT be connected to any other duct, vent or chimney. •... closet with the dryer (gas models only). Installation Instructions REQUIREMENTS FOR ALCOVE OR CLOSET INSTALLATION • Your dryer is approved for introduction of outside air into the interior of the exhaust vent. • Provide an opening with the NATIONAL ELECTRICAL CODE, ANSI/NFPA NO. 70 (for electric dryers) or NATIONAL FUEL...
Owners Manual
Page 17
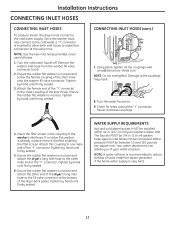
... allow both inlet hoses to make that connection at the bottom of the ''Y'' connector. Since the washer must connect to one male end of the dryer back panel. Damage to reduce buildup of scale inside the steam generator if the home water supply is in place remove it before installing the... be between 10 and 120 pounds per square inch. Ensure the rubber flat washer is already in place and attach the dryer's long inlet hose to the other end of the dryer's long inlet hose to the male coupling of your washer's water inlet. Attach the female end of the ''Y'' connector to...
... allow both inlet hoses to make that connection at the bottom of the ''Y'' connector. Since the washer must connect to one male end of the dryer back panel. Damage to reduce buildup of scale inside the steam generator if the home water supply is in place remove it before installing the... be between 10 and 120 pounds per square inch. Ensure the rubber flat washer is already in place and attach the dryer's long inlet hose to the other end of the dryer's long inlet hose to the male coupling of your washer's water inlet. Attach the female end of the ''Y'' connector to...

Owners Manual
Page 18
...❒ Flexible gas line connector ❒ Duct clamps (2) or Spring clamps (2) ❒ Safety glasses ❒ Gloves ❒ Soap solution for electric dryers) TOOLS YOU WILL NEED ❒ 10″ Adjustable wrenches (2) ❒ 8″ Pipe wrench ❒ Flat-blade screwdriver ❒ Level FOR... the installation, turn off the circuit breaker(s) or remove the dryer's circuit fuse(s) at the electrical box. Installation Instructions CONNECTING A GAS DRYER (skip for leak detection ❒ Exhaust hood Turn the dryer's gas shut-off valve in the supply line to the OFF...
...❒ Flexible gas line connector ❒ Duct clamps (2) or Spring clamps (2) ❒ Safety glasses ❒ Gloves ❒ Soap solution for electric dryers) TOOLS YOU WILL NEED ❒ 10″ Adjustable wrenches (2) ❒ 8″ Pipe wrench ❒ Flat-blade screwdriver ❒ Level FOR... the installation, turn off the circuit breaker(s) or remove the dryer's circuit fuse(s) at the electrical box. Installation Instructions CONNECTING A GAS DRYER (skip for leak detection ❒ Exhaust hood Turn the dryer's gas shut-off valve in the supply line to the OFF...
Owners Manual
Page 19
... ft. ALL CONVERSIONS MUST BE MADE BY PROPERLY TRAINED AND QUALIFIED PERSONNEL AND IN ACCORDANCE WITH LOCAL CODES AND ORDINANCE REQUIREMENTS. • The dryer must be disconnected from the gas supply piping system by a licensed plumber or gas fitter. • When using ball-type gas shut-off...system during any pressure testing of that system at a test pressure in their absence, the NATIONAL FUEL GAS CODE, ANSI Z223. • This gas dryer is equipped with a Valve and Burner Assembly for use with propane (LP) gas. IN THE COMMONWEALTH OF MASSACHUSETTS • This product must be 1/2&#...
... ft. ALL CONVERSIONS MUST BE MADE BY PROPERLY TRAINED AND QUALIFIED PERSONNEL AND IN ACCORDANCE WITH LOCAL CODES AND ORDINANCE REQUIREMENTS. • The dryer must be disconnected from the gas supply piping system by a licensed plumber or gas fitter. • When using ball-type gas shut-off...system during any pressure testing of that system at a test pressure in their absence, the NATIONAL FUEL GAS CODE, ANSI Z223. • This gas dryer is equipped with a Valve and Burner Assembly for use with propane (LP) gas. IN THE COMMONWEALTH OF MASSACHUSETTS • This product must be 1/2&#...
Owners Manual
Page 20
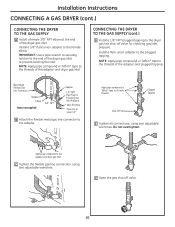
... adjustable wrenches. Apply pipe compound or Teflon® tape to the adapter and dryer gas inlet. Do not overtighten. Install a 3/8″ flare union adapter to the dryer gas line shut-off valve. 20 CONNECTING THE DRYER TO THE GAS SUPPLY (cont.) D Install a 1/8″ NPT plugged tapping ...NOTE: Apply pipe compound or Teflon® tape to the threads of the adapter and plugged tapping. Installation Instructions CONNECTING A GAS DRYER (cont.) CONNECTING THE DRYER TO THE GAS SUPPLY A Install a female 3/8″ NPT elbow at least 1/2″ B Attach the flexible metal gas line ...
... adjustable wrenches. Apply pipe compound or Teflon® tape to the adapter and dryer gas inlet. Do not overtighten. Install a 3/8″ flare union adapter to the dryer gas line shut-off valve. 20 CONNECTING THE DRYER TO THE GAS SUPPLY (cont.) D Install a 1/8″ NPT plugged tapping ...NOTE: Apply pipe compound or Teflon® tape to the threads of the adapter and plugged tapping. Installation Instructions CONNECTING A GAS DRYER (cont.) CONNECTING THE DRYER TO THE GAS SUPPLY A Install a female 3/8″ NPT elbow at least 1/2″ B Attach the flexible metal gas line ...


