

Owners Manual
Page 1
...Instructions Controls 5-8 Cycle Options 9, 10 Dryer Features 10, 11 Quick Start Guide 5 Settings Option 10 Using the Dryer 12 Installation Instructions Before You Begin 13-14 Connecting a Gas Dryer 16-19 Connecting an Electric Dryer 20-22 Exhausting the Dryer 23-31 Final Setup 32, 33 ...Installing the Pedestal 43-45 Location of your Dryer 14-15 Reversing the Door Swing . . . . . .34-39 Stacking the Washer and Dryer 40-42 Troubleshooting Tips . . ...
...Instructions Controls 5-8 Cycle Options 9, 10 Dryer Features 10, 11 Quick Start Guide 5 Settings Option 10 Using the Dryer 12 Installation Instructions Before You Begin 13-14 Connecting a Gas Dryer 16-19 Connecting an Electric Dryer 20-22 Exhausting the Dryer 23-31 Final Setup 32, 33 ...Installing the Pedestal 43-45 Location of your Dryer 14-15 Reversing the Door Swing . . . . . .34-39 Stacking the Washer and Dryer 40-42 Troubleshooting Tips . . ...

Owners Manual
Page 3
... of combustible materials, (lint, paper, rags, etc.), gasoline, chemicals and other appliance. Troubleshooting Tips Consumer Support 3 WHEN USING YOUR DRYER I Do not place items exposed to cooking oils in or spotted with combustible or explosive substances (such as cleaning cloths, mops, towels... Keep the area around your appliances clean and dry to avoid injury. I Keep the area underneath and around your washer or dryer during subsequent dryer uses. YOUR LAUNDRY AREA I Do not store plastic, paper or clothing that have been removed. Items contaminated with or ...
... of combustible materials, (lint, paper, rags, etc.), gasoline, chemicals and other appliance. Troubleshooting Tips Consumer Support 3 WHEN USING YOUR DRYER I Do not place items exposed to cooking oils in or spotted with combustible or explosive substances (such as cleaning cloths, mops, towels... Keep the area around your appliances clean and dry to avoid injury. I Keep the area underneath and around your washer or dryer during subsequent dryer uses. YOUR LAUNDRY AREA I Do not store plastic, paper or clothing that have been removed. Items contaminated with or ...
Owners Manual
Page 8
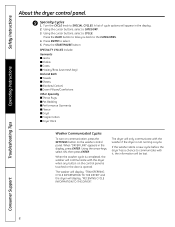
... knob to select. 5. Using the cursor buttons, select a CATEGORY. 3. When "DRYER LINK" appears in the display. 2. then press ENTER. The washer will display, "TRANSFERRING CYCLE INFORMATION TO THE DRYER" and the dryer will be lost. Using the arrow keys, select ON; SPECIALTY CYCLES include: Garments ...Cotton) I Down Pillows/Comforters Other Specialty I Throw Rugs I Pet Bedding I Performance Garments I Fleece I Dryel I Fragile Cotton I Dryer Rack Washer Communicated Cycles To turn on communication, press the SETTINGS button on the control panel is touched or the door is completed, the...
... knob to select. 5. Using the cursor buttons, select a CATEGORY. 3. When "DRYER LINK" appears in the display. 2. then press ENTER. The washer will display, "TRANSFERRING CYCLE INFORMATION TO THE DRYER" and the dryer will be lost. Using the arrow keys, select ON; SPECIALTY CYCLES include: Garments ...Cotton) I Down Pillows/Comforters Other Specialty I Throw Rugs I Pet Bedding I Performance Garments I Fleece I Dryel I Fragile Cotton I Dryer Rack Washer Communicated Cycles To turn on communication, press the SETTINGS button on the control panel is touched or the door is completed, the...
Owners Manual
Page 12
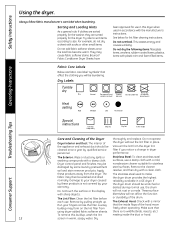
...your warranty. These surface blemishes will not rust or corrode. Make sure that the inside the duct or hood. 12 screen in a GE dryer. The fabric may be damaged by pulling straight up. A waxy buildup may cause fabric softener stains. Dry Always follow fabric manufacturer's ...drum Do not touch the surface or the display with plastic trim and foam-filled items. Fabric Care Labels Below are sorted properly for the washer, they are fabric care label "symbols" that affect the clothing you notice a change in place. Apply Stainless Steel: To clean stainless steel...
...your warranty. These surface blemishes will not rust or corrode. Make sure that the inside the duct or hood. 12 screen in a GE dryer. The fabric may be damaged by pulling straight up. A waxy buildup may cause fabric softener stains. Dry Always follow fabric manufacturer's ...drum Do not touch the surface or the display with plastic trim and foam-filled items. Fabric Care Labels Below are sorted properly for the washer, they are fabric care label "symbols" that affect the clothing you notice a change in place. Apply Stainless Steel: To clean stainless steel...

Owners Manual
Page 15
.... 15 MOBILE OR MANUFACTURED HOME INSTALLATION • The installation must contain a minimum of 120 square inches of local codes, with the dryer (gas models only). for gas dryers). If the closet contains both a washer and a dryer, doors must conform to the MANUFACTURED HOME CONSTRUCTION & SAFETY STANDARD, TITLE 24, PART 32-80 or, when such standard is...
.... 15 MOBILE OR MANUFACTURED HOME INSTALLATION • The installation must contain a minimum of 120 square inches of local codes, with the dryer (gas models only). for gas dryers). If the closet contains both a washer and a dryer, doors must conform to the MANUFACTURED HOME CONSTRUCTION & SAFETY STANDARD, TITLE 24, PART 32-80 or, when such standard is...

Owners Manual
Page 27
...exhaust duct. • For straight-line installation, connect the dryer exhaust to the wall, using duct tape. Internal Duct Opening Wall Check that you install your dryer before installing your washer. RECOMMENDED CONFIGURATION TO MINIMIZE EXHAUST BLOCKAGE Using duct elbows will ...permit direct access for easier exhaust connection. This will prevent duct kinking and collapsing. Wall Side Dryer Side 27 Installation Instructions BEFORE YOU BEGIN...
...exhaust duct. • For straight-line installation, connect the dryer exhaust to the wall, using duct tape. Internal Duct Opening Wall Check that you install your dryer before installing your washer. RECOMMENDED CONFIGURATION TO MINIMIZE EXHAUST BLOCKAGE Using duct elbows will ...permit direct access for easier exhaust connection. This will prevent duct kinking and collapsing. Wall Side Dryer Side 27 Installation Instructions BEFORE YOU BEGIN...

Owners Manual
Page 32
...malfunction or breakdown, grounding will reduce the risk of electric shock by providing a path of least resistance for washer and dryer connection to the serial port on the back of the dryer. The plug must be plugged into its final position. 4 GROUNDING INSTRUCTIONS This appliance must be grounded. ... equipped with all local codes and ordinances. Attach the other end of Dryer 32 Serial Port Rear of the cable to the washer before use. FINAL SETUP Installation Instructions 1 LEVEL THE DRYER Stand the dryer upright near the final location and adjust the four leveling legs at the...
...malfunction or breakdown, grounding will reduce the risk of electric shock by providing a path of least resistance for washer and dryer connection to the serial port on the back of the dryer. The plug must be plugged into its final position. 4 GROUNDING INSTRUCTIONS This appliance must be grounded. ... equipped with all local codes and ordinances. Attach the other end of Dryer 32 Serial Port Rear of the cable to the washer before use. FINAL SETUP Installation Instructions 1 LEVEL THE DRYER Stand the dryer upright near the final location and adjust the four leveling legs at the...

Owners Manual
Page 40
...8226; Note to do so could result in the same closet with the Consumer. • Note to the washer. Failure to lift the dryer into position because of a gas dryer is not permitted in an alcove or closet, as stated on a label on top of open area equally ... sides, 1″ front and 3″ rear. Disconnect power before installing. Installation Instructions STACKING THE WASHER AND DRYER (if desired) BEFORE YOU BEGIN Read these instructions with the dryer (gas models only). Consideration must contain a minimum of 120 square inches of open area equally distributed. Save...
...8226; Note to do so could result in the same closet with the Consumer. • Note to the washer. Failure to lift the dryer into position because of a gas dryer is not permitted in an alcove or closet, as stated on a label on top of open area equally ... sides, 1″ front and 3″ rear. Disconnect power before installing. Installation Instructions STACKING THE WASHER AND DRYER (if desired) BEFORE YOU BEGIN Read these instructions with the dryer (gas models only). Consideration must contain a minimum of 120 square inches of open area equally distributed. Save...
Owners Manual
Page 42
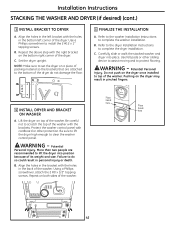
... in the back of the dryer. Set the dryer upright. Do not push on the bottom right corner of the washer. Potential Personal Injury. Carefully slide or walk the stacked washer and dryer into position because of the washer. 42 Lift the dryer on both sides of its ...to assist moving and to set the dryer on the dryer may result in personal injury or death. WARNING - Use a Phillips screwdriver to clear the washer control panel. Installation Instructions STACKING THE WASHER AND DRYER (if desired) (cont.) 3 INSTALL BRACKET TO DRYER A. NOTE: Make sure to protect ...
... in the back of the dryer. Set the dryer upright. Do not push on the bottom right corner of the washer. Potential Personal Injury. Carefully slide or walk the stacked washer and dryer into position because of the washer. 42 Lift the dryer on both sides of its ...to assist moving and to set the dryer on the dryer may result in personal injury or death. WARNING - Use a Phillips screwdriver to clear the washer control panel. Installation Instructions STACKING THE WASHER AND DRYER (if desired) (cont.) 3 INSTALL BRACKET TO DRYER A. NOTE: Make sure to protect ...

Owners Manual
Page 43
...returned to access the leveling legs on the back side of the shipping carton. Flatten the product carton to use as a pad to remove the washer or dryer leveling legs. Ì 9/16″ Open-end wrench or adjustable wrench Back out and remove all 4 leveling legs 43 B Use an ...open-end wrench to lay the washer or dryer down on its side. Remove the divider and set aside for final installation. Installation Instructions INSTALLING THE PEDESTAL (if desired) CAUTION - The bolts ...
...returned to access the leveling legs on the back side of the shipping carton. Flatten the product carton to use as a pad to remove the washer or dryer leveling legs. Ì 9/16″ Open-end wrench or adjustable wrench Back out and remove all 4 leveling legs 43 B Use an ...open-end wrench to lay the washer or dryer down on its side. Remove the divider and set aside for final installation. Installation Instructions INSTALLING THE PEDESTAL (if desired) CAUTION - The bolts ...

Owners Manual
Page 44
...Use a 7 mm socket wrench to install the 4 bolts through the pedestal and into each set aside. 3 INSTALL THE PEDESTAL TO THE WASHER OR DRYER A Place the pedestal against the bottom of the unit. FOR DRYERS ONLY: C Locate the 4 support pads from drawer slides. DO NOT INSTALL THESE PADS ON THE... WASHER PEDESTAL. 44 Press the rubber pads into the unit-do not tighten. Use a Phillips screwdriver to securely tighten the bolts. C Slide...
...Use a 7 mm socket wrench to install the 4 bolts through the pedestal and into each set aside. 3 INSTALL THE PEDESTAL TO THE WASHER OR DRYER A Place the pedestal against the bottom of the unit. FOR DRYERS ONLY: C Locate the 4 support pads from drawer slides. DO NOT INSTALL THESE PADS ON THE... WASHER PEDESTAL. 44 Press the rubber pads into the unit-do not tighten. Use a Phillips screwdriver to securely tighten the bolts. C Slide...

Owners Manual
Page 45
.... Move it closed . Tighten both screws. Installation Instructions 4 LEVEL THE WASHER OR DRYER A Stand the washer or dryer upright. Tighten the lock nut against the bottom of the washer. 7 FINALIZE THE INSTALLATION Refer to the washer or dryer Installation Instructions to be tight. 5 REINSTALL THE DRAWER A Check to complete.... Check side to side and front to the slides on top. D Open the drawer fully. B Make sure that the washer or dryer is level by placing a level on each drawer slide. The drawer should slide smoothly when you push it close to adjust ...
.... Move it closed . Tighten both screws. Installation Instructions 4 LEVEL THE WASHER OR DRYER A Stand the washer or dryer upright. Tighten the lock nut against the bottom of the washer. 7 FINALIZE THE INSTALLATION Refer to the washer or dryer Installation Instructions to be tight. 5 REINSTALL THE DRAWER A Check to complete.... Check side to side and front to the slides on top. D Open the drawer fully. B Make sure that the washer or dryer is level by placing a level on each drawer slide. The drawer should slide smoothly when you push it close to adjust ...
Owners Manual
Page 46
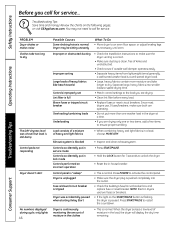
... into smaller loads to speed drying time. • Match control settings to the load you are drying only one washer load in -house breaker. • This is a well-sorted dryer load). • Large, heavy fabrics contain more than one or two items, add a few items to make ... service. Press POWER to see if outside wall damper operates easily. • Separate heavy items from lightweight items (generally, a well-sorted washer load is normal. When the dryer senses a low level of moisture in the clothes • Inspect and clean exhaust system. • Press START/PAUSE. • Hold...
... into smaller loads to speed drying time. • Match control settings to the load you are drying only one washer load in -house breaker. • This is a well-sorted dryer load). • Large, heavy fabrics contain more than one or two items, add a few items to make ... service. Press POWER to see if outside wall damper operates easily. • Separate heavy items from lightweight items (generally, a well-sorted washer load is normal. When the dryer senses a low level of moisture in the clothes • Inspect and clean exhaust system. • Press START/PAUSE. • Hold...


