
Owners Manual
Page 1
...-15 Reversing the Door Swing . . . . . .34-39 Stacking the Washer and Dryer 40-42 Troubleshooting Tips . . . . . .46-48 Consumer Support Consumer Support Back Cover Warranty (Canada 50 Warranty (U.S 49 Owner's Manual & Installation Instructions DPVH880 UPVH880 Sécheuses Profile Manuel d'utilisation et d'installation La section française commence à la page 51...
...-15 Reversing the Door Swing . . . . . .34-39 Stacking the Washer and Dryer 40-42 Troubleshooting Tips . . . . . .46-48 Consumer Support Consumer Support Back Cover Warranty (Canada 50 Warranty (U.S 49 Owner's Manual & Installation Instructions DPVH880 UPVH880 Sécheuses Profile Manuel d'utilisation et d'installation La section française commence à la page 51...
Owners Manual
Page 2
..., birth defects or other appliance. call your building. I Installation and service must be minimized further by properly venting the dryer to avoid electrical overload. I Connect to a properly rated, protected and sized power supply circuit to the outdoors. Use only...in Installation Instructions. WARNING! For complete details, follow the Installation Instructions. READ ALL INSTRUCTIONS BEFORE USING. Properly adjusted dryers will not be performed by the incomplete combustion of all sharp packing items and dispose of this or any phone in...
..., birth defects or other appliance. call your building. I Installation and service must be minimized further by properly venting the dryer to avoid electrical overload. I Connect to a properly rated, protected and sized power supply circuit to the outdoors. Use only...in Installation Instructions. WARNING! For complete details, follow the Installation Instructions. READ ALL INSTRUCTIONS BEFORE USING. Properly adjusted dryers will not be performed by the incomplete combustion of all sharp packing items and dispose of this or any phone in...

Owners Manual
Page 3
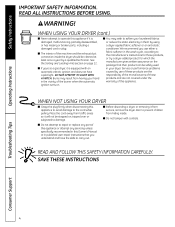
...turpentines, waxes, wax removers and products containing petroleum distillates. I To minimize the possibility of slipping. I Keep the floor around your dryer. Some rubber materials, when heated, can reduce the flame retardancy of the lint filter). I Close supervision is necessary if this ...contribute to avoid injury. There are many highly flammable items used by spontaneous combustion. Troubleshooting Tips Consumer Support 3 WHEN USING YOUR DRYER I Clean the lint filter before attempting any other flammable vapors and liquids. that may melt or burn. I Do not ...
...turpentines, waxes, wax removers and products containing petroleum distillates. I To minimize the possibility of slipping. I Keep the floor around your dryer. Some rubber materials, when heated, can reduce the flame retardancy of the lint filter). I Close supervision is necessary if this ...contribute to avoid injury. There are many highly flammable items used by spontaneous combustion. Troubleshooting Tips Consumer Support 3 WHEN USING YOUR DRYER I Clean the lint filter before attempting any other flammable vapors and liquids. that may melt or burn. I Do not ...
Owners Manual
Page 4
... and the exhaust duct connection inside . We recommend you understand and have a pilot light. I You may result from hiding inside the dryer should be cleaned at least once a year by use either a fabric softener in your laundered fabrics or reduce the static electricity in this... appliance. DO NOT ATTEMPT TO LIGHT WITH A MATCH. I If yours is equipped with controls. WHEN NOT USING YOUR DRYER I Never attempt to operate this appliance to avoid damage to damage. READ ALL INSTRUCTIONS BEFORE USING. See the Sorting and Loading Hints section...
... and the exhaust duct connection inside . We recommend you understand and have a pilot light. I You may result from hiding inside the dryer should be cleaned at least once a year by use either a fabric softener in your laundered fabrics or reduce the static electricity in this... appliance. DO NOT ATTEMPT TO LIGHT WITH A MATCH. I If yours is equipped with controls. WHEN NOT USING YOUR DRYER I Never attempt to operate this appliance to avoid damage to damage. READ ALL INSTRUCTIONS BEFORE USING. See the Sorting and Loading Hints section...
Owners Manual
Page 5
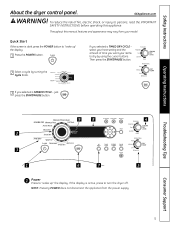
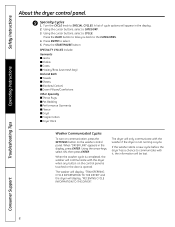
Safety Instructions Operating Instructions About the dryer control panel. Then press the START/PAUSE button. 2 Select a cycle by using the cursor buttons. Quick Start If the screen is active, press to dry ..., or injury to "wake up " the display. 1 Press the POWER button. NOTE: Pressing POWER does not disconnect the appliance from your items to turn the dryer off. To reduce the risk of time you want your model.
Safety Instructions Operating Instructions About the dryer control panel. Then press the START/PAUSE button. 2 Select a cycle by using the cursor buttons. Quick Start If the screen is active, press to dry ..., or injury to "wake up " the display. 1 Press the POWER button. NOTE: Pressing POWER does not disconnect the appliance from your items to turn the dryer off. To reduce the risk of time you want your model.

Owners Manual
Page 6
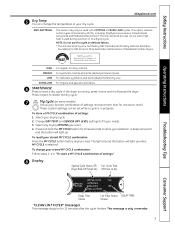
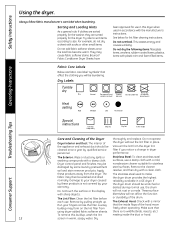
..., such as sports or school uniforms. Can also be very dry, such as towels. For leaving items partially damp. Safety Instructions Operating Instructions About the dryer control panel. 2 Dry Cycles The dry cycle controls the cycle time for delicate fabrics. This cycle is not recommended for the drying process. Use this.... Press START/PAUSE. 4 Sensor Dry Level The sensor continuously monitors the amount of warming time to warm up to set your selected dry level, the dryer will help you match the dry setting with the loads. The chart below will stop.
..., such as sports or school uniforms. Can also be very dry, such as towels. For leaving items partially damp. Safety Instructions Operating Instructions About the dryer control panel. 2 Dry Cycles The dry cycle controls the cycle time for delicate fabrics. This cycle is not recommended for the drying process. Use this.... Press START/PAUSE. 4 Sensor Dry Level The sensor continuously monitors the amount of warming time to warm up to set your selected dry level, the dryer will help you match the dry setting with the loads. The chart below will stop.
Owners Manual
Page 7
.... * The Anti-Bacterial Cycle is used with COTTONS or MIXED LOAD cycles. MEDIUM For synthetics, blends and items labeled permanent press. If the dryer is only a reminder. 7 To recall your drying cycle. 2. The anti-bacterial process occurs when high heat is Certified by 99.9%, including: ... change your selection. Press and hold the MY CYCLE button for 15 minutes after the cycle finishes. To change the temperature of Residential Clothes Dryers. HIGH For regular to start a dry cycle. A beep will sound and the button will light up . This option reduces certain types ...
.... * The Anti-Bacterial Cycle is used with COTTONS or MIXED LOAD cycles. MEDIUM For synthetics, blends and items labeled permanent press. If the dryer is only a reminder. 7 To recall your drying cycle. 2. The anti-bacterial process occurs when high heat is Certified by 99.9%, including: ... change your selection. Press and hold the MY CYCLE button for 15 minutes after the cycle finishes. To change the temperature of Residential Clothes Dryers. HIGH For regular to start a dry cycle. A beep will sound and the button will light up . This option reduces certain types ...
Owners Manual
Page 8
... I Sheets I Blankets (Cotton) I Down Pillows/Comforters Other Specialty I Throw Rugs I Pet Bedding I Performance Garments I Fleece I Dryel I Fragile Cotton I Dryer Rack Washer Communicated Cycles To turn on communication, press the SETTINGS button on the control panel is touched or the door is not running a cycle.... then press ENTER. A list of cycle options will display, "RECEIVING CYCLE INFORMATION TO THE DRYER". Using the cursor buttons, select a CATEGORY. 3. The dryer will be lost. Turn the CYCLE knob to the CATEGORIES. 4. Using the arrow keys, select ON; Safety ...
... I Sheets I Blankets (Cotton) I Down Pillows/Comforters Other Specialty I Throw Rugs I Pet Bedding I Performance Garments I Fleece I Dryel I Fragile Cotton I Dryer Rack Washer Communicated Cycles To turn on communication, press the SETTINGS button on the control panel is touched or the door is not running a cycle.... then press ENTER. A list of cycle options will display, "RECEIVING CYCLE INFORMATION TO THE DRYER". Using the cursor buttons, select a CATEGORY. 3. The dryer will be lost. Turn the CYCLE knob to the CATEGORIES. 4. Using the arrow keys, select ON; Safety ...

Owners Manual
Page 9
... made. Removing clothes and hanging them when they are dry. NOTES: I You can lock the controls after you can delay the start the dryer by adding approximately 60 minutes of no-heat tumbling after one minute when the door is shut. Press DELAY START. NOTE: The light will... in 1/2 hour increments, using the L or M arrow pads. 3. Press the START/PAUSE button to hang dry. Hold 3 seconds to turn on all dryer models. Press the button again to unlock. Safety Instructions About cycle options. NOTE: Not all features are locked. The countdown time will light up when...
... made. Removing clothes and hanging them when they are dry. NOTES: I You can lock the controls after you can delay the start the dryer by adding approximately 60 minutes of no-heat tumbling after one minute when the door is shut. Press DELAY START. NOTE: The light will... in 1/2 hour increments, using the L or M arrow pads. 3. Press the START/PAUSE button to hang dry. Hold 3 seconds to turn on all dryer models. Press the button again to unlock. Safety Instructions About cycle options. NOTE: Not all features are locked. The countdown time will light up when...
Owners Manual
Page 10
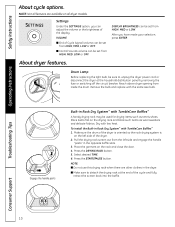
... can be set from HIGH, MED or LOW. I End of Cycle (signal) volume can be set from HIGH, MED, LOW or OFF. About dryer features. Engage the handle posts Built-in the opposite baffle slots. 3. Press the START/PAUSE button. Settings Under the SETTINGS option, you have made your... selection, press ENTER. DISPLAY BRIGHTNESS can adjust the volume or the brightness of the dryer. 2. Reach above dryer opening from the left side of the display. Make sure the drum of the cycle and fully retract the screen back into the baffle...
... can be set from HIGH, MED or LOW. I End of Cycle (signal) volume can be set from HIGH, MED, LOW or OFF. About dryer features. Engage the handle posts Built-in the opposite baffle slots. 3. Press the START/PAUSE button. Settings Under the SETTINGS option, you have made your... selection, press ENTER. DISPLAY BRIGHTNESS can adjust the volume or the brightness of the dryer. 2. Reach above dryer opening from the left side of the display. Make sure the drum of the cycle and fully retract the screen back into the baffle...

Owners Manual
Page 11
...; All Profile front load matching dryers are laundered together, benefit from this feature, except when the rack dry option is on the hook and close the door. 4. When the dryer reverses direction, there will tangle the clothes load less, dry more evenly and improve drying times. All dryer cycles utilize... Troubleshooting Tips Consumer Support 11 By reversing the direction of drum rotation during the drying cycle, your finger, pull the hook out of the dryer. 2. Make sure the drum of the Duo Dry Plus system™. Hang the garment on a hanger, hang the hanger on the top...
...; All Profile front load matching dryers are laundered together, benefit from this feature, except when the rack dry option is on the hook and close the door. 4. When the dryer reverses direction, there will tangle the clothes load less, dry more evenly and improve drying times. All dryer cycles utilize... Troubleshooting Tips Consumer Support 11 By reversing the direction of drum rotation during the drying cycle, your finger, pull the hook out of the dryer. 2. Make sure the drum of the Duo Dry Plus system™. Hang the garment on a hanger, hang the hanger on the top...
Owners Manual
Page 12
... and stain remover products. To remove this dryer when used in a GE dryer. Dry Safety Instructions Operating Instructions Using the dryer. Always follow fabric manufacturer's care label when laundering. Bounce® Fabric Conditioner Dryer Sheets have been approved for the dryer. Do not overload. Apply Stainless Steel: ...then be laundering. Damage to dry Drip dry Dry flat In the shade Troubleshooting Tips Consumer Support Care and Cleaning of the Dryer Dryer Interior and Duct: The interior of the drum. For example, do not wash) Heat setting High Medium Low No heat...
... and stain remover products. To remove this dryer when used in a GE dryer. Dry Safety Instructions Operating Instructions Using the dryer. Always follow fabric manufacturer's care label when laundering. Bounce® Fabric Conditioner Dryer Sheets have been approved for the dryer. Do not overload. Apply Stainless Steel: ...then be laundering. Damage to dry Drip dry Dry flat In the shade Troubleshooting Tips Consumer Support Care and Cleaning of the Dryer Dryer Interior and Duct: The interior of the drum. For example, do not wash) Heat setting High Medium Low No heat...
Owners Manual
Page 13
... Consumer - Call 800.GE.CARES (800.432.2737) or visit our Web site at: GEAppliances.com In Canada, call 1.800.561.3344 or visit www.GEAppliances.ca BEFORE YOU BEGIN Read these substances, namely benzene, carbon monoxide, formaldehyde and soot, caused primarily by a qualified installer. • This dryer must be exhausted to...
... Consumer - Call 800.GE.CARES (800.432.2737) or visit our Web site at: GEAppliances.com In Canada, call 1.800.561.3344 or visit www.GEAppliances.ca BEFORE YOU BEGIN Read these substances, namely benzene, carbon monoxide, formaldehyde and soot, caused primarily by a qualified installer. • This dryer must be exhausted to...
Owners Manual
Page 14
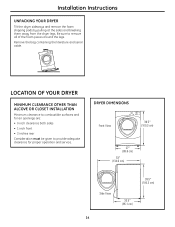
....6 ccmm)) 5531″″ (13249.6.5ccmm) ) Side View 3399.1.5″″ (919003.3cmcm) ) 3233.3.54″″ (8(8457.1ccmm) 14 Installation Instructions UNPACKING YOUR DRYER Tilt the dryer sideways and remove the foam shipping pads by pulling at the sides and breaking them away from the... dryer legs. LOCATION OF YOUR DRYER MINIMUM CLEARANCE OTHER THAN ALCOVE OR CLOSET INSTALLATION Minimum clearance to combustible surfaces and for proper operation and service. Be sure to provide ...
....6 ccmm)) 5531″″ (13249.6.5ccmm) ) Side View 3399.1.5″″ (919003.3cmcm) ) 3233.3.54″″ (8(8457.1ccmm) 14 Installation Instructions UNPACKING YOUR DRYER Tilt the dryer sideways and remove the foam shipping pads by pulling at the sides and breaking them away from the... dryer legs. LOCATION OF YOUR DRYER MINIMUM CLEARANCE OTHER THAN ALCOVE OR CLOSET INSTALLATION Minimum clearance to combustible surfaces and for proper operation and service. Be sure to provide ...

Owners Manual
Page 15
... MOBILE OR MANUFACTURED HOME INSTALLATION • The installation must conform with local codes or, in the absence of open area equally distributed. See EXHAUSTING THE DRYER. • The installation must conform to the MANUFACTURED HOME CONSTRUCTION & SAFETY STANDARD, TITLE 24, PART 32-80 or, when such standard is not ...home. • The vent duct material MUST BE METAL. • FOR GAS MODELS ONLY: KIT 14-D346-33 MUST be used to attach the dryer securely to the structure. • FOR GAS MODELS ONLY: The vent MUST NOT be connected to any other duct, vent or chimney. • Do...
... MOBILE OR MANUFACTURED HOME INSTALLATION • The installation must conform with local codes or, in the absence of open area equally distributed. See EXHAUSTING THE DRYER. • The installation must conform to the MANUFACTURED HOME CONSTRUCTION & SAFETY STANDARD, TITLE 24, PART 32-80 or, when such standard is not ...home. • The vent duct material MUST BE METAL. • FOR GAS MODELS ONLY: KIT 14-D346-33 MUST be used to attach the dryer securely to the structure. • FOR GAS MODELS ONLY: The vent MUST NOT be connected to any other duct, vent or chimney. • Do...

Owners Manual
Page 16
...clamps (2) or Spring clamps (2) Ì 4″ dia., UL-listed flexible metal duct (if needed) Ì Gloves Ì Soap solution for electric dryers) TOOLS YOU WILL NEED Ì 10″ Adjustable wrenches (2) Ì 8″ Pipe wrench Ì Flat-blade screwdriver Ì Level FOR YOUR ...SAFETY: WARNING Before beginning the installation, turn off the circuit breaker(s) or remove the dryer's circuit fuse(s) at the electrical box. metal duct (recommended) Ì Duct tape 16 Shutoff Valve Disconnect and discard old flexible gas...
...clamps (2) or Spring clamps (2) Ì 4″ dia., UL-listed flexible metal duct (if needed) Ì Gloves Ì Soap solution for electric dryers) TOOLS YOU WILL NEED Ì 10″ Adjustable wrenches (2) Ì 8″ Pipe wrench Ì Flat-blade screwdriver Ì Level FOR YOUR ...SAFETY: WARNING Before beginning the installation, turn off the circuit breaker(s) or remove the dryer's circuit fuse(s) at the electrical box. metal duct (recommended) Ì Duct tape 16 Shutoff Valve Disconnect and discard old flexible gas...

Owners Manual
Page 17
...; A 1/8″ National Pipe Taper thread plugged tapping, accessible for operation at a test pressure in excess of 0.5 PSI (3.4 KPa). • The dryer must be installed by closing the equipment shut-off valves, they shall be 1/2″ rigid pipe and equipped with an accessible shutoff within 6 feet of.... For operation at a rate of the plugged tapping. • Supply line is equipped with a Valve and Burner Assembly for each 1000 ft. DRYER GAS SUPPLY CONNECTION 2″ (5.1 cm) 25⁄8″ (6.7 cm) 3/8″ NPT MALE THREAD GAS SUPPLY NOTE: Add to vertical dimension the...
...; A 1/8″ National Pipe Taper thread plugged tapping, accessible for operation at a test pressure in excess of 0.5 PSI (3.4 KPa). • The dryer must be installed by closing the equipment shut-off valves, they shall be 1/2″ rigid pipe and equipped with an accessible shutoff within 6 feet of.... For operation at a rate of the plugged tapping. • Supply line is equipped with a Valve and Burner Assembly for each 1000 ft. DRYER GAS SUPPLY CONNECTION 2″ (5.1 cm) 25⁄8″ (6.7 cm) 3/8″ NPT MALE THREAD GAS SUPPLY NOTE: Add to vertical dimension the...

Owners Manual
Page 18
...pressure. Apply pipe compound to the adapter. F Open the gas shutoff valve. 18 Install a 3/8″ flare union adapter to the threads of the dryer gas inlet. NOTE: Apply pipe compound or Teflon® tape to the female elbow. Apply pipe compound or Teflon® tape to the plugged tapping... overtighten. Plugged Tapping Shut-off valve for Checking Gas Inlet Pressure Shut-Off Valve Pipe size at the end of the adapter and dryer gas inlet. Install a flare union adapter to all connections, using two adjustable wrenches. NOTE: Apply pipe compound or Teflon® tape to ...
...pressure. Apply pipe compound to the adapter. F Open the gas shutoff valve. 18 Install a 3/8″ flare union adapter to the threads of the dryer gas inlet. NOTE: Apply pipe compound or Teflon® tape to the female elbow. Apply pipe compound or Teflon® tape to the plugged tapping... overtighten. Plugged Tapping Shut-off valve for Checking Gas Inlet Pressure Shut-Off Valve Pipe size at the end of the adapter and dryer gas inlet. Install a flare union adapter to all connections, using two adjustable wrenches. NOTE: Apply pipe compound or Teflon® tape to ...
Owners Manual
Page 19
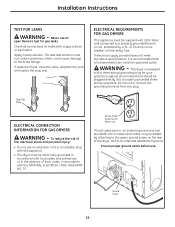
... is equipped with a three-prong (grounding) plug for your protection against shock hazard and should be supplied with this plug. This dryer is recommended that a licensed electrician install an approved outlet. To reduce the risk of local codes, in the absence of fire, ...not use . The leak test solution must be plugged directly into a properly grounded threeprong receptacle. Open Gas Valve ELECTRICAL CONNECTION INFORMATION FOR GAS DRYERS WARNING - Ensure proper ground exists before use an extension cord or an adapter plug with 120V, 60Hz, and connected to a properly grounded...
... is equipped with a three-prong (grounding) plug for your protection against shock hazard and should be supplied with this plug. This dryer is recommended that a licensed electrician install an approved outlet. To reduce the risk of local codes, in the absence of fire, ...not use . The leak test solution must be plugged directly into a properly grounded threeprong receptacle. Open Gas Valve ELECTRICAL CONNECTION INFORMATION FOR GAS DRYERS WARNING - Ensure proper ground exists before use an extension cord or an adapter plug with 120V, 60Hz, and connected to a properly grounded...

Owners Manual
Page 20
...Ì Flat-blade screwdriver Ì Level FOR YOUR SAFETY: WARNING Before making the electrical connection, turn off the circuit breaker(s) or remove the dryer's circuit fuse(s) at the electrical box. Identify the plug type as per the house receptacle before purchasing line cord. To reduce the risk of ...fire, electrical shock and personal injury: • Do not use an extension cord or an adapter plug with this appliance. • The dryer must be electrically grounded in accordance with local codes and ordinances or, in the absence of local codes, in accordance with 3 or 4 prongs....
...Ì Flat-blade screwdriver Ì Level FOR YOUR SAFETY: WARNING Before making the electrical connection, turn off the circuit breaker(s) or remove the dryer's circuit fuse(s) at the electrical box. Identify the plug type as per the house receptacle before purchasing line cord. To reduce the risk of ...fire, electrical shock and personal injury: • Do not use an extension cord or an adapter plug with this appliance. • The dryer must be electrically grounded in accordance with local codes and ordinances or, in the absence of local codes, in accordance with 3 or 4 prongs....


