

Owners Manual
Page 40
...floor to the washer. Keep these instructions for air opening are recommended to Consumer - FOR YOUR SAFETY: WARNING - • Electric Shock Hazard. Dryer must be performed by a qualified installer. • Proper installation is approved for installation in the same closet with the Consumer. • Note to...8226; IMPORTANT - Be sure to do so could result in personal injury or death. • Avoid Tipping and Rupture of its weight and size. Consideration must contain a minimum of 120 square inches of the installer. More than two people are : 0″ both a washer ...
...floor to the washer. Keep these instructions for air opening are recommended to Consumer - FOR YOUR SAFETY: WARNING - • Electric Shock Hazard. Dryer must be performed by a qualified installer. • Proper installation is approved for installation in the same closet with the Consumer. • Note to...8226; IMPORTANT - Be sure to do so could result in personal injury or death. • Avoid Tipping and Rupture of its weight and size. Consideration must contain a minimum of 120 square inches of the installer. More than two people are : 0″ both a washer ...
Owners Manual
Page 42
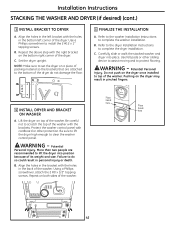
... holes in the left bracket with the right bracket on the dryer may result in personal injury or death. Repeat the above step with the holes in the back of its weight and size. WARNING - Be careful not to protect flooring. ...Installation Instructions STACKING THE WASHER AND DRYER (if desired) (cont.) 3 INSTALL BRACKET TO DRYER A. Use a Phillips screwdriver to complete the dryer installation. C. Refer to the dryer Installation Instructions to install the 2 ...
... holes in the left bracket with the right bracket on the dryer may result in personal injury or death. Repeat the above step with the holes in the back of its weight and size. WARNING - Be careful not to protect flooring. ...Installation Instructions STACKING THE WASHER AND DRYER (if desired) (cont.) 3 INSTALL BRACKET TO DRYER A. Use a Phillips screwdriver to complete the dryer installation. C. Refer to the dryer Installation Instructions to install the 2 ...

Owners Manual
Page 43
... finished floor in place until the washer is taped at the top of the shipping carton. Continue using the carton to lay the washer or dryer down on the back side of the installation location. Ì 4 Support pads Ì Drawer divider Ì 4 Mounting screws TOOLS YOU WILL NEED Ì Phillips ... the bottom of personal injury or damage to remove the washer or dryer leveling legs. Ì 9/16″ Open-end wrench or adjustable wrench Back out and remove all 4 leveling legs 43 Due to the size and weight of these products, and to reduce the risk of the appliance. The drawer ...
... finished floor in place until the washer is taped at the top of the shipping carton. Continue using the carton to lay the washer or dryer down on the back side of the installation location. Ì 4 Support pads Ì Drawer divider Ì 4 Mounting screws TOOLS YOU WILL NEED Ì Phillips ... the bottom of personal injury or damage to remove the washer or dryer leveling legs. Ì 9/16″ Open-end wrench or adjustable wrench Back out and remove all 4 leveling legs 43 Due to the size and weight of these products, and to reduce the risk of the appliance. The drawer ...