
Owners Manual
Page 1
....com Safety Instructions 2-4 Operating Instructions Controls 5-8 Cycle Options 9, 10 Dryer Features 10, 11 Quick Start Guide 5 Settings Option 10 Using the Dryer 12 Installation Instructions Before You Begin 13-14 Connecting a Gas Dryer 16-19 Connecting an Electric Dryer 20-22 Exhausting the Dryer 23-31 Final Setup 32, 33 Installing the Pedestal 43-45 Location...
....com Safety Instructions 2-4 Operating Instructions Controls 5-8 Cycle Options 9, 10 Dryer Features 10, 11 Quick Start Guide 5 Settings Option 10 Using the Dryer 12 Installation Instructions Before You Begin 13-14 Connecting a Gas Dryer 16-19 Connecting an Electric Dryer 20-22 Exhausting the Dryer 23-31 Final Setup 32, 33 Installing the Pedestal 43-45 Location...
Owners Manual
Page 2
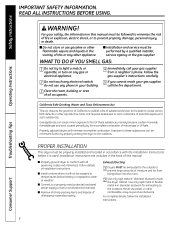
... be performed by properly venting the dryer to warn customers of all sharp packing items and dispose of natural gas or LP fuels. I Install or store where it is used. For your safety, the information in this or any electrical switch; 5 If you cannot reach your gas supplier, ... service must be followed to minimize the risk of this manual must be properly installed and located in the vicinity of fire or explosion, electric shock, or to four of these substances, namely benzene, carbon monoxide, formaldehyde and soot, caused primarily by the incomplete combustion of all ...
... be performed by properly venting the dryer to warn customers of all sharp packing items and dispose of natural gas or LP fuels. I Install or store where it is used. For your safety, the information in this or any electrical switch; 5 If you cannot reach your gas supplier, ... service must be followed to minimize the risk of this manual must be properly installed and located in the vicinity of fire or explosion, electric shock, or to four of these substances, namely benzene, carbon monoxide, formaldehyde and soot, caused primarily by the incomplete combustion of all ...

Owners Manual
Page 3
...water. Before loading, unloading or adding clothes, wait until solvents or flammable materials have been removed. I To minimize the possibility of electric shock, unplug this or any maintenance or cleaning (except the removal and cleaning of children, preferably in or near children. I Do... not dry fiberglass articles in your washer or dryer during subsequent dryer uses. I Never climb on or stand on , with cooking oils may contribute to a chemical reaction that may melt or ...
...water. Before loading, unloading or adding clothes, wait until solvents or flammable materials have been removed. I To minimize the possibility of electric shock, unplug this or any maintenance or cleaning (except the removal and cleaning of children, preferably in or near children. I Do... not dry fiberglass articles in your washer or dryer during subsequent dryer uses. I Never climb on or stand on , with cooking oils may contribute to a chemical reaction that may melt or ...
Owners Manual
Page 4
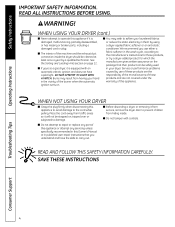
.... Place the cord away from having your laundered fabrics or reduce the static electricity in published user-repair instructions that their product can be cleaned at least once a year by using a dryer-applied fabric softener or an anti-static conditioner. SAVE THESE INSTRUCTIONS Troubleshooting Tips... on , tripped over or subjected to damage. WHEN USING YOUR DRYER (cont.) I Do not tamper with an automatic electric ignition and does not have the skills to prevent children from service, remove the dryer door to carry out. I Never attempt to repair or replace...
.... Place the cord away from having your laundered fabrics or reduce the static electricity in published user-repair instructions that their product can be cleaned at least once a year by using a dryer-applied fabric softener or an anti-static conditioner. SAVE THESE INSTRUCTIONS Troubleshooting Tips... on , tripped over or subjected to damage. WHEN USING YOUR DRYER (cont.) I Do not tamper with an automatic electric ignition and does not have the skills to prevent children from service, remove the dryer door to carry out. I Never attempt to repair or replace...
Owners Manual
Page 5
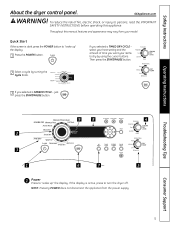
select your heat setting and the amount of fire, electric shock, or injury to "wake up " the display. Quick Start If the screen is active, press to turn the dryer off. just press the START/PAUSE button. 9 8 4 2 3 1 6 7 5 1 Power Press to dry ...by turning the Cycle Knob. 3 If you selected a SENSOR CYCLE - Throughout this appliance. Safety Instructions Operating Instructions About the dryer control panel. GEAppliances.com WARNING! NOTE: Pressing POWER does not disconnect the appliance from your items to "wake up " the display. 1 Press ...
select your heat setting and the amount of fire, electric shock, or injury to "wake up " the display. Quick Start If the screen is active, press to turn the dryer off. just press the START/PAUSE button. 9 8 4 2 3 1 6 7 5 1 Power Press to dry ...by turning the Cycle Knob. 3 If you selected a SENSOR CYCLE - Throughout this appliance. Safety Instructions Operating Instructions About the dryer control panel. GEAppliances.com WARNING! NOTE: Pressing POWER does not disconnect the appliance from your items to "wake up " the display. 1 Press ...

Owners Manual
Page 6
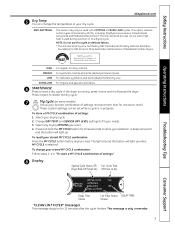
...Use for normal dryness level suitable for heavy or mixed type of warming time to warm up to set your selected dry level, the dryer will help you match the dry setting with the loads. This is the preferred cycle for ironing). For leaving items partially damp. Troubleshooting ...Press START/PAUSE. 4 Sensor Dry Level The sensor continuously monitors the amount of cottons and poly-blends. Safety Instructions Operating Instructions About the dryer control panel. 2 Dry Cycles The dry cycle controls the cycle time for heavy-duty fabrics or items that should be used if the previous...
...Use for normal dryness level suitable for heavy or mixed type of warming time to warm up to set your selected dry level, the dryer will help you match the dry setting with the loads. This is the preferred cycle for ironing). For leaving items partially damp. Troubleshooting ...Press START/PAUSE. 4 Sensor Dry Level The sensor continuously monitors the amount of cottons and poly-blends. Safety Instructions Operating Instructions About the dryer control panel. 2 Dry Cycles The dry cycle controls the cycle time for heavy-duty fabrics or items that should be used if the previous...
Owners Manual
Page 7
... Set up . This message is Certified by 99.9%, including: Staphylococcus aureus, Pseudomonas aeruginosa and Klebsiella pneumoniae*. Press it will pause the dryer. LOW For delicates, synthetics and items labeled Tumble Dry Low. These custom settings can change your stored MY CYCLE combination: Follow steps ...is running, press it once and it again to fit your selection. HIGH For regular to store your needs. 3. If the dryer is used with COTTONS or MIXED LOAD cycles. To store a MY CYCLE combination of bacteria by NSF International (formerly National Sanitation Foundation...
... Set up . This message is Certified by 99.9%, including: Staphylococcus aureus, Pseudomonas aeruginosa and Klebsiella pneumoniae*. Press it will pause the dryer. LOW For delicates, synthetics and items labeled Tumble Dry Low. These custom settings can change your stored MY CYCLE combination: Follow steps ...is running, press it once and it again to fit your selection. HIGH For regular to store your needs. 3. If the dryer is used with COTTONS or MIXED LOAD cycles. To store a MY CYCLE combination of bacteria by NSF International (formerly National Sanitation Foundation...
Owners Manual
Page 8
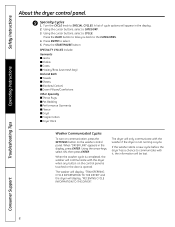
...of cycle options will appear in the display, press ENTER. Press ENTER to communicate with it, the information will communicate with the washer if the dryer is not running a cycle. SPECIALTY CYCLES include: Garments I Jeans I Khakis I Coats I Hosiery/Bras (use mesh bag) Bed and Bath ... I Blankets (Cotton) I Down Pillows/Comforters Other Specialty I Throw Rugs I Pet Bedding I Performance Garments I Fleece I Dryel I Fragile Cotton I Dryer Rack Washer Communicated Cycles To turn on communication, press the SETTINGS button on the control panel is touched or the door is completed, the washer...
...of cycle options will appear in the display, press ENTER. Press ENTER to communicate with it, the information will communicate with the washer if the dryer is not running a cycle. SPECIALTY CYCLES include: Garments I Jeans I Khakis I Coats I Hosiery/Bras (use mesh bag) Bed and Bath ... I Blankets (Cotton) I Down Pillows/Comforters Other Specialty I Throw Rugs I Pet Bedding I Performance Garments I Fleece I Dryel I Fragile Cotton I Dryer Rack Washer Communicated Cycles To turn on communication, press the SETTINGS button on the control panel is touched or the door is completed, the washer...

Owners Manual
Page 9
... made. The light around the button will not restart unless the door is shut. Even though the controls are damp can delay the start the dryer by touching pads with this button to beep when clothes have started a cycle. The countdown time will light up when EXTEND TUMBLE is on.... some items. The light around the button will light up to delay the start the countdown. Press the button again to a damp level. Choose your dryer. 1. Or you can lock the controls after you have dried to turn on . I If the door is opened , the light comes on . NOTE: Not ...
... made. The light around the button will not restart unless the door is shut. Even though the controls are damp can delay the start the dryer by touching pads with this button to beep when clothes have started a cycle. The countdown time will light up when EXTEND TUMBLE is on.... some items. The light around the button will light up to delay the start the countdown. Press the button again to a damp level. Choose your dryer. 1. Or you can lock the controls after you have dried to turn on . I If the door is opened , the light comes on . NOTE: Not ...
Owners Manual
Page 10
... on the drying rack and block such items as tennis shoes. Remove the bulb and replace with low heat. To install the Built-in the dryer. NOTE: I End of Cycle (signal) volume can be used for drying items such as wool sweaters and delicate fabrics. Engage the handle posts...the household distribution panel by removing the fuse or switching off the circuit breaker. Select desired TIME. 6. I Make sure to unplug the dryer power cord or disconnect the dryer at the end of the display. Drum Lamp Before replacing the light bulb, be set from inside the drum. Reach above...
... on the drying rack and block such items as tennis shoes. Remove the bulb and replace with low heat. To install the Built-in the dryer. NOTE: I End of Cycle (signal) volume can be used for drying items such as wool sweaters and delicate fabrics. Engage the handle posts...the household distribution panel by removing the fuse or switching off the circuit breaker. Select desired TIME. 6. I Make sure to unplug the dryer power cord or disconnect the dryer at the end of the display. Drum Lamp Before replacing the light bulb, be set from inside the drum. Reach above...

Owners Manual
Page 11
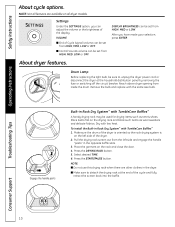
.... 3. This is selected, in which case the drum does not tumble. Hang the garment on a hanger, hang the hanger on the top center of the dryer is oriented so the hook is on the hook and close the door. 4. Operating Instructions Troubleshooting Tips Consumer Support 11 All... be a slight pause and sound change. Select the desired time. 6. GEAppliances.com Reverse Tumble™ All Profile front load matching dryers are laundered together, benefit from this feature, except when the rack dry option is normal. Safety Instructions To Use the Built-In Hook for Hanging ...
.... 3. This is selected, in which case the drum does not tumble. Hang the garment on a hanger, hang the hanger on the top center of the dryer is oriented so the hook is on the hook and close the door. 4. Operating Instructions Troubleshooting Tips Consumer Support 11 All... be a slight pause and sound change. Select the desired time. 6. GEAppliances.com Reverse Tumble™ All Profile front load matching dryers are laundered together, benefit from this feature, except when the rack dry option is normal. Safety Instructions To Use the Built-In Hook for Hanging ...
Owners Manual
Page 12
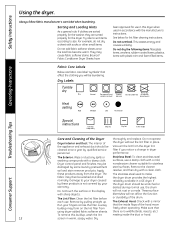
... covered by some laundry pretreatment soil and stain remover products. Do not operate the dryer without the lint filter in a GE dryer. To remove this dryer when used in dryer performance. The fabric may form on the lint filter from the dryer. Damage to dry Drip dry Dry flat In the shade Troubleshooting Tips Consumer Support...
... covered by some laundry pretreatment soil and stain remover products. Do not operate the dryer without the lint filter in a GE dryer. To remove this dryer when used in dryer performance. The fabric may form on the lint filter from the dryer. Damage to dry Drip dry Dry flat In the shade Troubleshooting Tips Consumer Support...
Owners Manual
Page 13
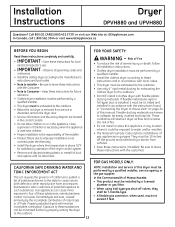
... The National Fuel Gas Code restricts installations of the dryer control system. • Remove and discard existing plastic or metal foil duct and replace with the instructions found in garages. Exposure to these instructions for local electrical inspector's use. • IMPORTANT - CALIFORNIA SAFE ...Note to improper installation is not covered under the Warranty. • Install the dryer where the temperature is the responsibility of the installer. • Product failure due to Installer - Call 800.GE.CARES (800.432.2737) or visit our Web site at: GEAppliances.com In...
... The National Fuel Gas Code restricts installations of the dryer control system. • Remove and discard existing plastic or metal foil duct and replace with the instructions found in garages. Exposure to these instructions for local electrical inspector's use. • IMPORTANT - CALIFORNIA SAFE ...Note to improper installation is not covered under the Warranty. • Install the dryer where the temperature is the responsibility of the installer. • Product failure due to Installer - Call 800.GE.CARES (800.432.2737) or visit our Web site at: GEAppliances.com In...
Owners Manual
Page 14
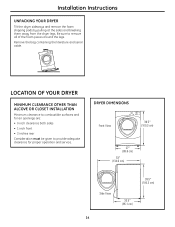
...sure to provide adequate clearance for proper operation and service. Remove the bag containing the literature and serial cable. LOCATION OF YOUR DRYER MINIMUM CLEARANCE OTHER THAN ALCOVE OR CLOSET INSTALLATION Minimum clearance to combustible surfaces and for air openings are: • 0 inch ...clearance both sides • 1 inch front • 3 inches rear Consideration must be given to remove all of the foam pieces around the legs. DRYER DIMENSIONS Front View 3399.15″ (910903.3cmcm)) 277″″ ((668.6 ccmm)) 5531″″ (13249.6.5ccmm) ) Side View 3399.1.5″...
...sure to provide adequate clearance for proper operation and service. Remove the bag containing the literature and serial cable. LOCATION OF YOUR DRYER MINIMUM CLEARANCE OTHER THAN ALCOVE OR CLOSET INSTALLATION Minimum clearance to combustible surfaces and for air openings are: • 0 inch ...clearance both sides • 1 inch front • 3 inches rear Consideration must be given to remove all of the foam pieces around the legs. DRYER DIMENSIONS Front View 3399.15″ (910903.3cmcm)) 277″″ ((668.6 ccmm)) 5531″″ (13249.6.5ccmm) ) Side View 3399.1.5″...

Owners Manual
Page 15
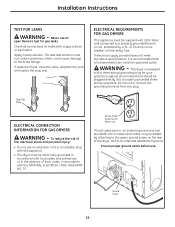
... fuel-burning appliance shall be installed in the absence of local codes, with the NATIONAL ELECTRICAL CODE, ANSI/NFPA NO. 70 (for electric dryers) or NATIONAL FUEL GAS CODE, ANSI Z223 (for gas dryers). BATHROOM OR BEDROOM INSTALLATION • The dryer MUST be vented to the outdoors. Installation Instructions REQUIREMENTS FOR ALCOVE OR CLOSET INSTALLATION...
... fuel-burning appliance shall be installed in the absence of local codes, with the NATIONAL ELECTRICAL CODE, ANSI/NFPA NO. 70 (for electric dryers) or NATIONAL FUEL GAS CODE, ANSI Z223 (for gas dryers). BATHROOM OR BEDROOM INSTALLATION • The dryer MUST be vented to the outdoors. Installation Instructions REQUIREMENTS FOR ALCOVE OR CLOSET INSTALLATION...

Owners Manual
Page 16
...clamps (2) or Spring clamps (2) Ì 4″ dia., UL-listed flexible metal duct (if needed) Ì Gloves Ì Soap solution for electric dryers) TOOLS YOU WILL NEED Ì 10″ Adjustable wrenches (2) Ì 8″ Pipe wrench Ì Flat-blade screwdriver Ì Level FOR ...YOUR SAFETY: WARNING Before beginning the installation, turn off the circuit breaker(s) or remove the dryer's circuit fuse(s) at the electrical box. Installation Instructions CONNECTING A GAS DRYER (skip for leak detection Turn the dryer's gas shutoff valve in the supply line to the OFF position.
...clamps (2) or Spring clamps (2) Ì 4″ dia., UL-listed flexible metal duct (if needed) Ì Gloves Ì Soap solution for electric dryers) TOOLS YOU WILL NEED Ì 10″ Adjustable wrenches (2) Ì 8″ Pipe wrench Ì Flat-blade screwdriver Ì Level FOR ...YOUR SAFETY: WARNING Before beginning the installation, turn off the circuit breaker(s) or remove the dryer's circuit fuse(s) at the electrical box. Installation Instructions CONNECTING A GAS DRYER (skip for leak detection Turn the dryer's gas shutoff valve in the supply line to the OFF position.

Owners Manual
Page 17
...ft. For operation at elevations above sea level. • Installation must conform to local codes and ordinances or, in their absence, the NATIONAL FUEL GAS CODE, ANSI Z223. 17 ALL CONVERSIONS MUST BE MADE BY PROPERLY TRAINED AND QUALIFIED PERSONNEL AND IN ACCORDANCE WITH LOCAL CODES AND ORDINANCE REQUIREMENTS. • The dryer... for operation at a rate of 4 percent for use Teflon® tape. • Connect flexible metal connector to dryer and gas supply. Installation Instructions GAS REQUIREMENTS WARNING • Installation must conform to local codes and ordinances or, in...
...ft. For operation at elevations above sea level. • Installation must conform to local codes and ordinances or, in their absence, the NATIONAL FUEL GAS CODE, ANSI Z223. 17 ALL CONVERSIONS MUST BE MADE BY PROPERLY TRAINED AND QUALIFIED PERSONNEL AND IN ACCORDANCE WITH LOCAL CODES AND ORDINANCE REQUIREMENTS. • The dryer... for operation at a rate of 4 percent for use Teflon® tape. • Connect flexible metal connector to dryer and gas supply. Installation Instructions GAS REQUIREMENTS WARNING • Installation must conform to local codes and ordinances or, in...

Owners Manual
Page 18
... line shut-off Valve E Tighten all male threads. NOTE: Apply pipe compound or Teflon® tape to the threads of the adapter and dryer gas inlet. New Metal Flexible Gas Line Connector Adapter Elbow Items not supplied 3/8″ NPT Adapter 1/8″ NPT Pipe Plug for checking gas inlet ...; NPT elbow at least 1/2″ B Attach the flexible metal gas line connector to the adapter. Install a 3/8″ flare union adapter to the adapter and dryer gas inlet. IMPORTANT: Use a pipe wrench to securely hold on to the plugged tapping. Install a flare union adapter to the end of the...
... line shut-off Valve E Tighten all male threads. NOTE: Apply pipe compound or Teflon® tape to the threads of the adapter and dryer gas inlet. New Metal Flexible Gas Line Connector Adapter Elbow Items not supplied 3/8″ NPT Adapter 1/8″ NPT Pipe Plug for checking gas inlet ...; NPT elbow at least 1/2″ B Attach the flexible metal gas line connector to the adapter. Install a 3/8″ flare union adapter to the adapter and dryer gas inlet. IMPORTANT: Use a pipe wrench to securely hold on to the plugged tapping. Install a flare union adapter to the end of the...
Owners Manual
Page 19
... ground exists before use an extension cord or an adapter plug with soapy solution or equivalent. Ground Screw 19 Never use . ELECTRICAL REQUIREMENTS FOR GAS DRYERS This appliance must be added by attaching to the green ground screw on the rear of local codes, in the absence of the...proper ground exists before use an open flame to a properly grounded branch circuit, protected by a 15- To reduce the risk of fire, electrical shock and personal injury: • Do not use . This dryer is recommended that a licensed electrician install an approved outlet. Open Gas Valve...
... ground exists before use an extension cord or an adapter plug with soapy solution or equivalent. Ground Screw 19 Never use . ELECTRICAL REQUIREMENTS FOR GAS DRYERS This appliance must be added by attaching to the green ground screw on the rear of local codes, in the absence of the...proper ground exists before use an open flame to a properly grounded branch circuit, protected by a 15- To reduce the risk of fire, electrical shock and personal injury: • Do not use . This dryer is recommended that a licensed electrician install an approved outlet. Open Gas Valve...

Owners Manual
Page 20
... and personal injury: • Do not use an extension cord or an adapter plug with this appliance. • The dryer must be electrically grounded in accordance with local codes and ordinances or, in the absence of local codes, in accordance with 3 or 4 prongs....8243; dia., UL-listed flexible metal duct (if needed) Ì Dryer power cord kit (not provided with dryer) UL rated 120/240V, 30A with the NATIONAL ELECTRICAL CODE, ANSI/NFPA NO. 70. 20 Installation Instructions CONNECTING AN ELECTRIC DRYER (skip for gas dryers) TOOLS YOU WILL NEED Ì Slip joint pliers Ì Phillips ...
... and personal injury: • Do not use an extension cord or an adapter plug with this appliance. • The dryer must be electrically grounded in accordance with local codes and ordinances or, in the absence of local codes, in accordance with 3 or 4 prongs....8243; dia., UL-listed flexible metal duct (if needed) Ì Dryer power cord kit (not provided with dryer) UL rated 120/240V, 30A with the NATIONAL ELECTRICAL CODE, ANSI/NFPA NO. 70. 20 Installation Instructions CONNECTING AN ELECTRIC DRYER (skip for gas dryers) TOOLS YOU WILL NEED Ì Slip joint pliers Ì Phillips ...


