
Owners Manual
Page 1
... Operating Instructions Controls 5-8 Cycle Options 9, 10 Dryer Features 10, 11 Quick Start Guide 5 Settings Option 10 Using the Dryer 12 Installation Instructions Before You Begin 13-14 Connecting a Gas Dryer 16-19 Connecting an Electric Dryer 20-22 Exhausting the Dryer 23-31 Final Setup 32, 33 Installing the Pedestal 43-45 Location of your Dryer 14-15 Reversing the Door Swing . . . . . .34-39 Stacking the Washer and Dryer 40-42 Troubleshooting Tips . . . . . .46-48 Consumer Support Consumer Support Back Cover Warranty (Canada 50 Warranty (U.S 49 Owner's Manual & Installation...
... Operating Instructions Controls 5-8 Cycle Options 9, 10 Dryer Features 10, 11 Quick Start Guide 5 Settings Option 10 Using the Dryer 12 Installation Instructions Before You Begin 13-14 Connecting a Gas Dryer 16-19 Connecting an Electric Dryer 20-22 Exhausting the Dryer 23-31 Final Setup 32, 33 Installing the Pedestal 43-45 Location of your Dryer 14-15 Reversing the Door Swing . . . . . .34-39 Stacking the Washer and Dryer 40-42 Troubleshooting Tips . . . . . .46-48 Consumer Support Consumer Support Back Cover Warranty (Canada 50 Warranty (U.S 49 Owner's Manual & Installation...
Owners Manual
Page 2
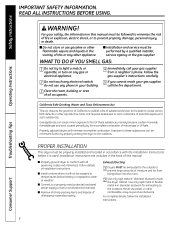
... phone in Installation Instructions. I Installation and service must be exhausted to the outside to light a match, or cigarette, or turn on any gas or electrical appliance. 4 Immediately call the fire department. 3 Clear the room, building or area of all shipping materials properly. Troubleshooting Tips Consumer Support 2 I Remove all sharp packing items and dispose of natural gas or LP fuels. Exhaust/Ducting 1 Dryers MUST be properly installed and located in...
... phone in Installation Instructions. I Installation and service must be exhausted to the outside to light a match, or cigarette, or turn on any gas or electrical appliance. 4 Immediately call the fire department. 3 Clear the room, building or area of all shipping materials properly. Troubleshooting Tips Consumer Support 2 I Remove all sharp packing items and dispose of natural gas or LP fuels. Exhaust/Ducting 1 Dryers MUST be properly installed and located in...

Owners Manual
Page 3
... produce fire by clothing during operation. Do not add these substances around the exhaust opening and adjacent surrounding areas free from the remaining particles that have used in or near children. I Never climb on or stand on , with or inside the dryer or in your washer or dryer during operation. These substances give off the circuit breaker before each load to play on...
... produce fire by clothing during operation. Do not add these substances around the exhaust opening and adjacent surrounding areas free from the remaining particles that have used in or near children. I Never climb on or stand on , with or inside the dryer or in your washer or dryer during operation. These substances give off the circuit breaker before each load to play on...
Owners Manual
Page 4
... are not covered under the warranty of the machine and the exhaust duct connection inside . I Grasp the plug firmly when disconnecting this Owner's Manual or in published user-repair instructions that their product can be cleaned at least once a year by a qualified technician. Burns may wish to soften your hand in the vicinity of this appliance or attempt any servicing unless specifically recommended in...
... are not covered under the warranty of the machine and the exhaust duct connection inside . I Grasp the plug firmly when disconnecting this Owner's Manual or in published user-repair instructions that their product can be cleaned at least once a year by a qualified technician. Burns may wish to soften your hand in the vicinity of this appliance or attempt any servicing unless specifically recommended in...
Owners Manual
Page 7
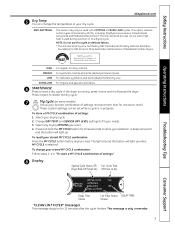
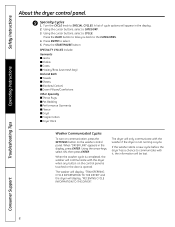
.... Select your stored MY CYCLE combination: Press the MY CYCLE button before drying a load. A beep will sound and the button will light up your needs. 3. NOTE: Do not use this drying cycle. MEDIUM For synthetics, blends and items labeled permanent press. Change DRY TEMP and SENSOR DRY LEVEL settings to store your selection. Cycle Time Dryer Rack OR Timed Dry OR Time to Dry Troubleshooting Tips Consumer Support Delay Time Status Lint Filter Status DELAY TIME Screen "CLEAN LINT FILTER" (message) This message stays on...
.... Select your stored MY CYCLE combination: Press the MY CYCLE button before drying a load. A beep will sound and the button will light up your needs. 3. NOTE: Do not use this drying cycle. MEDIUM For synthetics, blends and items labeled permanent press. Change DRY TEMP and SENSOR DRY LEVEL settings to store your selection. Cycle Time Dryer Rack OR Timed Dry OR Time to Dry Troubleshooting Tips Consumer Support Delay Time Status Lint Filter Status DELAY TIME Screen "CLEAN LINT FILTER" (message) This message stays on...
Owners Manual
Page 8
... I Dryer Rack Washer Communicated Cycles To turn on communication, press the SETTINGS button on the control panel is touched or the door is not running a cycle. The washer will display, "TRANSFERRING CYCLE INFORMATION TO THE DRYER" and the dryer will be lost. Using the cursor buttons, select a CYCLE. then press ENTER. Press the BACK button to take you back to SPECIAL CYCLES. Using the arrow keys, select ON; Troubleshooting Tips Consumer Support 8 The dryer will...
... I Dryer Rack Washer Communicated Cycles To turn on communication, press the SETTINGS button on the control panel is touched or the door is not running a cycle. The washer will display, "TRANSFERRING CYCLE INFORMATION TO THE DRYER" and the dryer will be lost. Using the cursor buttons, select a CYCLE. then press ENTER. Press the BACK button to take you back to SPECIAL CYCLES. Using the arrow keys, select ON; Troubleshooting Tips Consumer Support 8 The dryer will...

Owners Manual
Page 9
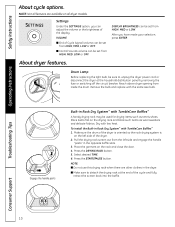
... controls are locked, the POWER button is on . Delay Start Use to turn the light off . 9 Consumer Support Press to unlock. To unlock the dryer, press and hold the LOCK button for 3 seconds. Drum Light Press this option selected. NOTES: I You can lock the controls to hang dry. NOTE: Not all dryer models. Or you have started a cycle. Children cannot accidentally start of your dry cycle and any selections from being made. Safety Instructions About cycle...
... controls are locked, the POWER button is on . Delay Start Use to turn the light off . 9 Consumer Support Press to unlock. To unlock the dryer, press and hold the LOCK button for 3 seconds. Drum Light Press this option selected. NOTES: I You can lock the controls to hang dry. NOTE: Not all dryer models. Or you have started a cycle. Children cannot accidentally start of your dry cycle and any selections from being made. Safety Instructions About cycle...
Owners Manual
Page 10
... the door. 4. Remove the bulb and replace with TumbleCare Baffles™ A handy drying rack may be sure to detach the drying rack at the household distribution panel by removing the fuse or switching off the circuit breaker. Engage the handle posts Built-in Rack Dry System™ with low heat. NOTE: I Control Sounds volume can be set from HIGH, MED, LOW or OFF. I End of the dryer. 2. Safety Instructions Operating Instructions About cycle options. Drum...
... the door. 4. Remove the bulb and replace with TumbleCare Baffles™ A handy drying rack may be sure to detach the drying rack at the household distribution panel by removing the fuse or switching off the circuit breaker. Engage the handle posts Built-in Rack Dry System™ with low heat. NOTE: I Control Sounds volume can be set from HIGH, MED, LOW or OFF. I End of the dryer. 2. Safety Instructions Operating Instructions About cycle options. Drum...

Owners Manual
Page 11
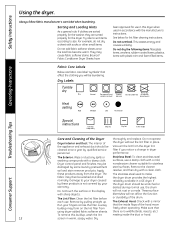
... the rack dry option is selected, in which case the drum does not tumble. Operating Instructions Troubleshooting Tips Consumer Support 11 Hang the garment on a hanger, hang the hanger on the top center of the baffle. 3. By reversing the direction of drum rotation during the drying cycle, your finger, pull the hook out of the dryer. 2. Select the desired time. 6. Typical loads such as part of the dryer...
... the rack dry option is selected, in which case the drum does not tumble. Operating Instructions Troubleshooting Tips Consumer Support 11 Hang the garment on a hanger, hang the hanger on the top center of the baffle. 3. By reversing the direction of drum rotation during the drying cycle, your finger, pull the hook out of the dryer. 2. Select the desired time. 6. Typical loads such as part of the dryer...
Owners Manual
Page 12
... dry Dry Normal Permanent Press/ wrinkle resistant Gentle/ delicate Do not dry Do not tumble dry (used with do not dry a sheet with a mirror that there is not covered by qualified service personnel. Damage to dry Drip dry Dry flat In the shade Troubleshooting Tips Consumer Support Care and Cleaning of the Dryer Dryer Interior and Duct: The interior of the appliance and exhaust duct should be washed and dried normally. The Exhaust Hood: Check...
... dry Dry Normal Permanent Press/ wrinkle resistant Gentle/ delicate Do not dry Do not tumble dry (used with do not dry a sheet with a mirror that there is not covered by qualified service personnel. Damage to dry Drip dry Dry flat In the shade Troubleshooting Tips Consumer Support Care and Cleaning of the Dryer Dryer Interior and Duct: The interior of the appliance and exhaust duct should be washed and dried normally. The Exhaust Hood: Check...
Owners Manual
Page 13
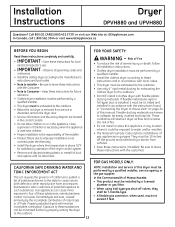
... off valves, they shall be minimized further by a qualified installer. • Install the clothes dryer according to collapse, be performed by a barrier from service or discarded, remove the dryer door. • Service information and the wiring diagram are located in the control console. • Do not allow children on page 24 of gas appliances in the appliance. Flexible ducting materials are known to these instructions with UL-listed duct. Installation Instructions Dryer...
... off valves, they shall be minimized further by a qualified installer. • Install the clothes dryer according to collapse, be performed by a barrier from service or discarded, remove the dryer door. • Service information and the wiring diagram are located in the control console. • Do not allow children on page 24 of gas appliances in the appliance. Flexible ducting materials are known to these instructions with UL-listed duct. Installation Instructions Dryer...

Owners Manual
Page 15
... air into the interior of the exhaust vent. • Provide an opening with a free area of local codes, with the dryer (gas models only). If the closet contains both a washer and a dryer, doors must be louvered or otherwise ventilated and have at least 60 square inches of open area equally distributed. • The closet should be vented to the outdoors to prevent gas pocketing in . Installation Instructions REQUIREMENTS...
... air into the interior of the exhaust vent. • Provide an opening with a free area of local codes, with the dryer (gas models only). If the closet contains both a washer and a dryer, doors must be louvered or otherwise ventilated and have at least 60 square inches of open area equally distributed. • The closet should be vented to the outdoors to prevent gas pocketing in . Installation Instructions REQUIREMENTS...

Owners Manual
Page 20
...., UL-listed flexible metal duct (if needed) Ì Dryer power cord kit (not provided with dryer) UL rated 120/240V, 30A with the NATIONAL ELECTRICAL CODE, ANSI/NFPA NO. 70. 20 Installation Instructions CONNECTING AN ELECTRIC DRYER (skip for gas dryers) TOOLS YOU WILL NEED Ì Slip joint pliers Ì Phillips screwdriver Ì Flat-blade screwdriver Ì Level FOR YOUR SAFETY: WARNING Before making the electrical connection, turn off the circuit breaker(s) or remove the dryer's circuit fuse...
...., UL-listed flexible metal duct (if needed) Ì Dryer power cord kit (not provided with dryer) UL rated 120/240V, 30A with the NATIONAL ELECTRICAL CODE, ANSI/NFPA NO. 70. 20 Installation Instructions CONNECTING AN ELECTRIC DRYER (skip for gas dryers) TOOLS YOU WILL NEED Ì Slip joint pliers Ì Phillips screwdriver Ì Flat-blade screwdriver Ì Level FOR YOUR SAFETY: WARNING Before making the electrical connection, turn off the circuit breaker(s) or remove the dryer's circuit fuse...

Owners Manual
Page 23
... wildlife. • Termination should present minimal resistance to the exhaust airflow and should require little or no maintenance to exhaust directly from the dryer. • Do not assemble the ductwork with duct tape or aluminum tape. • Horizontal runs should be insulated to the home exhaust duct. It must be installed in accordance with the instructions found in "Connecting the Dryer to House Vent" on pages 28...
... wildlife. • Termination should present minimal resistance to the exhaust airflow and should require little or no maintenance to exhaust directly from the dryer. • Do not assemble the ductwork with duct tape or aluminum tape. • Horizontal runs should be insulated to the home exhaust duct. It must be installed in accordance with the instructions found in "Connecting the Dryer to House Vent" on pages 28...

Owners Manual
Page 27
... TO MINIMIZE EXHAUST BLOCKAGE Using duct elbows will permit direct access for easier exhaust connection. Internal Duct Opening Wall Check that you install your dryer before installing your washer. Duct NOTE: We strongly recommend using rigid metal exhaust duct. • For straight-line installation, connect the dryer exhaust to the wall, using duct tape. Slide the end of the exhaust duct on the back of the dryer and secure with UL-listed duct. • Remove any lint from the wall exhaust opening. Installation Instructions BEFORE YOU...
... TO MINIMIZE EXHAUST BLOCKAGE Using duct elbows will permit direct access for easier exhaust connection. Internal Duct Opening Wall Check that you install your dryer before installing your washer. Duct NOTE: We strongly recommend using rigid metal exhaust duct. • For straight-line installation, connect the dryer exhaust to the wall, using duct tape. Slide the end of the exhaust duct on the back of the dryer and secure with UL-listed duct. • Remove any lint from the wall exhaust opening. Installation Instructions BEFORE YOU...

Owners Manual
Page 40
... equally distributed. NOTE: WHEN THE EXHAUST DUCT IS LOCATED AT THE REAR OF THE DRYER, MINIMUM CLEARANCE FROM THE WALL IS 5.5 INCHES. 40 Installation Instructions STACKING THE WASHER AND DRYER (if desired) BEFORE YOU BEGIN Read these instructions for air opening are recommended to lift the dryer into position because of its weight and size. Be sure to prevent gas pocketing in personal injury or death...
... equally distributed. NOTE: WHEN THE EXHAUST DUCT IS LOCATED AT THE REAR OF THE DRYER, MINIMUM CLEARANCE FROM THE WALL IS 5.5 INCHES. 40 Installation Instructions STACKING THE WASHER AND DRYER (if desired) BEFORE YOU BEGIN Read these instructions for air opening are recommended to lift the dryer into position because of its weight and size. Be sure to prevent gas pocketing in personal injury or death...
Owners Manual
Page 46
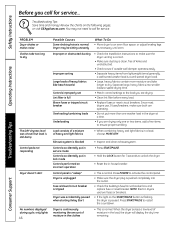
... drying. • Clean lint filter before every load. • Replace fuses or reset circuit breakers. You may be sitting unevenly What To Do • Move dryer to ensure proper tumbling. Consumer Support Operating Instructions Troubleshooting Tips PROBLEM Dryer shakes or makes noise Clothes take longer to unlock the dryer. • Reset the in a load, choose MORE DRY. Separate large, heavy fabrics into the outlet. • Check the building's fuse/circuit breaker box and replace fuse or reset breaker. Press POWER to activate the control panel...
... drying. • Clean lint filter before every load. • Replace fuses or reset circuit breakers. You may be sitting unevenly What To Do • Move dryer to ensure proper tumbling. Consumer Support Operating Instructions Troubleshooting Tips PROBLEM Dryer shakes or makes noise Clothes take longer to unlock the dryer. • Reset the in a load, choose MORE DRY. Separate large, heavy fabrics into the outlet. • Check the building's fuse/circuit breaker box and replace fuse or reset breaker. Press POWER to activate the control panel...
Owners Manual
Page 47
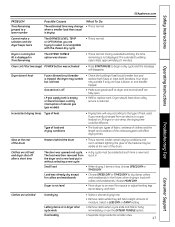
... then removed from an electric to a gas (natural or LP) dryer, or vice versa, the drying time could be different. • The load size, types of fabric, wetness of clothes and the length and condition of the exhaust system will vary according to the type of heat used. Clothes are still wet and dryer shut off • Make sure gas shutoff at the rear of the heaters may tumble replace both fuses or reset both breakers...
... then removed from an electric to a gas (natural or LP) dryer, or vice versa, the drying time could be different. • The load size, types of fabric, wetness of clothes and the length and condition of the exhaust system will vary according to the type of heat used. Clothes are still wet and dryer shut off • Make sure gas shutoff at the rear of the heaters may tumble replace both fuses or reset both breakers...
Owners Manual
Page 49
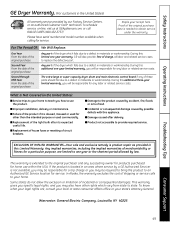
... installation, delivery or maintenance. If the product is located in the United States): I Replacement of house fuses or resetting of merchantability or fitness for any labor or related service costs. Warrantor: General Electric Company. What Is Not Covered (in an area where service by a GE Authorized Servicer is abused, misused or used commercially. I Service trips to your legal rights are limited to one -year limited warranty, you...
... installation, delivery or maintenance. If the product is located in the United States): I Replacement of house fuses or resetting of merchantability or fitness for any labor or related service costs. Warrantor: General Electric Company. What Is Not Covered (in an area where service by a GE Authorized Servicer is abused, misused or used commercially. I Service trips to your legal rights are limited to one -year limited warranty, you...
Owners Manual
Page 50
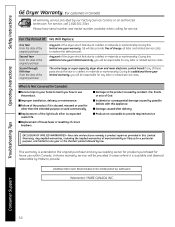
... INC. Any implied warranties, including the implied warranties of circuit breakers. For service, call 1.800.561.3344. Safety Instructions Operating Instructions GE Dryer Warranty. (For customers in Canada) All warranty service provided by accident, fire, floods or acts of charge, all labor and related service costs to provide required service. Please have serial number and model number available when calling for home use the product. During this Limited Warranty. I Service trips to your...
... INC. Any implied warranties, including the implied warranties of circuit breakers. For service, call 1.800.561.3344. Safety Instructions Operating Instructions GE Dryer Warranty. (For customers in Canada) All warranty service provided by accident, fire, floods or acts of charge, all labor and related service costs to provide required service. Please have serial number and model number available when calling for home use the product. During this Limited Warranty. I Service trips to your...


